
python小实例——tkinter实战(计算器)
一、完美计算器实验一
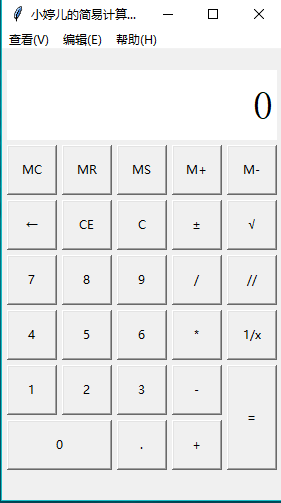
 import tkinter

 import math

 import tkinter.messagebox

 class calculator:

     #界面布局方法

     def __init__(self):

         #创建主界面,并且保存到成员属性中

         self.root = tkinter.Tk()

         self.root.minsize(280, 450)

         self.root.maxsize(280, 470)

         self.root.title('小餅餅丶的简易计算器1.0')

         # 设置显式面板的变量

         self.result = tkinter.StringVar()

         self.result.set(0)

         # 设置一个全局变量  运算数字和f符号的列表

         self.lists = []

         # 添加一个用于判断是否按下运算符号的标志

         self.ispresssign = False

         # 界面布局

         self.menus()

         self.layout()

         self.root.mainloop()

     #计算器菜单界面摆放

     def menus(self):

         # 添加菜单

         # 创建总菜单

         allmenu = tkinter.Menu(self.root)

         # 添加子菜单

         filemenu = tkinter.Menu(allmenu, tearoff=0)

         # 添加选项卡

         filemenu.add_command(label='标准型(T)            Alt+1', command=self.myfunc)

         filemenu.add_command(label='科学型(S)            Alt+2', command=self.myfunc)

         filemenu.add_command(label='程序员(P)            Alt+3', command=self.myfunc)

         filemenu.add_command(label='统计信息(A)        Alt+4', command=self.myfunc)

         # 添加分割线

         filemenu.add_separator()

         # 添加选项卡

         filemenu.add_command(label='历史记录(Y)      Ctrl+H', command=self.myfunc)

         filemenu.add_command(label='数字分组(I)', command=self.myfunc)

         # 添加分割线

         filemenu.add_separator()

         # 添加选项卡

         filemenu.add_command(label='基本(B)             Ctrl+F4', command=self.myfunc)

         filemenu.add_command(label='单位转换(U)      Ctrl+U', command=self.myfunc)

         filemenu.add_command(label='日期计算(D)      Ctrl+E', command=self.myfunc)

         menu1 = tkinter.Menu(filemenu, tearoff=0)

         menu1.add_command(label='抵押(M)', command=self.myfunc)

         menu1.add_command(label='汽车租赁(V)', command=self.myfunc)

         menu1.add_command(label='油耗(mpg)(F)', command=self.myfunc)

         menu1.add_command(label='油耗(l/100km)(U)', command=self.myfunc)

         filemenu.add_cascade(label='工作表(W)', menu=menu1)

         allmenu.add_cascade(label='查看(V)', menu=filemenu)

         # 添加子菜单2

         editmenu = tkinter.Menu(allmenu, tearoff=0)

         # 添加选项卡

         editmenu.add_command(label='复制(C)         Ctrl+C', command=self.myfunc)

         editmenu.add_command(label='粘贴(V)         Ctrl+V', command=self.myfunc)

         # 添加分割线

         editmenu.add_separator()

         # 添加选项卡

         menu2 = tkinter.Menu(filemenu, tearoff=0)

         menu2.add_command(label='复制历史记录(I)', command=self.myfunc)

         menu2.add_command(label='编辑(E)                      F2', command=self.myfunc)

         menu2.add_command(label='取消编辑(N)            Esc', command=self.myfunc)

         menu2.add_command(label='清除(L)    Ctrl+Shift+D', command=self.myfunc)

         editmenu.add_cascade(label='历史记录(H)', menu=menu2)

         allmenu.add_cascade(label='编辑(E)', menu=editmenu)

         # 添加子菜单3

         helpmenu = tkinter.Menu(allmenu, tearoff=0)

         # 添加选项卡

         helpmenu.add_command(label='查看帮助(V)       F1', command=self.myfunc)

         # 添加分割线

         helpmenu.add_separator()

         # 添加选项卡

         helpmenu.add_command(label='关于计算器(A)', command=self.myfunc)

         allmenu.add_cascade(label='帮助(H)', menu=helpmenu)

         self.root.config(menu=allmenu)

     #计算器主界面摆放

     def layout(self):

         # 显示屏

         result = tkinter.StringVar()

         result.set(0)

         show_label = tkinter.Label(self.root, bd=3, bg='white', font=('宋体', 30), anchor='e', textvariable=self.result)

         show_label.place(x=5, y=20, width=270, height=70)

         # 功能按钮MC

         button_mc = tkinter.Button(self.root, text='MC', command=self.wait)

         button_mc.place(x=5, y=95, width=50, height=50)

         # 功能按钮MR

         button_mr = tkinter.Button(self.root, text='MR', command=self.wait)

         button_mr.place(x=60, y=95, width=50, height=50)

         # 功能按钮MS

         button_ms = tkinter.Button(self.root, text='MS', command=self.wait)

         button_ms.place(x=115, y=95, width=50, height=50)

         # 功能按钮M+

         button_mjia = tkinter.Button(self.root, text='M+', command=self.wait)

         button_mjia.place(x=170, y=95, width=50, height=50)

         # 功能按钮M-

         button_mjian = tkinter.Button(self.root, text='M-', command=self.wait)

         button_mjian.place(x=225, y=95, width=50, height=50)

         # 功能按钮←

         button_zuo = tkinter.Button(self.root, text='←', command=self.dele_one)

         button_zuo.place(x=5, y=150, width=50, height=50)

         # 功能按钮CE

         button_ce = tkinter.Button(self.root, text='CE', command=lambda: self.result.set(0))

         button_ce.place(x=60, y=150, width=50, height=50)

         # 功能按钮C

         button_c = tkinter.Button(self.root, text='C', command=self.sweeppress)

         button_c.place(x=115, y=150, width=50, height=50)

         # 功能按钮±

         button_zf = tkinter.Button(self.root, text='±', command=self.zf)

         button_zf.place(x=170, y=150, width=50, height=50)

         # 功能按钮√

         button_kpf = tkinter.Button(self.root, text='√', command=self.kpf)

         button_kpf.place(x=225, y=150, width=50, height=50)

         # 数字按钮7

         button_7 = tkinter.Button(self.root, text='', command=lambda: self.pressnum(''))

         button_7.place(x=5, y=205, width=50, height=50)

         # 数字按钮8

         button_8 = tkinter.Button(self.root, text='', command=lambda: self.pressnum(''))

         button_8.place(x=60, y=205, width=50, height=50)

         # 数字按钮9

         button_9 = tkinter.Button(self.root, text='', command=lambda: self.pressnum(''))

         button_9.place(x=115, y=205, width=50, height=50)

         # 功能按钮/

         button_division = tkinter.Button(self.root, text='/', command=lambda: self.presscalculate('/'))

         button_division.place(x=170, y=205, width=50, height=50)

         # 功能按钮%

         button_remainder = tkinter.Button(self.root, text='//', command=lambda:self.presscalculate('//'))

         button_remainder.place(x=225, y=205, width=50, height=50)

         # 数字按钮4

         button_4 = tkinter.Button(self.root, text='', command=lambda: self.pressnum(''))

         button_4.place(x=5, y=260, width=50, height=50)

         # 数字按钮5

         button_5 = tkinter.Button(self.root, text='', command=lambda: self.pressnum(''))

         button_5.place(x=60, y=260, width=50, height=50)

         # 数字按钮6

         button_6 = tkinter.Button(self.root, text='', command=lambda: self.pressnum(''))

         button_6.place(x=115, y=260, width=50, height=50)

         # 功能按钮*

         button_multiplication = tkinter.Button(self.root, text='*', command=lambda: self.presscalculate('*'))

         button_multiplication.place(x=170, y=260, width=50, height=50)

         # 功能按钮1/x

         button_reciprocal = tkinter.Button(self.root, text='1/x', command=self.ds)

         button_reciprocal.place(x=225, y=260, width=50, height=50)

         # 数字按钮1

         button_1 = tkinter.Button(self.root, text='', command=lambda: self.pressnum(''))

         button_1.place(x=5, y=315, width=50, height=50)

         # 数字按钮2

         button_2 = tkinter.Button(self.root, text='', command=lambda: self.pressnum(''))

         button_2.place(x=60, y=315, width=50, height=50)

         # 数字按钮3

         button_3 = tkinter.Button(self.root, text='', command=lambda: self.pressnum(''))

         button_3.place(x=115, y=315, width=50, height=50)

         # 功能按钮-

         button_subtraction = tkinter.Button(self.root, text='-', command=lambda: self.presscalculate('-'))

         button_subtraction.place(x=170, y=315, width=50, height=50)

         # 功能按钮=

         button_equal = tkinter.Button(self.root, text='=', command=lambda: self.pressequal())

         button_equal.place(x=225, y=315, width=50, height=105)

         # 数字按钮0

         button_0 = tkinter.Button(self.root, text='', command=lambda: self.pressnum(''))

         button_0.place(x=5, y=370, width=105, height=50)

         # 功能按钮.

         button_point = tkinter.Button(self.root, text='.', command=lambda: self.pressnum('.'))

         button_point.place(x=115, y=370, width=50, height=50)

         # 功能按钮+

         button_plus = tkinter.Button(self.root, text='+', command=lambda: self.presscalculate('+'))

         button_plus.place(x=170, y=370, width=50, height=50)

     #计算器菜单功能

     def myfunc(self):

         tkinter.messagebox.showinfo('','程序员懒死在电脑前,打死也做不出的功能,只是装饰而已~')

     #数字方法

     def pressnum(self,num):

         # 全局化变量

         # 判断是否按下了运算符号

         if self.ispresssign == False:

             pass

         else:

             self.result.set(0)

             # 重置运算符号的状态

             self.ispresssign = False

         if num == '.':

             num = '0.'

         # 获取面板中的原有数字

         oldnum = self.result.get()

         # 判断界面数字是否为0

         if oldnum == '':

             self.result.set(num)

         else:

             # 连接上新按下的数字

             newnum = oldnum + num

             # 将按下的数字写到面板中

             self.result.set(newnum)

     #运算函数

     def presscalculate(self,sign):

         # 保存已经按下的数字和运算符号

         # 获取界面数字

         num = self.result.get()

         self.lists.append(num)

         # 保存按下的操作符号

         self.lists.append(sign)

         # 设置运算符号为按下状态

         self.ispresssign = True

     #获取运算结果

     def pressequal(self):

         # 获取所有的列表中的内容(之前的数字和操作)

         # 获取当前界面上的数字

         curnum = self.result.get()

         # 将当前界面的数字存入列表

         self.lists.append(curnum)

         # 将列表转化为字符串

         calculatestr = ''.join(self.lists)

         # 使用eval执行字符串中的运算即可

         endnum = eval(calculatestr)

         # 将运算结果显示在界面中

         self.result.set(str(endnum)[:10])

         if self.lists != 0:

             self.ispresssign = True

         # 清空运算列表

         self.lists.clear()

     #暂未开发说明

     def wait(self):

         tkinter.messagebox.showinfo('','功能在努力的实现,请期待2.0版本的更新')

     #←按键功能

     def dele_one(self):

         if self.result.get() == '' or self.result.get() == '':

             self.result.set('')

             return

         else:

             num = len(self.result.get())

             if num > 1:

                 strnum = self.result.get()

                 strnum = strnum[0:num - 1]

                 self.result.set(strnum)

             else:

                 self.result.set('')

     #±按键功能

     def zf(self):

         strnum = self.result.get()

         if strnum[0] == '-':

             self.result.set(strnum[1:])

         elif strnum[0] != '-' and strnum != '':

             self.result.set('-' + strnum)

     #1/x按键功能

     def ds(self):

         dsnum = 1 / int(self.result.get())

         self.result.set(str(dsnum)[:10])

         if self.lists != 0:

             self.ispresssign = True

         # 清空运算列表

         self.lists.clear()

     #C按键功能

     def sweeppress(self):

         self.lists.clear()

         self.result.set(0)

     #√按键功能

     def kpf(self):

         strnum = float(self.result.get())

         endnum = math.sqrt(strnum)

         if str(endnum)[-1] == '':

             self.result.set(str(endnum)[:-2])

         else:

             self.result.set(str(endnum)[:10])

         if self.lists != 0:

             self.ispresssign = True

         # 清空运算列表

         self.lists.clear()

 #实例化对象

 mycalculator = calculator()
来源于https://www.cnblogs.com/xiaobingbing/p/8016997.html
python小实例——tkinter实战(计算器)的更多相关文章
- Python小故事--------Tkinter的组件描述及解析
概念 Tkinter: 是Tk图形用户界面工具包标准(ctl)的Python接口,作为一个轻量级的跨平台图形用户界面(GUI)开发工具 frame: 屏幕上的一块矩形区域,多是用来作为容器(conta ...
- python小实例一:简单爬虫
本文所谓的爬虫就是通过本地远程访问url,然后将url的读成源代码形式,然后对源代码进行解析,获取自己需要的数据,相当于简单数据挖掘.本文实现的是将一个网页的图片爬出保存到本地的过程,例子很简单,用的 ...
- python小实例
一.跳动的心 love = '\n'.join([''.join([('love'[(x-y) % len('Love')] if ((x*0.05)**2+(y*0.1)**2-1)**3-(x*0 ...
- Python(五)编程小实例
Python(五)编程小实例 抓取网页信息,并生成txt文件内容! Python抓取网页技能--Python抓取网页就是我们常看见的网络爬虫,我们今天所要用到的就是我们Python中自带的模块,用这些 ...
- python+pcap+dpkt 抓包小实例
#!/usr/bin/env python # -*- coding: utf-8 -*- """ 网络数据包捕获与分析程序 """ imp ...
- Python数据分析实战视频教程【小蚊子数据分析实战课程】
点击了解更多Python课程>>> Python数据分析实战视频教程[小蚊子数据分析实战课程] [课程概述] Python数据分析实战' 适用人群:适合需提升竞争力.提升工作效率.喜 ...
- Python 小案例实战 —— 简易银行存取款查询系统
Python 小案例实战 -- 简易银行存取款查询系统 涉及知识点 包的调用 字典.列表的混合运用 列表元素索引.追加 基本的循环与分支结构 源码 import sys import time ban ...
- python爬取微信小程序(实战篇)
python爬取微信小程序(实战篇) 本文链接:https://blog.csdn.net/HeyShHeyou/article/details/90452656 展开 一.背景介绍 近期有需求需要抓 ...
- Python GUI之tkinter窗口视窗教程大集合(看这篇就够了) JAVA日志的前世今生 .NET MVC采用SignalR更新在线用户数 C#多线程编程系列(五)- 使用任务并行库 C#多线程编程系列(三)- 线程同步 C#多线程编程系列(二)- 线程基础 C#多线程编程系列(一)- 简介
Python GUI之tkinter窗口视窗教程大集合(看这篇就够了) 一.前言 由于本篇文章较长,所以下面给出内容目录方便跳转阅读,当然也可以用博客页面最右侧的文章目录导航栏进行跳转查阅. 一.前言 ...
随机推荐
- 增强篇6 CMOD增强删除
CMOD实施了一个增强,但是不需要了,怎么删除呢? 要删除PPCO0005 这个增强,进入编辑状态,发现没有删除按钮, 把PPCO0005 这项删除掉 敲回车,厉害了,他又回来了,所以在这里是没法删 ...
- C# WinForm程序中使用Unity3D控件 (转)
https://www.cnblogs.com/cnxkey/articles/5394378.html 最近在自学Unity3D,打算使用这个时髦.流行.强大的游戏引擎开发一个三维业务展示系统,不过 ...
- jenkins中点击增加云没反应
问题:非容器版jenkins中无法增加云 分析: 之前在jenkins中找自带的Kubernetes 插件找不到,所以就下载Kubernetes 插件进行离线安装,明明显示安装成功了,仍然不能增加云, ...
- Django:ORM中ForeignKey外键关系分析
假设有两张表,Role和User,因为多个用户会对应一个角色,属于多对一关系,所以User中的rolename字段使用ForeignKey,第一个参数为要关联的表Role,第二个参数related_n ...
- CentOS 6和CentOS 7的系统服务管理
也许你配置过Windows开机启动的服务,其中有些服务在日常的管理工作中用不到,我们就要把它停止,一来可以节省资源,而来可以减少安全隐患.在Linux上同样也有相关的工具来管理系统的服务. chkco ...
- 基于TreeSoft实现mysql、oracle、sql server的数据同步
一.为了解决数据同步汇聚,数据分发,数据转换,数据维护需求,TreeSoft推出了数据同步,数据处理等丰富功能 . TreeSoft作为中间传输载体负责连接各种数据源,为各种异构数据库之间架起沟通的桥 ...
- input回退禁止
//处理键盘事件 禁止后退键(Backspace)密码或单行.多行文本框除外 function forbidBackSpace(e) { var ev = e || window.event; //获 ...
- [C语言]给定直角三角形面积和斜边长
[A题] 翘课的HugeGun_ 时间限制:1000ms 内存限制:65536kb 题目描述 HugeGun学姐很喜欢翘课.不幸的是,这一次她被发现了. 老师让她打扫了教室.当她把扫把靠在墙上 ...
- Java基础---Java 类
类 成员变量直接定义在类里面,在方法的外面: 成员方法不要写static关键字 eg: public class Student { String name; // 成员变量 int aeg; //成 ...
- echo、print和print_r的区别
1.echo 可以输出一个或多个字符串 ,多个以逗号隔开就行 2.print 也可以输出一个或多个字符串 ,多个要用连接符 3.print_r()可以打印数组:对象 bool print_r ( mi ...