spring boot 之登录笔记
在测试平台的开发中,会牵涉到登录内容,页面需要登录后才能访问,所以,对于登录的开发是很有必要的。本文记录我在系统登录的一些自己的做法。
首先对登录进行设计。
如下:
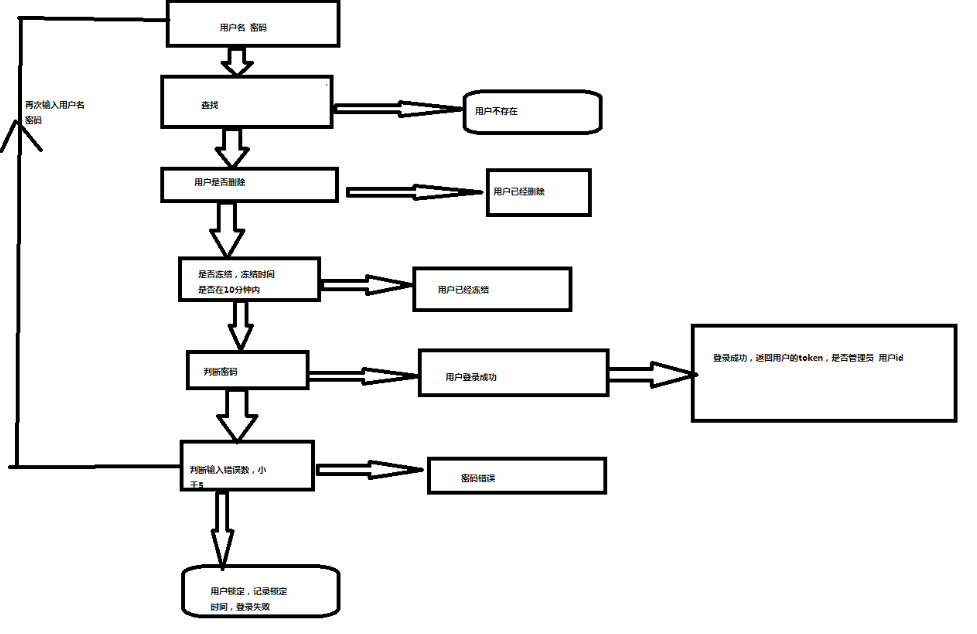
1.登录密码输入错误超过次数限制
2.能够使用用户名密码登录,邮箱密码登录。
目前登录所有信息都是在数据库存储。后续优化到redis里面。
使用spring boot+ jpa+durid。数据库mysql。
数据库设计如下:
DROP TABLE IF EXISTS `user`;

CREATE TABLE `user` (

  `id` int(11) NOT NULL AUTO_INCREMENT,

  `username` varchar(64) NOT NULL COMMENT '用户名',

  `password` varchar(255) NOT NULL COMMENT '用户密码',

  `email` varchar(64) DEFAULT NULL COMMENT '用户邮箱',

  `status` int(11) NOT NULL DEFAULT '0' COMMENT '状态,1代表删除',

  `admin` int(11) NOT NULL DEFAULT '0' COMMENT '是否是管理员,1代表是管理员',

  `iphone` varchar(20) DEFAULT NULL COMMENT '用户手机号',

  `workid` int(11) NOT NULL DEFAULT '0',

  `token` varchar(255) DEFAULT NULL,

  `errornum` int(2) NOT NULL DEFAULT '0',

  `freeze` int(2) NOT NULL DEFAULT '0',

  `freezetime` datetime DEFAULT NULL,

  PRIMARY KEY (`id`,`username`),

  KEY `username` (`username`),

  KEY `email` (`email`)

) ENGINE=InnoDB AUTO_INCREMENT=76 DEFAULT CHARSET=utf8 COMMENT='用户表';
数据库名称为planone
数据库创建后,我们去插入数据。
INSERT INTO `user` VALUES ('1', 'liwanlei', 'lueSGJZetyySpUndWjMBEg==', '952943386@qq.com', '0', '1', '', '1', 'liwanlei_vlywm4en9/IyTI64bLDQEA==', '0', '1', '2019-04-29 16:14:22');
那么接下来我们去创建工程
在pom文件增加依赖
<dependency>

            <groupId>org.springframework.boot</groupId>

            <artifactId>spring-boot-starter-thymeleaf</artifactId>

        </dependency>

        <dependency>

            <groupId>org.springframework.boot</groupId>

          、  <artifactId>spring-boot-starter-web</artifactId>

        </dependency>

 <dependency>

            <groupId>org.springframework.boot</groupId>

            <artifactId>spring-boot-starter-test</artifactId>

            <scope>test</scope>

        </dependency>

<dependency>

            <groupId>org.springframework.boot</groupId>

            <artifactId>spring-boot-starter-freemarker</artifactId>

        </dependency>

<dependency>

            <groupId>org.springframework.boot</groupId>

            <artifactId>spring-boot-starter-data-jpa</artifactId>

        </dependency>

        <dependency>

            <groupId>org.mybatis.spring.boot</groupId>

            <artifactId>mybatis-spring-boot-starter</artifactId>

            <version>1.2.0</version>

        </dependency>

<dependency>

            <groupId>mysql</groupId>

            <artifactId>mysql-connector-java</artifactId>

        </dependency>

<dependency>

            <groupId>org.projectlombok</groupId>

            <artifactId>lombok</artifactId>

        </dependency>

<dependency>

            <groupId>com.alibaba</groupId>

            <artifactId>druid-spring-boot-starter</artifactId>

            <version>1.1.10</version>

        </dependency>

 <dependency>

            <groupId>org.thymeleaf</groupId>

            <artifactId>thymeleaf</artifactId>

        </dependency>

        <dependency>

            <groupId>org.thymeleaf</groupId>

            <artifactId>thymeleaf-spring4</artifactId>

            <version>2.1.6.RELEASE</version>

        </dependency>
添加依赖后同步更新。
在application.yaml 进行配置
spring:

  datasource:

    druid:

      driver-class-name: com.mysql.jdbc.Driver

      url:  jdbc:mysql://localhost:3306/planone?serverTimeZone=UTC&characterEncoding=utf8&useSSL=true

      username:  root

      password: 123456

      initial-size: 10

      max-active: 1000

      min-idle: 10

      max-wait: 60000

      time-between-eviction-runs-millis: 2000

      keep-alive: true

      filter:

        stat:

          slow-sql-millis: 10000

          log-slow-sql: true

      max-evictable-idle-time-millis: 900000

      min-evictable-idle-time-millis: 400000

    thymeleaf:

        cache: false

        suffix: .html

        mode: HTML5

        encoding: UTF-8

        prefix: classpath:/templates/

server:

  port: 9999
配置完毕后,我们在resoures 文件新建templates 文件 和static 文件,添加静态页面用。
那么我们接下来开发后台,首先写的是dao
@Data

@DynamicUpdate

@Entity

@JsonIgnoreProperties(value = {"hibernateLazyInitializer", "handler"})

public class User implements Serializable {

    @Id

    @GeneratedValue(strategy = GenerationType.IDENTITY)

    private Integer id;

    private String username;

    private String password;

    private String email;

    private String iphone;

    private Integer status =0;

    private Integer admin =0;

    private String token;

    private Date freezetime;

    private  Integer errornum=0;

    private  Integer freeze= 0;

}
接下来去开发基于JpaRepository数据访问层
public interface UserRepository extends JpaRepository<User, Integer> {

    User findByUsername(String username);

    User findByEmail(String email);

}
开发server
public interface UserSerice {

    User login(String username, String password);

}
对应的实现类
@Service

@Component

public class UserSericeImpl implements UserSerice {

    @Autowired

    private UserRepository userRepository;

@Override

    public User login(String username, String password) {

        /*根据邮箱或者用户名登录*/

        User user = userRepository.findByUsername(username);

        if (user != null) {

            user = login_is(user, password, username);

            return user;

        } else {

            User useremail = userRepository.findByEmail(username);

            if (useremail != null) {

                user = login_is(useremail, password, username);

                return user;

            }

        }

        throw new PanExection(ResultEmus.USER_NOT_EXIT);

    }

  public User login_is(User user, String password, String username) {

        if (user.getStatus().equals(UserEmus.DELETE.getCode())) {

            throw new PanExection(ResultEmus.USER_DELETE);

        }

        SimpleDateFormat format = new SimpleDateFormat("yyyy-MM-dd HH:mm:ss");

        try {

            try {

                if (user.getFreeze().equals(FreezeEmus.DELETE.getCode()) && (new Date().getTime() - format.parse(user.getFreezetime().toString()).getTime() < 6 * 60 * 1000)) {

                    user.setErrornum(0);

                    userRepository.saveAndFlush(user);

                    throw new PanExection(ResultEmus.USER_FREE);

                }

            } catch (ParseException e) {

                throw new PanExection(ResultEmus.EXCEPTIONS);

            }

        } catch (NullPointerException e) {

            userRepository.saveAndFlush(user);

        }

        Boolean b = null;

        try {

            b = MD5Until.checkoutpassword(password, user.getPassword());

        } catch (Exception e) {

            throw new PanExection(ResultEmus.EXCEPTIONS);

        }

        if (b) {

            user.setErrornum(0);

            user.setFreezetime(null);

            Date date = new Date();

            String tokne = null;

            tokne = (String) userredis(redisTemplate).opsForValue().get(user.getUsername());

            if (tokne == null) {

                try {

                    tokne = MD5Until.md5(user.getUsername() + date.toString());

                } catch (Exception e) {

                    throw new PanExection(ResultEmus.EXCEPTIONS);

                }

                String token = user.getUsername() + "_" + tokne;

                user.setToken(token);

                userRepository.saveAndFlush(user);

                userredis(redisTemplate).opsForValue().set(username, token, 1, TimeUnit.DAYS);

            }

            return user;

        } else {

            if (user.getErrornum() > 4) {

                user.setErrornum(user.getErrornum() + 1);

                user.setFreeze(FreezeEmus.DELETE.getCode());

                user.setFreezetime(new Date());

                userRepository.saveAndFlush(user);

                throw new PanExection(ResultEmus.USER_FREE);

            } else {

                Integer err = user.getErrornum() + 1;

                user.setErrornum(err);

                userRepository.saveAndFlush(user);

                throw new PanExection(ResultEmus.USER_ERROR_PASSWORD);

            }

        }

    }

}
ResultEmus.java

@Getter

public enum ResultEmus {

    SUCCESS_REQUEST(0, "成功"),

    USER_NOT_EXIT(1, "用户不存在"),

    USER_BIND(2, "用户已经绑定"),

    USER_DELETE(3, "用户已经删除"),

    EXCEPTIONS(4, "转化异常"),

    USER_ERROR_PASSWORD(225, "密码错误"),

    USER_ERRPOR_EMAIL(6, "邮箱不匹配"),

    PARM_ERROR(7, "参数错误"),

    USER_EXIT(8, "用户已经存在")

  ;

    private Integer code;

    private String message;

    ResultEmus(Integer code, String message) {

        this.code = code;

        this.message = message;

    }

}
MD5Until.java

public class MD5Until {

    public static String md5(String text) throws Exception {

        MessageDigest md5 = MessageDigest.getInstance("MD5");

        BASE64Encoder base64en = new BASE64Encoder();

        String newstr = base64en.encode(md5.digest(text.getBytes()));

        return newstr;

    }

    public static boolean checkoutpassword(String password, String oldpassword) throws Exception {

        return md5(password).equals(oldpassword);

    }

}
开发完server端,我们去写controller
@RestController

@RequestMapping("/plan")

public class LoginContorl {

    @Autowired

    private UserSerice userSerice;

@GetMapping("/logins")

    public ModelAndView login(ModelAndView modelAndView) {

        modelAndView.setViewName("login");

        return modelAndView;

    }

    @PostMapping("/logins")

    public ModelAndView login(ModelAndView modelAndView, @Valid UserForm userVo, BindingResult bindingResult,

                              HttpServletRequest httpServletRequest) {

        HttpSession session = httpServletRequest.getSession();

        if (bindingResult.hasErrors()) {

            modelAndView.addObject("error", bindingResult.getFieldError().getDefaultMessage());

            modelAndView.setViewName("/plan/logins");

            return modelAndView;

        }

        String userName = userVo.getUsername();

        String password = userVo.getPassword();

        try {

            User user = userSerice.login(userName, password);

            session.setMaxInactiveInterval(3600);

            session.setAttribute("userid", user.getId());

            session.setAttribute("username", user.getUsername());

            return new ModelAndView("redirect:/web/index");

        } catch (PanExection e) {

            modelAndView.addObject("error", e.getMessage());

            modelAndView.setViewName("login");

            return modelAndView;

        }

    }

}
那么我们需要去写对应的html
html写在templates ,login接口如下
<!DOCTYPE html>

<html xmlns:th="http://www.thymeleaf.org">

<head>

    <meta charset="utf-8">

    <meta name="viewport" content="width=device-width, initial-scale=1, shrink-to-fit=no">

    <title>AutoTestPlatform</title>

    <link rel="stylesheet" th:href="@{/css/style.css}" href="../static/css/style.css">

    <link rel="shortcut icon" th:href="@{/images/favicon.png}" href="../static/images/favicon.png" />

</head>

<body>

<div class="body-wrapper">

    <div class="page-wrapper">

        <main class="content-wrapper auth-screen">

            <div class="mdc-layout-grid">

                <div class="mdc-layout-grid__inner">

                    <div class="mdc-layout-grid__cell stretch-card mdc-layout-grid__cell--span-4">

                    </div>

                    <div class="mdc-layout-grid__cell stretch-card mdc-layout-grid__cell--span-4">

                        <div class="mdc-card">

                            <section class="mdc-card__primary bg-white">

                                <form th:action="@{/plan/logins}" method="post">

                                    <div>

                                        <!--/*@thymesVar id="error" type=""*/-->

                                        <span id="basic-addon0"> </span>

                                        <span style="font-size: 12px;color: red" th:text="${error}" aria-describedby="basic-addon0"></span>

                                        <br />

                                    </div>

                                    <div class="mdc-layout-grid">

                                        <div class="mdc-layout-grid__inner">

                                            <div class="mdc-layout-grid__cell stretch-card mdc-layout-grid__cell--span-12">

                                                <label class="mdc-text-field w-100">

                                                    用户名<input type="username"name="username" class="mdc-text-field__input">

                                                    <div class="mdc-text-field__bottom-line"></div>

                                                </label>

                                            </div>

                                            <div class="mdc-layout-grid__cell stretch-card mdc-layout-grid__cell--span-12">

                                                <label class="mdc-text-field w-100">

                                                    密码<input type="password" name="password" class="mdc-text-field__input">

                                                    <div class="mdc-text-field__bottom-line"></div>

                                                </label>

                                            </div>

                                            <div class="mdc-layout-grid__cell stretch-card mdc-layout-grid__cell--span-6 d-flex align-item-center justify-content-end">

                                                <a th:href="@{/plan/rebackpassword}">忘记密码</a>

                                            </div>

                                            <div class="mdc-layout-grid__cell stretch-card mdc-layout-grid__cell--span-6 d-flex align-item-center justify-content-end">

                                                <a th:href="@{/plan/reg}">注册</a>

                                            </div>

                                            <div class="mdc-layout-grid__cell stretch-card mdc-layout-grid__cell--span-12">

                                                <button class="mdc-button mdc-button--raised w-100" data-mdc-auto-init="MDCRipple">

                                                    登录

                                                </button>

                                            </div>

                                        </div>

                                    </div>

                                </form>

                            </section>

                        </div>

                    </div>

                    <div class="mdc-layout-grid__cell stretch-card mdc-layout-grid__cell--span-4">

                    </div>

                </div>

            </div>

        </main>

    </div>

</div>

<!-- body wrapper -->

<!-- plugins:js -->

<script src="../../node_modules/material-components-web/dist/material-components-web.min.js"></script>

<script src="../../node_modules/jquery/dist/jquery.min.js"></script>

<!-- endinject -->

<!-- Plugin js for this page-->

<!-- End plugin js for this page-->

<!-- inject:js -->

<script src="../../js/misc.js"></script>

<script src="../../js/material.js"></script>

<!-- endinject -->

<!-- Custom js for this page-->

<!-- End custom js for this page-->

</body>

</html>
这样我们整个界面就开发完毕,我们进行调试测试

前面插入的数据是 liwanlei 密码是:111111
登录后跳转到首页
补充首页代码
<!DOCTYPE html>

<html xmlns:th="http://www.thymeleaf.org">

<head>

    <meta charset="utf-8">

    <meta name="viewport" content="width=device-width, initial-scale=1, shrink-to-fit=no">

    <title>AutoTestPlatform</title>

</head>

<h1>hello</h1>

<body>
至此 我们登录开发完毕
spring boot 之登录笔记的更多相关文章
- 玩转spring boot——简单登录认证
前言 在一个web项目中,某些页面是可以匿名访问的,但有些页面则不能.spring mvc提供了HandlerInterceptor接口来应对,只需要重写preHandle方法便可以实现此功能.那么使 ...
- 《深入实践Spring Boot》阅读笔记之三:核心技术源代码分析
刚关注的朋友,可以回顾前两篇文章: 基础应用开发 分布式应用开发 上篇文章总结了<深入实践Spring Boot>的第二部分,本篇文章总结第三部分,也是最后一部分.这部分主要讲解核心技术的 ...
- 《深入实践Spring Boot》阅读笔记之一:基础应用开发
上上篇「1718总结与计划」中提到,18年要对部分项目拆分,进行服务化,并对代码进行重构.公司技术委员会也推荐使用spring boot,之前在各个技术网站中也了解过,它可以大大简化spring配置和 ...
- 《深入实践Spring Boot》阅读笔记之二:分布式应用开发
上篇文章总结了<深入实践Spring Boot>的第一部分,这篇文章介绍第二部分:分布式应用开发,以及怎么构建一个高性能的服务平台. 主要从以下几个方面总结: Spring Boot SS ...
- Spring Boot 快速入门笔记
Spirng boot笔记 简介 Spring Boot是由Pivotal团队提供的全新框架,其设计目的是用来简化新Spring应用的初始搭建以及开发过程.该框架使用了特定的方式来进行配置,从而使开发 ...
- 《Spring Boot实战》笔记(目录)
目录 目 录第一部分 点睛Spring 4.x第1 章 Spring 基础 .............................................................. ...
- Spring BOOT的学习笔记
1,静态文件夹src/main/resources/static下的,图片必须放在images文件夹下才能访问,直接放在static下不能访问 2,配置热部署,否则修改下Html,图片都得重启 htt ...
- spring boot实战读书笔记1
1 覆盖起步依赖引入的传递依赖. 以Spring Boot的Web起步依赖为例,它传递依赖了Jackson JSON库.如果不想使用,可以使用 <exclusions>元素去除Jackso ...
- Spring Boot Cookbook 中文笔记
Spring Boot Cookbook 一.Spring Boot 入门 Spring Boot的自动配置.Command-line Runner RESTful by Spring Boot wi ...
随机推荐
- iOS - 毛玻璃特效
iOS7.0的SDK并没有提供给开发者实现毛玻璃效果的API,所以很多人都是通过一些别人封装的框架来实现 iOS7.0(包括)之前还是有系统的类可以实现毛玻璃效果的, 就是 UIToolbar这个类, ...
- Excel导入+写入数据库
1.引用服务 2.前端 <h2>这里是上传Excel功能页面</h2> <div> <form action="/Improve_Excel/get ...
- Dockerfile的编写(主观汇聚篇)
目录 一.什么是dockerfile 二.Dockerfile的基本结构 Dockerfile文件说明 三.总结 一.什么是dockerfile dockerfile是使用者用来自定义构建一个dock ...
- Flask之Local、LocalStack和LocalProxy
在我们使用Flask以及Werkzeug框架的过程中,经常会遇到如下三个概念:Local.LocalStack和LocalProxy.尤其在学习Flask的Request Context和App Co ...
- Python_while语句
1.while语句: count = 0 while (count<4): count +=1 print('准备放入第'+str(count)+'个杯子') 注:还是要注意一下,条件之后加“: ...
- 在Linux中安装ASPNET.Core3.0运行时
# 以下示例适用于x64位runtime v3.0.0 mkdir /runtimes cd /runtimes wget https://download.visualstudio.microsof ...
- Shell脚本字符串匹配及日常命令工具 - 用法总结(技巧指南)
Shell提供了很多字符串和文件处理的命令,如awk.expr.grep.sed等命令,还有文件的排序.合并和分割等一系列的操作命令.下面重点总结下Shell字符串处理.文本处理以及各类命令及函数用法 ...
- redis windows安装与liunx安装
windows安装redis 2.把安装包放在Linux文件系统下,利用WinSCP工具 3.解压缩 tar -zxf redis-4.0.2.tar.gz 4.切换到解压后的目录 cd redis- ...
- IDEA实用教程(四)—— 创建JavaSE工程
三. 创建JavaSE工程 第一步 第二步 第三步 第四步 第五步 第六步 运行代码.右键选中图中按钮 选择Run
- Linux网络编程综合运用之MiniFtp实现(八)
上节中实现了"USER"和"PASS"命令,如下: 事实上FTP是有很多命令组成的,如果就采用上面的这种方法来实现的话,就会有很多if...else if语句, ...