
Java进阶知识06 Hibernate一对一单向外键关联(Annotation+XML实现)
1、Annotation 注解版
1.1、创建Husband类和Wife类
 package com.shore.model;

 import javax.persistence.Entity;

 import javax.persistence.GeneratedValue;

 import javax.persistence.GenerationType;

 import javax.persistence.Id;

 import org.hibernate.annotations.Type;

 /**

  * @author DSHORE/2019-9-18

  * 一对一,单向关联(注解版)

  */

 @Entity

 public class Husband {//主表

     private Integer id;

     private String name;

     private Boolean sex;

     @Id

     @GeneratedValue(strategy = GenerationType.AUTO) //主键生成策略(使用test1测试时,必须加上这个,否会报错:id生成错误)

     public Integer getId() {

         return id;

     }

     public void setId(Integer id) {

         this.id = id;

     }

     public String getName() {

         return name;

     }

     public void setName(String name) {

         this.name = name;

     }

     @Type(type = "yes_no") //数据库中,会以Y/N的形式插入到sex字段中

     public Boolean getSex() {

         return sex;

     }

     public void setSex(Boolean sex) {

         this.sex = sex;

     }

 }
Wife类
 package com.shore.model;

 import javax.persistence.Entity;

 import javax.persistence.GeneratedValue;

 import javax.persistence.GenerationType;

 import javax.persistence.Id;

 import javax.persistence.OneToOne;

 import org.hibernate.annotations.Type;

 /**

  * @author DSHORE/2019-9-18

  * 一对一,单向关联(注解版)

  */

 @Entity

 public class Wife {//从表

     private Integer id;

     private String name;

     private Boolean sex;

     private Husband husband;

     @Id

     @GeneratedValue(strategy = GenerationType.AUTO) //主键生成策略(使用test1测试时,必须加上这个,否会报错:id生成错误)

     public Integer getId() {

         return id;

     }

     public void setId(Integer id) {

         this.id = id;

     }

     public String getName() {

         return name;

     }

     public void setName(String name) {

         this.name = name;

     }

     @Type(type = "yes_no") //数据库中,会以Y/N的形式插入到sex字段中

     public Boolean getSex() {

         return sex;

     }

     public void setSex(Boolean sex) {

         this.sex = sex;

     }

     @OneToOne  //默认创建的外键名称:husband_id

     //@JoinColumn(name="husbandId") //创建表时,指定该外键名:husbandId

     public Husband getHusband() {

         return husband;

     }

     public void setHusband(Husband husband) {

         this.husband = husband;

     }

 }
1.2、创建hibernate.cfg.xml核心配置文件
 <?xml version='1.0' encoding='utf-8'?>

 <!DOCTYPE hibernate-configuration PUBLIC

         "-//Hibernate/Hibernate Configuration DTD 3.0//EN"

         "http://www.hibernate.org/dtd/hibernate-configuration-3.0.dtd">

 <hibernate-configuration>

     <session-factory>

         <!-- Database connection settings -->

         <property name="connection.driver_class">com.mysql.jdbc.Driver</property>

         <property name="connection.url">jdbc:mysql://localhost:3306/hibernate</property>

         <property name="connection.username">root</property>

         <property name="connection.password">123456</property>

         <property name="dialect">org.hibernate.dialect.MySQLDialect</property>

         <property name="cache.provider_class">org.hibernate.cache.NoCacheProvider</property>

         <property name="show_sql">true</property>

         <property name="hbm2ddl.auto">create</property>

         <mapping class="com.shore.model.Husband" />

         <mapping class="com.shore.model.Wife" />

     </session-factory>

 </hibernate-configuration>
1.3、开始测试
 package com.shore.test;

 import org.hibernate.Session;

 import org.hibernate.SessionFactory;

 import org.hibernate.Transaction;

 import org.hibernate.cfg.AnnotationConfiguration;

 import org.hibernate.cfg.Configuration;

 import org.hibernate.tool.hbm2ddl.SchemaExport;

 import org.junit.AfterClass;

 import org.junit.BeforeClass;

 import org.junit.Test;

 import com.shore.model.Husband;

 import com.shore.model.Wife;

 /**

  * @author DSHORE/2019-9-18

  *

  */

 public class AnnotationTest {

 /*    public static SessionFactory sessionFactory = null;

     public static Session session = null;

     @BeforeClass

     public static void buildSessionFactory() {

         sessionFactory = new AnnotationConfiguration().configure().buildSessionFactory();

     }

     @AfterClass

     public static void close() {

         session.close();

         sessionFactory.close();

     }

     @Test

     public void test1(){//数据库表创建完后,插入数据

         session = sessionFactory.openSession();

         Transaction transaction = session.beginTransaction();

         Husband husband = new Husband();

         husband.setName("黄晓明");

         husband.setSex(true);//男

         session.save(husband);

         Wife wife = new Wife();

         wife.setName("AnglaBaby");

         wife.setSex(false);//女

         wife.setHusband(husband);

         session.save(wife);

         transaction.commit();//事务提交

     }*/

     // 要进行save操作,先save(husband),后save(wife)

     @Test

     public void test2() {//只创建数据库表,不插入任何数据,可以这样测试。(hibernate.cfg.xml配置文件用的是create)

         new SchemaExport(new AnnotationConfiguration().configure()).create(false, true);

     }

 }
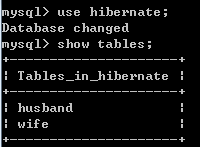
测试结果图:



2、XML实现 版
2.1、创建husband类和wife类
 package com.shore.domel;

 /**

  * @author DSHORE/2019-9-18

  * 一对一,单向关联(xml版)

  */

 public class Husband {//主表

     private Integer id;

     private String name;

     private Boolean sex;

     public Integer getId() {

         return id;

     }

     public void setId(Integer id) {

         this.id = id;

     }

     public String getName() {

         return name;

     }

     public void setName(String name) {

         this.name = name;

     }

     public Boolean getSex() {

         return sex;

     }

     public void setSex(Boolean sex) {

         this.sex = sex;

     }

 }
wife类
 package com.shore.domel;

 /**

  * @author DSHORE/2019-9-18

  * 一对一,单向关联(xml版)

  */

 public class Wife {//从表

     private Integer id;

     private String name;

     private Boolean sex;

     private Husband husband;

     public Integer getId() {

         return id;

     }

     public void setId(Integer id) {

         this.id = id;

     }

     public String getName() {

         return name;

     }

     public void setName(String name) {

         this.name = name;

     }

     public Boolean getSex() {

         return sex;

     }

     public void setSex(Boolean sex) {

         this.sex = sex;

     }

     public Husband getHusband() {

         return husband;

     }

     public void setHusband(Husband husband) {

         this.husband = husband;

     }

 }
2.2、创建 Husband.hbm.xml 配置文件和 Wife.hbm.xml 配置文件
 <?xml version="1.0"?>

 <!DOCTYPE hibernate-mapping PUBLIC

         "-//Hibernate/Hibernate Mapping DTD 3.0//EN"

         "http://www.hibernate.org/dtd/hibernate-mapping-3.0.dtd">

 <hibernate-mapping package="com.shore.domel">

     <class name="Husband" table="husband_xml">

         <id name="id">

             <generator class="native"/>

         </id>

         <property name="name" type="java.lang.String"/>

         <property name="sex" type="yes_no"/>

     </class>

 </hibernate-mapping>
Wife.hbm.xml 配置文件
 <?xml version="1.0"?>

 <!DOCTYPE hibernate-mapping PUBLIC

         "-//Hibernate/Hibernate Mapping DTD 3.0//EN"

         "http://www.hibernate.org/dtd/hibernate-mapping-3.0.dtd">

 <hibernate-mapping package="com.shore.domel">

     <class name="Wife" table="wife_xml">

         <id name="id">

             <generator class="native"/>

         </id>

         <property name="name" type="java.lang.String"/>

         <property name="sex" type="yes_no" />

         <!-- many-to-one:多对一,但加了个unique="true",就变成了一对一 -->

         <many-to-one name="husband" column="husband_id" unique="true"/>

     </class>

 </hibernate-mapping>
2.3、创建hibernate.cfg.xml 核心配置文件
 <?xml version='1.0' encoding='utf-8'?>

 <!DOCTYPE hibernate-configuration PUBLIC

         "-//Hibernate/Hibernate Configuration DTD 3.0//EN"

         "http://www.hibernate.org/dtd/hibernate-configuration-3.0.dtd">

 <hibernate-configuration>

     <session-factory>

         <!-- Database connection settings -->

         <property name="connection.driver_class">com.mysql.jdbc.Driver</property>

         <property name="connection.url">jdbc:mysql://localhost:3306/hibernate</property>

         <property name="connection.username">root</property>

         <property name="connection.password">123456</property>

         <property name="dialect">org.hibernate.dialect.MySQLDialect</property>

         <property name="cache.provider_class">org.hibernate.cache.NoCacheProvider</property>

         <property name="show_sql">true</property>

         <property name="hbm2ddl.auto">create</property>

         <!-- <mapping class="com.shore.model.Husband" />

         <mapping class="com.shore.model.Wife" /> -->

         <mapping resource="com/shore/domel/Husband.hbm.xml" />

         <mapping resource="com/shore/domel/Wife.hbm.xml" />

     </session-factory>

 </hibernate-configuration>
2.4、开始测试
 package com.shore.test;

 import org.hibernate.Session;

 import org.hibernate.SessionFactory;

 import org.hibernate.Transaction;

 import org.hibernate.cfg.Configuration;

 import org.junit.AfterClass;

 import org.junit.BeforeClass;

 import org.junit.Test;

 import com.shore.domel.Husband;

 import com.shore.domel.Wife;

 /**

  * @author DSHORE/2019-9-18

  *

  */

 public class XMLTest1 {

     public static SessionFactory sessionFactory = null;

     public static Session session = null;

     @BeforeClass

     public static void buildSessionFactory() {

                   //用注解版的话,Configuration()方法,得改用AnnotationConfiguration()方法

         sessionFactory = new Configuration().configure().buildSessionFactory();

     }

     @AfterClass

     public static void close() {

         session.close();

         sessionFactory.close();

     }

     @Test

     public void test() {

         session = sessionFactory.openSession();

         Transaction transaction = session.beginTransaction();

         Husband husband = new Husband();

         husband.setName("黄晓明");

         husband.setSex(true);//男

         session.save(husband);

         Wife wife = new Wife();

         wife.setName("AnglaBaby");

         wife.setSex(false);//女

         wife.setHusband(husband);

         session.save(wife);

         transaction.commit();

     }

 }
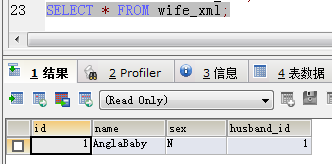
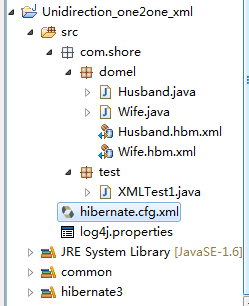
测试结果图:


Hibernate一对一单向关联映射(Annotation+XML实现):https://www.cnblogs.com/dshore123/p/11545058.html
Hibernate一对一双向关联映射(Annotation+XML实现):https://www.cnblogs.com/dshore123/p/11545077.html
Hibernate多对一单向关联映射(Annotation+XML实现):https://www.cnblogs.com/dshore123/p/11553213.html
Hibernate一对多单向关联映射(Annotation+XML实现):https://www.cnblogs.com/dshore123/p/11553215.html
Hibernate一对多和多对一双向关联映射(Annotation+XML实现):https://www.cnblogs.com/dshore123/p/11560433.html
Hibernate多对多单向关联映射(Annotation+XML实现):https://www.cnblogs.com/dshore123/p/11568536.html
Hibernate多对多双向关联映射(Annotation+XML实现):https://www.cnblogs.com/dshore123/p/11568963.html
|
原创作者:DSHORE 作者主页:http://www.cnblogs.com/dshore123/ 原文出自:https://www.cnblogs.com/dshore123/p/11545058.html 版权声明:欢迎转载,转载务必说明出处。(如果本文对您有帮助,可以点击一下右下角的 推荐,或评论,谢谢!) |
Java进阶知识06 Hibernate一对一单向外键关联(Annotation+XML实现)的更多相关文章
- Java进阶知识07 Hibernate一对一双向外键关联(Annotation+XML实现)
1.Annotation 注解版 1.1.创建Husband类和Wife类 package com.shore.model; import javax.persistence.Entity; impo ...
- Hibernate一对一单向外键关联
一.一对一单向外键关联: 一对一单向外键关联主要用到了以下两个注解: 1.OneToOne(cascade=CasecadeTYPE.ALL); cascade=CasecadeTYPE.ALL:表示 ...
- Hibernate 再接触 关系映射 一对一单向外键关联
对象之间的关系 数据库之间的关系只有外键 注意说关系的时候一定要反面也要说通 CRUD 数据库之间设计 主键关联 单向的外键关联 中间表 一对一单向外键关联 Husband.java package ...
- hibernate一对一双向外键关联
一对一双向外键关联:双方都持有对方的外键关联关系. 主控方和一对一单向外键关联的情况是一样的,主要的差异表现为,被空方需要添加: @OneToOne(mappedBy="card" ...
- hibernate---一对一单向外键关联--annotation (重要!!!)
1. 生成wife.java: package com.bjsxt.hibernate; import javax.persistence.Entity; import javax.persisten ...
- 04-hibernate注解-一对一双向外键关联
一对一双向外键 1,主控方的配置同一对一单向外键关联. 2,@OneToOne(mappedBy="card") //被控方 @OneToOne(mappedBy="ca ...
- Hibernate 再接触 关系映射 一对一双向外键关联
凡是双向关联必设mapped by 由对方主导 wifi.java package com.bjsxt.hibernate; import javax.persistence.Entity; imp ...
- HIBERNATE一对一双向外键联合主键关联
HIBERNATE一对一双向外键联合主键关联: 一. 创建主键类:这个主键必须实现serializedable接口和重写其中的hashCode方法和equals方法:为主键类添加一个叫做@Embedd ...
- 011一对一 唯一外键关联映射_单向(one-to-one)
² 两个对象之间是一对一的关系,如Person-IdCard(人—身份证号) ² 有两种策略可以实现一对一的关联映射 主键关联:即让两个对象具有相同的主键值,以表明它们之间的一一对应的关系:数据库 ...
随机推荐
- python 基础(十九)--re正则表达式模块
正则表达式模式 模式 描述 ^ 匹配字符串的开头 $ 匹配字符串的末尾. . 匹配任意字符,除了换行符,当re.DOTALL标记被指定时,则可以匹配包括换行符的任意字符. [...] 用来表示一组字符 ...
- X86逆向13:向程序中插入Dll
本章我们将学习Dll的注入技巧,我们将把一个动态链接库永久的插入到目标程序中,让程序在运行后直接执行这个Dll文件,这一章的内容也可以看作是第八课的加强篇,第八课中我们向程序中插入了一个弹窗,有木有发 ...
- go 表单
package main import ( "fmt" "io" "net/http" ) const form = `<html&g ...
- centos7上搭建NFS的实践
NFS 即network file system 可用于向k8s集群提供持久存储 最小化安装centos后 把网卡设置好了后 1.关闭防火墙 [root@NFS ~]# systemctl stop ...
- extjs 表格为可编辑,保存后为不可编辑状态
画出表格 编辑后 思路:在初始时设置一个状态,panduan='0',此时,就是一个不可编辑的input,当点击编辑时,改变panduan = '1',即可编辑.保存是加入正则表达式的判断,在将pan ...
- Android中如何判断内存卡是否存在
if (Environment.getExternalStorageState().equals(android.os.Environment.MEDIA_MOUNTED)) { /* 得到SD卡得路 ...
- 解决 Ubuntu 19 安装openjdk 8后与openjfx不兼容
小淘气放假了,孩子在上幼儿园的小朋友,报班也不能太变态嘛, 还是让他自己娱乐的时间多一点,但是现在在家的娱乐就是看电视,听说电视看多了越看越傻,就想方设法的给他找一点娱乐活动,把我闲置的树莓派给他装了 ...
- js扩展Date对象的方法,格式化日期格式(prototype)
扩展:Date.prototype.format = function(format){ var o = { "M+" : this.getMonth()+1, ...
- 【wifi移植 3】开发板wifi自动获取IP
内核版本:3.4.61 1. 配置内核,支持DHCP ~/kernel$ make menuconfig [*] Networking support ---> Networking opti ...
- 在 Sublime Text 3 中使用 SublimeClang 插件
SublimeClang 是 Sublime Text 中唯一的 C/C++ 自动补全插件,功能强大,自带语法检查功能,可惜目前作者停止更新了,而且只支持 Sublime Text 2.今晚在 ST ...