scrapydWeb安装和使用
1. 安装:pip install scrapydweb
2. 启动:scrapydweb
第一次执行,当前目录会生产配置文件:scrapydweb_settings_v8.py
配置账户和密码:
# The default is False, set it to True to enable basic auth for web UI.

ENABLE_AUTH = True

# In order to enable basic auth, both USERNAME and PASSWORD should be non-empty strings.

USERNAME = 'admin'

PASSWORD = 'admin'
配置文件:
# coding: utf8

"""

How ScrapydWeb works:

BROWSER_HOST <<<>>> SCRAPYDWEB_BIND:SCRAPYDWEB_PORT <<<>>> your SCRAPYD_SERVERS

GitHub: https://github.com/my8100/scrapydweb

"""

###############################################################################

###############################################################################

## QUICK SETUP: Simply search and update the SCRAPYD_SERVERS option, leave the rest as default.

## Recommended Reading: [How to efficiently manage your distributed web scraping projects]

## (https://medium.com/@my8100)

## ------------------------------ Chinese -------------------------------------

## 快速设置:搜索并更新 SCRAPYD_SERVERS 配置项即可,其余配置项保留默认值。

## 推荐阅读:[如何简单高效地部署和监控分布式爬虫项目]

## (https://juejin.im/post/5bebc5fd6fb9a04a053f3a0e)

###############################################################################

###############################################################################

############################## ScrapydWeb #####################################

# Setting SCRAPYDWEB_BIND to '0.0.0.0' or IP-OF-THE-CURRENT-HOST would make

# ScrapydWeb server visible externally; Otherwise, set it to '127.0.0.1'.

# The default is '0.0.0.0'.

SCRAPYDWEB_BIND = '127.0.0.1'

# Accept connections on the specified port, the default is 5000.

SCRAPYDWEB_PORT = 5000

# The default is False, set it to True to enable basic auth for web UI.

ENABLE_AUTH = True

# In order to enable basic auth, both USERNAME and PASSWORD should be non-empty strings.

USERNAME = 'admin'

PASSWORD = 'admin'

# The default is False, set it to True and add both CERTIFICATE_FILEPATH and PRIVATEKEY_FILEPATH

# to run ScrapydWeb in HTTPS mode.

# Note that this feature is not fully tested, please leave your comment here if ScrapydWeb

# raises any excepion at startup: https://github.com/my8100/scrapydweb/issues/18

ENABLE_HTTPS = False

# e.g. '/home/username/cert.pem'

CERTIFICATE_FILEPATH = ''

# e.g. '/home/username/cert.key'

PRIVATEKEY_FILEPATH = ''

############################## Scrapy #########################################

# ScrapydWeb is able to locate projects in the SCRAPY_PROJECTS_DIR,

# so that you can simply select a project to deploy, instead of packaging it in advance.

# e.g. 'C:/Users/username/myprojects/' or '/home/username/myprojects/'

SCRAPY_PROJECTS_DIR = ''

############################## Scrapyd ########################################

# Make sure that [Scrapyd](https://github.com/scrapy/scrapyd) has been installed

# and started on all of your hosts.

# Note that for remote access, you have to manually set 'bind_address = 0.0.0.0'

# in the configuration file of Scrapyd and restart Scrapyd to make it visible externally.

# Check out 'https://scrapyd.readthedocs.io/en/latest/config.html#example-configuration-file' for more info.

# ------------------------------ Chinese --------------------------------------

# 请先确保所有主机都已经安装和启动 [Scrapyd](https://github.com/scrapy/scrapyd)。

# 如需远程访问 Scrapyd,则需在 Scrapyd 配置文件中设置 'bind_address = 0.0.0.0',然后重启 Scrapyd。

# 详见 https://scrapyd.readthedocs.io/en/latest/config.html#example-configuration-file

# - the string format: username:password@ip:port#group

#   - The default port would be 6800 if not provided,

#   - Both basic auth and group are optional.

#   - e.g. '127.0.0.1:6800' or 'username:password@localhost:6801#group'

# - the tuple format: (username, password, ip, port, group)

#   - When the username, password, or group is too complicated (e.g. contains ':@#'),

#   - or if ScrapydWeb fails to parse the string format passed in,

#   - it's recommended to pass in a tuple of 5 elements.

#   - e.g. ('', '', '127.0.0.1', '6800', '') or ('username', 'password', 'localhost', '6801', 'group')
# 启动的服务,可以部署多个爬虫

SCRAPYD_SERVERS = [

    '127.0.0.1:6800',

    # 'username:password@localhost:6801#group',

    # ('username', 'password', 'localhost', '6801', 'group'),

]

# If both ScrapydWeb and one of your Scrapyd servers run on the same machine,

# ScrapydWeb would try to directly read Scrapy logfiles from disk, instead of making a request

# to the Scrapyd server.

# e.g. '127.0.0.1:6800' or 'localhost:6801', do not forget the port number.

LOCAL_SCRAPYD_SERVER = '127.0.0.1:6800'

# Check out this link to find out where the Scrapy logs are stored:

# https://scrapyd.readthedocs.io/en/stable/config.html#logs-dir

# e.g. 'C:/Users/username/logs/' or '/home/username/logs/'
# 日志文件保存的地址,用于日志分析

SCRAPYD_LOGS_DIR = '/Users/admin/www/reports/env/logs'

# ScrapydWeb would try every extension in sequence to locate the Scrapy logfile.

# The default is ['.log', '.log.gz', '.txt'].

SCRAPYD_LOG_EXTENSIONS = ['.log', '.log.gz', '.txt']

############################## LogParser ######################################

# By default ScrapydWeb would automatically run LogParser as a subprocess at startup,

# so that the stats of crawled_pages and scraped_items can be shown in the Jobs page.

# The default is True, set it to False to disable this behaviour.

# Note that you can run the LogParser service separately via command 'logparser' as you like.

# Run 'logparser -h' to find out the config file of LogParser for more advanced settings.

# Visit https://github.com/my8100/logparser for more info.
# 开启日志

ENABLE_LOGPARSER = True

# Whether to backup the stats json files locally after you visit the Stats page of a job

# so that it is still accessible even if the original logfile has been deleted.

# The default is True, set it to False to disable this behaviour.

BACKUP_STATS_JSON_FILE = True

############################## Timer Tasks ####################################

# Run ScrapydWeb with argument '-sw' or '--switch_scheduler_state', or click the ENABLED|DISABLED button

# on the Timer Tasks page to turn on/off the scheduler for the timer tasks and the snapshot mechanism below.

# The default is 300, which means ScrapydWeb would automatically create a snapshot of the Jobs page

# and save the jobs info in the database in the background every 300 seconds.

# Note that this behaviour would be paused if the scheduler for timer tasks is disabled.

# Set it to 0 to disable this behaviour.

JOBS_SNAPSHOT_INTERVAL = 300

############################## Page Display ###################################

# The default is True, set it to False to hide the Items page, as well as

# the Items column in the Jobs page.

SHOW_SCRAPYD_ITEMS = True

# The default is True, set it to False to hide the Job column in the Jobs page with non-database view.

SHOW_JOBS_JOB_COLUMN = True

# The default is 0, which means unlimited, set it to a positive integer so that

# only the latest N finished jobs would be shown in the Jobs page with non-database view.

JOBS_FINISHED_JOBS_LIMIT = 0

# If your browser stays on the Jobs page, it would be reloaded automatically every N seconds.

# The default is 300, set it to 0 to disable auto-reloading.

JOBS_RELOAD_INTERVAL = 300

# The load status of the current Scrapyd server is checked every N seconds,

# which is displayed in the top right corner of the page.

# The default is 10, set it to 0 to disable auto-refreshing.

DAEMONSTATUS_REFRESH_INTERVAL = 10

############################## Email Notice ###################################

# In order to be notified (and stop or forcestop a job when triggered) in time,

# you can reduce the value of POLL_ROUND_INTERVAL and POLL_REQUEST_INTERVAL,

# at the cost of burdening both CPU and bandwidth of your servers.

# Tip: set SCRAPYDWEB_BIND to the actual IP of your host, then you can visit ScrapydWeb

# via the links attached in the email. (check out the "ScrapydWeb" section above)

# Check out this link if you are using ECS of Alibaba Cloud and your SMTP server provides TCP port 25 only:

# https://www.alibabacloud.com/help/doc-detail/56130.htm

# The default is False, set it to True to enable email notification.

ENABLE_EMAIL = False

########## smtp settings ##########

SMTP_SERVER = ''

SMTP_PORT = 0

SMTP_OVER_SSL = False

# Config for https://mail.google.com using SSL

# SMTP_SERVER = 'smtp.gmail.com'

# SMTP_PORT = 465

# SMTP_OVER_SSL = True

# Config for https://mail.google.com

# SMTP_SERVER = 'smtp.gmail.com'

# SMTP_PORT = 587

# SMTP_OVER_SSL = False

# Config for https://mail.qq.com/ using SSL

# SMTP_SERVER = 'smtp.qq.com'

# SMTP_PORT = 465

# SMTP_OVER_SSL = True

# Config for http://mail.10086.cn/

# SMTP_SERVER = 'smtp.139.com'

# SMTP_PORT = 25

# SMTP_OVER_SSL = False

# The timeout in seconds for the connection attempt, the default is 10.

SMTP_CONNECTION_TIMEOUT = 10

########## sender & recipients ##########

# Leave this option as '' to default to the FROM_ADDR option below; Otherwise, set it up

# if your email service provider requires an username which is different from the FROM_ADDR option below to login.

# e.g. 'username'

EMAIL_USERNAME = ''

# As for different email service provider, you might have to get an APP password (like Gmail)

# or an authorization code (like QQ mail) and set it as the EMAIL_PASSWORD.

# Check out links below to get more help:

# https://stackoverflow.com/a/27515833/10517783 How to send an email with Gmail as the provider using Python?

# https://stackoverflow.com/a/26053352/10517783 Python smtplib proxy support

# e.g. 'password4gmail'

EMAIL_PASSWORD = ''

# e.g. 'username@gmail.com'

FROM_ADDR = ''

# e.g. ['username@gmail.com', ]

TO_ADDRS = [FROM_ADDR]

########## email working time ##########

# Monday is 1 and Sunday is 7.

# e.g, [1, 2, 3, 4, 5, 6, 7]

EMAIL_WORKING_DAYS = []

# From 0 to 23.

# e.g. [9] + list(range(15, 18)) >>> [9, 15, 16, 17], or range(24) for 24 hours

EMAIL_WORKING_HOURS = []

########## poll interval ##########

# Sleep N seconds before starting next round of poll, the default is 300.

POLL_ROUND_INTERVAL = 300

# Sleep N seconds between each request to the Scrapyd server while polling, the default is 10.

POLL_REQUEST_INTERVAL = 10

########## basic triggers ##########

# Trigger email notice every N seconds for each running job.

# The default is 0, set it to a positive integer to enable this trigger.

ON_JOB_RUNNING_INTERVAL = 0

# Trigger email notice when a job is finished.

# The default is False, set it to True to enable this trigger.

ON_JOB_FINISHED = False

########## advanced triggers ##########

# - LOG_XXX_THRESHOLD:

#   - Trigger email notice the first time reaching the threshold for a specific kind of log.

#   - The default is 0, set it to a positive integer to enable this trigger.

# - LOG_XXX_TRIGGER_STOP (optional):

#   - The default is False, set it to True to stop current job automatically when reaching the LOG_XXX_THRESHOLD.

#   - The SIGTERM signal would be sent only one time to shut down the crawler gracefully.

#   - In order to avoid an UNCLEAN shutdown, the 'STOP' action would be executed one time at most

#   - if none of the 'FORCESTOP' triggers is enabled, no matter how many 'STOP' triggers are enabled.

# - LOG_XXX_TRIGGER_FORCESTOP (optional):

#   - The default is False, set it to True to FORCESTOP current job automatically when reaching the LOG_XXX_THRESHOLD.

#   - The SIGTERM signal would be sent twice resulting in an UNCLEAN shutdown, without the Scrapy stats dumped!

#   - The 'FORCESTOP' action would be executed if both of the 'STOP' and 'FORCESTOP' triggers are enabled.

# Note that the 'STOP' action and the 'FORCESTOP' action would STILL be executed even when the current time

# is NOT within the EMAIL_WORKING_DAYS and the EMAIL_WORKING_HOURS, though NO email would be sent.

LOG_CRITICAL_THRESHOLD = 0

LOG_CRITICAL_TRIGGER_STOP = False

LOG_CRITICAL_TRIGGER_FORCESTOP = False

LOG_ERROR_THRESHOLD = 0

LOG_ERROR_TRIGGER_STOP = False

LOG_ERROR_TRIGGER_FORCESTOP = False

LOG_WARNING_THRESHOLD = 0

LOG_WARNING_TRIGGER_STOP = False

LOG_WARNING_TRIGGER_FORCESTOP = False

LOG_REDIRECT_THRESHOLD = 0

LOG_REDIRECT_TRIGGER_STOP = False

LOG_REDIRECT_TRIGGER_FORCESTOP = False

LOG_RETRY_THRESHOLD = 0

LOG_RETRY_TRIGGER_STOP = False

LOG_RETRY_TRIGGER_FORCESTOP = False

LOG_IGNORE_THRESHOLD = 0

LOG_IGNORE_TRIGGER_STOP = False

LOG_IGNORE_TRIGGER_FORCESTOP = False

############################## System #########################################

# The default is False, set it to True to enable debug mode and the interactive debugger

# would be shown in the browser instead of the "500 Internal Server Error" page.

# Note that use_reloader is set to False in run.py

DEBUG = False

# The default is False, set it to True to change the logging level from WARNING to DEBUG

# for getting more information about how ScrapydWeb works, especially while debugging.

VERBOSE = False
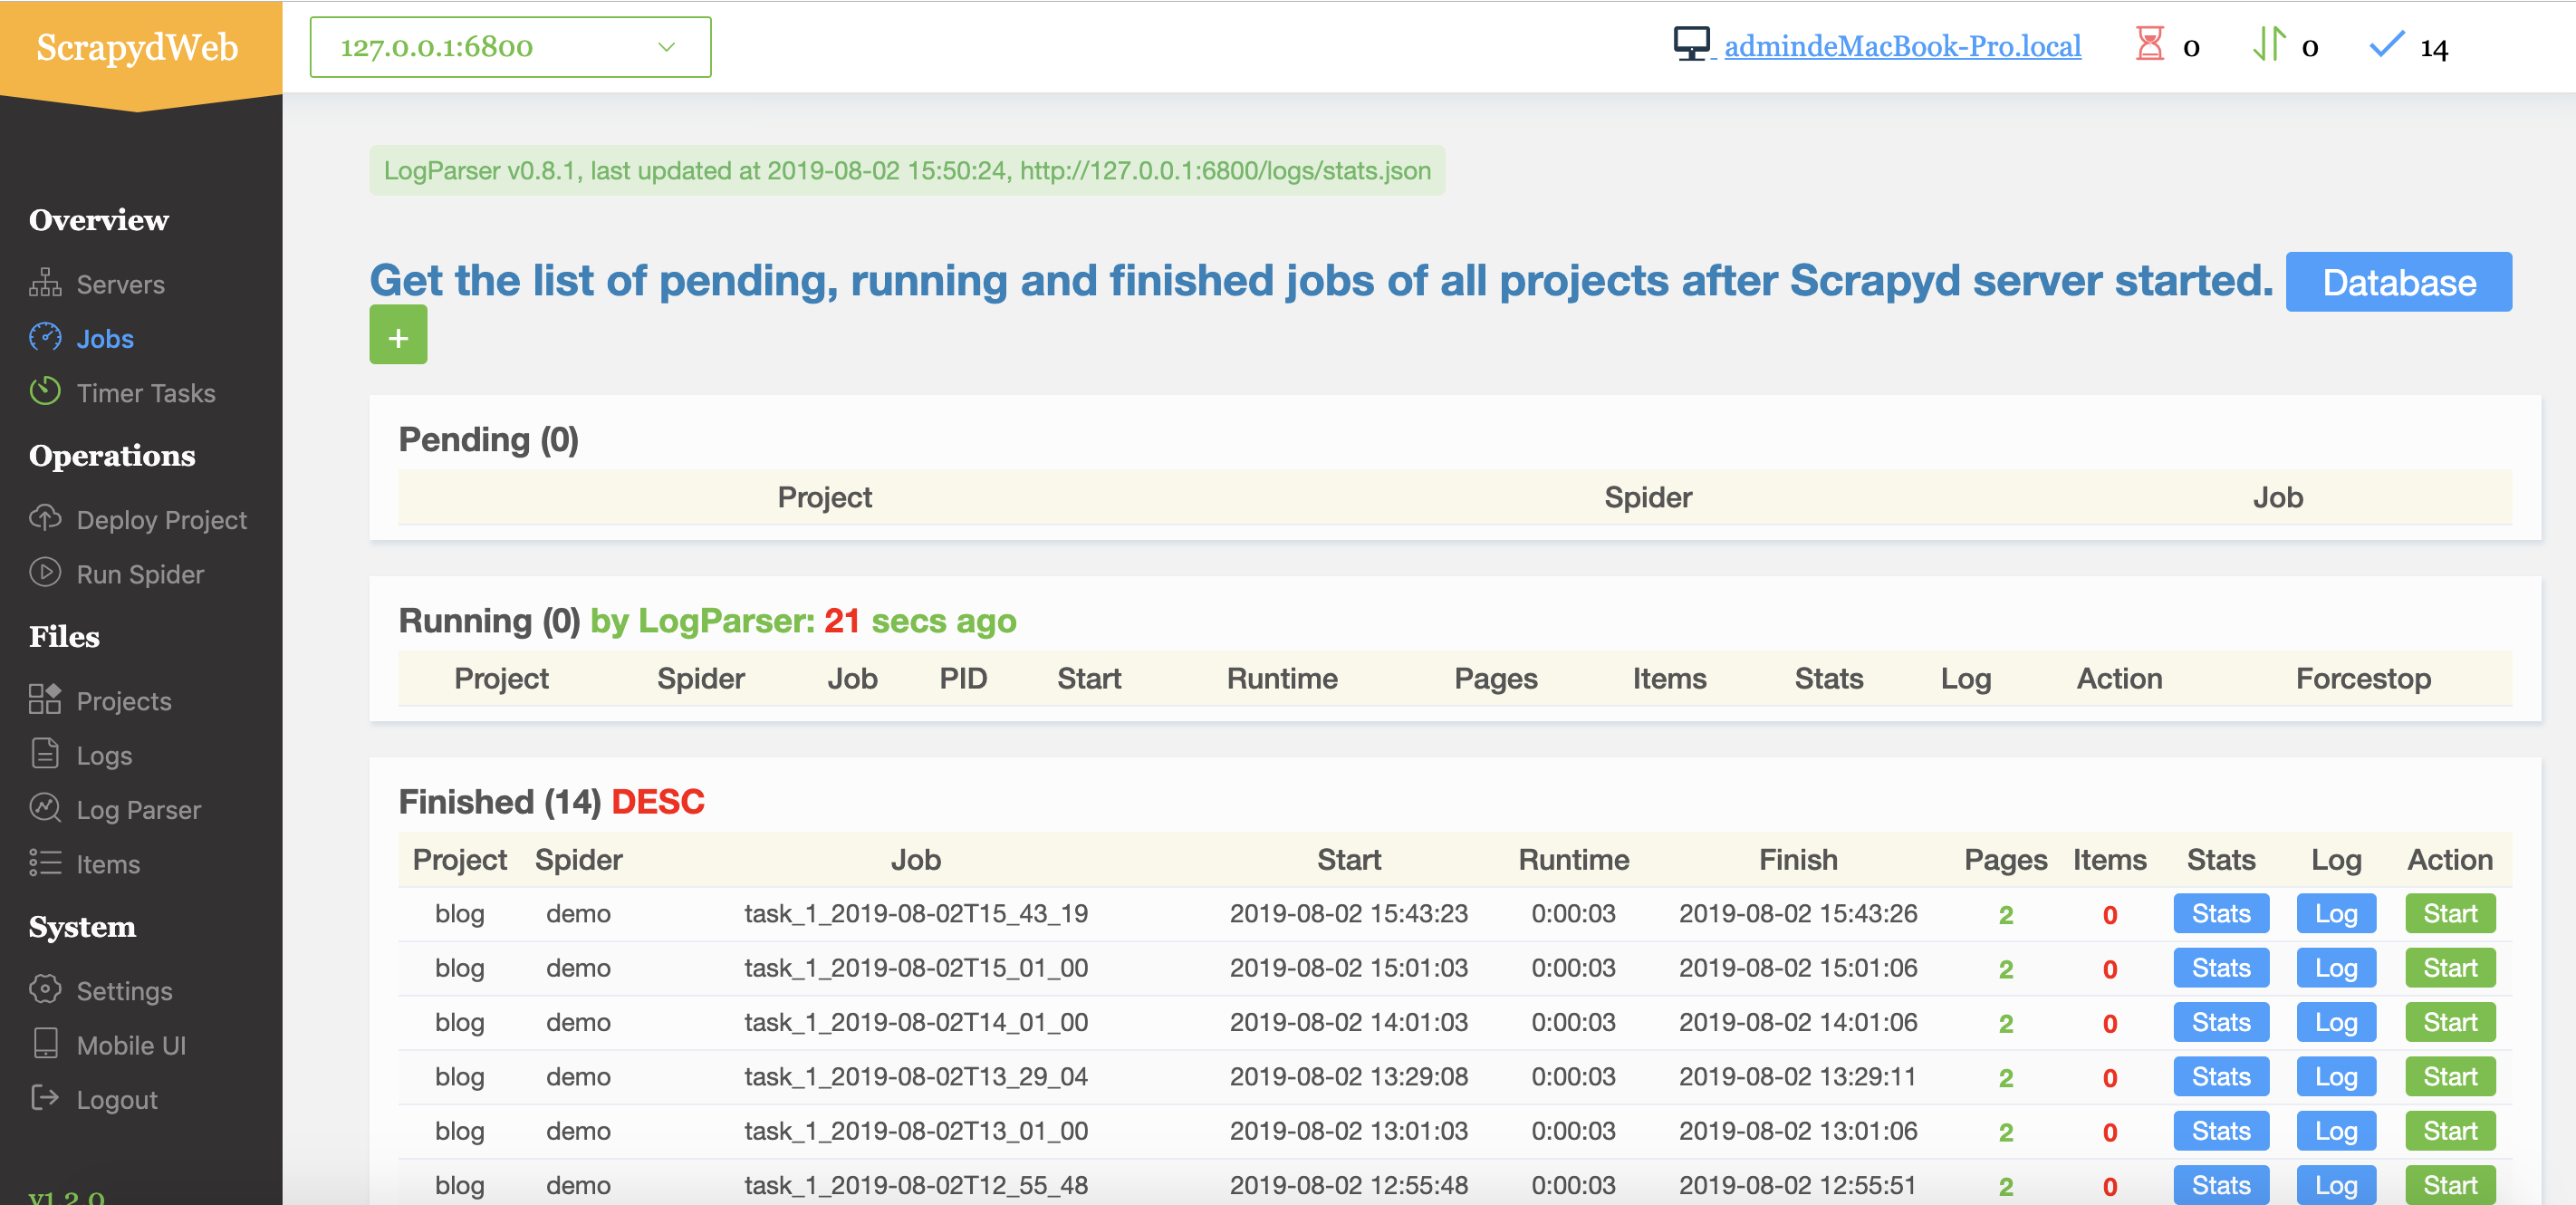
3. 界面:功能强大、还支持移动端
参考资料:https://github.com/my8100/files/blob/master/scrapydweb/README_CN.md
scrapydWeb安装和使用的更多相关文章
- 【python3】基于scrapyd + scrapydweb 的可视化部署
一.部署组件概览 该部署方式适用于 scrapy项目.scrapy-redis的分布式爬虫项目 需要安装的组件有: 1.scrapyd 服务端 [运行打包后的爬虫代码](所有的爬虫机器都要安 ...
- 笔记-爬虫部署及运行工具-scrapydweb
笔记-爬虫部署及运行工具-scrapydweb 1. 简介 scrapyd是爬虫部署工具,但它的ui比较简单,使用不是很方便. scrapydweb以scrapyd为基础,增加了ui界面和监 ...
- scrapydweb的初步使用(管理分布式爬虫)
https://github.com/my8100/files/blob/master/scrapydweb/README_CN.md 一.安装配置 1.请先确保所有主机都已经安装和启动 Scrapy ...
- Scrapy+Scrapyd+Scrapydweb实现爬虫可视化
Scrapy+Scrapyd+Scrapydweb实现爬虫可视化 Scrapyd是一个服务,用来运行scrapy爬虫的 它允许你部署你的scrapy项目以及通过HTTP JSON的方式控制你的爬虫 官 ...
- docker——容器安装tomcat
写在前面: 继续docker的学习,学习了docker的基本常用命令之后,我在docker上安装jdk,tomcat两个基本的java web工具,这里对操作流程记录一下. 软件准备: 1.jdk-7 ...
- 网络原因导致 npm 软件包 node-sass / gulp-sass 安装失败的处理办法
如果你正在构建一个基于 gulp 的前端自动化开发环境,那么极有可能会用到 gulp-sass ,由于网络原因你可能会安装失败,因为安装过程中部分细节会到亚马逊云服务器上获取文件.本文主要讨论在不变更 ...
- Sublime Text3安装JsHint
介绍 Sublime Text3使用jshint依赖Nodejs,SublimeLinter和Sublimelinter-jshint. NodeJs的安装省略. 安装SublimeLinter Su ...
- Fabio 安装和简单使用
Fabio(Go 语言):https://github.com/eBay/fabio Fabio 是一个快速.现代.zero-conf 负载均衡 HTTP(S) 路由器,用于部署 Consul 管理的 ...
- gentoo 安装
加载完光驱后 1进行ping命令查看网络是否通畅 2设置硬盘的标识为GPT(主要用于64位且启动模式为UEFI,还有一个是MBR,主要用于32位且启动模式为bois) parted -a optima ...
随机推荐
- koa 基础(八)koa 中间件的执行顺序
1.koa 中间件的执行顺序 app.js /** * koa 中间件的执行顺序 */ // 引入模块 const Koa = require('koa'); const router = requi ...
- C# 防火墙操作之开启与关闭
通过代码操作防火墙的方式有两种:一是代码操作修改注册表启用或关闭防火墙:二是直接操作防火墙对象来启用或关闭防火墙.不论哪一种方式,都需要使用管理员权限,所以操作前需要判断程序是否具有管理员权限. 1. ...
- vue文件流转换成pdf预览(pdf.js+iframe)
参考文档:https://www.jianshu.com/p/242525315bf6 PDFJS: https://mozilla.github.io/pdf.js/ 支持获取文件流到客户端 ...
- OGG 从Oracle备库同步数据至kafka
OGG 从Oracle备库同步数据至kafka Table of Contents 1. 目的 2. 环境及规划 3. 安装配置JDK 3.1. 安装jdk 3.2. 配置环境变量 4. 安装Data ...
- bloomberg learning
https://libguides.ust.hk/c.php?g=208028&p=1372192 Introduction to Bloomberg Professional Bloombe ...
- 手动部署 Ceph Mimic 三节点
目录 文章目录 目录 前文列表 部署拓扑 存储设备拓扑 网络拓扑 基础系统环境 安装 ceph-deploy 半自动化部署工具 部署 MON 部署 Manager 部署 OSD 部署 MDS 部署 R ...
- 接入上一篇SSM框架整合示例
需要创建相应的包与文件夹 Book数据表作为本示例数据 搭建项目开始 首先有bean后 private int id; private String name; private int cnt; 第一 ...
- JVM内存模型及配置参数
JVM 分为堆.栈.方法区.程序计数器.本地方法栈 栈内存存放局部变量表.操作栈.动态链接.方法出口等信息 1. 局部变量表存放了编译期可知的各种基本数据类型(boolean.byte.char.s ...
- JPA 或者Hibernate 实体类说明
这里简单介绍Hibernate的Annotation注解 一.声明实体 @Entity对实体注释.任何Hibernate映射对象都要有这个注释@Table声明此对象映射到数据库的数据表,通过它可以为实 ...
- CentOS的SVN服务器搭建与自动部署全过程
CentOS的SVN服务器搭建与自动部署全过程 http://www.jb51.net/article/106218.htm authz-db = authz 引起的 svn 认证失败 http:// ...