Nginx是一款开源的高性能HTTP服务器和返向代理服务器。
下载、编译、安装模块:
[root@localhost nginx-1.4.0]#wget http://nginx.org/download/nginx-1.4.0.tar.gz
[root@localhost nginx-1.4.0]#tar -xzf nginx-1.4.0.tar.gz -C /usr/src/
[root@localhost nginx-1.4.0]#yum -y install gcc pcre pcre-devel gcc openssl \
>openssl-devel gd gd-devel perl perl-ExtUtils-Embed
[root@localhost nginx-1.4.0]#cd /usr/src/nginx-1.4.0/
[root@localhost nginx-1.4.0]# ./configure --prefix=/usr/local/nginx \
> --with-ipv6 \
> --with-http_ssl_module \
> --with-http_realip_module \
> --with-http_addition_module \
> --with-http_dav_module \
> --with-http_flv_module \
> --with-http_mp4_module \
> --with-http_gzip_static_module \
> --with-http_perl_module \
> --with-mail \
> --with-mail_ssl_module
[root@localhost nginx-1.4.0]#make && make install
各模块介绍(码字太多,百度求解吧):
服务器被安装到/usr/local/nginx/目录下
Nginx常用 管理命令:
[root@localhost nginx]# /usr/local/nginx/sbin/nginx #启动主程序
[root@daqijiance xyz]# /usr/local/nginx/sbin/nginx -c \
>/usr/local/nginx/conf/nginx.conf #指定配置文件启动主程序
[root@localhost nginx]# /usr/local/nginx/sbin/nginx -s stop #关闭主程序
[root@localhost nginx]# /usr/local/nginx/sbin/nginx -s reload #重新加载设置
配置文件解析:
[root@daqijiance nginx]# cat conf/nginx.conf
#设置用户与组
user nobody;
#启动子进程数
worker_processes 1;
#error_log logs/error.log;
#error_log logs/error.log notice;
#错误日志文件,以及日志级别。
error_log logs/error.log info;
#进程号保存文件
pid logs/nginx.pid;
events {
#每个进程可以处理的连接数,受系统文件句柄的限制
worker_connections 1024;
}
http {
include mime.types;
#默认文件类型
default_type application/octet-stream;
log_format main '$remote_addr - $remote_user [$time_local] "$request" '
'$status $body_bytes_sent "$http_referer" '
'"$http_user_agent" "$http_x_forwarded_for"';
#access_log logs/access.log main;
#是否调用sendfile()进行数据复制,sendfile()复制数据是在内核级别完成的,所以会比一般的read、write更高效
sendfile on;
#开启后的服务器的响应头部信息产生独立的数据包发送,即一个响应头一个包
tcp_nopush on;
#保持连接的超时时间
keepalive_timeout 65;
#是否启用压缩功能,将页面压缩后传输更节省流量
gzip on;
#使用server定义虚拟主机
server {
#服务器监听的端口
listen 80;
#访问域名
server_name daqijiance.com *.daqijiance.com;
#编码格式,如果网页编码于此设置不同,则将被自动转码
#charset koi8-r;
#设置虚拟主机的访问日志
access_log logs/daqijiance.com..log main;
#对url进行匹配
location / {
#设置网页的根路径,使用的是相对路径,html指的是处于Nginx安装路径下
root html/daqijiance;
#首页文件,先找index.html,若没有,再找index.htm
index index.html index.htm index.aspx;
}
#error_page 404 /404.html;
# redirect server error pages to the static page /50x.html
#
error_page 500 502 503 504 /50x.html;
location = /50x.html {
root html;
}
# proxy the PHP scripts to Apache listening on 127.0.0.1:80
#
#location ~ \.php$ {
# proxy_pass http://127.0.0.1;
#}
# pass the PHP scripts to FastCGI server listening on 127.0.0.1:9000
#
#location ~ \.php$ {
# root html;
# fastcgi_pass 127.0.0.1:9000;
# fastcgi_index index.php;
# fastcgi_param SCRIPT_FILENAME /scripts$fastcgi_script_name;
# include fastcgi_params;
#}
# deny access to .htaccess files, if Apache's document root
# concurs with nginx's one
#
location ~ /\.ht {
deny all;
}
}
# another virtual host using mix of IP-, name-, and port-based configuration
#
server {
listen 80;
server_name hbgk.com *.hbgk.com hebeigankong.com *.hebeigankong.com;
location / {
root html/hebeigankong;
index index.html index.htm index.aspx;
}
}
server {
listen 80;
server_name yiyuanjiance.com *.yiyuanjiance.com;
location / {
root html/yiyuanjiance/;
index index.html index.htm index.aspx;
}
}
# HTTPS server
server {
listen 443;
server_name hbu.cn hbu.edu.cn *.hbu.cn *.hbu.edu.cn;
ssl on;
ssl_certificate cert.pem;
ssl_certificate_key cert.key;
ssl_session_timeout 5m;
ssl_protocols SSLv2 SSLv3 TLSv1;
ssl_ciphers HIGH:!aNULL:!MD5;
ssl_prefer_server_ciphers on;
location / {
root html/hbu;
index index.html index.htm index.aspx;
}
}
}
[root@localhost nginx]# mkdir /usr/local/nginx/html/{daqijiance,hebeigankong,yiyuanjiance}
[root@localhost nginx]# echo "daqijiance.com" > /usr/local/nginx/html/daqijiance/index.html
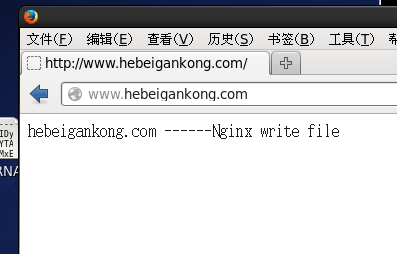
[root@localhost nginx]# echo "hebeigankong.com" > /usr/local/nginx/html/hebeigankong/index.html
[root@localhost nginx]# echo "yiyuanjiance.com" > /usr/local/nginx/html/yiyuanjiance/index.html
上面这个实例可以根据来路域名跳转到不同的网站页面,也就是多个网站绑定到了同一个IP,Nginx web服务器监听80端口实现对不同来访域名的解析,返回不同网站首页。
其实这个测试一般通过修改DNS域名解析,如果没有DNS域名解析,也可以通过修改hosts文件的方式实现。
[root@daqijiance xyz]# cat /etc/hosts
127.0.0.1 localhost localhost.localdomain localhost4 localhost4.localdomain4
::1 localhost localhost.localdomain localhost6 localhost6.localdomain6
192.168.50.157 www.daqijiance.com www.hebeigankong.com www.yiyuanjiance.com daqijiance.com hebeigankong.com yiyuanjiance.com hbgk.com hbu.cn hbu.edu.cn www.hbu.cn www.hbu.edu.cn
- CentOS7 实战源码部署nginx网站服务器
简介:实战演练nginx网站服务器的搭建 nginx 简介: Nginx是一款高性能的 HTTP 和反向代理服务器 Nginx的优点: 1.高并发量:根据官方给出的数据,能够支持高达 50,000 ...
- nodejs,node原生服务器搭建实例
nodejs,node原生服务器搭建实例
- asp.net网站服务器搭建之从零开始
asp.net网站服务器搭建之从零开始 一 IIS(Internet Information Services)安装: 1.选择"控制面板". 2.点"添加或删除程序 ...
- CentOS的SVN服务器搭建与自动部署全过程
CentOS的SVN服务器搭建与自动部署全过程 http://www.jb51.net/article/106218.htm authz-db = authz 引起的 svn 认证失败 http:// ...
- [原创]CentOS下Radius服务器搭建
一. 实现环境: 1.系统:CentOS release 6.6 (Final) 2.需要软件包: 1) freeradius-2.1.12-6.e16.x86_64 freeradius-m ...
- nginx+ftp服务器搭建简易文件服务器
在做一些小项目和学习项目过程中,学习了通过 nginx 和 FTP 搭建小型文件服务器,记录下: 1.环境 电脑:acer 操作系统:windows 10 ftp服务器 2.下载 nginx, 通过双 ...
- Win7服务器搭建实例教程:教你Win7如何搭建Web服务器【转载】
原文地址:http://www.pc841.com/article/20140607-30534.html 局域网Web服务器的主要功能是实现资源共享,同时借助于局域网服务器访问页面可有效的实现信息的 ...
- Nginx反向服务器搭建
Nginx环境搭建 下载解压Nginx源码包 可以通过已有的压缩包 这里也可以通过yum的在线下载 wget http://nginx.org/download/nginx-1.13.7.tar.gz ...
- centos 下git服务器搭建
准备 CentOS Linux release 7.0.1406 (Core) ssh 22端口 http 80端口 本文主要是ssh协议支持,http协议配置后还有问题. 摘抄的一段说明 SSH 协 ...
随机推荐
- Codeforces Round #514 (Div. 2)
目录 Codeforces 1059 A.Cashier B.Forgery C.Sequence Transformation D.Nature Reserve(二分) E.Split the Tr ...
- webstorm显示行号,结构预览
1,代码结构浏览menu>view>file structure popupwindwows>tool windws >structure (alt+7)代码结构当JS代码量很 ...
- window10总提示幸福倒计时,解决方法
删除window用于标识计算机更新的临时文件,需要先停止功能Windows Update. 在开始菜单的“搜索程序和文件”框输入“Services.msc”命令打开服务窗口 打开Windows Upd ...
- Linux的SSH免密登录认证过程研究
一.先看下SSH免密登录使用到的工具和生成的文件 工具:ssh-keygen用于生成秘钥文件,其中秘钥分为公钥和私钥.ssh-copy-id用于复制公钥文件到被控制机. 文件:ssh-keygen生成 ...
- cached-query 将缓存和查询数据库高速连接起来的轻类库
介绍 我们经常有这种需求:当我们把memcached增加到项目后我还还要写一个 cacheUtils 或者 cacheManager 之类的类来操作memcached. 而且一般的操作不外乎是这种操作 ...
- ITxlab倡议启动“互联网X大脑”计划
导语:"互联网X大脑"计划由ITxlab(互联网X实验室)联合科学院相关机构.基于7年以来取得的研究成果,倡议建立的互联网与脑科学前沿研究平台,吸引不同领域专家进行科学研究和成果交 ...
- event对象中 target和currentTarget 属性的区别。
首先本质区别是: event.target返回触发事件的元素 event.currentTarget返回绑定事件的元素
- Android开发中遇到的问题(二)——新建android工程的时候eclipse没有生成MainActivity和layout布局
一.新建android工程的时候eclipse没有生成MainActivity和layout布局 最近由于工作上的原因,开始学习Android开发,在入门的时候就遇到了不少的坑,遇到的第一个坑就是&q ...
- Geek地生活,文艺地思考
本文纯属整理自己零碎杂乱的思绪,和题目无关. 不知觉间,大学已经两年过去了,忙忙碌碌了两年,大一那年參加了学生会编 辑部和艺术团舞蹈队,课余时间的生活总是被舞蹈队排练.參演和编辑部 ...
- 在 Gradle 中使用 MyBatis Generator
在 Intellij IDEA 中结合 Gradle 使用 MyBatis Generator 逆向生成代码 Info: JDK 1.8 Gradle 2.14 Intellij IDEA 2016. ...