Aforge.net识别简易数字验证码问题
参考:https://www.bbsmax.com/A/rV57LjWGdP/
https://blog.csdn.net/louislong007/article/details/47683035
简易验证码样例:
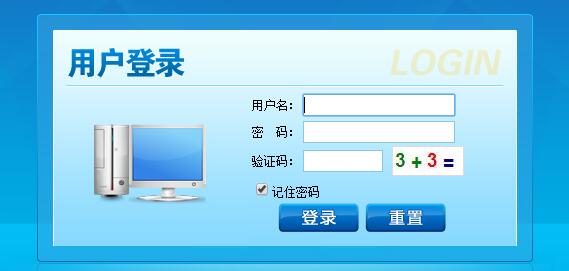
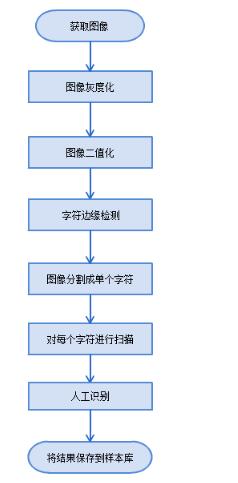
验证码识别流程:
首先进行图像获取:火狐浏览器,找到获取验证码地址,获取验证码图像,传递给类,直接获取到验证码!
验证码获取:
         /// <summary>

         /// 通过GET方式获取验证码

         /// </summary>

         /// <param name="Url">url</param>

         /// <param name="postDataStr">GET数据</param>

         /// <param name="cookie">GET容器</param>

         /// <returns></returns>

         public void SendDataByGET1(string Url, ref CookieContainer cookie)

         {

             HttpWebRequest request = (HttpWebRequest)WebRequest.Create(Url);

             if (cookie.Count == )

             {

                 request.CookieContainer = new CookieContainer();

                 cookie = request.CookieContainer;

             }

             else

             {

                 request.CookieContainer = cookie;

             }

             request.Method = "GET";

             request.ContentType = "text/html;charset=UTF-8";

             HttpWebResponse response = (HttpWebResponse)request.GetResponse();

             MemoryStream ms = null;

             using (var stream = response.GetResponseStream())

             {

                 Byte[] buffer = new Byte[response.ContentLength];

                 int offset = , actuallyRead = ;

                 do

                 {

                     actuallyRead = stream.Read(buffer, offset, buffer.Length - offset);

                     offset += actuallyRead;

                 }

                 while (actuallyRead > );

                 ms = new MemoryStream(buffer);

             }

             b = new Bitmap(ms);

             //aforge只接受像素格式为24/32bpp的像素格式图片,所以处理前,先进行格式转化

             var bnew = new Bitmap(b.Width, b.Height,PixelFormat.Format24bppRgb);

             Graphics g = Graphics.FromImage(bnew);

             g.DrawImage(b, , );

             g.Dispose();

             pictureBox1.Image = bnew;

             //b = new Threshold(50).Apply(b);

             response.Close();

           string  strCookies = request.CookieContainer.GetCookieHeader(request.RequestUri); //把cookies转换成字符串

        textBox2.Text=new VerificationCodeProcess().GetVerificationCode(bnew).ToString();

             //Stream myResponseStream = response.GetResponseStream();

             //StreamReader myStreamReader = new StreamReader(myResponseStream, Encoding.GetEncoding("utf-8"));

             //string retString = myStreamReader.ReadToEnd();

             //myStreamReader.Close();

             //myResponseStream.Close();

           //MessageBox.Show(strCookies);

         }
验证码处理:
using System;

using System.Collections.Generic;

using System.Linq;

using System.Text;

using System.Drawing;

using System.Drawing.Imaging;

using System.Drawing.Printing;

using System.Linq;

using System.Text;

using System.Windows.Forms;

//

using System.Net;

using System.IO;

using Model;

using BLL;

using Model;

using AForge;

using AForge.Imaging;

using AForge.MachineLearning;

using System.Drawing.Drawing2D;

using AForge.Imaging.Filters;

namespace EmsService

{

    public class VerificationCodeProcess

    {

        public int GetVerificationCode(Bitmap bmp)

        {

            //灰度

            bmp = ToGray(bmp);

            //  MessageBox.Show(b.PixelFormat.ToString());

            //二进制//

            // pictureBox3.Image = ConvertToBinaryImage(new Bitmap(pictureBox2.Image));

            bmp = ConvertToBinaryImage(bmp);

            //   MessageBox.Show(b.PixelFormat.ToString());

            //分割

            List<Bitmap> bmList = ToResizeAndCenterIt(Crop_X(Crop_Y(bmp)));

            //二进制化

            StringBuilder sb = new StringBuilder();

            List<string> lls = PP(bmList);

            int top = Convert.ToInt32(lls[]);

            int last = Convert.ToInt32(lls[]);

            int result = ;

            if (lls[] == "-")

            {

                result = top - last;

            }

            else

            {

                result = top + last;

            }

            return result;

        }

        /// <summary>

        /// 灰度处理

        /// </summary>

        /// <param name="bmp"></param>

        /// <returns></returns>

        public Bitmap ToGray(Bitmap bmp)

        {

            Bitmap bm = new Bitmap(bmp.Width, bmp.Height);

            for (int i = ; i < bmp.Width; i++)

            {

                for (int j = ; j < bmp.Height; j++)

                {

                    // 获取该点的像素的RGB的颜色

                    Color color = bmp.GetPixel(i, j);

                    // 利用公式计算灰度值

                    // 根据YUV的颜色空间中,Y的分量的物理意义是点的亮度,由该值反映亮度等级,

                    // 根据RGB和YUV颜色空间的变化关系可建立亮度Y与R、G、B三个颜色分量的对应:

                    // Y=0.3R+0.59G+0.11B,以这个亮度值表达图像的灰度值

                    int gray = (int)(color.R * 0.3 + color.G * 0.59 + color.B * 0.11);

                    Color newColor = Color.FromArgb(gray, gray, gray);

                    bm.SetPixel(i, j, newColor);

                }

            }

            return bm;

        }

        /// <summary>

        /// 二进制化

        /// </summary>

        /// <param name="bmp"></param>

        /// <returns></returns>

        public Bitmap ConvertToBinaryImage(Bitmap bmp)

        {

            Bitmap bm = new Bitmap(bmp.Width, bmp.Height);

            int average = ;

            for (int i = ; i < bmp.Width; i++)

            {

                for (int j = ; j < bmp.Height; j++)

                {

                    Color color = bmp.GetPixel(i, j);

                    average += color.B;

                }

            }

            average = ;

            for (int i = ; i < bmp.Width; i++)

            {

                for (int j = ; j < bmp.Height; j++)

                {

                    //获取该点的像素的RGB的颜色

                    Color color = bmp.GetPixel(i, j);

                    int value =  - color.B;

                    Color newColor = value > average ? Color.FromArgb(, , ) : Color.FromArgb(, , );

                    bm.SetPixel(i, j, newColor);

                }

            }

            return bm;

        }

        /// <summary>

        /// 重置图片的指定大小并且居中

        /// </summary>

        /// <param name="list"></param>

        /// <returns></returns>

        public List<Bitmap> ToResizeAndCenterIt(List<Bitmap> list, int w = , int h = )

        {

            List<Bitmap> resizeList = new List<Bitmap>();

            for (int i = ; i < list.Count; i++)

            {

                //MessageBox.Show(list[i].PixelFormat.ToString());

                //反转一下图片

                var bnew10 = new Bitmap(list[i].Width, list[i].Height, PixelFormat.Format24bppRgb);

                Graphics g10 = Graphics.FromImage(bnew10);

                g10.DrawImage(list[i], , );

                g10.Dispose();

                list[i] = bnew10;

                list[i] = new Invert().Apply(list[i]);

                int sw = list[i].Width;

                int sh = list[i].Height;

                Crop corpFilter = new Crop(new Rectangle(, , w, h));

                list[i] = corpFilter.Apply(list[i]);

                //var bnew1 = new Bitmap(list[i].Width, list[i].Height, PixelFormat.Format24bppRgb);

                //Graphics g1 = Graphics.FromImage(bnew1);

                //g1.DrawImage(list[i], 0, 0);

                //g1.Dispose();

                //再反转回去

                list[i] = new Invert().Apply(list[i]);

                // //计算中心位置

                int centerX = (w - sw) / ;

                int centerY = (h - sh) / ;

                var bnew2 = new Bitmap(list[i].Width, list[i].Height, PixelFormat.Format24bppRgb);

                Graphics g2 = Graphics.FromImage(bnew2);

                g2.DrawImage(list[i], , );

                g2.Dispose();

                list[i] = new CanvasMove(new AForge.IntPoint(centerX, centerY), Color.White).Apply(list[i]);

                resizeList.Add(list[i]);

            }

            return resizeList;

        }

        /// <summary>

        /// 按照 Y 轴线 切割

        /// (丢弃等于号)

        /// </summary>

        /// <param name="?"></param>

        /// <returns></returns>

        public List<Bitmap> Crop_Y(Bitmap b)

        {

            var list = new List<Bitmap>();

            //统计每一列的“1”的个数,方便切除

            int[] cols = new int[b.Width];

            /*

               *  纵向切割

               */

            for (int x = ; x < b.Width; x++)

            {

                for (int y = ; y < b.Height; y++)

                {

                    //获取当前像素点像素

                    var pixel = b.GetPixel(x, y);

                    //说明是黑色点

                    if (pixel.R == )

                    {

                        cols[x] = ++cols[x];

                    }

                }

            }

            int left = , right = ;

            for (int i = ; i < cols.Length; i++)

            {

                //说明该列有像素值(为了防止像素干扰,去噪后出现空白的问题,所以多判断一下,防止切割成多个)

                if (cols[i] >  || (i +  < cols.Length && cols[i + ] > ))

                {

                    if (left == )

                    {

                        //切下来图片的横坐标left

                        left = i;

                    }

                    else

                    {

                        //切下来图片的横坐标right

                        right = i;

                    }

                }

                else

                {

                    //说明已经有切割图了,下面我们进行切割处理

                    if ((left >  || right > ))

                    {

                        Crop corp = new Crop(new Rectangle(left, , right - left + , b.Height));

                        var small = corp.Apply(b);

                        //居中,将图片放在20*50的像素里面

                        list.Add(small);

                    }

                    left = right = ;

                }

            }

            return list;

        }

        /// <summary>

        /// 按照 X 轴线 切割

        /// </summary>

        /// <param name="b"></param>

        /// <returns></returns>

        public List<Bitmap> Crop_X(List<Bitmap> list)

        {

            var corplist = new List<Bitmap>();

            //再对分割的图进行上下切割,取出上下的白边

            foreach (var segb in list)

            {

                //统计每一行的“1”的个数,方便切除

                int[] rows = new int[segb.Height];

                /*

                 *  横向切割

                   */

                for (int y = ; y < segb.Height; y++)

                {

                    for (int x = ; x < segb.Width; x++)

                    {

                        //获取当前像素点像素

                        var pixel = segb.GetPixel(x, y);

                        //说明是黑色点

                        if (pixel.R == )

                        {

                            rows[y] = ++rows[y];

                        }

                    }

                }

                int bottom = , top = ;

                for (int y = ; y < rows.Length; y++)

                {

                    //说明该行有像素值(为了防止像素干扰,去噪后出现空白的问题,所以多判断一下,防止切割成多个)

                    if (rows[y] >  || (y +  < rows.Length && rows[y + ] > ))

                    {

                        if (top == )

                        {

                            //切下来图片的top坐标

                            top = y;

                        }

                        else

                        {

                            //切下来图片的bottom坐标

                            bottom = y;

                        }

                    }

                    else

                    {

                        //说明已经有切割图了,下面我们进行切割处理

                        if ((top >  || bottom > ) && bottom - top > )

                        {

                            Crop corp = new Crop(new Rectangle(, top, segb.Width, bottom - top + ));

                            var small = corp.Apply(segb);

                            corplist.Add(small);

                        }

                        top = bottom = ;

                    }

                }

            }

            return corplist;

        }

        //模式匹配

        public List<string> PP(List<Bitmap> list)

        {

            var files = Directory.GetFiles(Environment.CurrentDirectory + "\\temp\\");

            var templateList = files.Select(i => { return new Bitmap(i); }).ToList();

            var templateListFileName = files.Select(i => { return i.Substring(i.Length - ).Substring(, ); }).ToList();

            var result = new List<string>();

            ExhaustiveTemplateMatching templateMatching = new ExhaustiveTemplateMatching(0.9f);

            //这里面有四张图片,进行四张图的模板匹配

            for (int i = ; i < ; i++)

            {

                float max = ;

                int index = ;

                for (int j = ; j < templateList.Count; j++)

                {

                    var compare = templateMatching.ProcessImage(list[i], templateList[j]);

                    if (compare.Length >  && compare[].Similarity > max)

                    {

                        //记录下最相似的

                        max = compare[].Similarity;

                        index = j;

                    }

                }

                result.Add(templateListFileName[index]);

            }

            return result;

        }

    }

}
效果图: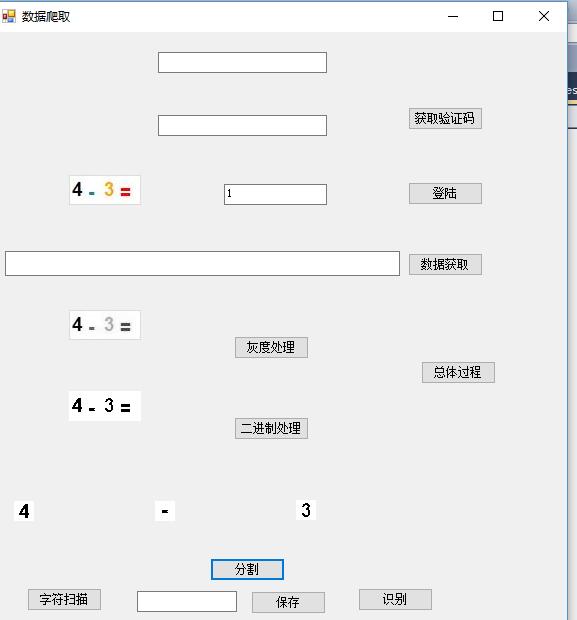
/// <summary> /// 通过GET方式获取验证码 /// </summary> /// <param name="Url">url</param> /// <param name="postDataStr">GET数据</param> /// <param name="cookie">GET容器</param> /// <returns></returns> public void SendDataByGET1(string Url, ref CookieContainer cookie) { HttpWebRequest request = (HttpWebRequest)WebRequest.Create(Url); if (cookie.Count == 0) { request.CookieContainer = new CookieContainer(); cookie = request.CookieContainer; } else { request.CookieContainer = cookie; }
request.Method = "GET"; request.ContentType = "text/html;charset=UTF-8";
HttpWebResponse response = (HttpWebResponse)request.GetResponse();
MemoryStream ms = null; using (var stream = response.GetResponseStream()) { Byte[] buffer = new Byte[response.ContentLength]; int offset = 0, actuallyRead = 0; do { actuallyRead = stream.Read(buffer, offset, buffer.Length - offset); offset += actuallyRead; } while (actuallyRead > 0); ms = new MemoryStream(buffer); }
b = new Bitmap(ms);
//aforge只接受像素格式为24/32bpp的像素格式图片,所以处理前,先进行格式转化 var bnew = new Bitmap(b.Width, b.Height,PixelFormat.Format24bppRgb);
Graphics g = Graphics.FromImage(bnew);
g.DrawImage(b, 0, 0);
g.Dispose(); // // ////灰度 // Bitmap temp; // temp = AForge.Imaging.Image.Clone(b, b.PixelFormat); // b = new Grayscale(0.2125, 0.7154, 0.0721).Apply(b); // //二值化 // b = new Threshold(50).Apply(b); pictureBox1.Image = bnew; //b = new Threshold(50).Apply(b); response.Close(); string strCookies = request.CookieContainer.GetCookieHeader(request.RequestUri); //把cookies转换成字符串
textBox2.Text=new VerificationCodeProcess().GetVerificationCode(bnew).ToString();
//Stream myResponseStream = response.GetResponseStream(); //StreamReader myStreamReader = new StreamReader(myResponseStream, Encoding.GetEncoding("utf-8")); //string retString = myStreamReader.ReadToEnd(); //myStreamReader.Close(); //myResponseStream.Close();
//MessageBox.Show(strCookies); }
Aforge.net识别简易数字验证码问题的更多相关文章
- selenium来识别数字验证码
用python写一爬虫,需要模拟登陆,并且有数字验证码.通过selenium+pytesseract+PIL可以实现验证码识别并登陆.三大步: 用selenium截屏,此时截取的是整个页面的 用PIL ...
- [验证码识别技术]字符验证码杀手--CNN
字符验证码杀手--CNN 1 abstract 目前随着深度学习,越来越蓬勃的发展,在图像识别和语音识别中也表现出了强大的生产力.对于普通的深度学习爱好者来说,一上来就去跑那边公开的大型数据库,比如I ...
- Python——pytessercat识别简单的验证码
什么是验证码 验证码(CAPTCHA)是“Completely Automated Public Turing test to tell Computersand Humans Apart” (全自动 ...
- selenium破解数字验证码
搞了半天,总算弄出来了,识别率还可以,普通的数字验证码 from selenium import webdriver from PIL import Image import pytesseract ...
- 爬虫(十二):图形验证码的识别、滑动验证码的识别(B站滑动验证码)
1. 验证码识别 随着爬虫的发展,越来越多的网站开始采用各种各样的措施来反爬虫,其中一个措施便是使用验证码.随着技术的发展,验证码也越来越花里胡哨的了.最开始就是几个数字随机组成的图像验证码,后来加入 ...
- python利用selenium库识别点触验证码
利用selenium库和超级鹰识别点触验证码(学习于静谧大大的书,想自己整理一下思路) 一.超级鹰注册:超级鹰入口 1.首先注册一个超级鹰账号,然后在超级鹰免费测试地方可以关注公众号,领取1000积分 ...
- 中文价格识别为数字 java代码
运行效果: public class VoicePriceRecognition { private final static String NOT_HAS_PRICE_CONTENT="n ...
- 务必收藏备用:.net core中通过Json或直接获取图形验证码(数字验证码、字母验证码、混合验证码),有源代码全实战demo(开源代码.net core3.0)
很多人写的博客大家看了会一知半解,不知道怎么用,应该引用什么类库或者代码不全,这样很多小白很是头疼,尤其是尝新技术更是如此.我们这边不止告诉你步骤,而且还提供开源demo.随着时间的推移,我们的dem ...
- PHP写的简单数字验证码
用PHP写的随机生成的5位数字验证码 $yzm = ""; for($i=0;$i<5;$i++) { $a = rand(0,9); $yzm.= $a; } echo $ ...
随机推荐
- Vnpy官网汇总
Vnpy首页:http://www.vnpy.cn/ Vnpy社区:https://www.vnpy.com/ Vnpy论坛:http://www.vnpie.com/forum.php Github ...
- jmockit mock 类的static 属性
final Object[] originValue = new Object[1];try{ new Expectations(XXStatic.class){ { originValue[0] = ...
- 安装在类虚拟机crossover中的容器怎么进行的备份和恢复
备份教程: 步骤一:运行CrossOver,选中相关容器,然后在[容器]中找到并点击[导出“MathType6.9b_Trial_YY.exe”到存档],或者直接右击容器名称,然后选择[导出“Math ...
- Assignments 1
跑了一下之前写的UiPath Assignments脚本,没什么问题,发上来供大家参考. 先看结果: github:https://github.com/WendyZheng1022/RPA 有时间我 ...
- composer的安装方法 以及 ThinkPHP5安装
1.下载installer的文件,使用浏览器开启链接:getcomposer.org/installer,下载如下文件到 E:\xs2016\composer, 将installer重命名为compo ...
- vue刷新当前路由
原理:跳转到空白页,然后再快速跳回原来的页面: 1,新建一个refresh.vue页面并添加到路由,页面内容如下 <script> export default { beforeRoute ...
- argument 1 must be 2-item sequence, not int
看了 https://blog.csdn.net/qq_18250439/article/details/80872425 的说明,才明白为什么错了. 当使用Python3-pygame时出现Typ ...
- GDAL——命令使用专题——gdalsrsinfo命令
GDAL——命令使用专题——gdalsrsinfo命令 前言 GDAL(Geospatial Data Abstraction Library)是一个在X/MIT许可协议下的开源栅格空间数据转换库. ...
- Jsoup解析获取品花社图片
Jsoup解析获取品花社图片 emmmm,闲着没事,想起了之前一个学长做的品花社的APP,刚好之前有了解Jsoup这个Java解析HTML的库,便花了三四个小时写了这个东西,把网站上大大小小的MM的图 ...
- UVa 11389 - The Bus Driver Problem 难度:0
题目 https://uva.onlinejudge.org/index.php?option=com_onlinejudge&Itemid=8&page=show_problem&a ...