Salesforce Lightning Builder Flows (Salesforce Lightning 构建Flows)
本文构建Salesforce Lightning Flows 只是一个简单的实现步骤,原文地址如下:
https://trailhead.salesforce.com/en/content/learn/modules/business_process_automation/flow
在开始之前我们得先知道几个概念:
- Lightning Flow:它是包含了构建、管理、运行流和流程的产品。
- Flow Builder:它是构建Flow的工具。
- Flow:通过收集数据并在Salesforce org或外部系统中执行某些操作来自动化业务流程的应用程序。
注:then add a flow action to your process。
Flow 构建块
每个Flow都由三个构建块组成。
- Elements:它显示在画布上。添加一个元素到画布,从工具栏单击或拖拽它。
- Connectors:定义flow在运行时的路径,它们告诉Flow接下来将做什么。
- Resources:是表示给定值的容器,如字段值或公式。您可以在整个流程中引用资源。例如,查找帐户的ID,将该ID存储在一个变量中,然后引用该ID来更新帐户。
- Flow 元素包含四种不同的类型
- Screen:向用户显示数据或从屏幕上收集用户输入的信息,可以在屏幕上添加简单的字段,像输入字段和单选按钮,以及out-of-the-box Lightning组件,如文件上传。

- Logic:控制Flow的数据Create,Update,循环结束设置数据。
- Actions:当您拥有必要的信息(可能通过屏幕从用户那里收集)时,在Salesforce中执行一些操作。Flow可以查找、创建、更新和删除Salesforce记录。他们还可以创建聊天帖子,提交记录以获得批准,并发送电子邮件。如果您的操作无法开箱即用,请从Flow中调用Apex代码。
- Integrations:通过使用核心操作或Apex操作将流连接到外部数据库。Core actions允许您在不经过Salesforce服务器的情况下发出请求。Flow Builder还与平台事件有一些关联。使用Create Records元素发布平台事件消息。使用Pause元素订阅平台事件。
- Screen:向用户显示数据或从屏幕上收集用户输入的信息,可以在屏幕上添加简单的字段,像输入字段和单选按钮,以及out-of-the-box Lightning组件,如文件上传。
- Take a Tour(参考)

1.Toolbox:它里面包含元素和资源。
2.Canvas:Flow构建是在可视化界面构建。
3.Button Bar:按钮提供关于Flow的任何信息,例如:
1、Flow是否被激活
2、Flow保存了多长时间
3、流是否有任何警告或错误。要查看警告或错误,请单击相应的图标
4.Keyboard Shortcuts:使用这些快捷键来快速浏览Flow
1、windows快捷键:
放大,按Ctrl =。
缩小,按Ctrl -。
适应,按Ctrl 0。
缩放以查看,按Ctrl 1。
要平移,按住空格键,同时用鼠标拖动画布。
要选择画布上的多个元素,请按住Shift键并单击每个元素。2、Mac 快捷键:
放大,按Ctrl =。缩小,按Ctrl -。
适应,按Ctrl 0。
缩放以查看,按Ctrl 1。
- 要平移,按住空格键,同时用鼠标拖动画布。
要选择画布上的多个元素,请按住Shift或Command并单击每个元素。
- 要平移,按住空格键,同时用鼠标拖动画布。
- 构建Flow步骤
- 添加一个Screen来收集用户输入
- From the toolbox, drag a Screen element onto the canvas.
- Name it New Account in the Label field.
- In Screen Components, click Text and then click Text again.
- Select the first Text screen component and enter Account Name in the Label field.
- Select the second Text screen component and enter Phone Number in the Label field.
- Select the footer and on the right and under Control Navigation, deselect Previous and Pause.

- Click Done.
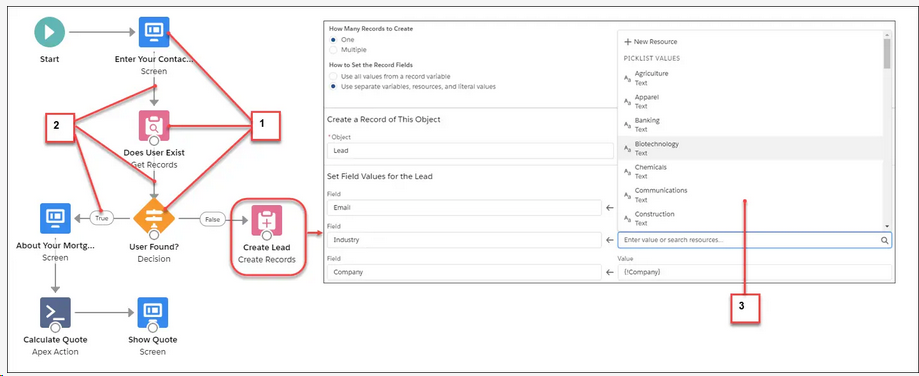
- 添加Create Record元素来创建记录
- From the Toolbox, drag a Create Records element onto the canvas. Name it Create Account.
- For How to Set the Record Fields, select Use separate variables, resources, and literal values.
- In Create a Record of This Object, in Object, select Account.
- In Field, select Name.
- In Value, select SCREEN COMPONENTS | Account_Name.
- Click Add Field.
- In Field, select Phone.
- In Value, select SCREEN COMPONENTS | Phone_Number.
- In Store Account ID in Variable, select New Resource from the Variable dropdown. The New Resource window appears.
- In Resource Type, select Variable.
- Name the API Account_Id.
- In Data Type, select Text.
- Click Done.
- In Store Account ID in Variable, select VARIABLES | Account_Id from the Variable dropdown. Make sure that your Create Records element looks like this.
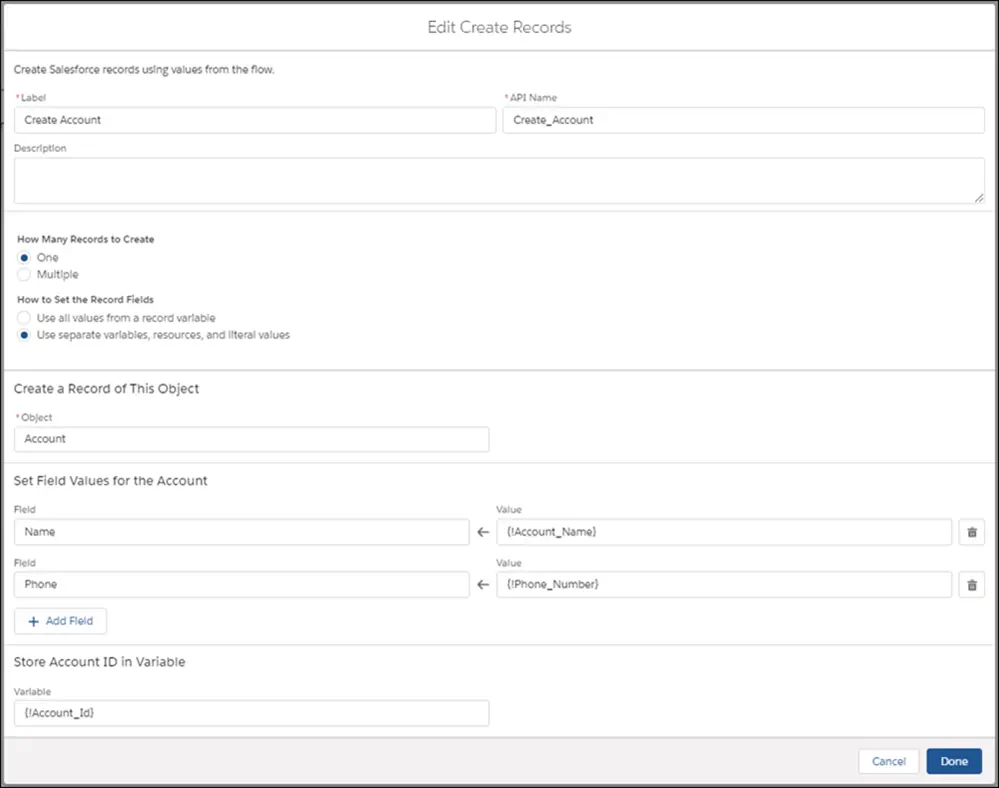
- Click Done.
- 创建能够上传文件的界面
- Drag another Screen element onto the canvas.
- In Screen Properties, configure these settings.
- Name the screen Upload Files in the Label field.
- Under Control Navigation, deselect Previous and Pause.
- If you don't make that selection users will be able to navigate back to the first screen, and multiple accounts could accidentally be created.
- On the left in Screen Components, click File Upload.
- For API Name, enter accountFiles.
- For File Upload Label, enter Upload Related Files.
- For Related Record ID, select VARIABLES | Account_Id.
- For Allow Multiple Files, select $GlobalConstant.True.
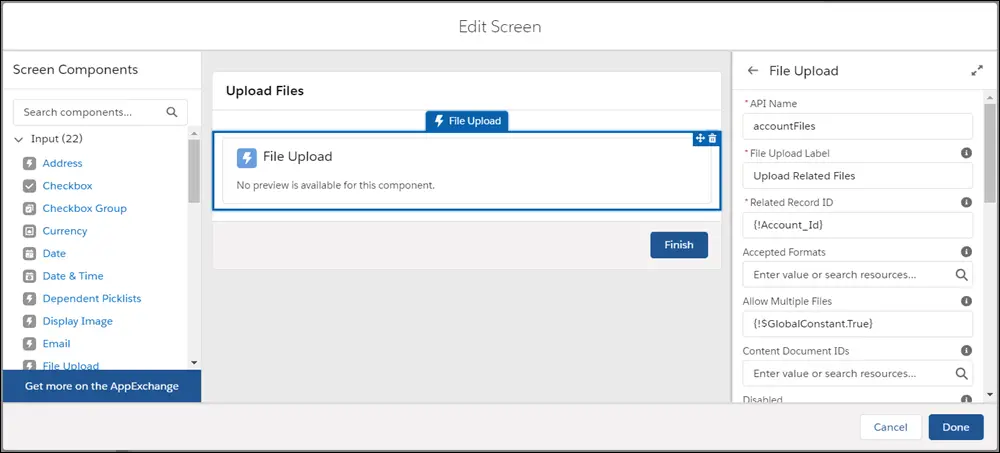
- Click Done.
- 连接元素以及完成流程
- Click the node at the bottom of Start and drag it to New Account.
- Click the node at the bottom of New Account and drag it to Create Account.
- Click the node at the bottom of Create Account and drag it to Upload Files.

- Save the flow, name it Quick Account in Flow Label, and set the type to Screen Flow.
- Click Save.
Skip the warning you see about Lightning runtime. We talk about that next.
- 让你的Flows更像Lightning
Salesforce提供了两种运行时体验,它们决定了某人在运行Flow的样子和感觉。让你的Flows融入到Lightning Experience,确保你在Lightning已启用了这个Flows。
- From Setup, enter Automation in the Quick Find box, and then select Process Automation Settings.
- Verify that Enable Lightning runtime for flows is selected.
- Save your changes.
Distribute Your Flow (分配你的Flow)
- 将Flow分配给用户。
- 要了解更多关于Flow的分配,请参考Screen Flow Distribution模块。
- Activate Your Flow(激活你的Flow)
- From Setup, enter Flows in the Quick Find box, then select Flows.
- Click Quick Account.
- Find the appropriate version of the flow, and select Activate in the Action column.
- Add Your Flow to the Home Page(添加你的Flow到Home Page中)
- Create a home page.
- From Setup, enter Builder in the Quick Find checkbox, and then select Lightning App Builder.
- Click New.
- Select Home Page and click Next.
- Give the page a name and click Next.
- Click CLONE SALESFORCE DEFAULT PAGE, select Home Page Default, and click Finish.
- Drag a Flow component to the top of the right column

- For Flow, select Quick Account.
- Save your changes and activate the page. Mark this page as the default home page and click Save.
- To see your flow in action, go to your Home page.
- Click Back to return to Setup.
- Click
 , and under All Items, click Home.

- Make Sure Your Users Can Run the Flow
- Create a home page.
- 添加一个Screen来收集用户输入
Salesforce Lightning Builder Flows (Salesforce Lightning 构建Flows)的更多相关文章
- salesforce lightning零基础学习(二) lightning 知识简单介绍----lightning事件驱动模型
看此篇博客前或者后,看一下trailhead可以加深印象以及理解的更好:https://trailhead.salesforce.com/modules/lex_dev_lc_basics 做过cla ...
- Salesforce LWC学习(一)Salesforce DX配置
LWC: Create a Salesforce DX Project and Lightning Web Component:https://www.youtube.com/watch?v=p268 ...
- Salesforce LWC学习(六) @salesforce & lightning/ui*Api Reference
上一篇中我们在demo中使用了很多的 @salesforce 以及 lightning/ui*Api的方法,但是很多没有细节的展开.其实LWC中针对这些module提供了很多好用的方法,下面对这两种进 ...
- Salesforce LWC学习(二十三) Lightning Message Service 浅谈
本篇参考: https://trailhead.salesforce.com/content/learn/superbadges/superbadge_lwc_specialist https://d ...
- iOS开发~interface Builder(简称 IB) 界面构建器
1.interface Builder 设置界面 1.1 是什么? 一个可视化的界面编辑工具软件,在xcode4之后整合到了xcode中 1.2 作用? 通过可视化的界面设置,能够少写或不写代码而完成 ...
- salesforce lightning零基础学习(一) lightning简单介绍以及org开启lightning
lightning对于开发salesforce人员来说并不陌生,即使没有做过lightning开发,这个名字肯定也是耳熟能详.原来的博客基本都是基于classic基于配置以及开发,后期博客会以ligh ...
- salesforce lightning零基础学习(三) 表达式的!(绑定表达式)与 #(非绑定表达式)
在salesforce的classic中,我们使用{!expresion}在前台页面展示信息,在lightning中,上一篇我们也提及了,如果展示attribute的值,可以使用{!v.expresi ...
- salesforce lightning零基础学习(十一) Aura框架下APP构造实现
前面的一些lightning文章讲述了aura的基础知识,aura封装的常用js以及aura下的事件处理.本篇通过官方的一个superbadge来实现一个single APP的实现. superbad ...
- Salesforce Lightning开发学习(一)Hello World开发实践
一:什么是Lightning Component framework Lightning Component framework 简称Lightning,是Salesforce封装的一个前端框架,开发 ...
随机推荐
- 关于HTMl CSS
HTML 结构 CSS 表现 JS 行为 首先说一个SEO,搜索引擎优化 标准文档流:(1)前提:在没有css的干预下 (2)块级元素:独占一行,可定义宽和 ...
- RAID阵列盘有一块状态变为外来处理方法
感谢: https://blog.csdn.net/cmzsteven/article/details/63680933
- 第十节 集合类Collection和Map
接口 Collection<E> (E)代表类型 集合类: 与数组的异同: 数组:数组虽然也可以存储对象,但长度是固定的:集合的长度是可变的,数组中可以存储基本数据类型,集合只能存储对象 ...
- poj1002总结
1.之前一直是runtime error,没有找出具体原因,把冒牌排序改成了合并排序,当输入是100000行时,从大约10s变到1s内 2.感觉是atoi指针导致的,当判断atoi的入参不为NULL时 ...
- Linux安装软件、python开发环境
软件安装与卸载 更新Ubuntu软件下载地址 1. 寻找国内镜像源 所谓的镜像源:可以理解为提供下载软件的地方,比如Android手机上可以下载软件的91手机助手:iOS手机上可以下载软件的AppSt ...
- 关于synchronized的同步操作
一般有两种方法 同步方法和同步代码块 假设P1.P2是同一个类的不同对象,这个类中定义了以下几种情况的同步块或同步方法,P1.P2就都可以调用它们. 1. 把synchronized当作函数修饰符时, ...
- .Net Core+Angular6 学习 第四部分(EF Core(Code First))
目的: 打算通过EF core 练习从database receive data 显示到UI. 1. 创建一个新的project Model.定义一个 base interface entity以及实 ...
- [转载] java多线程总结(一)
转载自:http://www.cnblogs.com/lwbqqyumidi/p/3804883.html 作者:Windstep 多线程作为Java中很重要的一个知识点,在此还是有必要总结一下的. ...
- .NET并行计算和并发8:硬件支持
共享内存多核系统,分布式内存系统 区别 分布式内存系统主要通过Message passing interface在各个微处理器之间通信,但是MPI共享内存多核系统是没有必要的,会造成额外的开销. 分布 ...
- 运维ip语法,DNS配置方法
修改配置文件: /etc/resolv.conf nameserver DNS_IP_1 nameserver DNS_IP_2 nameserver 指定本机解析: /etc/hosts 主机IP ...