
第八章 nginx基础介绍
一、nginx概述
nginx是一个开源且高性能、可靠的http web服务、代理服务。
开源:直接获取源代码
高性能:支持海量并发
可靠:服务稳定
二、nginx特点
1.高性能高并发
性能高,支持海量并发,当并发特别高的时候,nginx比其他的web服务响应速度快
2.轻量且高扩展性
功能模块多,但仅需要保留必要的模块
需要哪个模块添加哪个模块,可以兼容第三方模块
3.高可靠性
很多web服务跑一段时间后需要重启,nginx不需要nginx支持宕机时间级别为9999、99999
4.支持热部署
nginx可以在开机情况下进行升级和重启
5.互联网公司使用nginx
nginx技术成熟,可以做负载,web,缓存
6.nginx支持epool网络类型
1)epool:当用户发起请求,直接对请求的内容进行处理
Epool: 当用户发起请求,epool模型会直接进行处理,效率高效,并无连接限制。
2)select:当用户发起请求,先遍历扫描数据,然后对请求的内容进行处理
Select: 当用户发起一次请求,select模型就会进行一次遍历扫描,从而导致性能低下。
三、其他的web服务
1.apache:最早使用的web服务,难以掌握,性能不高
2.nginx
1)Tengine:淘宝根据nginx进一步开发得到的服务
2)openresty:是一个基于 Nginx 与 Lua 的高性能 Web 平台
3.lighttpd:消耗的内存和cpu较低
4.IIS:windows的web服务
5.GWS:Google web server
6.BWS:baidu web server
四、nginx的应用场景
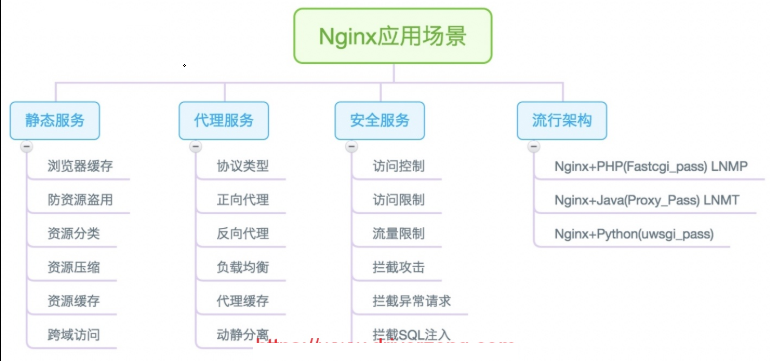
五、nginx安装
1.epel源安装
[root@web01 ~]# yum install -y nginx
2.官方源安装
1.配置官方源
[root@web02 ~]# vim /etc/yum.repos.d/nginx.repo
[nginx-stable]
name=nginx stable repo
baseurl=http://nginx.org/packages/centos/7/$basearch/
gpgcheck=1
enabled=1
gpgkey=https://nginx.org/keys/nginx_signing.key
module_hotfixes=true
2.安装依赖
[root@web02 ~]# yum install -y gcc gcc-c++ autoconf pcre pcre-devel make automake wget httpd-tools vim tree
3.安装nginx
[root@web02 ~]# yum install -y nginx
4.启动服务
[root@web02 ~]# systemctl start nginx
#或者
[root@web02 ~]# nginx
5.检验启动
#方式一:
[root@web02 ~]# ps -ef | grep nginx
#方式二:
[root@web02 ~]# netstat -lntp | grep 80
#方式三:
访问页面 10.0.0.8:80
#方式四:
#查看版本
[root@web02 ~]# nginx -v
#查看安装模块
[root@web02 ~]# nginx -V
3.nginx常用命令
1.启动命令
[root@web02 ~]# systemctl start nginx
#或者
[root@web02 ~]# nginx
#注意,使用哪种方式启动就用哪种方式关闭
2.关闭命令
[root@web02 ~]# systemctl stop nginx
#或者
[root@web02 ~]# nginx -s stop
3.nginx重启
[root@web02 ~]# systemctl restart nginx
4.nginx重载配置文件
[root@web02 ~]# systemctl reload nginx
#或者
[root@web02 ~]# nginx -s reload
5.检查nginx配置
[root@web01 ~]# nginx -t
nginx: the configuration file /etc/nginx/nginx.conf syntax is ok
nginx: configuration file /etc/nginx/nginx.conf test is successful
6.加入开机自启
[root@web01 ~]# systemctl enable nginx
Created symlink from /etc/systemd/system/multi-user.target.wants/nginx.service to /usr/lib/systemd/system/nginx.service.
7.CentOS6操作
#启动
[root@web01 ~]# nginx
[root@web01 ~]# /etc/init.d/nginx start
[root@web01 ~]# service nginx start
#配置开机自启
[root@web01 ~]# chkconfig nginx on
4.源码包安装
1.安装依赖
[root@web03 ~]# yum install -y gcc gcc-c++ autoconf pcre pcre-devel make automake wget httpd-tools vim tree
2.下载或上传源码包
[root@web03 ~]# wget http://nginx.org/download/nginx-1.18.0.tar.gz
#或者
[root@web03 ~]# rz nginx-1.18.0.tar.gz
3.解压
[root@web03 ~]# tar xf nginx-1.18.0.tar.gz
4.创建用户
[root@web03 ~]# groupadd www -g 666
[root@web03 ~]# useradd www -u 666 -g 666
5.生成编译文件
[root@web03 ~]# cd nginx-1.18.0/
[root@web03 ~/nginx-1.18.0]# ./configure --prefix=/usr/local/nginx-1.18.0 --user=www --group=www --with-http_addition_module --with-http_auth_request_module --without-http_gzip_module
6.编译安装
[root@web03 ~/nginx-1.18.0]# make && make install
7.配置system管理
[root@web03 ~]# vim /etc/systemd/system/nginx.service
[Unit]
Description=nginx - high performance web server
After=network.target remote-fs.target nss-lookup.target
[Service]
Type=forking
ExecStart=/usr/local/nginx/sbin/nginx -c /usr/local/nginx/conf/nginx.conf
ExecReload=/usr/local/nginx/sbin/nginx -s reload
ExecStop=/usr/local/nginx/sbin/nginx -s stop
[Install]
WantedBy=multi-user.target
8.做软连接
[root@web03 ~]# ln -s /usr/local/nginx-1.18.0 /usr/local/nginx
#配置环境变量
[root@web03 ~]# cat /etc/profile.d/nginx.sh
export PATH=/usr/local/nginx/sbin/:$PATH
#软连接的作用:
1)配置环境变量可以不加版本号
2)配置system启动可以不加版本号
3)升级直接切换软连接的链接文件即可
9.启动
[root@web03 ~]# systemctl daemon-reload
[root@web03 ~]# systemctl start nginx
#配置开机自启
[root@web03 ~]# systemctl enable nginx
六、nginx搭建上传作业平台
1.需求
1.使用两种方式安装方式安装nginx
2.搭建交作业页面
2.环境准备
| 主机 | 角色 | IP |
|---|---|---|
| web02 | web服务器 | 10.0.0.8 |
| web01 | web服务器 | 10.0.0.7 |
3.web01使用epol源配置nginx
1.关闭防火墙
[root@web01 ~]# systemctl stop firewalld
[root@web01 ~]# systemctl disable firewalld
2.关闭selinux
[root@web01 ~]# setenforce 0
[root@web01 ~]# vim /etc/selinux/config
SELINUX=disabled
3.安装nginx服务
[root@web01 ~]# yum -y install nginx
4.启动nginx服务并验证服务
[root@web01 ~]# systemctl start nginx
[root@web01 ~]# netstat -lntp
Active Internet connections (only servers)
Proto Recv-Q Send-Q Local Address Foreign Address State PID/Program name
tcp 0 0 0.0.0.0:111 0.0.0.0:* LISTEN 6125/rpcbind
tcp 0 0 0.0.0.0:80 0.0.0.0:* LISTEN 8752/nginx: master
tcp 0 0 0.0.0.0:22 0.0.0.0:* LISTEN 7108/sshd
tcp 0 0 127.0.0.1:25 0.0.0.0:* LISTEN 7249/master
tcp6 0 0 :::111 :::* LISTEN 6125/rpcbind
tcp6 0 0 :::80 :::* LISTEN 8752/nginx: master
tcp6 0 0 :::22 :::* LISTEN 7108/sshd
tcp6 0 0 ::1:25 :::* LISTEN 7249/master
[root@web01 ~]#
5.设置开机自启
[root@web01 ~]# systemctl enable nginx
Created symlink from /etc/systemd/system/multi-user.target.wants/nginx.service to /usr/lib/systemd/system/nginx.serv
6.上传交作业平台压缩包
[root@web01 ~]# rz -bye
[root@web01 ~]# ll
total 36
-rw-------. 1 root root 1350 2020-06-09 21:42 anaconda-ks.cfg
-rw-r--r--. 1 root root 497 2020-08-05 16:53 hostname_ip.sh
-rw-r--r-- 1 root root 26995 2020-08-13 16:42 kaoshi.zip
7.修改nginx配置文件
[root@web01 ~]# vim /etc/nginx/conf.d/zuoye.conf
server {
listen 80;
server_name 10.0.0.7;
location / {
root /zuoye/www;
index index.html index.htm;
}
# access_log logs/www_access.log main;
}
8.修改nginx主配置文件
[root@web01 ~]# vim /etc/nginx/nginx.conf
# For more information on configuration, see:
# * Official English Documentation: http://nginx.org/en/docs/
# * Official Russian Documentation: http://nginx.org/ru/docs/
worker_processes 1;
events {
worker_connections 1024;
}
#error_log logs/error.log error;
http {
include mime.types;
default_type application/octet-stream;
sendfile on;
keepalive_timeout 65;
log_format main '$remote_addr - $remote_user [$time_local] "$request"'
'$status $body_bytes_sent "$http_referer" '
'"$http_user_agent" "$http_x_forwarded_for"';
include conf.d/zuoye.conf;
}
~
9.创建目录
[root@web01 ~]# mkdir -p /zuoye/www
10.解压交作业平台压缩包到指定目录
[root@web01 ~]# unzip kaoshi.zip -d /zuoye/www/
Archive: kaoshi.zip
inflating: /zuoye/www/info.php
inflating: /zuoye/www/bg.jpg
inflating: /zuoye/www/index.html
inflating: /zuoye/www/upload_file.php
11.重启服务
[root@web01 ~]# systemctl restart nginx
4.web02使用官方源配置nginx
1.关闭防火墙
[root@web02 ~]# systemctl stop firewalld
[root@web02 ~]# systemctl disable firewalld
2.关闭selinux
[root@web02 ~]# setenforce 0
[root@web02 ~]# vim /etc/selinux/config
SELINUX=disabled
3.配置官方源
[root@web02 ~]# vim /etc/yum.repos.d/nginx.repo
[nginx-stable]
name=nginx stable repo
baseurl=http://nginx.org/packages/centos/7/$basearch/
gpgcheck=1
enabled=1
gpgkey=https://nginx.org/keys/nginx_signing.key
module_hotfixes=true
4.安装依赖
[root@web02 ~]# yum install -y gcc gcc-c++ autoconf pcre pcre-devel make automake wget httpd-tools vim tree
5.安装nginx
[root@web02 ~]# yum install -y nginx
6.启动nginx服务并验证
[root@web02 ~]# systemctl start nginx
[root@web02 ~]# netstat -lntp
Active Internet connections (only servers)
Proto Recv-Q Send-Q Local Address Foreign Address State PID/Program name
tcp 0 0 0.0.0.0:111 0.0.0.0:* LISTEN 6131/rpcbind
tcp 0 0 0.0.0.0:80 0.0.0.0:* LISTEN 8929/nginx: master
tcp 0 0 0.0.0.0:22 0.0.0.0:* LISTEN 7144/sshd
tcp 0 0 127.0.0.1:25 0.0.0.0:* LISTEN 7283/master
tcp6 0 0 :::111 :::* LISTEN 6131/rpcbind
tcp6 0 0 :::22 :::* LISTEN 7144/sshd
tcp6 0 0 ::1:25 :::* LISTEN 7283/master
7.设置开机自启
[root@web02 ~]# systemctl enable nginx
Created symlink from /etc/systemd/system/multi-user.target.wants/nginx.service to /usr/lib/systemd/system/nginx.serv
8.上传交作业平台压缩包
[root@web02 ~]# rz -bye
[root@web02 ~]# ll
total 36
-rw-------. 1 root root 1350 2020-06-09 21:42 anaconda-ks.cfg
-rw-r--r--. 1 root root 497 2020-08-05 16:53 hostname_ip.sh
-rw-r--r-- 1 root root 26995 2020-08-13 16:42 kaoshi.zip
9.配置nginx服务文件
[root@web02 ~]# vim /etc/nginx/conf.d/zuoye.conf
server {
listen 80;
server_name 10.0.0.8;
location / {
. /zuoye/www;
index index.html index.htm;
}
# access_log logs/www_access.log main;
}
10.创建目录
[root@web02 ~]# mkdir -p /zuoye/www
11.解压交作业平台压缩包到指定目录
[root@web02 ~]# unzip kaoshi.zip -d /zuoye/www/
Archive: kaoshi.zip
inflating: /zuoye/www/info.php
inflating: /zuoye/www/bg.jpg
inflating: /zuoye/www/index.html
inflating: /zu/www/upload_file.php
12.重启服务
[root@web02 ~]# systemctl restart nginx
5.测试
web01能正常访问上传作业平台
web02能正常访问上传作业平台
第八章 nginx基础介绍的更多相关文章
- Nginx基础知识介绍
Nginx基础知识介绍 作者:尹正杰 版权声明:原创作品,谢绝转载!否则将追究法律责任. 一.Nginx概述 Nginx是免费的.开源的.高性能的HTTP和正向/反向代理服务器.邮件代理服务器.以及T ...
- Nginx的介绍和安装详解
[介绍+安装]Nginx的介绍和安装详解 == 介绍和安装 == Nginx是一个自由.开源.高性能及轻量级的HTTP服务器及反转代理服务器, 其性能与IMAP/POP3代理服务器相当.Nginx ...
- Nginx 基础知识学习
资料 基础 掘金-前端开发者必备的Nginx知识 介绍的比较综合,正向代理反向代理的区别.负载均衡等知识,都有介绍 静默虚空-Nginx 简易教程 博客园上的一篇推荐文章 简书-全面了解Nginx到底 ...
- Linux - nginx基础及常用操作
目录 Linux - nginx基础及常用操作 Tengine淘宝nginx安装流程 nginx的主配置文件nginx.conf 基于域名的多虚拟主机实战 nginx的访问日志功能 网站的404页面优 ...
- Web服务基础介绍
Web服务基础介绍 作者:尹正杰 版权声明:原创作品,谢绝转载!否则将追究法律责任. 一.正常情况下的单次web服务访问流程 博主推荐阅读: https://www.cnblogs.com/yinzh ...
- Nginx基础详细讲解
Nginx基础详细讲解 链接:https://pan.baidu.com/s/1xB20bnuanh0Avs4kwRpSXQ 提取码:migq 复制这段内容后打开百度网盘手机App,操作更方便哦 1. ...
- nginx基础概念
nginx基础概念(100%) connection¶ 在nginx中connection就是对tcp连接的封装,其中包括连接的socket,读事件,写事件.利用nginx封装的connection, ...
- Nginx-->基础-->理论-->002:Nginx进程介绍
一.Nginx进程介绍
- Nginx-->基础-->理论-->001:Nginx基本介绍
一.nginx基本介绍 传统上基于进程或者线程模型架构的web服务通过每进程或者每线程处理并发连接请求,这势必毁在网络和I/O操作时产生阻塞,其另外一个必然结果则是对内存和CPU的利用率低下,产生一个 ...
随机推荐
- xss中shellcode的调用
shellcode就是利用漏洞所执行的代码 在完整的xss攻击之中,会将shellcode存放在一定的地方,然后触发漏洞,引发shellcode. 1.远程调用执行js 可将js代码单独放在一个js文 ...
- 什么是Lambda架构
一.Lambda架构需求 Lambda架构背后的需求是由于MR架构的延迟问题.MR虽然实现了分布式.可扩展数据处理系统的目的,但是在处理数据时延迟比较严重.实际上如果内存和CPU足够强大,MR也可以实 ...
- java时间日期的运用
我们在使用QQ.微信等应用时,我们的手机会提示该消息时在过去的某个时间发送的,我们如何运用JAVA来实现这个功能呢? 代码如下: public class Time { public static v ...
- Alibaba内部SpringCloud参考笔记,在GitHub一天就标星81.6k?
前言 阿里巴巴,作为国内互联网公司的Top,算是业界的标杆,有阿里背景的程序员,也更具有权威性.作为程序员,都清楚阿里对于员工要求有多高,技术人员掌握的技术水平更是望尘莫及.所以,大厂程序员的很多经验 ...
- C# winform 打包成安装程序(exe)
C# 打包成安装程序 1.扩展-> 安装扩展 联网搜索 install 2.新建安装程序项目 3.添加程序 4.添加打包需要的文件 5. 添加x86与x64文件夹,并添加s ...
- Win10环境下Hadoop(单节点伪分布式)的安装与配置--bug(yarn的8088端口打不开+)
一.本文思路 [1].配置java环境–JDK12(Hadoop的底层实现语言是java,hadoop运行需要JDK环境) [2].安装Hadoop 1.解压hadop 2.配置hadoop环境变量 ...
- 虚拟机系列 | JVM类加载机制
本文源码:GitHub·点这里 || GitEE·点这里 一.类加载简介 类的加载机制是指把编译后的.class类文件的二进制数据读取到内存中,并为之创建一个java.lang.Class对象,用来封 ...
- C++实现职工管理系统(中)
C++实现职工管理系统(中) 大家好,今天是在博客园的第九天,博主今天给大家带来的是职工管理系统(C++)(中) 这次的随笔记录是实现(上)结语处说的几个功能 目录 C++实现职工管理系统(中) 1. ...
- python 魔法方法诠释
什么是Python魔法方法 什么是魔法方法呢?它们在面向对象的Python的处处皆是.它们是一些可以让你对类添加"魔法"的特殊方法. 它们经常是两个下划线包围来命名的(比如 ini ...
- idea如何通过数据库生成实体类
---恢复内容开始--- https://blog.csdn.net/liu_yulong/article/details/72910588 ---恢复内容结束---