
SpringBoot Web 学习
SpringBoot Web 开发
静态资源
打开WebMvcAutoConfiguration类里面的静态类WebMvcAutoConfigurationAdapter里面的addResourceHandlers()方法
@Override

public void addResourceHandlers(ResourceHandlerRegistry registry) {

    // 有没有自定义配置

    if (!this.resourceProperties.isAddMappings()) {

        logger.debug("Default resource handling disabled");

        return;

    }

    Duration cachePeriod = this.resourceProperties.getCache().getPeriod();

    CacheControl cacheControl = this.resourceProperties.getCache().getCachecontrol().toHttpCacheControl();

    // 1. WebJars 方式, 只需要输入 /webjars/**

    if (!registry.hasMappingForPattern("/webjars/**")) {

        customizeResourceHandlerRegistration(registry.addResourceHandler("/webjars/**")

                .addResourceLocations("classpath:/META-INF/resources/webjars/")

                .setCachePeriod(getSeconds(cachePeriod)).setCacheControl(cacheControl)

                .setUseLastModified(this.resourceProperties.getCache().isUseLastModified()));

    }

    // 2. 获得静态资源的路径

    String staticPathPattern = this.mvcProperties.getStaticPathPattern();

    if (!registry.hasMappingForPattern(staticPathPattern)) {

        customizeResourceHandlerRegistration(registry.addResourceHandler(staticPathPattern)

                .addResourceLocations(getResourceLocations(this.resourceProperties.getStaticLocations()))

                .setCachePeriod(getSeconds(cachePeriod)).setCacheControl(cacheControl)

                .setUseLastModified(this.resourceProperties.getCache().isUseLastModified()));

    }

}
1、 WebJars (一般不使用)
WebJars 官网
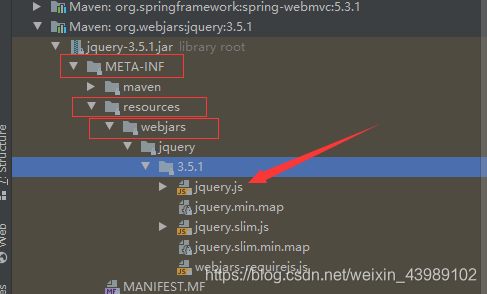
访问资源路径: /webjars/** 映射到 classpath:/META-INF/resources/webjars/
访问路径:http://localhost:8080/webjars/**
测试
可以使用Maven 引入 JQuery.
<dependency>

    <groupId>org.webjars</groupId>

    <artifactId>jquery</artifactId>

    <version>3.5.1</version>

</dependency>
如果你要访问 jquery 相当于你只要输入 : http://localhost:8080/webjars/jquery/3.5.1/jquery.js 就可以访问到。
2、 获得静态资源路径
getStaticPathPattern() 码源为:
public String getStaticPathPattern() {

     return this.staticPathPattern;

 }

// 点进 staticPathPattern

/**

 * Path pattern used for static resources.

 */

private String staticPathPattern = "/**";
WebMvcAutoConfiguration类里面的静态类WebMvcAutoConfigurationAdapter类码源:
@EnableConfigurationProperties({ WebMvcProperties.class,

        org.springframework.boot.autoconfigure.web.ResourceProperties.class, WebProperties.class })

public static class WebMvcAutoConfigurationAdapter implements WebMvcConfigurer {

    ....

}

// 点进 WebProperties 配置类

@ConfigurationProperties("spring.web")

public class WebProperties {

    public static class Resources {

        private static final String[] CLASSPATH_RESOURCE_LOCATIONS = { "classpath:/META-INF/resources/",

                "classpath:/resources/", "classpath:/static/", "classpath:/public/" };

        /**

         * Locations of static resources. Defaults to classpath:[/META-INF/resources/,

         * /resources/, /static/, /public/].

         */

        private String[] staticLocations = CLASSPATH_RESOURCE_LOCATIONS;

    }

}
访问资源路径:/** 映射到 “classpath:/META-INF/resources/”, “classpath:/resources/”, “classpath:/static/”, “classpath:/public/”
这4个目录都能够被识别到
访问路径:http://localhost:8080/**
优先级: public < static(默认) < resources
3、 自定义配置 (一般不配置,使用第二种默认的)
application.properties
spring.mvc.static-path-pattern=/xxxx
首页
EnableWebMvcConfiguration类的内部类EnableWebMvcConfiguration码源:
@Bean

public WelcomePageHandlerMapping welcomePageHandlerMapping(ApplicationContext applicationContext,

        FormattingConversionService mvcConversionService, ResourceUrlProvider mvcResourceUrlProvider) {

    WelcomePageHandlerMapping welcomePageHandlerMapping = new WelcomePageHandlerMapping(

            new TemplateAvailabilityProviders(applicationContext), applicationContext, getWelcomePage(),

            this.mvcProperties.getStaticPathPattern());// this.mvcProperties.getStaticPathPattern() 获取自定义的配置

    welcomePageHandlerMapping.setInterceptors(getInterceptors(mvcConversionService, mvcResourceUrlProvider));

    welcomePageHandlerMapping.setCorsConfigurations(getCorsConfigurations());

    return welcomePageHandlerMapping;

}

    ....

private Optional<Resource> getWelcomePage() {

    // this.resourceProperties.getStaticLocations() 点进去是系统定义的4个静态资源目录

    String[] locations = getResourceLocations(this.resourceProperties.getStaticLocations());

    return Arrays.stream(locations).map(this::getIndexHtml).filter(this::isReadable).findFirst();

}

private Resource getIndexHtml(String location) {

    // 在静态资源目录下找 index.html ,返回首页

    return this.resourceLoader.getResource(location + "index.html");

}
所以将 index.html 放在静态资源目录下即可直接访问到。
在 templates 目录下的所有页面,只能通过 Controller 来跳转。需要模板引擎的支持。(thymeleaf)
Thymeleaf 模板引擎
什么是 Thymeleaf ?
Thymeleaf是适用于Web和独立环境的现代服务器端Java模板引擎,能够处理HTML,XML,JavaScript,CSS甚至纯文本。
jsp 就是一个模板引擎。
Thymeleaf 官网
Thymeleaf Github
SpringBoot Start
需要带入依赖:
<!-- Thymeleaf : 基于 3.x 开发 -->

<dependency>

    <groupId>org.springframework.boot</groupId>

    <artifactId>spring-boot-starter-thymeleaf</artifactId>

</dependency>
导入的东西都有xxxProperties自动配置类,查看 Thymeleaf 的自动配置类:ThymeleafProperties的源码:
@ConfigurationProperties(prefix = "spring.thymeleaf")

public class ThymeleafProperties {

	private static final Charset DEFAULT_ENCODING = StandardCharsets.UTF_8;

        // 默认前缀

	public static final String DEFAULT_PREFIX = "classpath:/templates/";

        // 默认后缀

	public static final String DEFAULT_SUFFIX = ".html";

        ...

}
测试在 templates 目录下新建 test.html, 编写 Controller:
@Controller

public class IndexController {

    @RequestMapping("/test")

    public String index(){

        return "test";

    }

}
输入 http://localhost:8080/test 即可访问到。
Thymeleaf 基础语法 (另外再自学吧,淦!)
所有的 html 元素都可以被 thymeleaf 替换接管: th:元素名
导入命名空间
<html xmlns:th="http://www.thymeleaf.org">
属性优先级:
| Order | Feature | Attributes | |
|---|---|---|---|
| 1 | Fragment inclusion | th:insert、th:replace | |
| 2 | Fragment iteration | th:each | |
| 3 | Conditional evaluation | th:if、th:unless、th:switch、th:case | |
| 4 | Local variable definition | th:object、th:with | |
| 5 | General attribute modification | th:attr、th:attrprepend、th:attrappend | |
| 6 | Specific attribute modification | th:value、th:href、th:src、… | |
| 7 | Text (tag body modification) | th:text、th:utext | |
| 8 | Fragment specification | th:fragment | |
| 9 | Fragment removal | th:remove |
1、 简单变量
- 变量表达式: ${…}
<div th:text="${msg}"></div>
- 选择表达式: *{…}
<div th:object="${session.user}">

    <p>Name: <span th:text="*{name}"></span></p>

    <p>Age: <span th:text="*{age}"></span></p>

    <p>Sex: <span th:text="*{sex}"></span></p>

</div>

<!-- 等价于 -->

<div>

    <p>Name: <span th:text="${session.user.name}"></span></p>

    <p>Age: <span th:text="${session.user.age}"></span></p>

    <p>Sex: <span th:text="${session.user.sex}"></span></p>

</div>
消息表达式: #{…}
用于国际化链接表达式: @{…}
<a th:href="@{test.html}">Content 路径,默认访问静态资源目录下的文件</a>
- 片段表达式: ~{…} (模板插入: th:insert, th:replace)
<!--侧边栏-->

<nav th:fragment="sidebarMenu">...</nav>

<!-- 侧边栏插入 -->

<div th:insert="~{文件名::sidebarMenu}"></div>
templates/conmons/commons.html

<nav th:fragment="sidebarMenu">...</nav>

<!-- 使用界面的侧边栏引入 -->

<div th:replace="~{commons/commons::sidebarMenu}"></div>
2、 文字
- 文本文字(单引号): ‘one text’, ‘Another one!’,…
- 数字: 0, 34, 3.0, 12.3,…
- 布尔值: true, false
- 空值: null
3、 文本操作:
- 文本连接符: +
- 文本替换 : |The name is ${name}|
4、比较运算符:
- 比较: >, <, >=, <= (gt, lt, ge, le)
- 相等: ==, != (eq, ne)
5、条件运算符:
- If-then: (if) ? (then)
- If-then-else: (if) ? (then) : (else)
- Default: (value) ?: (defaultvalue)
6、 循环
th:each
<tr th:each="user,iterStat : ${users}">

    <td th:text="${user.name}"></td>

    <td th:text="${user.age}"></td>

    <td th:text="${user.sex}"></td>

</tr>
iterStat 对象包含以下属性:
- index,从0开始的角标
- count,元素的个数,从1开始
- size,总元素个数
- current,当前遍历到的元素
- even/odd,返回是否为奇偶,boolean值
- first/last,返回是否为第一或最后,boolean值
MVC 配置原理
官方文档
Spring Boot为Spring MVC提供了自动配置,适用于大多数应用程序。
自动配置在 Spring 的默认值之上添加了以下功能:
- 包含
ContentNegotiatingViewResolver和BeanNameViewResolverbeans。 - 支持提供静态资源,包括对 WebJars 的支持。
- 自动注册
Converter,GenericConverter和Formatterbeans。 - 支持
HttpMessageConverters。 - 自动注册
MessageCodesResolver。 - 静态
index.html支持。 - 自动使用
ConfigurableWebBindingInitializerbean。
如果你想保留 Spring Boot MVC 功能,并且你想添加额外的 MVC 配置(拦截器,格式化程序,视图控制器和其他功能),你可以编写自己 MVC配置类 添加上@Configuration注解,并且这个配置类的类型必须为WebMvcConfigurer类(他是一个接口类,实现即可) 但不加@EnableWebMvc注解。
如果您想完全控制 Spring MVC,可以添加注释@EnableWebMvc。
初体验
自定义一个视图解析器
// 扩展 Spring MVC

@Configuration

public class MyNvcConfig implements WebMvcConfigurer {

    // ContentNegotiatingViewResolver ——> ViewResolver 实现了视图解析器接口,我们就可以把他看做视图解析器

    // 放入到 Spring 容器中

    @Bean

    public ViewResolver myViewResolver(){

        return new MyViewResolver();

    }

    // 自定义一个视图解析器 MyViewResolver

    public static class MyViewResolver implements ViewResolver {

        @Override

        public View resolveViewName(String viewName, Locale locale) throws Exception {

            return null;

        }

    }

}
所有的请求都会经过DispatcherServlet类,在此类源码的一下方法打上断点。 debug 启动 SpringBoot
protected void doDispatch(HttpServletRequest request, HttpServletResponse response)
可以看到自己写的视图解析器配置类:

如果需要自定义一些功能,只需要写组件,然后将它交给 SpringBoot,SpringBoot会帮我们自动装配。
首页跳转实现
输入:http://localhost:8080/index.html、http://localhost:8080/都会跳转到 index.html
@Configuration

public class MyMvcConfig implements WebMvcConfigurer {

    @Override

    public void addViewControllers(ViewControllerRegistry registry) {

        // 首页跳转实现

        registry.addViewController("/").setViewName("index");

        registry.addViewController("/index.html").setViewName("index");

    }

}
国际化
在 static 目录下新建 i18n(internationalization的缩写,中间有18个字母) 文件夹,新建 login.properties 文件,再建一个 login_zh_CN.properties 文件
IDEA 会自动生成 ResourceBundle ‘login’ 文件夹,右击可以新建其他语言的配置文件


打开某个配置文件,点击编辑器底部的 ResourceBundle ,即可同时编写三个文件。
自动配置类:MessageSourceAutoConfiguration
配置文件:
# 国际化配置文件位置

spring.messages.basename=i18n.login
html: 使用 Thymeleaf 的 #{xxx} 获取,链接传递的参数:@{/index.html(l=‘zh_CN’)}
<body class="text-center">
<form class="form-signin">
<img class="mb-4" th:src="@{/img/bootstrap-solid.svg}" alt="" width="72" height="72">
<h1 class="h3 mb-3 font-weight-normal" th:text="#{login.tip}">Please sign in</h1>
<label for="inputEmail" class="sr-only" th:text="#{login.username}">Username</label>
<input type="text" id="inputEmail" class="form-control" th:placeholder="#{login.username}" required autofocus>
<label for="inputPassword" class="sr-only" th:text="#{login.password}">Password</label>
<input type="password" id="inputPassword" class="form-control" th:placeholder="#{login.password}" required>
<div class="checkbox mb-3">
<label>
<input type="checkbox" value="remember-me" th:text="#{login.remember}">
</label>
</div>
<button class="btn btn-lg btn-primary btn-block" type="submit" th:text="#{login.btn}">Sign in</button>
<p class="mt-5 mb-3 text-muted">© 2017-2020</p>
<a class="btn btn-sm" th:href="@{/index.html(l='zh_CN')}">中文</a>
<a class="btn btn-sm" th:href="@{/index.html(l='en_US')}">English</a>
</form>
</body>
如果需要按钮进行切换,需要自定义一个组件:MyLocaleResolver
public class MyLocaleResolver implements LocaleResolver {

    // 解析请求

    @Override

    public Locale resolveLocale(HttpServletRequest request) {

        // 获得请求的语言参数

        String language = request.getParameter("l");

        Locale locale = Locale.getDefault(); // 如果没有,就是用默认的

        // 如果请求的连接携带了国际化的参数

        if (!StringUtils.isEmpty(language)){

            // zh_CN

            String[] split = language.split("_");

            // 国家,地区

            locale = new Locale(split[0], split[1]);

        }

        return locale;

    }

    @Override

    public void setLocale(HttpServletRequest request, HttpServletResponse response, Locale locale) {}

}
将自己的组件注册到 Spring 容器中:@Bean
// MyMvcConfig.java

// 注入Bean 自定义国际化组件

@Bean

public LocaleResolver localeResolver(){

    return new MyLocaleResolver();

}
登录功能实现
html :
<form class="form-signin" th:action="@{/user/login}" method="post">

    ...

    <h1 class="h3 mb-3 font-weight-normal" th:text="#{login.tip}">Please sign in</h1>

  	<!-- 如果msg不为空则显示 -->

  	<p style="color: red;" th:text="${msg}" th:if="${not #strings.isEmpty(msg)}"></p>

    ...

</form>
LopginController:
@Controller

public class LoginController {

    @RequestMapping("/user/login")

    public String login(

            @RequestParam("username") String username,

            @RequestParam("password") String password,

            Model model,

    		HttpSession session){

        // 具体业务

        if (!StringUtils.isEmpty(username) && "123".equals(password)){

            session.setAttribute("loginUser", username);

            return "redirect:/main.html";

        }else {

            // 告诉用户,登录失败

            model.addAttribute("msg", "用户或密码错误!");

            return "index";

        }

    }

}
路径映射:MyMvcConfig的addViewControllers()方法 (重定向到 /main.html 会跳转到 dashboard.html 这个模板)
@Configuration

public class MyMvcConfig implements WebMvcConfigurer {

    @Override

    public void addViewControllers(ViewControllerRegistry registry) {

		...

        registry.addViewController("/main.html").setViewName("dashboard");

    }

}
登录拦截器
编写登录拦截器:LoginHandlerInterceptor
public class LoginHandlerInterceptor implements HandlerInterceptor {

    @Override

    public boolean preHandle(HttpServletRequest request, HttpServletResponse response, Object handler) throws Exception {

        // 登录成功之后应该有用户的 session

        Object loginUser = request.getSession().getAttribute("loginUser");

        // 没有登录

        if (loginUser == null){

            request.setAttribute("msg", "没有权限,请先登录!");

            request.getRequestDispatcher("/index.html").forward(request, response);

            return false;

        } else {

            return true;

        }

    }

}
配置中注册拦截器:MyMvcConfig
@Override

public void addInterceptors(InterceptorRegistry registry) {

    registry.addInterceptor(new LoginHandlerInterceptor())

        .addPathPatterns("/**")

        .excludePathPatterns("/index.html", "/", "/user/login",

                             "/js/**",      // js静态资源

                             "/css/**",     // css静态资源

                             "/img/**"      // img静态资源

                            );

}
Thymeleaf代码复用
templates/conmons/commons.html 存放模板代码, 使用th:fragment="id"进行标记。
<nav th:fragment="topBar">...</nav>
templates/xxx.html 使用时,使用th:replace="~{路径::id}"进行引用。
<!-- 项目导航栏 -->

<div th:replace="~{commons/commons::topBar}"></div>
如果需要传递参数,可以直接使用()传参,接收判断
<!-- 传递参数给组件 -->

<div th:replace="~{commons/commons::sidebarMenu(active='main.html')}"></div>

<!-- 接收判断 -->

<a th:class="${active=='main.html'? 'nav-link active' : 'nav-link'}" th:href="@{/index.html}">...</a>
员工列表循环显示:
<thead>

    <tr>

        <th>id</th>

        <th>lastName</th>

        <th>email</th>

        <th>gender</th>

        <th>department</th>

        <th>birth</th>

        <th>操作</th>

    </tr>

</thead>

<tbody>

    <tr th:each="emp: ${employees}">

        <td th:text="${emp.getId()}"></td>

        <td th:text="${emp.getLastName()}"></td>

        <td th:text="${emp.getEmail()}"></td>

        <td th:text="${emp.getGender()==0 ? '女' : '男' }"></td>

        <td th:text="${emp.getDepartment().getName()}"></td>

        <td th:text="${#dates.format(emp.getBirth(), 'yyyy-MM-dd HH:mm:ss')}"></td>

        <td>

            <button class="btn btn-sm btn-primary">编辑</button>

            <button class="btn btn-sm btn-danger">删除</button>

        </td>

    </tr>

</tbody>

</table>
停了超长时间,继续都摸不着头脑了
1、添加员工
<form th:action="@{/emp}" method="post">

    <div class="form-group">

        <label>LastName</label>

        <input name="lastName" type="text" class="form-control" placeholder="面包">

    </div>

    <div class="form-group">

        <label>Email</label>

        <input name="email" type="email" class="form-control" placeholder="1752196851@qq.com">

    </div>

    <div class="form-group">

        <label>Gender</label><br>

        <div class="form-check form-check-inline">

            <input class="form-check-input" type="radio" name="gender" value="1">

            <label class="form-check-label">男</label>

        </div>

        <div class="form-check form-check-inline">

            <input class="form-check-input" type="radio" name="gender" value="0">

            <label class="form-check-label">女</label>

        </div>

    </div>

    <div class="form-group">

        <label>department</label>

        <!-- 我们在 controller 接收的是一个 Employee,所以我们需要提交的是其中的一个属性! department.id -->

        <select class="form-control" name="department.id">

            <option th:each="dept:${departments}" th:text="${dept.getName()}" th:value="${dept.getId()}"></option>

        </select>

    </div>

    <div class="form-group">

        <label>Birth</label>

        <input name="birth" type="text" class="form-control" placeholder="2020/12/01">

    </div>

    <button type="submit" class="btn btn-primary">添加</button>

</form>
2、修改员工
<form th:action="@{/updateEmp}" method="post">

    <!-- id隐藏域 -->

    <input type="hidden" name="id" th:value="${emp.getId()}">

    <div class="form-group">

        <label>LastName</label>

        <input th:value="${emp.getLastName()}" name="lastName" type="text" class="form-control" placeholder="面包">

    </div>

    <div class="form-group">

        <label>Email</label>

        <input th:value="${emp.getEmail()}" name="email" type="email" class="form-control" placeholder="1752196851@qq.com">

    </div>

    <div class="form-group">

        <label>Gender</label><br>

        <div class="form-check form-check-inline">

            <input th:checked="${emp.getGender()==1}" class="form-check-input" type="radio" name="gender" value="1">

            <label class="form-check-label">男</label>

        </div>

        <div class="form-check form-check-inline">

            <input th:checked="${emp.getGender()==0}" class="form-check-input" type="radio" name="gender" value="0">

            <label class="form-check-label">女</label>

        </div>

    </div>

    <div class="form-group">

        <label>department</label>

        <!-- 我们在 controller 接收的是一个 Employee,所以我们需要提交的是其中的一个属性! department.id -->

        <select class="form-control" name="department.id">

            <option th:selected="${dept.getId()==emp.getDepartment().getId()}" th:each="dept:${departments}" th:text="${dept.getName()}" th:value="${dept.getId()}"></option>

        </select>

    </div>

    <div class="form-group">

        <label>Birth</label>

        <input th:value="${#dates.format(emp.getBirth(), 'yyyy-MM-dd HH:mm')}" name="birth" type="text" class="form-control" placeholder="2020/12/01">

    </div>

    <button type="submit" class="btn btn-primary">修改</button>

</form>
配置文件日期格式:
# 日期格式化

spring.mvc.format.date=yyyy-MM-dd
3、删除员工
<a class="btn btn-sm btn-danger" th:href="@{/deleteEmp/}+${emp.getId()}">删除</a>
4、404页面
在templates文件夹下新建error文件夹,放置404.html、500.html等等即可。
SpringBoot Web 学习的更多相关文章
- SpringBoot Web学习笔记
一.资源的访问: 情形一.所有的 /webjars/** 都会去 classpath:/META_INFO/resource/webjars/ 下找资源: webjars:以jar包的方式引入静态 ...
- Springboot 框架学习
Springboot 框架学习 前言 Spring Boot是Spring 官方的顶级项目之一,她的其他小伙伴还有Spring Cloud.Spring Framework.Spring Data等等 ...
- SpringBoot+Shiro学习(七):Filter过滤器管理
SpringBoot+Shiro学习(七):Filter过滤器管理 Hiwayz 关注 0.5 2018.09.06 19:09* 字数 1070 阅读 5922评论 1喜欢 20 先从我们写的一个 ...
- SpringBoot web获取请求数据【转】
SpringBoot web获取请求数据 一个网站最基本的功能就是匹配请求,获取请求数据,处理请求(业务处理),请求响应,我们今天来看SpringBoot中怎么获取请求数据. 文章包含的内容如下: 获 ...
- MacOS下SpringBoot基础学习
学于黑马和传智播客联合做的教学项目 感谢 黑马官网 传智播客官网 微信搜索"艺术行者",关注并回复关键词"springboot"获取视频和教程资料! b站在线视 ...
- Java Web 学习路线
实际上,如果时间安排合理的话,大概需要六个月左右,有些基础好,自学能力强的朋友,甚至在四个月左右就开始找工作了.大三的时候,我萌生了放弃本专业的念头,断断续续学 Java Web 累计一年半左右,总算 ...
- Web学习之css
CSS指层叠样式表(Cascading Style Sheets),CSS 是标准的布局语言,用来控制元素的尺寸.颜色.排版.CSS 由 W3C 发明,用来取代基于表格的布局.框架以及其他非标准的表现 ...
- web学习第一章
web学习第一章 我是大概9月10日开始走上IT之路的,一开始学习了小段时间的自动化办公软件, 昨天我开始学习客户端网页编程,我了解什么是WEB,一些比较老古董的计算模式和发展历史,印象最让我深刻 ...
- [原创]java WEB学习笔记95:Hibernate 目录
本博客的目的:①总结自己的学习过程,相当于学习笔记 ②将自己的经验分享给大家,相互学习,互相交流,不可商用 内容难免出现问题,欢迎指正,交流,探讨,可以留言,也可以通过以下方式联系. 本人互联网技术爱 ...
随机推荐
- 《C++ 程序设计》读书笔记
本文联合编辑:小辣辣.向她致以最崇高的敬(爱)意 第一章 C++的初步认识 在程序进行编译时,先对所有的预处理命令进行处理,将头文件的具体内容代替 #include 指令,然后再对该程序单元进行整体编 ...
- 连接数据库查询 将查询结果写入exce文件中
package com.cn.peitest.connectDatabase; import java.io.File; import java.lang.reflect.Field; import ...
- HBase内存配置及JVM优化
前言 本文从HBase的内存布局说起,先充分了解HBase的内存区的使用与分配,随后给出了不同业务场景下的读写内存分配规划,并指导如何分析业务的内存使用情况,以及在使用当中写内存Memstore及读内 ...
- hive向es推送数据
第一步:首先要保证网络是通的,很多公司里子网遍布,要和运维和工程侧同事确认好网络是通的,es的地址可以通过curl es地址的方式测试一下. 第二步:下载需要的jar包,必须的是es-hadoop的包 ...
- Linux嵌入式学习-mount命令+nfs挂载失败原因【转】
NFS 挂载失败原因[待搜集] 1.挂载时若出现mount.nfs: Input/output error 解决:在客户端也需启动portmap服务 service portmap status[查看 ...
- Docker之1---介绍和安装
Docker介绍 Docker是一个开源项目,让应用程序布署在软件货柜下的工作可以自动化进行,借此在Linux操作系统上,提供一个额外的软件抽象层,以及操作系统层虚拟化的自动管理机制. Docker利 ...
- SpringBoot+Prometheus+Grafana实现应用监控和报警
一.背景 SpringBoot的应用监控方案比较多,SpringBoot+Prometheus+Grafana是目前比较常用的方案之一.它们三者之间的关系大概如下图: 关系图 二.开发SpringBo ...
- 用漫画的形式展现——URL和HTTP
http请求内容:请求头:get.post等发送请求(其他:head.put.delete.option) host 地址 user-Agent cookie 通行证 head:与get请求类似,不同 ...
- java使用正则的例子
package com.accord.util; import java.util.ArrayList; import java.util.List; import java.util.regex.M ...
- ElasticSearch- 单节点 unassigned_shards 故障排查
故障现象 在部署ELK的单机环境,当连接Kibana时候提示下面错误,即使重启整个服务也是提示Kibana server is not ready. {"message":&quo ...