仵航说 前后端分离,文件上传下载(springBoot+vue+elementUI)仵老大
1.介绍
本文主要是介绍前后端分离的上传下载,后端使用的是SpringBoot,持久层用的是mybatis-plus,前端用的Vue,UI用的elementUI,测试了一下,文本,图片,excel,都是可以上传下载的,前端就是一个页面,后端就是一个controller页面,就可以解决
代码不清晰的话,我把这个前端的vue 跟 后端的controller代码,以及本篇文章的MD版本放到了这个链接里 https://wwa.lanzous.com/b0cqr478f 密码:19qb
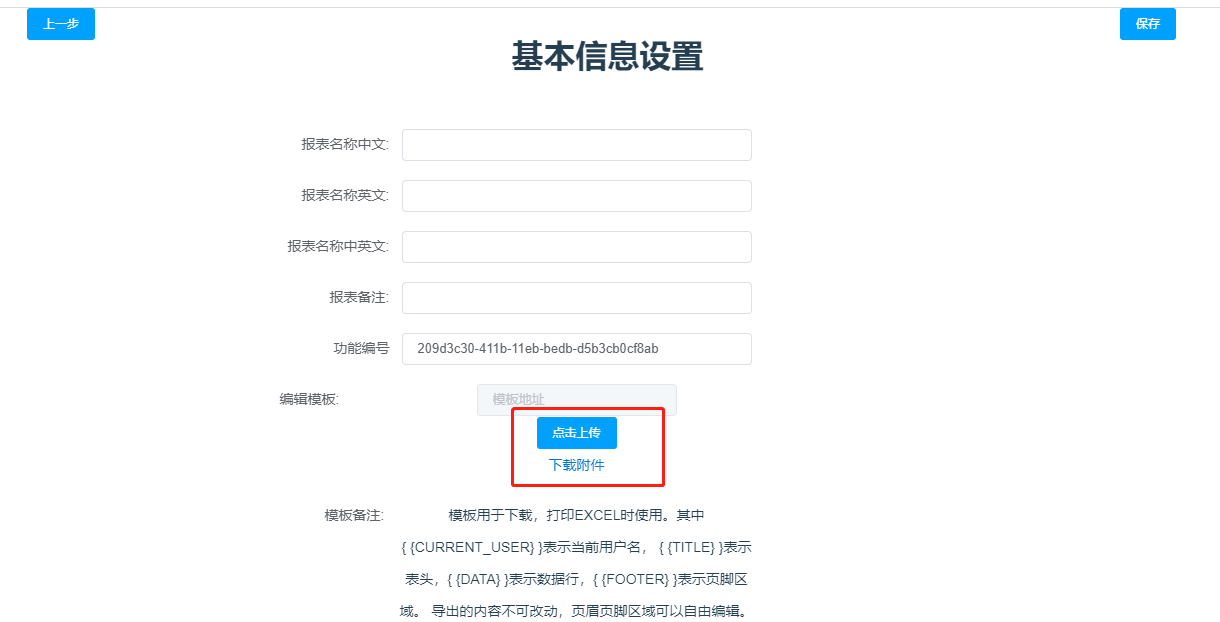
1.1前端样子
2.前端
2.1先分享一下前端的全部代码
<template>
<div>
<center>
</center>
<div style="float: left;margin-left: 100px">
<!-- <router-link to="/reportTools/customQuery" style="color: darkblue">-->
<!-- 上一步-->
<!-- </router-link>-->
<el-button type="primary" v-on:click="tocustomQuery" >上一步</el-button>
</div>
<div style="float: right;margin-right: 100px">
<el-button type="primary" v-on:click="saveResource" >保存</el-button>
</div>
<br>
<h1>基本信息设置</h1>
<br>
<br>
<center>
<div style="margin-right: 170px">
<el-form ref="form" :model="form" label-width="120px" >
<el-form-item label="报表名称中文:" style="width: 470px;">
<el-input v-model="form.reportName" ></el-input>
</el-form-item>
<el-form-item label="报表名称英文:" style="width: 470px;">
<el-input v-model="form.reportEnName"></el-input>
</el-form-item>
<el-form-item label="报表名称中英文:" style="width: 470px;">
<el-input v-model="form.reportChEnName"></el-input>
</el-form-item>
<el-form-item label="报表备注:" style="width: 470px;">
<el-input v-model="form.remarks"></el-input>
</el-form-item>
<el-form-item label="功能编号" style="width: 470px;">
<el-input v-model="form.code" ></el-input>
</el-form-item>
<el-form-item label="编辑模板:" style="width: 570px;">
<el-input placeholder="模板地址" style="width: 200px" disabled></el-input>
<el-upload class="upload-demo"

                 :action="uploadUrl"

                 :before-upload="handleBeforeUpload"

                 :on-error="handleUploadError"

                 :before-remove="beforeRemove"

                 multiple

                 :limit="5"

                 :on-exceed="handleExceed"

                 :file-list="fileList">

        <el-button size="small" type="primary">点击上传</el-button>

      </el-upload>

      <a href="http://localhost:8080/file/download?fileName=test.xls">下载附件</a>
</el-form-item>
<el-form-item label="模板备注:" style="width: 480px;">
模板用于下载,打印EXCEL时使用。其中{ {CURRENT_USER} }表示当前用户名,
{ {TITLE} }表示表头,{ {DATA} }表示数据行,{ {FOOTER} }表示页脚区域。
导出的内容不可改动,页眉页脚区域可以自由编辑。
</el-form-item>
<el-form-item >
<el-select v-model="form.isPublic" style="width: 350px;">
<el-option label="私有查询" value="2" ></el-option>
<el-option label="公共查询" value="1"></el-option>
</el-select>
</el-form-item>
<el-form-item >
<el-checkbox label="是否打印" v-model="form.isPrinting" true-label="1" false-label="2"></el-checkbox>
<el-checkbox label="是否导出" v-model="form.isExport" true-label="1" false-label="2"></el-checkbox>
<el-form-item type="hidden" style="width: 470px;">
</el-form-item>
</el-form-item>
</el-form>
</div>
</center>
</div>
</template>
<script>
import axios from 'axios'
import { uuid } from 'vue-uuid';
export default {
data() {
return {
form: {
reportName:'',
reportEnName:'',
reportChEnName:'',
remarks:'',
code:'',
isPublic:'1',
isPrinting:"1",
isExport:"1",
datas:[{},{},{},{}],
A0010011:'',
A0010012:'',
A0010013:'',
A0010014:'',
},
// uuid1:'',
// cusList:{},
uploadUrl: 'file/upload',
fileList: [],
}
},
created() {
console.log("上个页面传来的是",sessionStorage)
// this.handleUUIDv1()
this.form.code = this.$uuid.v1()
console.log("页面刷新后新产生的uuid是",this.form.code)
},
watch:{
reportName: function (newVal,oldVal) {//新值和原值
console.log("name改变了 a:"+newVal+" b:"+oldVal)
}
},
methods: {
//使用uuid
// handleUUIDv1() {
// this.uuid1 = this.$uuid.v1()
// },
//点击多选按钮true和false变成1或者2
reset(form){
this.$refs['form'].resetFields();
},
//获取上个页面传来的数据
getcustomQuery() {
let reportName=this.form.reportName
sessionStorage.setItem("reportName",reportName)
let reportEnName = this.form.reportEnName
sessionStorage.setItem("reportEnName",reportEnName)
let reportChEnName = this.form.reportChEnName
sessionStorage.setItem("reportChEnName",reportChEnName)
let remarks = this.form.remarks
sessionStorage.setItem("remarks",remarks)
let code = this.form.code
sessionStorage.setItem("code",code)
let isPublic = this.form.isPublic
sessionStorage.setItem("isPublic",isPublic)
let isPrinting = this.form.isPrinting
sessionStorage.setItem("isPrinting",isPrinting)
let isExport = this.form.isExport
sessionStorage.setItem("isExport",isExport)
console.log("上个页面传来的是",sessionStorage)
},
// this.$router.push('/reportTools/cusMain'),点击保存发送链接 并跳转
tocustomQuery(){
this.$router.push('/reportTools/customQuery')
},
saveResource(){
console.log("当前页面表单的数据",this.form)
// sessionStorage.setItem("params",JSON.stringify(this.form))
console.log("sessionStorage中的数据",sessionStorage)
this.getcustomQuery()
this.$http.post("http://localhost:8080/reporttools/report-show/addReportShow",sessionStorage).then(
resp=>{
console.log(resp)
//this.$router.push('/reportTools/cusMain')
})
},
handleExceed(files, fileList) {
this.$message.warning(`当前限制选择 5 个文件,本次选择了 ${files.length} 个文件,共选择了 ${files.length + fileList.length} 个文件`);
},
beforeRemove(file, fileList) {
return this.$confirm(`确定移除 ${ file.name }?`);
},
handleUploadError(error, file) {
console.log("文件上传出错:"+error)
},
//测试上传文件(注意web的上下文)
handleBeforeUpload(file){
console.log("开始上传,上传的文件为:"+file)
let formData = new FormData();
formData.append("multipartFiles", file);
axios({
method: 'post',
url: 'file/upload',
data: formData,
headers: {'Content-Type': 'multipart/form-data' }
}).then((res) => {
console.log("文件上传返回:"+res)
}).catch(error => {
console.log("文件上传异常:"+error)
})
},
}
}
</script>
<style scoped>
a {
text-decoration: none;
}
</style>
2.2分享一下前端template层的代码
2.2.1上传下载template全部代码
<el-upload class="upload-demo"

                 :action="uploadUrl"

                 :before-upload="handleBeforeUpload"

                 :on-error="handleUploadError"

                 :before-remove="beforeRemove"

                 multiple

                 :limit="5"

                 :on-exceed="handleExceed"

                 :file-list="fileList">

        <el-button size="small" type="primary">点击上传</el-button>

      </el-upload>
<a href="http://localhost:8080/file/download?fileName=test.xls">下载附件</a>
2.2.2 上传代码
<el-upload class="upload-demo"
:action="uploadUrl"
:before-upload="handleBeforeUpload"
:on-error="handleUploadError"
:before-remove="beforeRemove"
multiple
:limit="5"
:on-exceed="handleExceed"
:file-list="fileList">
<el-button size="small" type="primary">点击上传</el-button>
</el-upload>
2.2.3下载代码
下载代码就是一个a标签
<a href="http://localhost:8080/file/download?fileName=test.xls">下载附件</a>
2.3分享一下前端script代码
<script>

import axios from 'axios'

import { uuid } from 'vue-uuid';

export default {

  data() {

    return {

      form: {

        reportName:'',

        reportEnName:'',

        reportChEnName:'',

        remarks:'',

        code:'',

        isPublic:'1',

        isPrinting:"1",

        isExport:"1",

        datas:[{},{},{},{}],

        A0010011:'',

        A0010012:'',

        A0010013:'',

        A0010014:'',

      },

      // uuid1:'',

      // cusList:{},

      uploadUrl: 'file/upload',

      fileList: [],

    }

  },

  created() {

    console.log("上个页面传来的是",sessionStorage)

    // this.handleUUIDv1()

    this.form.code = this.$uuid.v1()

    console.log("页面刷新后新产生的uuid是",this.form.code)

  },

  watch:{

    reportName: function (newVal,oldVal) {//新值和原值

      console.log("name改变了 a:"+newVal+"    b:"+oldVal)

    }

  },

  methods: {

    //使用uuid

    // handleUUIDv1() {

    //   this.uuid1 = this.$uuid.v1()

    // },

    //点击多选按钮true和false变成1或者2

    reset(form){

      this.$refs['form'].resetFields();

    },

    //获取上个页面传来的数据

    getcustomQuery() {

      let reportName=this.form.reportName

      sessionStorage.setItem("reportName",reportName)

      let reportEnName = this.form.reportEnName

      sessionStorage.setItem("reportEnName",reportEnName)

      let reportChEnName = this.form.reportChEnName

      sessionStorage.setItem("reportChEnName",reportChEnName)

      let remarks = this.form.remarks

      sessionStorage.setItem("remarks",remarks)

      let code = this.form.code

      sessionStorage.setItem("code",code)

      let isPublic = this.form.isPublic

      sessionStorage.setItem("isPublic",isPublic)

      let isPrinting = this.form.isPrinting

      sessionStorage.setItem("isPrinting",isPrinting)

      let isExport = this.form.isExport

      sessionStorage.setItem("isExport",isExport)

      console.log("上个页面传来的是",sessionStorage)

    },

    // this.$router.push('/reportTools/cusMain'),点击保存发送链接 并跳转

    tocustomQuery(){

      this.$router.push('/reportTools/customQuery')

    },

    saveResource(){

      console.log("当前页面表单的数据",this.form)

      // sessionStorage.setItem("params",JSON.stringify(this.form))

      console.log("sessionStorage中的数据",sessionStorage)

      this.getcustomQuery()

      this.$http.post("http://localhost:8080/reporttools/report-show/addReportShow",sessionStorage).then(

        resp=>{

        console.log(resp)

          //this.$router.push('/reportTools/cusMain')

      })

    },

    handleExceed(files, fileList) {

      this.$message.warning(`当前限制选择 5 个文件,本次选择了 ${files.length} 个文件,共选择了 ${files.length + fileList.length} 个文件`);

    },

    beforeRemove(file, fileList) {

      return this.$confirm(`确定移除 ${ file.name }?`);

    },

    handleUploadError(error, file) {

      console.log("文件上传出错:"+error)

    },

    //测试上传文件(注意web的上下文)

    handleBeforeUpload(file){

      console.log("开始上传,上传的文件为:"+file)

      let formData = new FormData();

      formData.append("multipartFiles", file);

      axios({

        method: 'post',

        url: 'http://localhost:8080/file/upload',

        data: formData,

        headers: {'Content-Type': 'multipart/form-data' }

      }).then((res) => {

        console.log("文件上传返回:"+res)

      }).catch(error => {

        console.log("文件上传异常:"+error)

      })

    },

  }

}

</script>

<style scoped>

a {

  text-decoration: none;

}

</style>
2.3.1上传script全部代码
主要是对前端做一些限制
handleExceed(files, fileList) {

  this.$message.warning(`当前限制选择 5 个文件,本次选择了 ${files.length} 个文件,共选择了 ${files.length + fileList.length} 个文件`);

},

beforeRemove(file, fileList) {

  return this.$confirm(`确定移除 ${ file.name }?`);

},

handleUploadError(error, file) {

  console.log("文件上传出错:"+error)

},

//测试上传文件(注意web的上下文)

handleBeforeUpload(file){

  console.log("开始上传,上传的文件为:"+file)

  let formData = new FormData();

  formData.append("multipartFiles", file);

  axios({

    method: 'post',

    url: 'http://localhost:8080/file/upload',

    data: formData,

    headers: {'Content-Type': 'multipart/form-data' }

  }).then((res) => {

    console.log("文件上传返回:"+res)

  }).catch(error => {

    console.log("文件上传异常:"+error)

  })

},
2.3.2在data的return里添加
 uploadUrl: 'file/upload',

    fileList: [],
也就是在data层的 return里写
data(){

    return {

    	 uploadUrl: 'http://localhost:8080/file/upload',

    		fileList: [],

	}

}
就这样前端就完成了
后端主要就是一个controller层
2.3.3Axios的引入
很重要的一个,因为我的写法不一样可能有不兼容的地方,有的vue不能这么写,所以需要引入一下
直接引入就可以,在script里面,
不会就看我上面分享的
import axios from 'axios'
3.后端
3.1后端全部代码
package com.ciic.reporter.updownload.controller;

import org.apache.tomcat.util.http.fileupload.IOUtils;

import org.springframework.web.bind.annotation.*;

import org.springframework.web.multipart.MultipartFile;

import javax.servlet.http.HttpServletRequest;

import javax.servlet.http.HttpServletResponse;

import java.io.*;

import java.nio.file.Files;

import java.nio.file.Path;

import java.nio.file.Paths;

@RestController

@RequestMapping("file")

public class CiicUpDownloadController {

    private  final static String rootPath = "E:/attachment/";

    @RequestMapping("/upload")

    public  Object uploadFile(@RequestParam("file") MultipartFile[] multipartFiles){

        File fileDir = new File(rootPath);

        if (!fileDir.exists() && !fileDir.isDirectory()) {

            fileDir.mkdirs();

        }

        try {

            if (multipartFiles != null && multipartFiles.length > 0) {

                for(int i = 0;i<multipartFiles.length;i++){

                    try {

                        //以原来的名称命名,覆盖掉旧的,这里也可以使用UUID之类的方式命名,这里就没有处理了

                        String storagePath = rootPath+multipartFiles[i].getOriginalFilename();

                        System.out.println("上传的文件:" + multipartFiles[i].getName() + "," + multipartFiles[i].getContentType() + "," + multipartFiles[i].getOriginalFilename()

                                +",保存的路径为:" + storagePath);

                        // 3种方法: 第1种

//                        Streams.copy(multipartFiles[i].getInputStream(), new FileOutputStream(storagePath), true);

                        // 第2种

                        Path path = Paths.get(storagePath);

                        Files.write(path,multipartFiles[i].getBytes());

                        // 第3种

                       // multipartFiles[i].transferTo(new File(storagePath));

                    } catch (IOException e) {

                        e.printStackTrace();

                    }

                }

            }

        } catch (Exception e) {

            e.printStackTrace();

        }

        //前端可以通过状态码,判断文件是否上传成功

        return "文件上传成功";

    }

    /**

     *

     * @param fileName 文件名

     * @param response

     * @return

     */

    @RequestMapping("/download")

    public Object downloadFile(@RequestParam String fileName, HttpServletResponse response){

        OutputStream os = null;

        InputStream is= null;

        try {

            // 取得输出流

            os = response.getOutputStream();

            // 清空输出流

            response.reset();

            response.setContentType("application/x-download;charset=utf-8");

            //Content-Disposition中指定的类型是文件的扩展名,并且弹出的下载对话框中的文件类型图片是按照文件的扩展名显示的,点保存后,文件以filename的值命名,

            // 保存类型以Content中设置的为准。注意:在设置Content-Disposition头字段之前,一定要设置Content-Type头字段。

            //把文件名按UTF-8取出,并按ISO8859-1编码,保证弹出窗口中的文件名中文不乱码,中文不要太多,最多支持17个中文,因为header有150个字节限制。

            response.setHeader("Content-Disposition", "attachment;filename="+ new String(fileName.getBytes("utf-8"),"ISO8859-1"));

            //读取流

            File f = new File(rootPath+fileName);

            is = new FileInputStream(f);

            if (is == null) {

                System.out.println("下载附件失败,请检查文件“" + fileName + "”是否存在");

                return "下载附件失败,请检查文件“" + fileName + "”是否存在";

            }

            //复制

            IOUtils.copy(is, response.getOutputStream());

            response.getOutputStream().flush();

        } catch (IOException e) {

            return "下载附件失败,error:"+e.getMessage();

        }

        //文件的关闭放在finally中

        finally

        {

            try {

                if (is != null) {

                    is.close();

                }

            } catch (IOException e) {

                e.printStackTrace();

            }

            try {

                if (os != null) {

                    os.close();

                }

            } catch (IOException e) {

                e.printStackTrace();

            }

        }

        //其实,这个返回什么都不重要

        return "下载成功";

    }

}
3.2后端定义一个class类
@RestController

@RequestMapping("file")

public class CiicUpDownloadController {

}
3.3后端定义一个上传的路径
private final static String rootPath = "E:/attachment/";
3.3.1加上上面定义的类也就是
@RestController

@RequestMapping("file")

public class CiicUpDownloadController {

	 private  final static String rootPath = "E:/attachment/";

}
3.4后端定义上传方法
 @RequestMapping("/upload")

    public  Object uploadFile(@RequestParam("file") MultipartFile[] multipartFiles){

        File fileDir = new File(rootPath);

        if (!fileDir.exists() && !fileDir.isDirectory()) {

            fileDir.mkdirs();

        }

        try {

            if (multipartFiles != null && multipartFiles.length > 0) {

                for(int i = 0;i<multipartFiles.length;i++){

                    try {

                        //以原来的名称命名,覆盖掉旧的,这里也可以使用UUID之类的方式命名,这里就没有处理了

                        String storagePath = rootPath+multipartFiles[i].getOriginalFilename();

                        System.out.println("上传的文件:" + multipartFiles[i].getName() + "," + multipartFiles[i].getContentType() + "," + multipartFiles[i].getOriginalFilename()

                                +",保存的路径为:" + storagePath);

                        // 3种方法: 第1种

//                        Streams.copy(multipartFiles[i].getInputStream(), new FileOutputStream(storagePath), true);

                        // 第2种

                        Path path = Paths.get(storagePath);

                        Files.write(path,multipartFiles[i].getBytes());

                        // 第3种

                       // multipartFiles[i].transferTo(new File(storagePath));

                    } catch (IOException e) {

                        e.printStackTrace();

                    }

                }

            }

        } catch (Exception e) {

            e.printStackTrace();

        }

        //前端可以通过状态码,判断文件是否上传成功

        return "文件上传成功";

    }
3.4.3加上之前的路径和类就是
@RestController

@RequestMapping("file")

public class CiicUpDownloadController {

    private  final static String rootPath = "E:/attachment/";

    @RequestMapping("/upload")

    public  Object uploadFile(@RequestParam("file") MultipartFile[] multipartFiles){

        File fileDir = new File(rootPath);

        if (!fileDir.exists() && !fileDir.isDirectory()) {

            fileDir.mkdirs();

        }

        try {

            if (multipartFiles != null && multipartFiles.length > 0) {

                for(int i = 0;i<multipartFiles.length;i++){

                    try {

                        //以原来的名称命名,覆盖掉旧的,这里也可以使用UUID之类的方式命名,这里就没有处理了

                        String storagePath = rootPath+multipartFiles[i].getOriginalFilename();

                        System.out.println("上传的文件:" + multipartFiles[i].getName() + "," + multipartFiles[i].getContentType() + "," + multipartFiles[i].getOriginalFilename()

                                +",保存的路径为:" + storagePath);

                        // 3种方法: 第1种

//                        Streams.copy(multipartFiles[i].getInputStream(), new FileOutputStream(storagePath), true);

                        // 第2种

                        Path path = Paths.get(storagePath);

                        Files.write(path,multipartFiles[i].getBytes());

                        // 第3种

                       // multipartFiles[i].transferTo(new File(storagePath));

                    } catch (IOException e) {

                        e.printStackTrace();

                    }

                }

            }

        } catch (Exception e) {

            e.printStackTrace();

        }

        //前端可以通过状态码,判断文件是否上传成功

        return "文件上传成功";

    }

}
3.5后端定义下载方法
/**

     *

     * @param fileName 文件名

     * @param response

     * @return

     */

    @RequestMapping("/download")

    public Object downloadFile(@RequestParam String fileName, HttpServletResponse response){

        OutputStream os = null;

        InputStream is= null;

        try {

            // 取得输出流

            os = response.getOutputStream();

            // 清空输出流

            response.reset();

            response.setContentType("application/x-download;charset=utf-8");

            //Content-Disposition中指定的类型是文件的扩展名,并且弹出的下载对话框中的文件类型图片是按照文件的扩展名显示的,点保存后,文件以filename的值命名,

            // 保存类型以Content中设置的为准。注意:在设置Content-Disposition头字段之前,一定要设置Content-Type头字段。

            //把文件名按UTF-8取出,并按ISO8859-1编码,保证弹出窗口中的文件名中文不乱码,中文不要太多,最多支持17个中文,因为header有150个字节限制。

            response.setHeader("Content-Disposition", "attachment;filename="+ new String(fileName.getBytes("utf-8"),"ISO8859-1"));

            //读取流

            File f = new File(rootPath+fileName);

            is = new FileInputStream(f);

            if (is == null) {

                System.out.println("下载附件失败,请检查文件“" + fileName + "”是否存在");

                return "下载附件失败,请检查文件“" + fileName + "”是否存在";

            }

            //复制

            IOUtils.copy(is, response.getOutputStream());

            response.getOutputStream().flush();

        } catch (IOException e) {

            return "下载附件失败,error:"+e.getMessage();

        }

        //文件的关闭放在finally中

        finally

        {

            try {

                if (is != null) {

                    is.close();

                }

            } catch (IOException e) {

                e.printStackTrace();

            }

            try {

                if (os != null) {

                    os.close();

                }

            } catch (IOException e) {

                e.printStackTrace();

            }

        }

        //其实,这个返回什么都不重要

        return "下载成功";

    }
3.5.1加上之前定义的路径类和上传方法就是
package com.ciic.reporter.updownload.controller;

import org.apache.tomcat.util.http.fileupload.IOUtils;

import org.springframework.web.bind.annotation.*;

import org.springframework.web.multipart.MultipartFile;

import javax.servlet.http.HttpServletRequest;

import javax.servlet.http.HttpServletResponse;

import java.io.*;

import java.nio.file.Files;

import java.nio.file.Path;

import java.nio.file.Paths;

@RestController

@RequestMapping("file")

public class CiicUpDownloadController {

    private  final static String rootPath = "E:/attachment/";

    @RequestMapping("/upload")

    public  Object uploadFile(@RequestParam("file") MultipartFile[] multipartFiles){

        File fileDir = new File(rootPath);

        if (!fileDir.exists() && !fileDir.isDirectory()) {

            fileDir.mkdirs();

        }

        try {

            if (multipartFiles != null && multipartFiles.length > 0) {

                for(int i = 0;i<multipartFiles.length;i++){

                    try {

                        //以原来的名称命名,覆盖掉旧的,这里也可以使用UUID之类的方式命名,这里就没有处理了

                        String storagePath = rootPath+multipartFiles[i].getOriginalFilename();

                        System.out.println("上传的文件:" + multipartFiles[i].getName() + "," + multipartFiles[i].getContentType() + "," + multipartFiles[i].getOriginalFilename()

                                +",保存的路径为:" + storagePath);

                        // 3种方法: 第1种

//                        Streams.copy(multipartFiles[i].getInputStream(), new FileOutputStream(storagePath), true);

                        // 第2种

                        Path path = Paths.get(storagePath);

                        Files.write(path,multipartFiles[i].getBytes());

                        // 第3种

                       // multipartFiles[i].transferTo(new File(storagePath));

                    } catch (IOException e) {

                        e.printStackTrace();

                    }

                }

            }

        } catch (Exception e) {

            e.printStackTrace();

        }

        //前端可以通过状态码,判断文件是否上传成功

        return "文件上传成功";

    }

    /**

     *

     * @param fileName 文件名

     * @param response

     * @return

     */

    @RequestMapping("/download")

    public Object downloadFile(@RequestParam String fileName, HttpServletResponse response){

        OutputStream os = null;

        InputStream is= null;

        try {

            // 取得输出流

            os = response.getOutputStream();

            // 清空输出流

            response.reset();

            response.setContentType("application/x-download;charset=utf-8");

            //Content-Disposition中指定的类型是文件的扩展名,并且弹出的下载对话框中的文件类型图片是按照文件的扩展名显示的,点保存后,文件以filename的值命名,

            // 保存类型以Content中设置的为准。注意:在设置Content-Disposition头字段之前,一定要设置Content-Type头字段。

            //把文件名按UTF-8取出,并按ISO8859-1编码,保证弹出窗口中的文件名中文不乱码,中文不要太多,最多支持17个中文,因为header有150个字节限制。

            response.setHeader("Content-Disposition", "attachment;filename="+ new String(fileName.getBytes("utf-8"),"ISO8859-1"));

            //读取流

            File f = new File(rootPath+fileName);

            is = new FileInputStream(f);

            if (is == null) {

                System.out.println("下载附件失败,请检查文件“" + fileName + "”是否存在");

                return "下载附件失败,请检查文件“" + fileName + "”是否存在";

            }

            //复制

            IOUtils.copy(is, response.getOutputStream());

            response.getOutputStream().flush();

        } catch (IOException e) {

            return "下载附件失败,error:"+e.getMessage();

        }

        //文件的关闭放在finally中

        finally

        {

            try {

                if (is != null) {

                    is.close();

                }

            } catch (IOException e) {

                e.printStackTrace();

            }

            try {

                if (os != null) {

                    os.close();

                }

            } catch (IOException e) {

                e.printStackTrace();

            }

        }

        //其实,这个返回什么都不重要

        return "下载成功";

    }

}
谢谢大家的阅读,原创不易,喜欢就随手点个赞,这将是我最强的写作动力。如果觉得文章对你有点帮助,还挺有趣,就关注一下我的公众号「仵航」

仵航说 前后端分离,文件上传下载(springBoot+vue+elementUI)仵老大的更多相关文章
- SpringBoot + Vue前后端分离图片上传到本地并前端访问图片
同理应该可用于其他文件 图片上传 application.yml 配置相关常量 prop: upload-folder: E:/test/ # 配置SpringMVC文件上传限制,默认1M.注意MB要 ...
- 循序渐进VUE+Element 前端应用开发(23)--- 基于ABP实现前后端的附件上传,图片或者附件展示管理
在我们一般系统中,往往都会涉及到附件的处理,有时候附件是图片文件,有时候是Excel.Word等文件,一般也就是可以分为图片附件和其他附件了,图片附件可以进行裁剪管理.多个图片上传管理,及图片预览操作 ...
- django 12天(跨域,文件上传,下载,cookie,session)
django 12天(跨域,文件上传,下载) 跨域 什么是跨域 1.协议不同 2.端口不同 3.主机不同 如何解决跨域 1.安装django-cors-headers模块 2.在settings.py ...
- SpringBoot入门一:基础知识(环境搭建、注解说明、创建对象方法、注入方式、集成jsp/Thymeleaf、logback日志、全局热部署、文件上传/下载、拦截器、自动配置原理等)
SpringBoot设计目的是用来简化Spring应用的初始搭建以及开发过程.该框架使用了特定的方式来进行配置,从而使开发人员不再需要定义样板化的配置.通过这种方式,SpringBoot致力于在蓬勃发 ...
- JavaWeb 文件上传下载
1. 文件上传下载概述 1.1. 什么是文件上传下载 所谓文件上传下载就是将本地文件上传到服务器端,从服务器端下载文件到本地的过程.例如目前网站需要上传头像.上传下载图片或网盘等功能都是利用文件上传下 ...
- react-native之文件上传下载
目录 文件上传 1.文件选择 2.文件上传 1.FormData对象包装 2.上传示例 文件下载 最近react-native项目上需要做文件上传下载的功能,由于才接触react-native不久,好 ...
- java+大文件上传下载
文件上传下载,与传统的方式不同,这里能够上传和下载10G以上的文件.而且支持断点续传. 通常情况下,我们在网站上面下载的时候都是单个文件下载,但是在实际的业务场景中,我们经常会遇到客户需要批量下载的场 ...
- 转载:JavaWeb 文件上传下载
转自:https://www.cnblogs.com/aaron911/p/7797877.html 1. 文件上传下载概述 1.1. 什么是文件上传下载 所谓文件上传下载就是将本地文件上传到服务器端 ...
- SpringMVC文件上传下载(单文件、多文件)
前言 大家好,我是bigsai,今天我们学习Springmvc的文件上传下载. 文件上传和下载是互联网web应用非常重要的组成部分,它是信息交互传输的重要渠道之一.你可能经常在网页上传下载文件,你可能 ...
随机推荐
- Lambda表达式(一)入门认识篇
Lambda表达式(一)入门认识篇 Lambda简介 Lambda 表达式是 JDK8 的一个新特性,可以取代大部分的匿名内部类,写出更优雅的 Java 代码,尤其在集合的遍历和其他集合操作中,可以极 ...
- pytest的setup和teardown
学过unittest的setup和teardown,前置和后置执行功能.pytest也有此功能并且功能更强大,今天就来学习一下吧. 用例运行级别: 模块级(setup_module/teardown_ ...
- appium元素定位总结
appium元素定位方法总结 使用uiautomator定位 driver.find_element_by_android_uiautomator(uia_string) 根据resourceId属性 ...
- laradock使用问题汇总
laradock简介 一套完整的基于Docker的PHP开发环境.包含了预先打包的Docker镜像,所有预先配置都是为了提供一个完美的PHP开发环境(中文文档).PS: 不是最新版的 windows1 ...
- transient关键字的作用以及几个疑问的解决
目录 1.从Serilizable说到transient 2.序列化属性对象的类需要实现Serilizable接口? 3.不想被序列化的字段怎么办? 4.ArrayList里面的elementData ...
- 一万三千字的HashMap面试必问知识点详解
目录 概论 Hasmap 的继承关系 hashmap 的原理 解决Hash冲突的方法 开放定址法 再哈希法 链地址法 建立公共溢出区 hashmap 最终的形态 Hashmap 的返回值 HashMa ...
- 「刷题笔记」AC自动机
自动AC机 Keywords Research 板子题,同luoguP3808,不过是多测. 然后多测不清空,\(MLE\)两行泪. 板子放一下 #include<bits/stdc++.h&g ...
- sql注入绕过安全狗实战
=绕过 like regexp(匹配)> < (测试安全狗 ><不可以绕过) 注释+换行(%0a作为垃圾数据填充) 联合查询绕过 探测出当union select 出现时会拦截 ...
- UML第一次个人作业
这个作业属于哪个课程 https://api.jihuayu.site/cnblogs 这个作业要求在哪里 https://edu.cnblogs.com/campus/fzzcxy/2018SE1/ ...
- 在Python中使用moviepy进行音视频剪辑混音合成时输出文件无声音问题
专栏:Python基础教程目录 专栏:使用PyQt开发图形界面Python应用 专栏:PyQt入门学习 老猿Python博文目录 老猿学5G博文目录 在使用moviepy进行音视频剪辑时发现输出成功但 ...