
Python+MySQL随机试卷及答案生成程序
一、背景
本文章主要是分享如何使用Python从MySQL数据库中面抽取试题,生成的试卷每一份都不一样。
二、准备工作
1.安装Python3
下载地址:https://www.python.org/downloads/windows/
2.安装库
pip install python-docx==0.8.10
pip install PyMySQL==1.0.2
3.试题库.xlsx
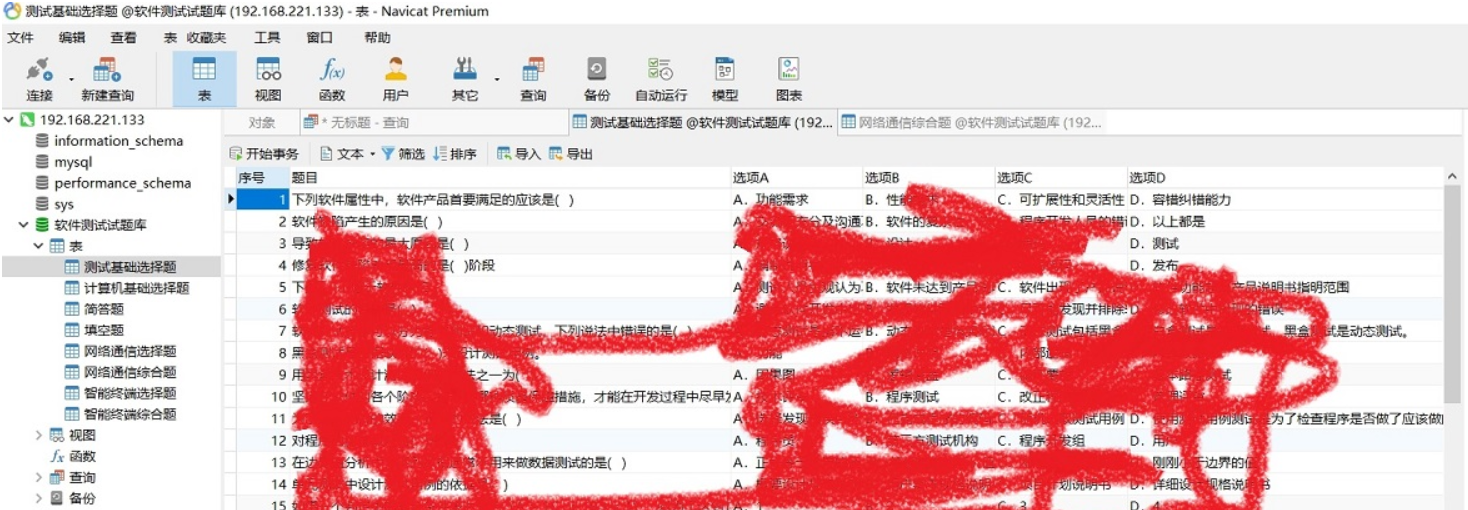
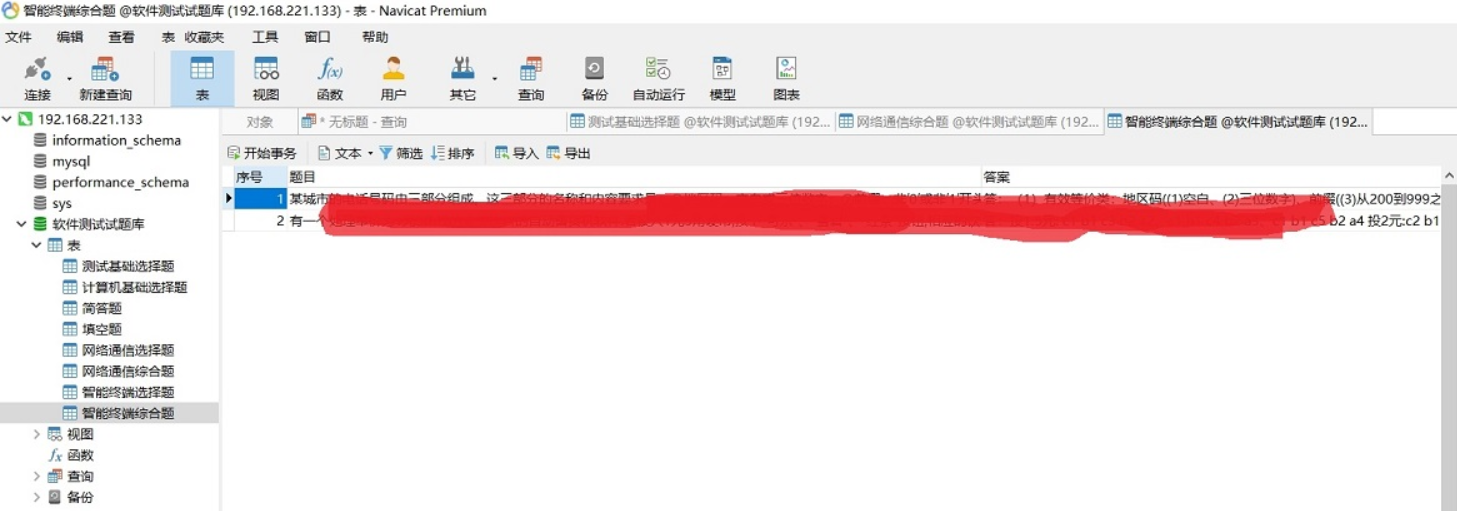
开发程序前需要先收集试题,本文是将试题收集存放MySQL数据库中,格式如下:
选择题数据库截图:
填空题/解答题/综合题数据库截图:
三、代码
Python+MySQL随机试卷及答案生成程序.py
# _*_ coding:utf-8 _*_

import random,os,pymysql

from docx import Document

from docx.shared import Inches,Pt

from docx.enum.text import WD_ALIGN_PARAGRAPH,WD_LINE_SPACING

from docx.oxml.ns import qn

from docx.shared import Inches

class SunckSql():

    def __init__(self, host, user, passwd, dbName='', charset='utf8'):

        self.host = host

        self.user = user

        self.passwd = passwd

        self.dbName = dbName

        self.charset = charset

    def connet(self):

        self.db = pymysql.connect(host=self.host, user=self.user, passwd=self.passwd, db=self.dbName,

                                  charset=self.charset)  # 连接数据库

        self.cursor = self.db.cursor()  # 获取操作游标

    def close(self):

        self.cursor.close()  # 释放游标

        self.db.close()  # 关闭数据库连接

    # 查询

    def get_all(self, sql):

        res = None

        try:

            self.connet()

            self.cursor.execute(sql)  # 执行sql语句

            res = self.cursor.fetchall()  # 返回查询所有结果

        except Exception as e:

            print('查询失败:%s' % e)

        finally:

            self.close()

        return res

    # 增加、删除、修改

    def shell_sql(self, sql):

        "执行sql语句"

        print(sql)

        count = 0

        try:

            self.connet()

            count = self.cursor.execute(sql)  # 执行sql语句

            self.db.commit()  # 提交

        except Exception as e:

            print('事务提交失败:%s' % e)

            self.db.rollback()  # 如果提交失败,回滚到上一次数据

        finally:

            self.close()

        return count

def router_docx(choice1='', choice2='', choice3='', choice5='', choice6='', choice7='',paper_path='',name='1'):

    "生成网络通信方向试题及答案"

    docx1 = Document()

    docx2 = Document()

    docx1.styles['Normal'].font.name = '宋体'                                 #选择字体

    docx1.styles['Normal']._element.rPr.rFonts.set(qn('w:eastAsia'), '宋体')  #默认字体

    docx1.styles['Normal'].font.size = Pt(11)                                #默认字号大小

    docx1.styles['Normal'].paragraph_format.space_before = Pt(0)             #默认段前间距

    docx1.styles['Normal'].paragraph_format.space_after = Pt(0)              #默认段后间距

    docx1.styles['Normal'].paragraph_format.line_spacing_rule = WD_LINE_SPACING.ONE_POINT_FIVE   #默认单倍行距

    sec = docx1.sections[0]                                                  # sections对应文档中的“节”

    sec.left_margin = Inches(1)                                              # 设置左页面边距

    sec.right_margin = Inches(1)                                             #设置右页面边距

    sec.top_margin = Inches(0.5)                                             # 设置上页面边距

    sec.bottom_margin = Inches(0.5)                                          #设置下页面边距

    p=docx1.add_paragraph()                                                  #添加段落

    run = p.add_run('软件测试(网络通信)方向试题(%s)' % name)                      #使用add_run添加文字

    run.font.name = '微软雅黑'                                                 #设置字体

    run._element.rPr.rFonts.set(qn('w:eastAsia'), '微软雅黑')                  #设置字体

    run.font.size = Pt(18)                                                   #字体大小设置

    p.paragraph_format.alignment = WD_ALIGN_PARAGRAPH.CENTER                 #段落文字居中设置

    docx1.add_paragraph('【说明】')                                            # 添加段落文字

    docx1.add_paragraph('1.笔试时间为60分钟。')

    docx1.add_paragraph('2.请将答案写在答题卡上,且不允许在试题卷上做任何涂写和标记。')

    q=docx2.add_paragraph()                                                  #添加段落

    run = q.add_run('软件测试(网络通信)方向试题答案(%s)' % name)                   #使用add_run添加文字

    run.font.name = '微软雅黑'                                                 #设置字体

    run._element.rPr.rFonts.set(qn('w:eastAsia'), '微软雅黑')                  #设置字体

    run.font.size = Pt(18)                                                   #字体大小设置

    q.paragraph_format.alignment = WD_ALIGN_PARAGRAPH.CENTER                 #段落文字居中设置

    p1 = docx1.add_paragraph()

    p1.paragraph_format.space_before = Pt(12)                                #设置段前间距

    docx2.add_paragraph('一、选择题')

    run = p1.add_run('一、选择题(每题3分共45分)')

    run.bold = True                                                          # 字体加粗

    list1=random.sample(range(0,len(choice1)-1),3)                           #len范围内获取指定的数量

    x=1

    for y in list1:

        docx1.add_paragraph(str(x)+'、'+choice1[y][1])

        docx1.add_paragraph(choice1[y][2])

        docx1.add_paragraph(choice1[y][3])

        docx1.add_paragraph(choice1[y][4])

        p11=docx1.add_paragraph(choice1[y][5])

        p11.paragraph_format.space_after = Pt(12)                            #段后间距

        docx2.add_paragraph(str(x)+'、'+choice1[y][6])

        x+=1

    list2=random.sample(range(0,len(choice2)-1),7)

    x=1

    for y in list2:

        docx1.add_paragraph(str(x+3)+'、'+choice2[y][1])

        docx1.add_paragraph(choice2[y][2])

        docx1.add_paragraph(choice2[y][3])

        docx1.add_paragraph(choice2[y][4])

        p11=docx1.add_paragraph(choice2[y][5])

        p11.paragraph_format.space_after = Pt(12)

        docx2.add_paragraph(str(x+3)+'、'+choice2[y][6])

        x+=1

    list3=random.sample(range(0,len(choice3)-1),5)

    x=1

    for y in list3:

        docx1.add_paragraph(str(x+10)+'、'+choice3[y][1])

        docx1.add_paragraph(choice3[y][2])

        docx1.add_paragraph(choice3[y][3])

        docx1.add_paragraph(choice3[y][4])

        p11=docx1.add_paragraph(choice3[y][5])

        p11.paragraph_format.space_after = Pt(12)

        docx2.add_paragraph(str(x+10)+'、'+choice3[y][6])

        x+=1

    p2 = docx1.add_paragraph()

    p2.paragraph_format.space_before = Pt(12)

    docx2.add_paragraph('二、填空题')

    run = p2.add_run('二、填空题(每题3分,共15分)')

    run.bold = True

    list2 = random.sample(range(0, len(choice5)-1), 5)

    i = 1

    for j in list2:

        docx1.add_paragraph(str(i) + '、' + choice5[j][1])

        docx2.add_paragraph(str(i) + '、' + str(choice5[j][2]))

        i += 1

    p3 = docx1.add_paragraph()

    p3.paragraph_format.space_before = Pt(12)

    docx2.add_paragraph('三、简答题')

    run = p3.add_run('三、简答题(每题10分,共20分)')

    run.bold = True

    list3 = random.sample(range(0, len(choice6)-1), 2)

    n = 1

    for m in list3:

        docx1.add_paragraph(str(n) + '、' + choice6[m][1])

        docx1.add_paragraph('\r')

        docx2.add_paragraph(str(n) + '、' + choice6[m][2])

        n += 1

    p4 = docx1.add_paragraph()

    p4.paragraph_format.space_before = Pt(12)

    docx2.add_paragraph('四、综合题')

    run = p4.add_run('四、综合题(共20分)')

    run.bold = True

    list4 = random.randint(0, len(choice7)-1)

    docx1.add_paragraph('1、' + choice7[list4][1])

    docx2.add_paragraph(choice7[list4][2])

    docx1.save(os.path.join(paper_path, '网络通信试题(%s).docx' % name))              #保存试题

    docx2.save(os.path.join(paper_path, '网络通信试题答案(%s).docx' % name))           #保存答案

def android_docx(choice1, choice2, choice4, choice5, choice6, choice8,paper_path,name):

    """生成智能终端方向的试题"""

    docx1 = Document()

    docx2 = Document()

    docx1.styles['Normal'].font.name = '宋体'                                        #选择字体

    docx1.styles['Normal']._element.rPr.rFonts.set(qn('w:eastAsia'), '宋体')         #默认字体

    docx1.styles['Normal'].font.size = Pt(11)                                       #默认字号大小

    docx1.styles['Normal'].paragraph_format.space_before = Pt(0)                    #默认段前间距

    docx1.styles['Normal'].paragraph_format.space_after = Pt(0)                     #默认段后间距

    docx1.styles['Normal'].paragraph_format.line_spacing_rule = WD_LINE_SPACING.ONE_POINT_FIVE   #默认单倍行距

    sec = docx1.sections[0]                                                         # sections对应文档中的“节”

    sec.left_margin = Inches(1)                                                     # 设置左页面边距

    sec.right_margin = Inches(1)                                                    #设置右页面边距

    sec.top_margin = Inches(0.5)                                                    # 设置上页面边距

    sec.bottom_margin = Inches(0.5)                                                 #设置下页面边距

    p=docx1.add_paragraph()                                                         #添加段落

    run = p.add_run('软件测试(智能终端)方向试题(%s)' % name)                             #使用add_run添加文字

    run.font.name = '微软雅黑'                                                        #设置字体

    run._element.rPr.rFonts.set(qn('w:eastAsia'), '微软雅黑')                         #设置字体

    run.font.size = Pt(18)                                                          #字体大小设置

    p.paragraph_format.alignment = WD_ALIGN_PARAGRAPH.CENTER                        #段落文字居中设置

    docx1.add_paragraph('【说明】')                                                   # 添加段落文字

    docx1.add_paragraph('1.笔试时间为60分钟。')

    docx1.add_paragraph('2.请将答案写在答题卡上,且不允许在试题卷上做任何涂写和标记。')

    q = docx2.add_paragraph()                                                       # 添加段落

    run = q.add_run('软件测试(智能终端)方向试题答案(%s)' % name)                          # 使用add_run添加文字

    run.font.name = '微软雅黑'                                                        # 设置字体

    run._element.rPr.rFonts.set(qn('w:eastAsia'), '微软雅黑')                         # 设置字体

    run.font.size = Pt(18)                                                          # 字体大小设置

    q.paragraph_format.alignment = WD_ALIGN_PARAGRAPH.CENTER                        # 段落文字居中设置

    p1 = docx1.add_paragraph()

    p1.paragraph_format.space_before = Pt(12)                                       #设置段前间距

    docx2.add_paragraph('一、选择题')

    run = p1.add_run('一、选择题(每题3分共45分)')

    run.bold = True                                                                 # 字体加粗

    list1=random.sample(range(0,len(choice1)-1),3)

    x=1

    for y in list1:

        docx1.add_paragraph(str(x)+'、'+choice1[y][1])

        docx1.add_paragraph(choice1[y][2])

        docx1.add_paragraph(choice1[y][3])

        docx1.add_paragraph(choice1[y][4])

        p11=docx1.add_paragraph(choice1[y][5])

        p11.paragraph_format.space_after = Pt(12)                                  #段后间距

        docx2.add_paragraph(str(x)+'、'+choice1[y][6])

        x+=1

    list2=random.sample(range(0,len(choice2)-1),7)

    x=1

    for y in list2:

        docx1.add_paragraph(str(x+3)+'、'+choice2[y][1])

        docx1.add_paragraph(choice2[y][2])

        docx1.add_paragraph(choice2[y][3])

        docx1.add_paragraph(choice2[y][4])

        p11=docx1.add_paragraph(choice2[y][5])

        p11.paragraph_format.space_after = Pt(12)

        docx2.add_paragraph(str(x+3)+'、'+choice2[y][6])

        x+=1

    list3=random.sample(range(0,len(choice4)-1),5)

    x=1

    for y in list3:

        docx1.add_paragraph(str(x+10)+'、'+choice4[y][1])

        docx1.add_paragraph(choice4[y][2])

        docx1.add_paragraph(choice4[y][3])

        docx1.add_paragraph(choice4[y][4])

        p11=docx1.add_paragraph(choice4[y][5])

        p11.paragraph_format.space_after = Pt(12)

        docx2.add_paragraph(str(x+10)+'、'+choice4[y][6])

        x+=1

    p2 = docx1.add_paragraph()

    p2.paragraph_format.space_before = Pt(12)

    docx2.add_paragraph('二、填空题')

    run = p2.add_run('二、填空题(每题3分,共15分)')

    run.bold = True

    list2 = random.sample(range(0, len(choice5)-1), 5)

    i = 1

    for j in list2:

        docx1.add_paragraph(str(i) + '、' + choice5[j][1])

        docx2.add_paragraph(str(i) + '、' + str(choice5[j][2]))

        i += 1

    p3 = docx1.add_paragraph()

    p3.paragraph_format.space_before = Pt(12)

    docx2.add_paragraph('三、简答题')

    run = p3.add_run('三、简答题(每题10分,共20分)')

    run.bold = True

    list3 = random.sample(range(0, len(choice6)-1), 2)

    n = 1

    for m in list3:

        docx1.add_paragraph(str(n) + '、' + choice6[m][1])

        docx1.add_paragraph('\r')

        docx2.add_paragraph(str(n) + '、' + choice6[m][2])

        n += 1

    p4 = docx1.add_paragraph()

    p4.paragraph_format.space_before = Pt(12)

    docx2.add_paragraph('四、综合题')

    run = p4.add_run('四、综合题(共20分)')

    run.bold = True

    list4 = random.randint(0, len(choice8)-1)

    docx1.add_paragraph('1、' + choice8[list4][1])

    docx2.add_paragraph(choice8[list4][2])

    docx1.save(os.path.join(paper_path, '智能终端试题(%s).docx' % name))

    docx2.save(os.path.join(paper_path, '智能终端试题答案(%s).docx' % name))

def main(ip,name,passwd,db_name):

    paper_path = os.path.join(os.path.dirname(os.path.abspath(__file__)), '试卷')   #试卷存放路径

    if not os.path.exists(paper_path):

        os.mkdir(paper_path)                                                       #创建试卷文件夹

    my = SunckSql(ip,name,passwd,db_name)                                          #连接数据库

    choice1 = my.get_all("select * from %s" % '计算机基础选择题')                     #查询数据库中的试题

    choice2 = my.get_all("select * from %s" % '测试基础选择题')

    choice3 = my.get_all("select * from %s" % '网络通信选择题')

    choice4 = my.get_all("select * from %s" % '智能终端选择题')

    choice5 = my.get_all("select * from %s" % '填空题')

    choice6 = my.get_all("select * from %s" % '简答题')

    choice7 = my.get_all("select * from %s" % '网络通信综合题')

    choice8 = my.get_all("select * from %s" % '智能终端综合题')

    for i in range(1,4):                                                           #同时生成3份试卷及答案

        router_docx(choice1, choice2, choice3, choice5, choice6, choice7, paper_path, i)

        android_docx(choice1, choice2, choice4, choice5, choice6, choice8, paper_path, i)

if __name__ == "__main__":

    main(ip='数据库ip地址', name='mysql账号', passwd='mysql密码', db_name='软件测试试题库')
Python+MySQL随机试卷及答案生成程序的更多相关文章
- python实践项目八:生成随机试卷文件
描述:匹配美国50个州的首府. 下面是程序需要完成的任务: • 创建35 份不同的测验试卷. • 为每份试卷创建50 个多重选择题,次序随机. • 为每个问题提供一个正确答案和3 个随机的错误答案,次 ...
- 如何实现MySQL随机查询数据与MySQL随机更新数据?
以下的文章主要介绍的是MySQL随机选取数据,对实现MySQ随机查询数据与MySQ随机更新数据的实际操作步骤的描述,以及对其实际操作中所要用到的语句的描述,以下就是对其具体操作步骤的描述. MySQL ...
- 实验8、31个最重要的Python Flask面试问题和答案
实验介绍 1. 实验内容 内容涵盖了31个最热门的Flask面试问题,帮助学生更好的理解Flask. 2. 实验要点 了解面试Flask开发人员的常见问题 实验内容 Flask面试问答 Q:Flask ...
- Python—>Mysql—>Dbvisualizer
MySQLdb: https://pypi.python.org/pypi/MySQL-python/1.2.4 import MySQLdb 1.Download Connector/Python: ...
- Python Mysql 篇
Python 操作 Mysql 模块的安装 linux: yum install MySQL-python window: http://files.cnblogs.com/files/wupeiqi ...
- MYSQL随机抽取查询 MySQL Order By Rand()效率问题
MYSQL随机抽取查询:MySQL Order By Rand()效率问题一直是开发人员的常见问题,俺们不是DBA,没有那么牛B,所只能慢慢研究咯,最近由于项目问题,需要大概研究了一下MYSQL的随机 ...
- Python MySQL ORM QuickORM hacking
# coding: utf-8 # # Python MySQL ORM QuickORM hacking # 说明: # 以前仅仅是知道有ORM的存在,但是对ORM这个东西内部工作原理不是很清楚, ...
- 分享:mysql 随机查询数据
在mysql中查询5条不重复的数据,使用以下: 1 SELECT * FROM `table` ORDER BY RAND() LIMIT 5 就可以了.但是真正测试一下才发现这样效率非常低.一个1 ...
- python 之路,Day11(上) - python mysql and ORM
python 之路,Day11 - python mysql and ORM 本节内容 数据库介绍 mysql 数据库安装使用 mysql管理 mysql 数据类型 常用mysql命令 创建数据库 ...
随机推荐
- 使用JMeter进行负载测试快速入门
相信JMeter是很多测试人员必备技能之一,今天简单讲一下开发人员如何使用JMeter进行简单的压力测试快速入门. 安装JMeter Jmter官方地址 按提示下载JMeter,然后直接解压就可以用了 ...
- 面试官:小伙子,你给我简单说一下RocketMQ 整合 Spring Boot吧
前言 在使用SpringBoot的starter集成包时,要特别注意版本.因为SpringBoot集成RocketMQ的starter依赖是由Spring社区提供的,目前正在快速迭代的过程当中,不同版 ...
- JavaScript中遍历的几种方法
1.while循环 while后面跟循环条件和执行语句,只要满足条件,就会一直执行里面的执行 var i = 0 while(){ console.log(i) i++ } 2.do...while循 ...
- Goldengate搭建
OGG进程 捕获进程(源端):捕获online redo log或者archived log中增量事务日志 传输进程(源端):把目标端落地的trail文件通过配置的路由信息传输到目标端 网络传输:tc ...
- python绘折线图
# -*- coding: utf-8 -*- import numpy as np import matplotlib.pyplot as plt #X轴,Y轴数据 y = [0.3,0.4,2,5 ...
- pyhon 自动化 logger
#!/Users/windows8.1/PycharmProjects/pythonapi# @Software: PyCharm Community Edition# -*- coding: utf ...
- mysqldump备份数据
create database test; use test; create table test(id int,name char(8)); insert into test values(1,'p ...
- QEMU/KVM网络模式(二)——NAT
在QEMU/KVM中,默认使用IP伪装的方式去实现NAT,而不是用SNAT或DNAT的方式. 1.安装软件包 # yum -y install bridge-utils iptables dnsmas ...
- iOS 调用系统拍照遇到的坑
iOS 11之前用的一套图片选择器框架,之前一直没问题,iOS11之后拍照后回调失败......,打断点方法完全执行,也能回调成功:但是去掉断点又恢复不能会调的问题.困扰了一下午,愣是没有解决.后来把 ...
- C# HTML帮助类 包括补全标签 截取HTML字符串包含标签
public static class HtmlHelper { /// <summary> /// 按文本内容长度截取HTML字符串(支持截取带HTML代码样式的字符串) /// < ...