Forms and actions
Forms and actions
Adding new albums
We can now code up the functionality to add new albums. There are two bits to this part:
- Display a form for user to provide details.
- Process the form submission and store to database.
We will use zend-form to do this. zend-form manages the various form inputs as well as their validation, the latter of which is handled by the zend-inputfilter component. We'll start by creating a new class, Album\Form\AlbumForm, extending from Zend\Form\Form. Create the filemodule/Album/src/Form/AlbumForm.php with the following contents:
namespace Album\Form;

use Zend\Form\Form;

class AlbumForm extends Form

{

    public function __construct($name = null)

    {

        // We will ignore the name provided to the constructor

        parent::__construct('album');

        $this->add([

            'name' => 'id',

            'type' => 'hidden',

        ]);

        $this->add([

            'name' => 'title',

            'type' => 'text',

            'options' => [

                'label' => 'Title',

            ],

        ]);

        $this->add([

            'name' => 'artist',

            'type' => 'text',

            'options' => [

                'label' => 'Artist',

            ],

        ]);

        $this->add([

            'name' => 'submit',

            'type' => 'submit',

            'attributes' => [

                'value' => 'Go',

                'id'    => 'submitbutton',

            ],

        ]);

    }

}
Within the constructor of AlbumForm we do several things. First, we set the name of the form as we call the parent's constructor. The, we create four form elements: the id, title, artist, and submit button. For each item we set various attributes and options, including the label to be displayed.
Form method
HTML forms can be sent using
POSTandGET. zend-form defaults toPOST; therefore you don't have to be explicit in setting this option. If you want to change it toGEThowever, set the method attribute in the constructor:$this->setAttribute('method', 'GET');
We also need to set up validation for this form. zend-inputfilter provides a general purpose mechanism for input validation. It also provides an interface,InputFilterAwareInterface, which zend-form will use in order to bind an input filter to a given form. We'll add this capability now to our Album class.
// module/Album/src/Model/Album.php:

namespace Album\Model;

// Add the following import statements:

use DomainException;

use Zend\InputFilter\InputFilter;

use Zend\InputFilter\InputFilterAwareInterface;

use Zend\InputFilter\InputFilterInterface;

class Album implements InputFilterAwareInterface

{

    public $id;

    public $artist;

    public $title;

    // Add this property:

    private $inputFilter;

    public function exchangeArray(array $data)

    {

        $this->id     = ! empty($data['id']) ? $data['id'] : null;

        $this->artist = ! empty($data['artist']) ? $data['artist'] : null;

        $this->title  = ! empty($data['title']) ? $data['title'] : null;

    }

    public function getArrayCopy()

    {

        return [

            'id'     => $this->id,

            'artist' => $this->artist,

            'title'  => $this->title,

        ];

    }

    /* Add the following methods: */

    public function setInputFilter(InputFilterInterface $inputFilter)

    {

        throw new DomainException(sprintf(

            '%s does not allow injection of an alternate input filter',

            __CLASS__

        ));

    }

    public function getInputFilter()

    {

        if ($this->inputFilter) {

            return $this->inputFilter;

        }

        $inputFilter = new InputFilter();

        $inputFilter->add([

            'name' => 'id',

            'required' => true,

            'filters' => [

                ['name' => 'int'],

            ],

        ]);

        $inputFilter->add([

            'name' => 'artist',

            'required' => true,

            'filters' => [

                ['name' => 'StripTags'],

                ['name' => 'StringTrim'],

            ],

            'validators' => [

                [

                    'name' => 'StringLength',

                    'options' => [

                        'encoding' => 'UTF-8',

                        'min' => 1,

                        'max' => 100,

                    ],

                ],

            ],

        ]);

        $inputFilter->add([

            'name' => 'title',

            'required' => true,

            'filters' => [

                ['name' => 'StripTags'],

                ['name' => 'StringTrim'],

            ],

            'validators' => [

                [

                    'name' => 'StringLength',

                    'options' => [

                        'encoding' => 'UTF-8',

                        'min' => 1,

                        'max' => 100,

                    ],

                ],

            ],

        ]);

        $this->inputFilter = $inputFilter;

        return $this->inputFilter;

    }

}
The InputFilterAwareInterface defines two methods: setInputFilter() andgetInputFilter(). We only need to implement getInputFilter() so we throw an exception from setInputFilter().
Within getInputFilter(), we instantiate an InputFilter and then add the inputs that we require. We add one input for each property that we wish to filter or validate. For the id field we add an int filter as we only need integers. For the text elements, we add two filters, StripTags and StringTrim, to remove unwanted HTML and unnecessary white space. We also set them to be requiredand add a StringLength validator to ensure that the user doesn't enter more characters than we can store into the database.
We now need to get the form to display and then process it on submission. This is done within the AlbumController::addAction():
// module/Album/src/Controller/AlbumController.php:

// Add the following import statements at the top of the file:

use Album\Form\AlbumForm;

use Album\Model\Album;

class AlbumController extends AbstractActionController

{

    /* ... */

    /* Update the following method to read as follows: */

    public function addAction()

    {

        $form = new AlbumForm();

        $form->get('submit')->setValue('Add');

        $request = $this->getRequest();

        if (! $request->isPost()) {

            return ['form' => $form];

        }

        $album = new Album();

        $form->setInputFilter($album->getInputFilter());

        $form->setData($request->getPost());

        if (! $form->isValid()) {

            return ['form' => $form];

        }

        $album->exchangeArray($form->getData());

        $this->table->saveAlbum($album);

        return $this->redirect()->toRoute('album');

    }

    /* ... */

}
After adding the Album and AlbumForm classes to the import list, we implementaddAction(). Let's look at the addAction() code in a little more detail:
$form = new AlbumForm();

$form->get('submit')->setValue('Add');
We instantiate AlbumForm and set the label on the submit button to "Add". We do this here as we'll want to re-use the form when editing an album and will use a different label.
$request = $this->getRequest();

if (! $request->isPost()) {

    return ['form' => $form];

}
If the request is not a POST request, then no form data has been submitted, and we need to display the form. zend-mvc allows you to return an array of data instead of a view model if desired; if you do, the array will be used to create a view model.
$album = new Album();

$form->setInputFilter($album->getInputFilter());

$form->setData($request->getPost());
At this point, we know we have a form submission. We create an Album instance, and pass its input filter on to the form; additionally, we pass the submitted data from the request instance to the form.
if (! $form->isValid()) {

    return ['form' => $form];

}
If form validation fails, we want to redisplay the form. At this point, the form contains information about what fields failed validation, and why, and this information will be communicated to the view layer.
$album->exchangeArray($form->getData());

$this->getAlbumTable()->saveAlbum($album);
If the form is valid, then we grab the data from the form and store to the model using saveAlbum().
return $this->redirect()->toRoute('album');After we have saved the new album row, we redirect back to the list of albums using the Redirect controller plugin.
We now need to render the form in the add.phtml view script:
<?php

// module/Album/view/album/album/add.phtml:

$title = 'Add new album';

$this->headTitle($title);

?>

<h1><?= $this->escapeHtml($title) ?></h1>

<?php

$form->setAttribute('action', $this->url('album', ['action' => 'add']));

$form->prepare();

echo $this->form()->openTag($form);

echo $this->formHidden($form->get('id'));

echo $this->formRow($form->get('title'));

echo $this->formRow($form->get('artist'));

echo $this->formSubmit($form->get('submit'));

echo $this->form()->closeTag();
We display a title as before, and then we render the form. zend-form provides several view helpers to make this a little easier. The form() view helper has anopenTag() and closeTag() method which we use to open and close the form. Then for each element with a label, we can use formRow() to render the label, input, and any validation error messages; for the two elements that are standalone and have no validation rules, we use formHidden() andformSubmit().
Alternatively, the process of rendering the form can be simplified by using the bundled formCollection view helper. For example, in the view script above replace all the form-rendering echo statements with:
echo $this->formCollection($form);This will iterate over the form structure, calling the appropriate label, element, and error view helpers for each element, but you still have to wrapformCollection($form) with the open and close form tags. This helps reduce the complexity of your view script in situations where the default HTML rendering of the form is acceptable.
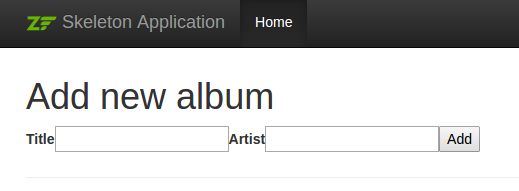
You should now be able to use the "Add new album" link on the home page of the application to add a new album record, resulting in something like the following:
This doesn't look all that great! The reason is because Bootstrap, the CSS foundation used in the skeleton, has specialized markup for displaying forms! We can address that in our view script by:
- Adding markup around the elements.
- Rendering labels, elements, and error messages separately.
- Adding attributes to elements.
Update your add.phtml view script to read as follows:
<?php

$title = 'Add new album';

$this->headTitle($title);

?>

<h1><?= $this->escapeHtml($title) ?></h1>

<?php

// This provides a default CSS class and placeholder text for the title element:

$album = $form->get('title');

$album->setAttribute('class', 'form-control');

$album->setAttribute('placeholder', 'Album title');

// This provides a default CSS class and placeholder text for the artist element:

$artist = $form->get('artist');

$artist->setAttribute('class', 'form-control');

$artist->setAttribute('placeholder', 'Artist');

// This provides CSS classes for the submit button:

$submit = $form->get('submit');

$submit->setAttribute('class', 'btn btn-primary');

$form->setAttribute('action', $this->url('album', ['action' => 'add']));

$form->prepare();

echo $this->form()->openTag($form);

?>

<?php // Wrap the elements in divs marked as form groups, and render the

      // label, element, and errors separately within ?>

<div class="form-group">

    <?= $this->formLabel($album) ?>

    <?= $this->formElement($album) ?>

    <?= $this->formElementErrors()->render($album, ['class' => 'help-block']) ?>

</div>

<div class="form-group">

    <?= $this->formLabel($artist) ?>

    <?= $this->formElement($artist) ?>

    <?= $this->formElementErrors()->render($artist, ['class' => 'help-block']) ?>

</div>

<?php

echo $this->formSubmit($submit);

echo $this->formHidden($form->get('id'));

echo $this->form()->closeTag();
The results we get are much better:

The above is meant to demonstrate both the ease of use of the default form features, as well as some of the customizations possible when rendering forms. You should be able to generate any markup necessary for your site.
Editing an album
Editing an album is almost identical to adding one, so the code is very similar. This time we use editAction() in the AlbumController:
// module/Album/src/Controller/AlbumController.php:

// ...

    public function editAction()

    {

        $id = (int) $this->params()->fromRoute('id', 0);

        if (0 === $id) {

            return $this->redirect()->toRoute('album', ['action' => 'add']);

        }

        // Retrieve the album with the specified id. Doing so raises

        // an exception if the album is not found, which should result

        // in redirecting to the landing page.

        try {

            $album = $this->table->getAlbum($id);

        } catch (\Exception $e) {

            return $this->redirect()->toRoute('album', ['action' => 'index']);

        }

        $form = new AlbumForm();

        $form->bind($album);

        $form->get('submit')->setAttribute('value', 'Edit');

        $request = $this->getRequest();

        $viewData = ['id' => $id, 'form' => $form];

        if (! $request->isPost()) {

            return $viewData;

        }

        $form->setInputFilter($album->getInputFilter());

        $form->setData($request->getPost());

        if (! $form->isValid()) {

            return $viewData;

        }

        $this->table->saveAlbum($album);

        // Redirect to album list

        return $this->redirect()->toRoute('album', ['action' => 'index']);

    }
This code should look comfortably familiar. Let's look at the differences from adding an album. Firstly, we look for the id that is in the matched route and use it to load the album to be edited:
$id = (int) $this->params()->fromRoute('id', 0);

if (0 === $id) {

    return $this->redirect()->toRoute('album', ['action' => 'add']);

}

// Retrieve the album with the specified id. Doing so raises

// an exception if the album is not found, which should result

// in redirecting to the landing page.

try {

    $album = $this->table->getAlbum($id);

} catch (\Exception $e) {

    return $this->redirect()->toRoute('album', ['action' => 'index']);

}
params is a controller plugin that provides a convenient way to retrieve parameters from the matched route. We use it to retrieve the id from the route we created within the Album module's module.config.php. If the id is zero, then we redirect to the add action, otherwise, we continue by getting the album entity from the database.
We have to check to make sure that the album with the specified id can actually be found. If it cannot, then the data access method throws an exception. We catch that exception and re-route the user to the index page.
$form = new AlbumForm();

$form->bind($album);

$form->get('submit')->setAttribute('value', 'Edit');
The form's bind() method attaches the model to the form. This is used in two ways:
- When displaying the form, the initial values for each element are extracted from the model.
- After successful validation in
isValid(), the data from the form is put back into the model.
These operations are done using a hydrator object. There are a number of hydrators, but the default one is Zend\Hydrator\ArraySerializable which expects to find two methods in the model: getArrayCopy() andexchangeArray(). We have already written exchangeArray() in our Albumentity, so we now need to write getArrayCopy():
// module/Album/src/Model/Album.php:

// ...

    public function exchangeArray($data)

    {

        $this->id     = (isset($data['id']))     ? $data['id']     : null;

        $this->artist = (isset($data['artist'])) ? $data['artist'] : null;

        $this->title  = (isset($data['title']))  ? $data['title']  : null;

    }

    // Add the following method:

    public function getArrayCopy()

    {

        return [

            'id'     => $this->id,

            'artist' => $this->artist,

            'title'  => $this->title,

        ];

    }

// ...
As a result of using bind() with its hydrator, we do not need to populate the form's data back into the $album as that's already been done, so we can just call the mapper's saveAlbum() method to store the changes back to the database.
The view template, edit.phtml, looks very similar to the one for adding an album:
<?php

// module/Album/view/album/album/edit.phtml:

$title = 'Edit album';

$this->headTitle($title);

?>

<h1><?= $this->escapeHtml($title) ?></h1>

<?php

$album = $form->get('title');

$album->setAttribute('class', 'form-control');

$album->setAttribute('placeholder', 'Album title');

$artist = $form->get('artist');

$artist->setAttribute('class', 'form-control');

$artist->setAttribute('placeholder', 'Artist');

$submit = $form->get('submit');

$submit->setAttribute('class', 'btn btn-primary');

$form->setAttribute('action', $this->url('album', [

    'action' => 'edit',

    'id'     => $id,

]));

$form->prepare();

echo $this->form()->openTag($form);

?>

<div class="form-group">

    <?= $this->formLabel($album) ?>

    <?= $this->formElement($album) ?>

    <?= $this->formElementErrors()->render($album, ['class' => 'help-block']) ?>

</div>

<div class="form-group">

    <?= $this->formLabel($artist) ?>

    <?= $this->formElement($artist) ?>

    <?= $this->formElementErrors()->render($artist, ['class' => 'help-block']) ?>

</div>

<?php

echo $this->formSubmit($submit);

echo $this->formHidden($form->get('id'));

echo $this->form()->closeTag();
The only changes are to use the ‘Edit Album' title and set the form's action to the 'edit' action too, using the current album identifier.
You should now be able to edit albums.
Deleting an album
To round out our application, we need to add deletion. We have a "Delete" link next to each album on our list page, and the naive approach would be to do a delete when it's clicked. This would be wrong. Remembering our HTTP spec, we recall that you shouldn't do an irreversible action using GET and should use POST instead.
We shall show a confirmation form when the user clicks delete, and if they then click "yes", we will do the deletion. As the form is trivial, we'll code it directly into our view (zend-form is, after all, optional!).
Let's start with the action code in AlbumController::deleteAction():
// module/Album/src/Album/Controller/AlbumController.php:

//...

    // Add content to the following method:

    public function deleteAction()

    {

        $id = (int) $this->params()->fromRoute('id', 0);

        if (!$id) {

            return $this->redirect()->toRoute('album');

        }

        $request = $this->getRequest();

        if ($request->isPost()) {

            $del = $request->getPost('del', 'No');

            if ($del == 'Yes') {

                $id = (int) $request->getPost('id');

                $this->getAlbumTable()->deleteAlbum($id);

            }

            // Redirect to list of albums

            return $this->redirect()->toRoute('album');

        }

        return array(

            'id'    => $id,

            'album' => $this->getAlbumTable()->getAlbum($id)

        );

    }

//...
As before, we get the id from the matched route, and check the request object'sisPost() to determine whether to show the confirmation page or to delete the album. We use the table object to delete the row using the deleteAlbum()method and then redirect back the list of albums. If the request is not a POST, then we retrieve the correct database record and assign to the view, along with the id.
The view script is a simple form:
<?php

// module/Album/view/album/album/delete.phtml:

$title = 'Delete album';

$url   = $this->url('album', ['action' => 'delete', 'id' => $id]);

$this->headTitle($title);

?>

<h1><?= $this->escapeHtml($title) ?></h1>

<p>

    Are you sure that you want to delete

    "<?= $this->escapeHtml($album->title) ?>" by

    "<?= $this->escapeHtml($album->artist) ?>"?

</p>

<form action="<?= $url ?>" method="post">

<div class="form-group">

    <input type="hidden" name="id" value="<?= (int) $album->id ?>" />

    <input type="submit" class="btn btn-danger" name="del" value="Yes" />

    <input type="submit" class="btn btn-success" name="del" value="No" />

</div>

</form>
In this script, we display a confirmation message to the user and then a form with "Yes" and "No" buttons. In the action, we checked specifically for the "Yes" value when doing the deletion.
Ensuring that the home page displays the list of albums
One final point. At the moment, the home page,http://zf2-tutorial.localhost/ doesn't display the list of albums.
This is due to a route set up in the Application module's module.config.php. To change it, open module/Application/config/module.config.php and find the home route:
'home' => [

    'type' => Literal::class,

    'options' => [

        'route'    => '/',

        'defaults' => [

            'controller' => Controller\IndexController::class,

            'action'     => 'index',

        ],

    ],

],
Import Album\Controller\AlbumController at the top of the file:
use Album\Controller\AlbumController;and change the controller from Controller\IndexController::class toAlbumController::class:
'home' => [

    'type' => Literal::class,

    'options' => [

        'route'    => '/',

        'defaults' => [

            'controller' => AlbumController::class, // <-- change here

            'action'     => 'index',

        ],

    ],

],
That's it — you now have a fully working application!
Forms and actions的更多相关文章
- 使用struts+spring+hibernate组装web应用
这篇文章将讨论怎样组合几个着名的框架去做到松耦合的目的,怎样建立你的构架,怎样让你的各个应用层保持一致.富于挑战的是:组合这些框架使得每一层都以一种松耦合的方式彼此沟通,而与底层的技术无关.这篇文章将 ...
- Spring,hibernate,struts的面试笔试题(含答案)
Hibernate工作原理及为什么要用? 原理: 1.读取并解析配置文件 2.读取并解析映射信息,创建SessionFactory 3.打开Sesssion 4.创建事务Transation 5.持久 ...
- Spring+Struts+Hibernate 简介(转)
http://blog.csdn.net/slnqnd/article/details/1772910/ Struts2.0 +Hibernate 3.2 +Spring 2.0 一. ...
- Trigger Execution Sequence in Oracle Forms
Introduction ------------ This document lists the order in which triggers fire in Oracle Forms 4.5: ...
- Windows Forms Application Creation and Initialization
Windows Forms Application Creation and Initialization This topic details the steps performed after a ...
- stark - 分页、search、actions
一.分页 效果图 知识点 1.分页 {{ showlist.pagination.page_html|safe }} 2.page.py class Pagination(object): def _ ...
- stark——分页、search、actions
一.分页 1.引入自定义分页组件 在/stark目录下创建utils工具包目录,复制page.py到该目录下,文件中有之前自定义的分页组件. class Pagination(object): def ...
- Oracle Forms Execute_Query Example To Fetch The Records From Database
Execute_Query command is used to fetch all the records for current database data block in Oracle For ...
- Limitations of Forms Personalization (文档 ID 420518.1)
In this Document Purpose Scope Details Diagnostics & Utilities Community: References A ...
随机推荐
- POJ 2352 Stars
题意:有一堆星星,每个星星的级别为坐标不高于它且不在它右边的星星个数,求级别为0-n - 1的星星个数. 解法:树状数组.输入的星星坐标已经按y坐标升序排序,y坐标相等的按x升序排序,所以每输入一个数 ...
- Could not locate executable null 解决办法
问题导读: 1.建一个MapReduce Project,运行时发现出问题:Could not locate executable null,该如何解决?2.Could not locate exec ...
- (转载)linux环境变量
转自:http://www.cnblogs.com/growup/archive/2011/07/02/2096142.html Linux 的变量可分为两类:环境变量和本地变量 环境变量,或者称为全 ...
- 验证码生成-->漂亮啊
验证码不用输出太多的HTML代码,直接创建一个一般处理程序,直接上代码 public class VCode : IHttpHandler { HttpContext context = null; ...
- 词汇小助手V3.0发布了——不只是一个查单词的软件
欢迎使用词汇小助手 作者:IT小小龙 电子邮箱:long_python@126.com 个人博客:http://blog.sina.com.cn/buduanqs 一款跨平台词汇查询记忆学习软件. 已 ...
- 手把手教你写对拍程序(PASCAL)
谁适合看这篇文章? ACMERS,OIERS或其它参加算法竞赛或需要算法的人 对操作系统并不太熟悉的人 不会写对拍的人 在网上找不到一个特别详细的对拍样例的人 不嫌弃我写的太低幼的人 前言 在NOIP ...
- 命令cp
cp 源 目标cp -r 递归复制整个目录cp -v 显示复制的详细信息
- A Tour of Go Exercise: Fibonacci closure
Let's have some fun with functions. Implement a fibonacci function that returns a function (a closur ...
- 【Stage3D学习笔记续】真正的3D世界(三):纹理效果
混合模式: 代码 示例是<Stage3D指南>中的直接弄出来的,可以通过点击键盘上的Q.W.E这3个按键,更换混合模式.模型和纹理,可以直观的查看不同混合模式的效果,住:下方的地形使用&q ...
- MSSQLSERVER- CharIndex的妙用,找出有妙用
CharIndex 1:CharIndex语法: CharIndex(expression1,expression2[,start_location]) 2:参数 expression1 一个表达式, ...