
Look into Bitmap images
What's a Bitmap image?
I'm not going to explain the differences between raster and vector images, nor the difference between bitmap image with extension .bmp and jpg/png images. Herein, the bitmap refers to raster images with .bmp extension only.
Bitmap is uncompressed, and the image is represented with arrays, namely, RGB arrays.
What's the storage of a bitmap
File structure of a bitmap
- The bitmaps stored on the physical devices contains serval parts:
- BITMAPINFO
1. BITMAPINFOHEADER
2. RGBQUAD
2. The stored data in array
A bitmap file is composed with
- BITMAPFILEHEADER
- BITMAPINFOHEADER
- Data array
The definition are
typedef struct tagBITMAPFILEHEADER {

    WORD  bfType;		// 2 bytes

    DWORD bfSize;		// 4 bytes

    WORD  bfReserved1;	// 2 bytes

    WORD  bfReserved2;  // 2 bytes

    DWORD bfOffBits;    // 4 bytes

} BITMAPFILEHEADER, *LPBITMAPFILEHEADER, *PBITMAPFILEHEADER;
typedef struct tagBITMAPINFO {

    BITMAPINFOHEADER bmiHeader;

    RGBQUAD          bmiColors[1];		// the '1' here is pretty tricky

} BITMAPINFO, *LPBITMAPINFO, *PBITMAPINFO;
typedef struct tagBITMAPINFOHEADER {

    DWORD biSize;			 // 8 bytes

    LONG  biWidth;			// 4 bytes

    LONG  biHeight;			// 4 bytes

    WORD  biPlanes;			//

    WORD  biBitCount;

    DWORD biCompression;

    DWORD biSizeImage;

    LONG  biXPelsPerMeter;

    LONG  biYPelsPerMeter;

    DWORD biClrUsed;

    DWORD biClrImportant;

} BITMAPINFOHEADER, *PBITMAPINFOHEADER;
typedef struct tagRGBQUAD {

    BYTE rgbBlue;

    BYTE rgbGreen;

    BYTE rgbRed;

    BYTE rgbReserved;

} RGBQUAD;
Let's use Lena.bmp as an illustration:

(Well, this blog doesn;t support BMP image, please see the attach file)
Open it with a hex editor, such as WinHex, and it shows
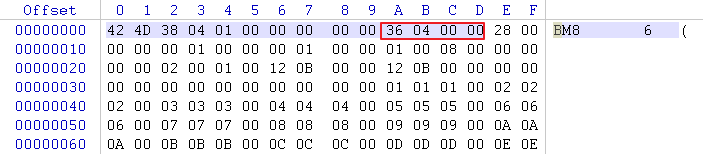
The highlighted 14 bytes are BITMAPFILEHEADER,
WORD bfType -> 0x4D42
DWORD bfSize -> 0x00010438 = 66616
WORD bfReserved1 -> 0x0000 = 0
WORD bfReserved2 -> 0x0000 = 0
DWORD bfOffBits -> 0x00000436 = 1078
bfTypeshows that this file is a bitmap file;bfSizeis the file size, as we can see below, the file sis 66,614 bytes;bfReserved1andbfReserved2must be zerosbfOffBitsis the offset, in bytes, from the beginning of the BITMAPFILEHEADER structure to the bitmap bits.
e:\temp\code\MFC_PICTURE_TEST\Look into Bitmap images.assets\1566902617332.png
And this is the start of array data,

seen what I mean?
The next is BITMAPINFOHEADER, and the data are highlighted in different colors,
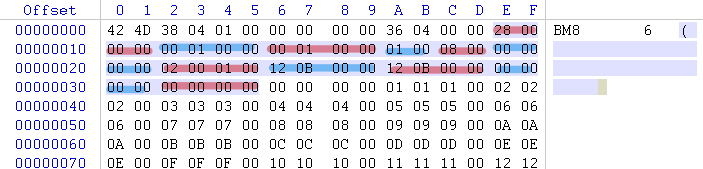
and these values can be calculated as
DWORD biSize = 0x00000028 = 40
LONG biWidth = 0x00000100 = 256
LONG biHeight = 0x00000100 = 256
WORD biPlanes = 0x0001 = 1
WORD biBitCount = 0x0008 = 8
DWORD biCompression = 0x00000000 = 0
DWORD biSizeImage = 0x00010002 = 65,538
LONG biXPelsPerMeter = 0x00000B12 = 2,834
LONG biYPelsPerMeter = 0x00000B12 = 2,834
DWORD biClrUsed = 0x000000 = 0
DWORD biClrImportant = 0x000000 = 0
And we can see,
0x0436 + 0x00010002 = 0x00010438
1,078 + 65,538 = 66,616
i.e.
data_start_offset + data_length = file_end
It's the start of data, however, since Lena.bmp is a gray image, all the three channels are same, you can find a pure red/blue image, you will find that, the bitmap is stored in [B, G, R, reserved] order, therefore, if you want to interpret in RGB mode, you should be careful with it.
[C++]Read Bitmap File
The following code are mainly from this website, slightly modified.
typedef unsigned int Uint8;

Uint8* datBuff[2] = { nullptr, nullptr }; // Header buffers

Uint8* pixels = nullptr; // Pixels

BITMAPFILEHEADER* bmpHeader = nullptr; // Header

BITMAPINFOHEADER* bmpInfo = nullptr; // Info

// The file... We open it with it's constructor

std::ifstream file(_T("Lena.bmp"), std::ios::binary);

if (!file){

std::cout << "Failure to open bitmap file.\n";

return 1;

}

// Allocate byte memory that will hold the two headers

datBuff[0] = new Uint8[sizeof(BITMAPFILEHEADER)];

datBuff[1] = new Uint8[sizeof(BITMAPINFOHEADER)];

file.read((char*)datBuff[0], sizeof(BITMAPFILEHEADER));

file.read((char*)datBuff[1], sizeof(BITMAPINFOHEADER));

// Construct the values from the buffers

bmpHeader = (BITMAPFILEHEADER*)datBuff[0];

bmpInfo = (BITMAPINFOHEADER*)datBuff[1];

// Check if the file is an actual BMP file

if (bmpHeader->bfType != 0x4D42){

std::cout << "File isn't a bitmap file\n";

return 2;

}

// First allocate pixel memory

pixels = new Uint8[bmpInfo->biSizeImage];

// Go to where image data starts, then read in image data

file.seekg(bmpHeader->bfOffBits);

file.read((char*)pixels, bmpInfo->biSizeImage);

// First allocate pixel memory

pixels = new Uint8[bmpInfo->biSizeImage];

// Go to where image data starts, then read in image data

file.seekg(bmpHeader->bfOffBits);

file.read((char*)pixels, bmpInfo->biSizeImage);

// Set width and height to the values loaded from the file

int w = bmpInfo->biWidth;

int h = bmpInfo->biHeight;

// We're almost done. We have our image loaded, however it's not in the right format.

// .bmp files store image data in the BGR format, and we have to convert it to RGB.

// Since we have the value in bytes, this shouldn't be to hard to accomplish

Uint8 tmpRGB = 0; // Swap buffer

for (unsigned long i = 0; i < bmpInfo->biSizeImage; i += 3){

    tmpRGB        = pixels[i];

    pixels[i]     = pixels[i + 2];

    pixels[i + 2] = tmpRGB;

}

delete[] datBuff[0];

delete[] datBuff[1];

delete[] pixels;
Create Bitmap Image in memory, and draw on screen
The code is mainly from this webpage, slightly modified.
Again, the reference are given:
void CChildView::OnPaint()

{

	CPaintDC dc(this); // device context for painting

	HDC hdc = dc.m_hDC;

	int nWidth = 100;

	int nHeight = 100;

	int nChannels = 3;

	int nImages = 3;	// three images in a row, presented in a column

	auto nSize = nWidth * nHeight * nChannels * nImages;

	unsigned char* data = new unsigned char[nSize] {0};

	//memset(data, 0xFF, nSize);

	long split = nWidth * nHeight / 4,

		nPixel = nWidth * nHeight;		// Pixels in an image

	// Fill the different images for differnt channels

	unsigned char* dat = data;

	for (int i = 0; i < nPixel; ++i, dat += 3)		// Image 0

		dat[0] = (i / nWidth) * (255.0 / nHeight);

	for (int i = 0; i < nPixel; ++i, dat += 3)		// Image 1

		dat[1] = (i / nWidth) * (255.0 / nHeight);

	for (int i = 0; i < nPixel; ++i, dat += 3)		// Image 2

		dat[2] = (i / nWidth) * (255.0 / nHeight);

	// Allocate enough memory for the BITMAPINFOHEADER and 256 RGBQUAD palette entries

	// NOTE: the pallet bytes are ONLY NEEDED for color LUT images ...

	// not needed here

	int nColors = 0;		// In BI_RGB image, the look-up-table isn't used, so the size can be zero

	LPBITMAPINFO lpbi = (LPBITMAPINFO) new BYTE[sizeof(BITMAPINFOHEADER)+ (nColors * sizeof(RGBQUAD))];

	// These are all the members of the bitmap header struct

	lpbi->bmiHeader.biSize   = sizeof(BITMAPINFOHEADER); // bytes

	lpbi->bmiHeader.biWidth  = nWidth;                   // pixels units

	lpbi->bmiHeader.biHeight = -nHeight * 3;             // negative =  = top down; pos =

	// origin LLeft

	lpbi->bmiHeader.biPlanes = 1;    // must be 1

	lpbi->bmiHeader.biBitCount = 24; // can be 32 for 4-byte pixels

	// (Upper byte ignored)

	lpbi->bmiHeader.biCompression = BI_RGB; // BI_RGB means uncompressed

	lpbi->bmiHeader.biSizeImage = 0;        // size of img in bytes; 0 okay

	// for BI_RGB

	lpbi->bmiHeader.biXPelsPerMeter = 0;	// physical device information unavailable

	lpbi->bmiHeader.biYPelsPerMeter = 0;    // physical device information unavailable

	lpbi->bmiHeader.biClrUsed       = 0;	// Look-Up-Tables (LUT) only

	lpbi->bmiHeader.biClrImportant  = 0;	// LUTs only

	// Draw the image into the CRT device

	::SetDIBitsToDevice(

		hdc,                 // handle to DC

		0, 0,                // x-y-coord of destination upper-left corner

		nWidth, nHeight * 3, // width-height of source rectangle

			                 // three images present in one column

		0, 0,                // x-y-coord of source upper-left corner

		0,                   // uStartScan,                                // first scan line in array

		nHeight * 3,         // number of scan lines ...

		data,                // array of DIB bits

		lpbi,                // bitmap information

		DIB_RGB_COLORS);     // RGB vs. palette indexes ... RGB means raw

	delete[] data;

	delete[] lpbi;

}

As we can see from the result, the array is stored in [B, G, R] sequence, and no more reserved byte is need.
Besides, if you uncomment the memset(data, 0xFF, nSize); at the 12th line, which means you set all the other values to be 255, you'll get a more beautiful image as

If you are a Chinese, this blog may help you.
The source code can be found in: 链接: https://pan.baidu.com/s/12NCP1tQjtLOdDccODOwpEg 提取码: 4uka 复制这段内容后打开百度网盘手机App,操作更方便哦
Look into Bitmap images的更多相关文章
- [翻译]开发文档:android Bitmap的高效使用
内容概述 本文内容来自开发文档"Traning > Displaying Bitmaps Efficiently",包括大尺寸Bitmap的高效加载,图片的异步加载和数据缓存 ...
- 【开源毕设】一款精美的家校互动APP分享——爱吖校推 [你关注的,我们才推](持续开源更新3)附高效动态压缩Bitmap
一.写在前面 爱吖校推如同它的名字一样,是一款校园类信息推送交流平台,这么多的家校互动类软件,你选择了我,这是我的幸运.从第一次在博客园上写博客到现在,我一次一次地提高博文的质量和代码的可读性,都是为 ...
- Android Bitmap 和 ByteArray的互相转换
Android Bitmap 和 ByteArray的互相转换 移动平台图像处理,需要将图像传给native处理,如何传递?将bitmap转换成一个 byte[] 方便传递也方便cpp代码直接处理图像 ...
- Android-Drawable、Bitmap、byte[]、资源文件相互转换
我们在Android的开发中,经常可以遇到图片的处理,当中,有很多是 Bitmap.Drawable.byte[]和资源文件它们直接相互转换. 今天就此总结一下: 1.资源文件转为Drawable 2 ...
- bitmap对海量无重复的整数排序--转
原文地址:http://blog.csdn.net/u013074465/article/details/46956295 现在有n个无重复的正整数(n 小于10的7次方),如果内存限制在1.5M以内 ...
- 基于位图(Bitmap、BitmapData)的图片处理方法(C#)
目前操作位图的主流方法有三种: 1.基于Bitmap像素的处理方法,以GetPixel()和SetPixel()方法为主.方法调用简单,但是效率偏低. 2.基于内存的像素操作方法,以System.Ru ...
- android:布局、绘制、内存泄露、响应速度、listview和bitmap、线程优化以及一些优化的建议!
1.布局优化 首先删除布局中无用的控件和层级,其次有选择地使用性能较低的viewgroup,比如布局中既可以使用RelativeLayout和LinearLayout,那我们就采用LinearLayo ...
- 获取View的截图-将View转换为Bitmap对象
开发中,有时候需要获取View的截图来做动画来达到动画流程的目的 原理:将View的内容画到一个Bitmap画布上,然后取出 下面封装了一个从View生成Bitmap的工具类 /** * 将View转 ...
- bitmap解码
#include <stdio.h> #include <stdlib.h> #include <string.h> #define BYTE unsigned c ...
- Bitmap转换成BitmapImage
public BitmapImage BitmapToBitmapImage(System.Drawing.Bitmap bitmap) { MemoryStream ms = new MemoryS ...
随机推荐
- Jenkins部署(基于Linux)
1.安装JDK 我不列出来了,自行百度 java -version 2.安装tomcat (1)创建目录tomcat8 (2)导入tomcat文件到tomcat8目录中并解压 (3)启动tomcat ...
- VSCode 配置 Python 开发环境
一.环境准备 首先需要先安装好 Python 和 VSCode, 下载地址如下 VSCode Python 二.安装 Python 扩展 首先在VSCode上安装 Python 扩展,如图: 三.新建 ...
- LeetCode刷题总结-递归篇
递归是算法学习中很基本也很常用的一种方法,但是对于初学者来说比较难以理解(PS:难点在于不断调用自身,产生多个返回值,理不清其返回值的具体顺序,以及最终的返回值到底是哪一个?).因此,本文将选择Lee ...
- .NET Core3.0 日志 logging
多年的经验,日志记录是软件开发的重要组成部分.没有日志记录机制的系统不是完善的系统.在开发阶段可以通过debug附件进程进行交互调试,可以检测到一些问题,但是在上线之后,日志的记录起到至关重要的作用. ...
- 一个html,3D 标签 鼓励自己
效果如图: <!DOCTYPE html PUBLIC "-//W3C//DTD XHTML 1.0 Transitional//EN" "http://www.w ...
- 双系统开机引导菜单修复方法 进win7无须重启|metro引导|双系统菜单名字修改
此文转自互联网,一部分是原创. 主要内容 1.修复双系统菜单(win7与win8双系统),进入win7不再需要重启,普通菜单样式(普通引导,非metro界面),更加简洁,实用,开机即可选择操作系统 2 ...
- Text 尺寸获取
获取text在当前文本内容下应该尺寸: 宽度:text.preferredWidth 高度:text.preferredHeight
- css四种基本选择器
css选择器是什么? 要使用css对HTML页面中的元素实现一对一,一对多或者多对一的控制,这就需要用到CSS选择器. HTML页面中的元素就是通过CSS选择器进行控制的. CSS选择器:就是指定CS ...
- SpringBoot之配置文件的注入
@PropertySource&@ImportResource&@Bean @PropertySource:加载指定的配置文件: /** * 将配置文件中配置的每一个属性的值,映射到这 ...
- ASP.NET Core如何使用压缩中间件提高Web应用程序性能
前言 压缩可以大大的降低我们Web服务器的响应速度,压缩从而提高我们网页的加载速度,以及节省一定的带宽. 何时使用相应压缩中间件 在IIS,Apache,Nginx中使用基于服务端的响应压缩技术.中间 ...