Spring MVC + Spring + MyBatis 框架整合
本文介绍使用SSM框架开发web项目Demo.
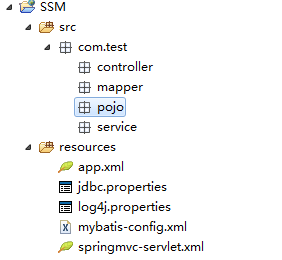
一、创建一个web-Poject项目
1.导入相关jar文件至lib下。“相关jar文件” --提取密码 oraw
2.修改web.xml文件
<?xml version="1.0" encoding="UTF-8"?>

<web-app version="3.0"

    xmlns="http://java.sun.com/xml/ns/javaee"

    xmlns:xsi="http://www.w3.org/2001/XMLSchema-instance"

    xsi:schemaLocation="http://java.sun.com/xml/ns/javaee

    http://java.sun.com/xml/ns/javaee/web-app_3_0.xsd">

  <display-name></display-name>

  <welcome-file-list>

    <welcome-file>index.jsp</welcome-file>

  </welcome-file-list>

  <!-- 加载spring容器 -->

   <listener>

      <listener-class>org.springframework.web.context.ContextLoaderListener</listener-class>

  </listener>

  <context-param>

      <param-name>contextConfigLocation</param-name>

      <param-value>classpath:app.xml</param-value>

  </context-param>

  <!-- 前端控制器 -->

  <servlet>

      <servlet-name>DispatcherServlet</servlet-name>

      <servlet-class>org.springframework.web.servlet.DispatcherServlet</servlet-class>

     <init-param>

         <param-name>contextConfigLocation</param-name>

         <param-value>classpath:springmvc-servlet.xml</param-value>

     </init-param>

  </servlet>

  <servlet-mapping>

          <servlet-name>DispatcherServlet</servlet-name>

          <url-pattern>/</url-pattern>

  </servlet-mapping>

  <!-- 解决post方式的乱码的过滤器 -->

  <filter>

      <filter-name>characterEncodingFilter</filter-name>

      <filter-class>org.springframework.web.filter.CharacterEncodingFilter</filter-class>

      <init-param>

          <param-name>encoding</param-name>

          <param-value>UTF-8</param-value>

      </init-param>

  </filter>

  <filter-mapping>

          <filter-name>characterEncodingFilter</filter-name>

          <url-pattern>/*</url-pattern>

  </filter-mapping>

</web-app>
二、创建相关配置文件。
1.mybatis核心配置文件---mybatis-config.xml
<?xml version="1.0" encoding="UTF-8"?>

    <!DOCTYPE configuration

        PUBLIC "-//mybatis.org//DTD Config 3.0//EN"

        "http://mybatis.org/dtd/mybatis-3-config.dtd">

        <!-- 配置懒加载 -->

    <configuration>

        <settings>

            <setting name="lazyLoadingEnabled" value="false" />

        </settings>


    <!-- 配置别名 -->

       <typeAliases>

           <package name="com.test.pojo"/>

       </typeAliases>

   </configuration>
2.创建jdbc.properties文件,用于连接数据库相关配置(案例连接mysql数据库)
 driverClassName=com.mysql.jdbc.Driver

 url=jdbc\:mysql\://localhost\:端口号/数据库名?useUnicode\=true&characterEncoding\=UTF-8

 password=ok

 uname=root
注意:需要改写上面文件中的端口号和数据库名方可使用,mysql默认端口为3306;
3.创建spring核心配置文件,本文案例名称为app.xml,可根据自己喜好起名(特殊字符除外),但是要和web.xml映射的spring配置文件名一致。
<?xml version="1.0" encoding="UTF-8"?>

<beans xmlns="http://www.springframework.org/schema/beans"

    xmlns:xsi="http://www.w3.org/2001/XMLSchema-instance" xmlns:p="http://www.springframework.org/schema/p"

    xmlns:aop="http://www.springframework.org/schema/aop" xmlns:tx="http://www.springframework.org/schema/tx"

    xmlns:context="http://www.springframework.org/schema/context"

    xsi:schemaLocation="http://www.springframework.org/schema/beans

     http://www.springframework.org/schema/beans/spring-beans-3.0.xsd

     http://www.springframework.org/schema/tx

     http://www.springframework.org/schema/tx/spring-tx.xsd

     http://www.springframework.org/schema/aop

     http://www.springframework.org/schema/aop/spring-aop-3.0.xsd

     http://www.springframework.org/schema/context

     http://www.springframework.org/schema/context/spring-context-3.0.xsd">

    <!-- 扫包(service层) -->

    <context:component-scan base-package="com.test.service" />

    <!-- 导入连接池配置文件 -->

    <context:property-placeholder location="classpath:jdbc.properties" />

    <!-- 数据源 -->

    <bean id="dataSource" class="org.apache.commons.dbcp.BasicDataSource"

        destroy-method="close" scope="singleton">

        <property name="driverClassName" value="${driverClassName}"></property>

        <property name="url" value="${url}"></property>

        <property name="username" value="${uname}"></property>

        <property name="password" value="${password}"></property>

    </bean>

    <!-- 配置mybatis SqlSessionFactoryBean -->

    <bean id="sqlSessionFactory" class="org.mybatis.spring.SqlSessionFactoryBean">

        <property name="dataSource" ref="dataSource" />

        <property name="configLocation" value="classpath:mybatis-config.xml" />

    </bean>

    <!-- Mapper接口所在包名,Spring会自动查找其下的Mapper -->

    <bean class="org.mybatis.spring.mapper.MapperScannerConfigurer">

        <property name="basePackage" value="com.test.mapper" />

    </bean>

    <!-- 事务管理器 -->

    <bean id="transactionManager"

        class="org.springframework.jdbc.datasource.DataSourceTransactionManager">

        <property name="dataSource" ref="dataSource"></property>

    </bean>

    <!-- 事务管理 -->

    <tx:advice id="transactionAdvice" transaction-manager="transactionManager">

        <tx:attributes>

            <tx:method name="add*" propagation="REQUIRED" read-only="false"

                isolation="DEFAULT" />

            <tx:method name="del*" propagation="REQUIRED" read-only="false"

                isolation="DEFAULT" />

            <tx:method name="update*" propagation="REQUIRED" read-only="false"

                isolation="DEFAULT" />

            <tx:method name="get*" propagation="NEVER" read-only="true" />

            <tx:method name="query*" propagation="NEVER" read-only="true" />

        </tx:attributes>

    </tx:advice>

    <aop:config>

        <!-- 定义切点 -->

        <aop:pointcut expression="execution(* com.test.service..*.*(..))"

            id="pointCut" />

        <aop:advisor advice-ref="transactionAdvice" pointcut-ref="pointCut" />

    </aop:config>

</beans>
4.创建springmvc核心配置文件,本文案例名称为springmvc-servlet.xml,可根据自己喜好起名(特殊字符除外),但是要和web.xml中前端控制器映射的配置文件名一致。
<?xml version="1.0" encoding="UTF-8"?>

<beans xmlns="http://www.springframework.org/schema/beans"

    xmlns:xsi="http://www.w3.org/2001/XMLSchema-instance" xmlns:context="http://www.springframework.org/schema/context"

    xmlns:aop="http://www.springframework.org/schema/aop" xmlns:tx="http://www.springframework.org/schema/tx"

    xmlns:mvc="http://www.springframework.org/schema/mvc" xmlns:p="http://www.springframework.org/schema/p"

    xsi:schemaLocation="http://www.springframework.org/schema/beans

           http://www.springframework.org/schema/beans/spring-beans-2.5.xsd

           http://www.springframework.org/schema/context

           http://www.springframework.org/schema/context/spring-context-2.5.xsd

           http://www.springframework.org/schema/aop

           http://www.springframework.org/schema/aop/spring-aop-2.5.xsd

           http://www.springframework.org/schema/tx

           http://www.springframework.org/schema/tx/spring-tx-2.5.xsd

              http://www.springframework.org/schema/mvc

           http://www.springframework.org/schema/mvc/spring-mvc.xsd">

    <context:component-scan base-package="com.test.controller"></context:component-scan>

    <mvc:annotation-driven>

        <mvc:message-converters>

            <bean

                class="com.alibaba.fastjson.support.spring.FastJsonHttpMessageConverter">

                <property name="supportedMediaTypes">

                    <list>

                        <value>text/html;charset=UTF-8</value>

                        <value>application/json</value>

                    </list>

                </property>

                <property name="features">

                    <list>

                        <value>WriteDateUseDateFormat</value>

                    </list>

                </property>

            </bean>

            <bean class="org.springframework.http.converter.StringHttpMessageConverter">

                <property name="supportedMediaTypes">

                    <list>

                        <value>application/json;charset=UTF-8</value>

                    </list>

                </property>

            </bean>

        </mvc:message-converters>

    </mvc:annotation-driven>

    <bean

        class="org.springframework.web.servlet.view.ContentNegotiatingViewResolver">

        <property name="favorParameter" value="true"></property>

        <property name="mediaTypes">

            <map>

                <entry key="json" value="application/json;charset=UTF-8"></entry>

                <entry key="html" value="text/html;charset=UTF-8"></entry>

            </map>

        </property>

        <property name="viewResolvers">

            <list>

                <bean

                    class="org.springframework.web.servlet.view.InternalResourceViewResolver">

                    <property name="prefix" value="/WEB-INF/jsp/"></property>

                    <property name="suffix" value=".jsp"></property>

                </bean>

            </list>

        </property>

    </bean>

</beans>
三、创建需要的包。
先创建一个简单的数据库。别忘记修改jdbc.properties文件连接数据库相关配置。

1.实体类、2.控制器 3.数据访问层 4.业务逻辑层
1.创建实体类----属性和数据库字段名最好一致,方便映射。
 package com.test.pojo;

 public class Person {

     private int id;

     private String name;

     public int getId() {

         return id;

     }

     public void setId(int id) {

         this.id = id;

     }

     public String getName() {

         return name;

     }

     public void setName(String name) {

         this.name = name;

     }

 }
2.创建mapper接口和mapper.xml,注意mapper接口和mapper.xml文件名一致,扫包spring容器管理机制.

(1)mapper接口。(查询操作)
package com.test.mapper;

import java.util.List;

import com.test.pojo.Person;

public interface PersonMapper {

    List<Person> getPerson();//查询所有数据

}
(2)mapper.xml
 <?xml version="1.0" encoding="UTF-8"?>

 <!DOCTYPE mapper SYSTEM "http://mybatis.org/dtd/mybatis-3-mapper.dtd" >

 <mapper namespace="com.test.mapper.PersonMapper">

     <select id="getPerson" resultType="Person">

         SELECT * FROM person

     </select>

 </mapper>
3.创建service层。
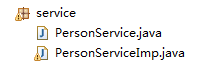
(1)service接口
 package com.test.service;

 import java.util.List;

 import com.test.pojo.Person;

 public interface PersonService {

     List<Person> getPerson();

 }
(2)service实现类
 package com.test.service;

 import java.util.List;

 import javax.annotation.Resource;

 import org.springframework.beans.factory.annotation.Autowired;

 import org.springframework.stereotype.Service;

 import com.test.mapper.PersonMapper;

 import com.test.pojo.Person;

 @Service

 public class PersonServiceImp implements PersonService {

     //两种注入方式 任选其一

     // @Resource注入,按名称注入 名称为mapper接口名首字母小写

     @Resource(name = "personMapper")

     private PersonMapper personMapper;

     /* @Autowired注入,按类型注入

     @Autowired

     private PersonMapper personMapper;*/

     @Override

     public List<Person> getPerson() {

         return personMapper.getPerson();

     }

 }
4.创建控制器。
package com.test.controller;

import java.util.List;

import org.springframework.beans.factory.annotation.Autowired;

import org.springframework.stereotype.Controller;

import org.springframework.web.bind.annotation.RequestMapping;

import org.springframework.web.bind.annotation.ResponseBody;

import com.test.pojo.Person;

import com.test.service.PersonService;

@Controller

public class PersonController {

	@Autowired

	private PersonService personService;


     //返回json格式数据

	@RequestMapping("/index")

	@ResponseBody

	public Object show(){

		List<Person> list = personService.getPerson();

		return list;

	}

}
5.部署项目运行。

Spring MVC + Spring + MyBatis 框架整合的更多相关文章
- spring、spring mvc、mybatis框架整合基本知识
学习了一个多月的框架知识了,这两天很想将它整合一下.网上看了很多整合案例,基本都是基于Eclipse的,但现在外面公司基本都在用Intellij IDEA了,所以结合所学知识,自己做了个总结,有不足之 ...
- IDEA下创建Maven项目,并整合使用Spring、Spring MVC、Mybatis框架
项目创建 本项目使用的是IDEA 2016创建. 首先电脑安装Maven,接着打开IDEA新建一个project,选择Maven,选择图中所选项,下一步. 填写好GroupId和ArtifactId, ...
- spring mvc与mybatis事务整合
之前公司用的是mybatis,但事务管理这块是用ejb的CMT容器管理的事务.基本原理是ejb请求进来,业务代码会创建一个mybatis的session然后放入当前线程,之后所有的方法操作涉及到数据库 ...
- SSM(Spring MVC +Spring+Mybatis)整合——maven工程
所谓的SSM 其实就是Spring MVC下整合mybatis. 具体的定义网络上都有,很详细. 这里只说项目的搭建步骤. 第一步 新建maven工程 工程目录如下: 配置pom.xml文件,引入所需 ...
- SSM 三大框架系列:Spring 5 + Spring MVC 5 + MyBatis 3.5 整合(附源码)
之前整理了一下新版本的 SSM 三大框架,这篇文章是关于它的整合过程和项目源码,版本号分别为:Spring 5.2.2.RELEASE.SpringMVC 5.2.2.RELEASE.MyBatis ...
- SSM 即所谓的 Spring MVC + Spring + MyBatis 整合开发。
SSM 即所谓的 Spring MVC + Spring + MyBatis 整合开发.是目前企业开发比较流行的架构.代替了之前的SSH(Struts + Spring + Hibernate) 计划 ...
- 转载 Spring、Spring MVC、MyBatis整合文件配置详解
Spring.Spring MVC.MyBatis整合文件配置详解 使用SSM框架做了几个小项目了,感觉还不错是时候总结一下了.先总结一下SSM整合的文件配置.其实具体的用法最好还是看官方文档. ...
- ssm(spring,spring mvc,mybatis)框架
ssm框架各个技术的职责 spring :spring是一个IOC DI AOP的 容器类框架 spring mvc:spring mvc 是一个mvc框架 mybatis:是一个orm的持久层框架 ...
- SSM(Spring+SpringMVC+MyBatis)框架整合开发流程
回忆了 Spring.SpringMVC.MyBatis 框架整合,完善一个小demo,包括基本的增删改查功能. 开发环境 IDEA MySQL 5.7 Tomcat 9 Maven 3.2.5 需要 ...
- SSM(Spring,SpringMVC,Mybatis)框架整合项目
快速上手SSM(Spring,SpringMVC,Mybatis)框架整合项目 环境要求: IDEA MySQL 8.0.25 Tomcat 9 Maven 3.6 数据库环境: 创建一个存放书籍数据 ...
随机推荐
- C++没有库则寸步难行,有库则几乎可以做任何事情——Bjarne Stroustrupi
"Without a good library, most interesting tasks are hard to do in C++; but given a good library ...
- 一种基于Qt的可伸缩的全异步C/S架构服务器实现(一) 综述
本文向大家介绍一种基于Qt的伸缩TCP服务实现.该实现针对C/S客户端-服务集群应用需求而搭建.连接监听.数据传输.数据处理均在独立的线程池中进行,根据特定任务不同,可安排负责监听.传输.处理的线程数 ...
- WCF研究-后篇
最后就对之前的资料进行整理以及在其他博客园的朋友那看到的资料稍微分享一下,这样有助于学习和使用WCF的朋友更好的学习和理解WCF 后期要是看到合适的资料也会再次编辑这个后篇,让我共同进步! 后篇 1. ...
- QML学习【一】Basic Types
QML入门教程(1) QML是什么? QML是一种描述性的脚本语言,文件格式以.qml结尾.语法格式非常像CSS(参考后文具体例子),但又支持javacript形式的编程控制.它结合了QtDesi ...
- 使用PNG实现半透明的窗体(使用GDI+)
Delphi中标准控件是不支持png图片的,据说从Window2000后增加gdiplus.dll库处理更多的gdi图像,其中包括png. 关键的几个api GdipCreateBitma ...
- Oracle高级查询、事物、过程及函数
一.SQL函数 1.分类:单行函数(日期.数值.转换.字符等),多行函数,也称为分组函数(max.min.avg.sum.row_number.rank等). 2.数值函数 abs(n):求数字n的绝 ...
- 《HelloGitHub》第 39 期
兴趣是最好的老师,HelloGitHub 就是帮你找到兴趣! 简介 分享 GitHub 上有趣.入门级的开源项目. 这是一个面向编程新手.热爱编程.对开源社区感兴趣 人群的月刊,月刊的内容包括:各种编 ...
- niaobulashi-一个基于springboot shrio的权限管理系统
github项目地址:https://github.com/niaobulashi/niaobulashi springboot学习地址:http://www.ityouknow.com/spring ...
- C++标准库(体系结构与内核分析)(侯捷第一讲)
一.C++标准库介绍 C++标准库:C++ Standard Library C++标准库与STL有什么关系: STL:Standard Template Library STL包含6大部件,基本占标 ...
- MD5加密工具代码
找到一个开源的MD5加密工具代码,收藏起来 /** * MD5加密工具 */ public class MD5Utils { /** * byte[]字节数组 转换成 十六进制字符串 * @param ...