nginx重启后,反向代理失败之问题排查记录
问题与排查过程
本地开发环境的服务器,部署了nginx,nginx上对静态的web前端页面进行了http 80端口代理;然后呢,因为一些原因,服务器重启了,重启服务器后,我去把nginx启动起来,但是nginx怎么也代理不了80端口,问题如下:
浏览器访问没响应,本地telnet服务器的80端口是通的,使用wireshark抓包,过程如下:
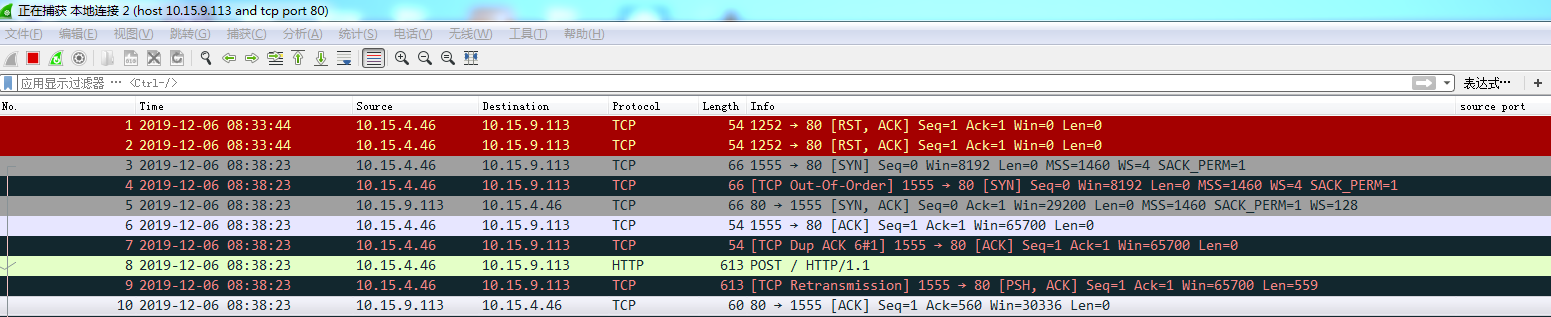
包3-包7,tcp 三次握手;
包8,本机给开发服务器发了http请求;
包9,本机重传;
包10,服务器返回ack,确认收到请求,但是依然没有请求返回。
后续一直没有请求返回
服务器端,将nginx.conf进行了精简,精简后,主要配置如下:
server {

        listen       80;

        server_name  localhost;

        gzip on;

        gzip_http_version 1.1;

        gzip_comp_level 3;

        gzip_types text/plain application/json application/javascript text/css  image/jpeg image/gif image/png application/zip;

        access_log  logs/host.access.log;

        #这里对web前端静态页面做了代理,路径为/police3-web/scm

        location / {

            root   /police3-web/scm;

            try_files $uri index.html /index.html;

            if ($request_filename ~* \.(gif|jpg|jpeg|png|css|js|ico|eot|otf|fon|font|ttf|ttc|woff|woff2)$) {

              expires   7d;

            }

        }

        location ^~ /scm {

           proxy_set_header X-Real-IP $remote_addr;

           proxy_set_header Host $host;

           proxy_set_header X-Forwarded-For $proxy_add_x_forwarded_for;

             proxy_pass http://localhost:9080;

        }

        location ~/group([0-9])/M([0-9])([0-9]) {

                add_header Access-Control-Allow-Origin *;

                add_header Access-Control-Allow-Methods 'GET, POST, OPTIONS';

                add_header Access-Control-Allow-Headers 'DNT,X-Mx-ReqToken,Keep-Alive,User-Agent,X-Requested-With,If-Modified-Since,Cache-Control,Content-Type,Authorization';

                #ngx_fastdfs_module;//因为怀疑和fastdfs有关系,专门注释了

        }

    }
重启nginx后,观察logs/error.log:
2019/12/06 08:56:53 [alert] 10588#0: worker process 10802 exited on signal 11 (core dumped)

2019/12/06 08:56:53 [alert] 10588#0: worker process 10802 exited on signal 11 (core dumped)

2019/12/06 08:56:53 [alert] 10588#0: worker process 10802 exited on signal 11 (core dumped)

2019/12/06 08:56:53 [notice] 10588#0: start worker process 10806

2019/12/06 08:56:53 [notice] 10588#0: start worker process 10806

ngx_http_fastdfs_process_init pid=10806

2019/12/06 08:56:56 [notice] 10588#0: signal 17 (SIGCHLD) received from 10806

2019/12/06 08:56:56 [notice] 10588#0: signal 17 (SIGCHLD) received from 10806

2019/12/06 08:56:56 [alert] 10588#0: worker process 10806 exited on signal 11 (core dumped)

2019/12/06 08:56:56 [alert] 10588#0: worker process 10806 exited on signal 11 (core dumped)

2019/12/06 08:56:56 [alert] 10588#0: worker process 10806 exited on signal 11 (core dumped)

2019/12/06 08:56:56 [notice] 10588#0: start worker process 10808

2019/12/06 08:56:56 [notice] 10588#0: start worker process 10808

ngx_http_fastdfs_process_init pid=10808

2019/12/06 08:56:59 [notice] 10588#0: signal 17 (SIGCHLD) received from 10808

2019/12/06 08:56:59 [notice] 10588#0: signal 17 (SIGCHLD) received from 10808

2019/12/06 08:56:59 [alert] 10588#0: worker process 10808 exited on signal 11 (core dumped)

2019/12/06 08:56:59 [alert] 10588#0: worker process 10808 exited on signal 11 (core dumped)

2019/12/06 08:56:59 [alert] 10588#0: worker process 10808 exited on signal 11 (core dumped)

2019/12/06 08:56:59 [notice] 10588#0: start worker process 10812

2019/12/06 08:56:59 [notice] 10588#0: start worker process 10812
差不多就是循环往复地打这些日志,然后我就去百度了一下,查到了这篇:
https://blog.csdn.net/hexuan1/article/details/45222867
里面提到了dmesg命令,我这边也执行了一下,输出如下:
[55522.992453] nginx[10844]: segfault at 4 ip 00007f23d017ff84 sp 00007ffdf82783e0 error 4 in libfdfsclient.so[7f23d0179000+18000]

[55526.018405] nginx[10851]: segfault at 4 ip 00007f23d017ff84 sp 00007ffdf82783e0 error 4 in libfdfsclient.so[7f23d0179000+18000]

[55529.043590] nginx[10853]: segfault at 4 ip 00007f23d017ff84 sp 00007ffdf82783e0 error 4 in libfdfsclient.so[7f23d0179000+18000]

[55532.070932] nginx[10855]: segfault at 4 ip 00007f23d017ff84 sp 00007ffdf82783e0 error 4 in libfdfsclient.so[7f23d0179000+18000]

[55535.097444] nginx[10859]: segfault at 4 ip 00007f23d017ff84 sp 00007ffdf82783e0 error 4 in libfdfsclient.so[7f23d0179000+18000]

[55538.122466] nginx[10861]: segfault at 4 ip 00007f23d017ff84 sp 00007ffdf82783e0 error 4 in libfdfsclient.so[7f23d0179000+18000]

[55541.148914] nginx[10871]: segfault at 4 ip 00007f23d017ff84 sp 00007ffdf82783e0 error 4 in libfdfsclient.so[7f23d0179000+18000]

[55544.201955] nginx[10914]: segfault at 4 ip 00007f23d017ff84 sp 00007ffdf82783e0 error 4 in libfdfsclient.so[7f23d0179000+18000]

[55547.229135] nginx[10921]: segfault at 4 ip 00007f23d017ff84 sp 00007ffdf82783e0 error 4 in libfdfsclient.so[7f23d0179000+18000]

[55550.254445] nginx[10923]: segfault at 4 ip 00007f23d017ff84 sp 00007ffdf82783e0 error 4 in libfdfsclient.so[7f23d0179000+18000]

[55553.279543] nginx[10928]: segfault at 4 ip 00007f23d017ff84 sp 00007ffdf82783e0 error 4 in libfdfsclient.so[7f23d0179000+18000]

[55556.305874] nginx[10932]: segfault at 4 ip 00007f23d017ff84 sp 00007ffdf82783e0 error 4 in libfdfsclient.so[7f23d0179000+18000]

[55559.331128] nginx[10936]: segfault at 4 ip 00007f23d017ff84 sp 00007ffdf82783e0 error 4 in libfdfsclient.so[7f23d0179000+18000]

[55562.356655] nginx[10938]: segfault at 4 ip 00007f23d017ff84 sp 00007ffdf82783e0 error 4 in libfdfsclient.so[7f23d0179000+18000]

[55565.408411] nginx[10943]: segfault at 4 ip 00007f23d017ff84 sp 00007ffdf82783e0 error 4 in libfdfsclient.so[7f23d0179000+18000]

[55568.434908] nginx[10948]: segfault at 4 ip 00007f23d017ff84 sp 00007ffdf82783e0 error 4 in libfdfsclient.so[7f23d0179000+18000]

[55571.459719] nginx[10950]: segfault at 4 ip 00007f23d017ff84 sp 00007ffdf82783e0 error 4 in libfdfsclient.so[7f23d0179000+18000]
我注意到,这里面提到了:libfdfsclient.so,因为我们的nginx对fastdfs进行了代理(这块同事弄的,暂时没问具体机制,搜了一下,大概如下:https://blog.csdn.net/qq_34301871/article/details/80060235)
我就想,之前同事好像和我说,要把fastdfs重新启动起来,我一想,可能服务器重启后,fastdfs没启动导致的。
然后执行了一下命令,重启了fastdfs相关服务:
/etc/init.d/fdfs_trackerd start

/etc/init.d/fdfs_storaged start
然后再观察nginx的error.log,居然就没有一直打印上面的错误日志了:
2019/12/06 08:58:21 [notice] 10588#0: signal 17 (SIGCHLD) received from 10950

2019/12/06 08:58:21 [notice] 10588#0: signal 17 (SIGCHLD) received from 10950

2019/12/06 08:58:21 [alert] 10588#0: worker process 10950 exited on signal 11 (core dumped)

2019/12/06 08:58:21 [alert] 10588#0: worker process 10950 exited on signal 11 (core dumped)

2019/12/06 08:58:21 [alert] 10588#0: worker process 10950 exited on signal 11 (core dumped)

2019/12/06 08:58:21 [notice] 10588#0: start worker process 10954

2019/12/06 08:58:21 [notice] 10588#0: start worker process 10954

ngx_http_fastdfs_process_init pid=10954

  ##重启fastdfs服务后,这里日志就稳定在下面这一行,没有一直打印错误了:

[2019-12-06 08:58:23] INFO - fastdfs apache / nginx module v1.21, response_mode=proxy, base_path=/tmp, url_have_group_name=1, group_name=group1, storage_server_port=23000, path_count=1, store_path0=/home/fastdfs/storage, connect_timeout=2, network_timeout=30, tracker_server_count=1, if_alias_prefix=, local_host_ip_count=3, anti_steal_token=0, token_ttl=0s, anti_steal_secret_key length=0, token_check_fail content_type=, token_check_fail buff length=0, load_fdfs_parameters_from_tracker=1, storage_sync_file_max_delay=86400s, use_storage_id=0, storage server id/ip count=0 / 0, flv_support=1, flv_extension=flv

2019/12/06 09:00:32 [info] 10954#0: *2 client timed out (110: Connection timed out) while waiting for request, client: 10.15.4.46, server: 0.0.0.0:80
那,错误排查就到这里了。略坑略坑。
参考
dmesg命令:
https://www.runoob.com/linux/linux-comm-dmesg.html
https://www.cnblogs.com/zhaoxuguang/p/7810651.html
nginx重启后,反向代理失败之问题排查记录的更多相关文章
- Nginx设置Https反向代理,指向Docker Gitlab11.3.9 Https服务
目录 目录 1.GitLab11.3.9的安装 2.域名在阿里云托管,申请免费的1年证书 3.Gitlab 的 https 配置 4.Nginx 配置 https,反向代理指向 Gitlab 配置 目 ...
- nginx二级域名反向代理
nginx二级域名反向代理 添加两个开发测试的域名 test.xxx.com :8088 testmobile.xxx.com: 8089 内网地址:127.0.0.1 外网地址:127.0.0.1 ...
- 【转】Nginx服务器的反向代理proxy_pass配置方法讲解
[转]Nginx服务器的反向代理proxy_pass配置方法讲解 转自:http://www.jb51.net/article/78746.htm 就普通的反向代理来讲Nginx的配置还是比较简单的, ...
- Nginx+Tomcat实现反向代理及动静分离
Nginx+Tomcat实现反向代理及动静分离 时间 2014-07-07 15:18:35 51CTO推荐博文 原文 http://yijiu.blog.51cto.com/433846/143 ...
- Nginx 之六: Nginx服务器的反向代理功能
一:Nginx作为正向代理服务器: 1.正向代理:代理(proxy)服务也可以称为是正向代理,指的是将服务器部署在公司的网关,代理公司内部员工上外网的请求,可以起到一定的安全作用和管理限制作用,正向代 ...
- 五、Nginx多Server反向代理配置
Nginx强大的正则表达式支持,可以使server_name的配置变得很灵活,如果你要做多用户博客,那么每个用户拥有自己的二级域名也就很容易实现了. server_name的匹配顺序 Nginx中的s ...
- 【转载】Nginx + Tomcat 实现反向代理
通常的代理服务器,只用于代理内部网络对Internet的连接请求,客户机必须指定代理服务器,并将本来要直接发送到Web服务器上的http请求发送到代理服务器中由代理服务器向Internet上的web服 ...
- Nginx 如何设置反向代理 多服务器,配置区分开来,单独文件保存单个服务器 server 主机名配置,通过 include 实现
samcao 关注 2015.06.15 10:08* 字数 0 阅读 408评论 0喜欢 0 网络结构如上图.可能你只有一个公网的Ip地址. 但是您的内网有个网站需要映射至外网.而又不想添加其它 ...
- Nginx 部署、反向代理配置、负载均衡
Nginx 部署.反向代理配置.负载均衡 最近我们的angular项目部署,我们采用的的是Nginx,下面对Nginx做一个简单的介绍. 为什么选择Nginx 轻:相比于Apache,同样的web服务 ...
随机推荐
- FPGA时序约束理解记录
最近整理了一下时序约束的内容,顺便发出来分享记录一下. 任何硬件想要工作正常,均需满足建立和保持时间,至于这个概念不再陈述. 下面将重点介绍两个概念:建立余量和保持余量.FPGA内部进行时序分析无非就 ...
- Python中使用字典的几个小技巧
1 解包 所谓解包,就是将字典通过 ** 操作符转为 Key=Value 的形式,这种形式可以直接传给函数作为关键字参数. 说说适用的几种情况. 1.1 搜索拼接条件 当应用中使用类似 SQLAlch ...
- 中级前端必备知识点(2.5w+月薪)进阶 (分享知乎 : 平酱的填坑札记 关注专栏 用户:安大虎)
前端已经不再是5年前刚开始火爆时候的那种html+css+js+jquery的趋势了,现在需要你完全了解前端开发的同时,还要具备将上线.持续化.闭环.自动化.语义化.封装......等概念熟练运用到工 ...
- 设计模式之代理模式(Java)
简介 代理模式出场率真的相当的高,几乎所有框架中无一例外都用到了代理模式,所以了解一下收益还是很高的. 代理模式是什么 如果用一句话来描述代理模式: 代理模式就是为其他对象提供一种代理以控制对被代理对 ...
- python私有变量的分类
- 使用Typescript重构axios(二十)——请求取消功能:实现第一种使用方式
0. 系列文章 1.使用Typescript重构axios(一)--写在最前面 2.使用Typescript重构axios(二)--项目起手,跑通流程 3.使用Typescript重构axios(三) ...
- PTA刷题记录(1)
团队天梯赛-------(2)分值:20 题目要求:你写个程序把给定的符号打印成沙漏的形状.例如给定17个“*”,要求按下列格式打印 ***** *** * *** ***** 所谓“沙漏形状” ...
- 代码托管服务平台GitHub
GitHub 可以托管各种 git 库,并提供一个 Web 界面,但与其它像 SourceForge 或 Google Code 这样的服务不同,GitHub 的独特卖点在于从另外一个项目进行分支的简 ...
- python使用openpyxl操作excel总结
安装openpyxl pip install openpyxl 简单示例 from openpyxl import Workbook #创建一个工作薄对象,也就是创建一个excel文档 wb = Wo ...
- 思科获取DHCP过程
主机如何获取DHCP的过程? 地址请求: 客户端发布一个DHCP请求信息,该信息会发给网内所有主机,非DHCP服务器会丢弃信息. 地址提供: DHCP服务端收到该信息后,会从地址池内挑选一个未被使用的 ...