springboot 整合shiro
参考:
https://blog.csdn.net/fuweilian1/article/details/80309192(推荐)
https://blog.csdn.net/weixin_38132621/article/details/80216056
https://www.cnblogs.com/ll409546297/p/7815409.html#undefined
/* ------------是拦截所有的文件夹,不包含子文件夹: /** -----------是拦截所有的文件夹及里面的子文件夹:
依赖包:
<dependency>
    <groupId>org.apache.shiro</groupId>
    <artifactId>shiro-spring</artifactId>
    <version>1.3.2</version>
</dependency>
数据库表
一切从简,用户 user 表,以及角色 role 表
Shiro 相关类
Shiro 配置类
@Configuration
public class ShiroConfig {
    @Bean
    public ShiroFilterFactoryBean shirFilter(SecurityManager securityManager) {
        ShiroFilterFactoryBean shiroFilterFactoryBean = new ShiroFilterFactoryBean();
        // 必须设置 SecurityManager
        shiroFilterFactoryBean.setSecurityManager(securityManager);
        // setLoginUrl 如果不设置值,默认会自动寻找Web工程根目录下的"/login.jsp"页面 或 "/login" 映射
        shiroFilterFactoryBean.setLoginUrl("/notLogin");
        // 设置无权限时跳转的 url;
        shiroFilterFactoryBean.setUnauthorizedUrl("/notRole");

        // 设置拦截器
        Map<String, String> filterChainDefinitionMap = new LinkedHashMap<>();
        //游客,开发权限
        filterChainDefinitionMap.put("/guest/**", "anon");
        //用户,需要角色权限 “user”
        filterChainDefinitionMap.put("/user/**", "roles[user]");
        //管理员,需要角色权限 “admin”
        filterChainDefinitionMap.put("/admin/**", "roles[admin]");
        //开放登陆接口
        filterChainDefinitionMap.put("/login", "anon");
        //其余接口一律拦截
        //主要这行代码必须放在所有权限设置的最后,不然会导致所有 url 都被拦截
        filterChainDefinitionMap.put("/**", "authc");

        shiroFilterFactoryBean.setFilterChainDefinitionMap(filterChainDefinitionMap);
        System.out.println("Shiro拦截器工厂类注入成功");
        return shiroFilterFactoryBean;
    }

    /**
     * 注入 securityManager
     */
    @Bean
    public SecurityManager securityManager() {
        DefaultWebSecurityManager securityManager = new DefaultWebSecurityManager();
        // 设置realm.
        securityManager.setRealm(customRealm());
        return securityManager;
    }

    /**
     * 自定义身份认证 realm;
     * <p>
     * 必须写这个类,并加上 @Bean 注解,目的是注入 CustomRealm,
     * 否则会影响 CustomRealm类 中其他类的依赖注入
     */
    @Bean
    public CustomRealm customRealm() {
        return new CustomRealm();
    }
}
注意:里面的 SecurityManager 类导入的应该是 import org.apache.shiro.mgt.SecurityManager; 但是,如果你是复制代码过来的话,会默认导入 java.lang.SecurityManager 这里也稍稍有点坑,其他的类的话,也是都属于 shiro 包里面的类
shirFilter 方法中主要是设置了一些重要的跳转 url,比如未登陆时,无权限时的跳转;以及设置了各类 url 的权限拦截,比如 /user 开始的 url 需要 user 权限,/admin 开始的 url 需要 admin 权限等
权限拦截 Filter
当运行一个Web应用程序时,Shiro将会创建一些有用的默认 Filter 实例,并自动地将它们置为可用,而这些默认的 Filter 实例是被 DefaultFilter 枚举类定义的,当然我们也可以自定义 Filter 实例,这些在以后的文章中会讲到 
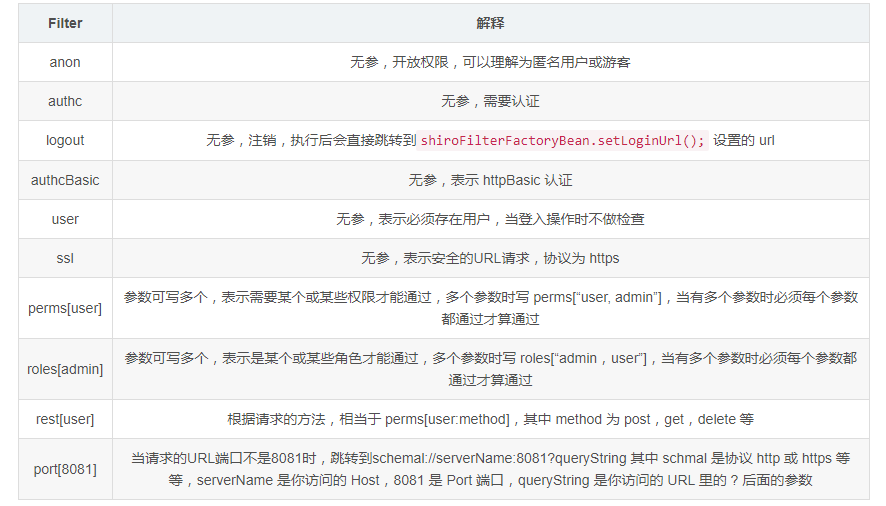
常用的主要就是 anon,authc,user,roles,perms 等
注意:anon, authc, authcBasic, user 是第一组认证过滤器,perms, port, rest, roles, ssl 是第二组授权过滤器,要通过授权过滤器,就先要完成登陆认证操作(即先要完成认证才能前去寻找授权) 才能走第二组授权器(例如访问需要 roles 权限的 url,如果还没有登陆的话,会直接跳转到 shiroFilterFactoryBean.setLoginUrl(); 设置的 url )
自定义 realm 类:
我们首先要继承 AuthorizingRealm 类来自定义我们自己的 realm 以进行我们自定义的身份,权限认证操作。
记得要 Override 重写 doGetAuthenticationInfo 和 doGetAuthorizationInfo 两个方法(两个方法名很相似,不要搞错)
public class CustomRealm extends AuthorizingRealm {
    private UserMapper userMapper;

    @Autowired
    private void setUserMapper(UserMapper userMapper) {
        this.userMapper = userMapper;
    }

    /**
     * 获取身份验证信息
     * Shiro中,最终是通过 Realm 来获取应用程序中的用户、角色及权限信息的。
     *
     * @param authenticationToken 用户身份信息 token
     * @return 返回封装了用户信息的 AuthenticationInfo 实例
     */
    @Override
    protected AuthenticationInfo doGetAuthenticationInfo(AuthenticationToken authenticationToken) throws AuthenticationException {
        System.out.println("————身份认证方法————");
        UsernamePasswordToken token = (UsernamePasswordToken) authenticationToken;
        // 从数据库获取对应用户名密码的用户
        String password = userMapper.getPassword(token.getUsername());
        if (null == password) {
            throw new AccountException("用户名不正确");
        } else if (!password.equals(new String((char[]) token.getCredentials()))) {
            throw new AccountException("密码不正确");
        }
        return new SimpleAuthenticationInfo(token.getPrincipal(), password, getName());
    }

    /**
     * 获取授权信息
     *
     * @param principalCollection
     * @return
     */
    @Override
    protected AuthorizationInfo doGetAuthorizationInfo(PrincipalCollection principalCollection) {
        System.out.println("————权限认证————");
        String username = (String) SecurityUtils.getSubject().getPrincipal();
        SimpleAuthorizationInfo info = new SimpleAuthorizationInfo();
        //获得该用户角色
        String role = userMapper.getRole(username);
        Set<String> set = new HashSet<>();
        //需要将 role 封装到 Set 作为 info.setRoles() 的参数
        set.add(role);
        //设置该用户拥有的角色
        info.setRoles(set);
        return info;
    }
}
重写的两个方法分别是实现身份认证以及权限认证,shiro 中有个作登陆操作的 Subject.login() 方法,当我们把封装了用户名,密码的 token 作为参数传入,便会跑进这两个方法里面(不一定两个方法都会进入)
其中 doGetAuthorizationInfo 方法只有在需要权限认证时才会进去,比如前面配置类中配置了 filterChainDefinitionMap.put("/admin/**", "roles[admin]"); 的管理员角色,这时进入 /admin 时就会进入 doGetAuthorizationInfo 方法来检查权限;而 doGetAuthenticationInfo 方法则是需要身份认证时(比如前面的 Subject.login() 方法)才会进入
再说下 UsernamePasswordToken 类,我们可以从该对象拿到登陆时的用户名和密码(登陆时会使用 new UsernamePasswordToken(username, password);),而 get 用户名或密码有以下几个方法
token.getUsername()  //获得用户名 String
token.getPrincipal() //获得用户名 Object
token.getPassword()  //获得密码 char[]
token.getCredentials() //获得密码 Object
注意:有很多人会发现,UserMapper 等类,接口无法通过 @Autowired 注入进来,跑程序的时候会报 NullPointerException,网上说了很多诸如是 Spring 加载顺序等原因,但其实有一个很重要的地方要大家注意,CustomRealm 这个类是在 shiro 配置类的 securityManager.setRealm() 方法中设置进去的,而很多人直接写securityManager.setRealm(new CustomRealm()); ,这样是不行的,必须要使用 @Bean 注入 MyRealm,不能直接 new 对象:
    @Bean
    public SecurityManager securityManager() {
        DefaultWebSecurityManager securityManager = new DefaultWebSecurityManager();
        // 设置realm.
        securityManager.setRealm(customRealm());
        return securityManager;
    }

    @Bean
    public CustomRealm customRealm() {
        return new CustomRealm();
    }
道理也很简单,和 Controller 中调用 Service 一样,都是 SpringBean,不能自己 new
当然,同样的道理也可以这样写:
    @Bean
    public SecurityManager securityManager(CustomRealm customRealm) {
        DefaultWebSecurityManager securityManager = new DefaultWebSecurityManager();
        // 设置realm.
        securityManager.setRealm(customRealm);
        return securityManager;
    }
然后只要在 CustomRealm 类加上个类似 @Component 的注解即可
功能实现
本文的功能全部以接口返回 json 数据的方式实现
根据 url 权限分配 controller
游客
@RestController
@RequestMapping("/guest")
public class GuestController{
    @Autowired
    private final ResultMap resultMap;

    @RequestMapping(value = "/enter", method = RequestMethod.GET)
    public ResultMap login() {
        return resultMap.success().message("欢迎进入,您的身份是游客");
    }

    @RequestMapping(value = "/getMessage", method = RequestMethod.GET)
    public ResultMap submitLogin() {
        return resultMap.success().message("您拥有获得该接口的信息的权限!");
    }
}
普通登陆用户
@RestController
@RequestMapping("/user")
public class UserController{
    @Autowired
    private final ResultMap resultMap;

    @RequestMapping(value = "/getMessage", method = RequestMethod.GET)
    public ResultMap getMessage() {
        return resultMap.success().message("您拥有用户权限,可以获得该接口的信息!");
    }
}
管理员
@RestController
@RequestMapping("/admin")
public class AdminController {
    @Autowired
    private final ResultMap resultMap;

    @RequestMapping(value = "/getMessage", method = RequestMethod.GET)
    public ResultMap getMessage() {
        return resultMap.success().message("您拥有管理员权限,可以获得该接口的信息!");
    }
}
突然注意到 CustomRealm 类那里抛出了 AccountException 异常,现在建个类进行异常捕获
@RestControllerAdvice
public class ExceptionController {
    private final ResultMap resultMap;

    @Autowired
    public ExceptionController(ResultMap resultMap) {
        this.resultMap = resultMap;
    }

    // 捕捉 CustomRealm 抛出的异常
    @ExceptionHandler(AccountException.class)
    public ResultMap handleShiroException(Exception ex) {
        return resultMap.fail().message(ex.getMessage());
    }
}
当然还有进行登陆等处理的 LoginController
@RestController
public class LoginController {
    @Autowired
    private ResultMap resultMap;
    private UserMapper userMapper;

    @RequestMapping(value = "/notLogin", method = RequestMethod.GET)
    public ResultMap notLogin() {
        return resultMap.success().message("您尚未登陆!");
    }

    @RequestMapping(value = "/notRole", method = RequestMethod.GET)
    public ResultMap notRole() {
        return resultMap.success().message("您没有权限!");
    }

    @RequestMapping(value = "/logout", method = RequestMethod.GET)
    public ResultMap logout() {
        Subject subject = SecurityUtils.getSubject();
        //注销
        subject.logout();
        return resultMap.success().message("成功注销!");
    }

    /**
     * 登陆
     *
     * @param username 用户名
     * @param password 密码
     */
    @RequestMapping(value = "/login", method = RequestMethod.POST)
    public ResultMap login(String username, String password) {
        // 从SecurityUtils里边创建一个 subject
        Subject subject = SecurityUtils.getSubject();
        // 在认证提交前准备 token(令牌)
        UsernamePasswordToken token = new UsernamePasswordToken(username, password);
        // 执行认证登陆
        subject.login(token);
        //根据权限,指定返回数据
        String role = userMapper.getRole(username);
        if ("user".equals(role)) {
            return resultMap.success().message("欢迎登陆");
        }
        if ("admin".equals(role)) {
            return resultMap.success().message("欢迎来到管理员页面");
        }
        return resultMap.fail().message("权限错误!");
    }
}
测试
springboot 整合shiro的更多相关文章
- 补习系列(6)- springboot 整合 shiro 一指禅
目标 了解ApacheShiro是什么,能做什么: 通过QuickStart 代码领会 Shiro的关键概念: 能基于SpringBoot 整合Shiro 实现URL安全访问: 掌握基于注解的方法,以 ...
- SpringBoot系列十二:SpringBoot整合 Shiro
声明:本文来源于MLDN培训视频的课堂笔记,写在这里只是为了方便查阅. 1.概念:SpringBoot 整合 Shiro 2.具体内容 Shiro 是现在最为流行的权限认证开发框架,与它起名的只有最初 ...
- SpringBoot整合Shiro实现基于角色的权限访问控制(RBAC)系统简单设计从零搭建
SpringBoot整合Shiro实现基于角色的权限访问控制(RBAC)系统简单设计从零搭建 技术栈 : SpringBoot + shiro + jpa + freemark ,因为篇幅原因,这里只 ...
- 转:30分钟了解Springboot整合Shiro
引自:30分钟了解Springboot整合Shiro 前言:06年7月的某日,不才创作了一篇题为<30分钟学会如何使用Shiro>的文章.不在意之间居然斩获了22万的阅读量,许多人因此加了 ...
- springboot整合Shiro功能案例
Shiro 核心功能案例讲解 基于SpringBoot 有源码 从实战中学习Shiro的用法.本章使用SpringBoot快速搭建项目.整合SiteMesh框架布局页面.整合Shiro框架实现用身份认 ...
- SpringBoot整合Shiro实现权限控制,验证码
本文介绍 SpringBoot 整合 shiro,相对于 Spring Security 而言,shiro 更加简单,没有那么复杂. 目前我的需求是一个博客系统,有用户和管理员两种角色.一个用户可能有 ...
- SpringBoot 整合Shiro 一指禅
目标 了解ApacheShiro是什么,能做什么: 通过QuickStart 代码领会 Shiro的关键概念: 能基于SpringBoot 整合Shiro 实现URL安全访问: 掌握基于注解的方法,以 ...
- SpringBoot整合Shiro+MD5+Salt+Redis实现认证和动态权限管理(上)----筑基中期
写在前面 通过前几篇文章的学习,我们从大体上了解了shiro关于认证和授权方面的应用.在接下来的文章当中,我将通过一个demo,带领大家搭建一个SpringBoot整合Shiro的一个项目开发脚手架, ...
- SpringBoot整合Shiro+MD5+Salt+Redis实现认证和动态权限管理|前后端分离(下)----筑基后期
写在前面 在上一篇文章<SpringBoot整合Shiro+MD5+Salt+Redis实现认证和动态权限管理(上)----筑基中期>当中,我们初步实现了SpringBoot整合Shiro ...
- SpringBoot整合Shiro权限框架实战
什么是ACL和RBAC ACL Access Control list:访问控制列表 优点:简单易用,开发便捷 缺点:用户和权限直接挂钩,导致在授予时的复杂性,比较分散,不便于管理 例子:常见的文件系 ...
随机推荐
- 个人永久性免费-Excel催化剂功能第53波-无比期待的合并工作薄功能
合并工作薄.工作表功能,几乎每一款Excel插件都提供,而且系列衍生功能甚至有多达10多个.今天Excel催化剂重拾武器,在现有众多插件没提供到位的部分场景中,给予支持和补充,做到人有我优,人无我有的 ...
- 基于surging 的stage组件设计,谈谈我眼中的微服务。
一.前言 随着业务的发展,并发量的增多,业务的复杂度越来越大,对于系统架构能力要求越来越高,这时候微服务的设计思想应运而生,但是对于微服务需要引擎进行驱动,这时候基于.NET CORE 的微服务引擎s ...
- sql LocalDB 的安装环境和使用方法
LocalDB LocalDB专门为开发商.它是非常容易安装,无需管理,但它提供了相同的T-SQL语言,编程表面和客户端供应商定期的SQL Server Express.实际上,目标SQL Serve ...
- 备战金九银十,Java研发面试题(Spring、MySQL、JVM、Mybatis、Redis、Tomcat)[带答案],刷起来!
八月在即,马上就是"金九银十",又是跳槽招聘季.咱们这行公认涨薪不如跳槽加的快.但不建议频繁跳槽,还是要学会融合团队,抓住每个机会提升技能. 苏先生在这里给大家整理了一套各大互联网 ...
- F#周报2019年第30期
新闻 Fantomas 3.0 宣告.NET Core 3.0预览版7 .NET Core 3.0预览版7中ASP.NET Core与Blazor的升级 Visual Studio 2019版本16. ...
- .NET为何物?
.NET是 Microsoft XML Web services 平台.XML Web services 允许应用程序通过 Internet 进行通讯和共享数据,而不管所采用的是哪种操作系统.设备或编 ...
- C++虚函数的工作原理
静态绑定与动态绑定 讨论静态绑定与动态绑定,首先需要理解的是绑定,何为绑定?函数调用与函数本身的关联,以及成员访问与变量内存地址间的关系,称为绑定. 理解了绑定后再理解静态与动态. 静态绑定:指在程序 ...
- CEPH 自动化测试用例介绍
1.QA 的内部逻辑关系. 首先用一个图表示一下QA的内部的逻辑关系. 2.QA的脚本介绍 3.QA脚本运行
- 0x15 字符串
KMP算法 next数组的求法 void calc_next() { next[]=; , j=; i<=n; ++i) { &&a[i]!=a[j+]) j=next[j]; ...
- S3 Select for Java 使用记录
背景 后台基本使用 Amazon 的全家桶(EC2.DynamoDB.S3.Step Fuction 等等)构建.现在需要根据访问者的 IP 确定访问者的国家或地区. 已知: 访问者 IP 一个 ip ...