
android自定义圆角实线边框,圆角虚线边框,直实线,虚实线,半圆角边框
先上图
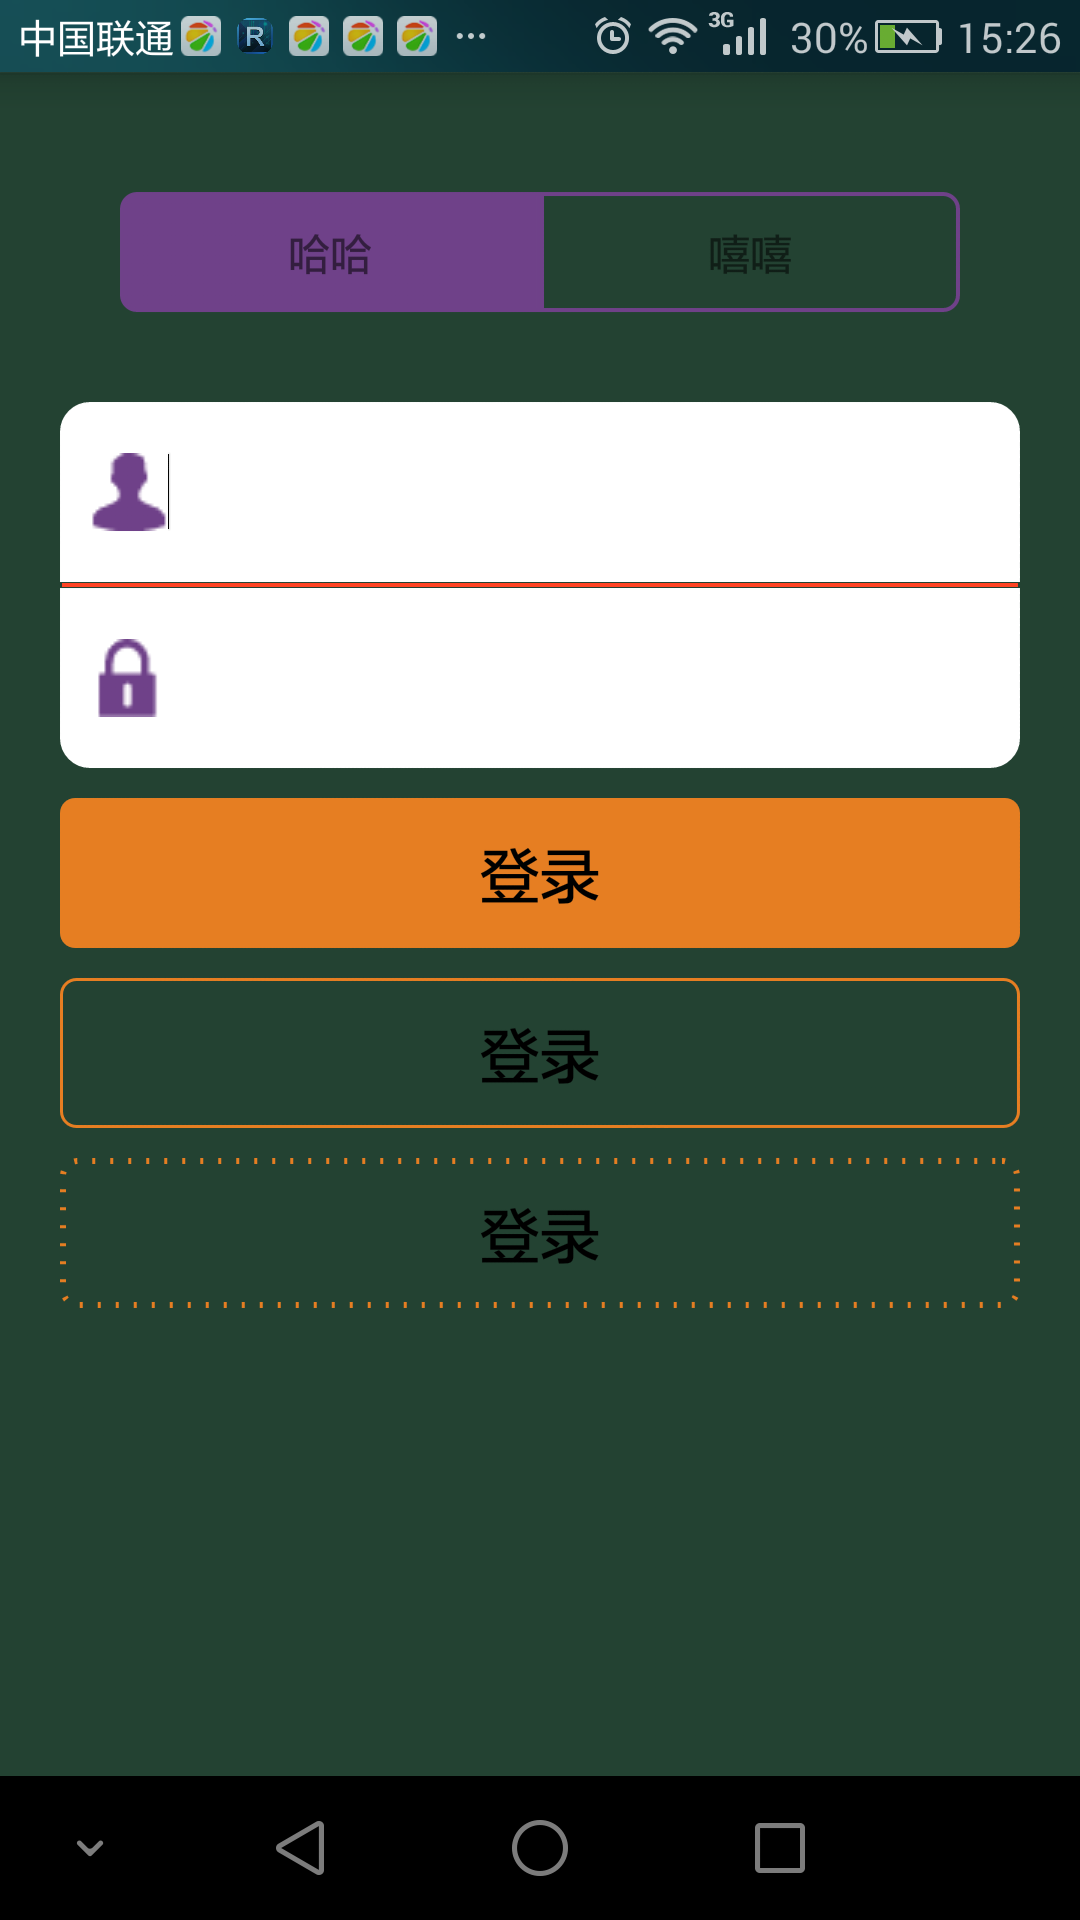
在现实项目开发中,单纯的Button,EditText等控件远远不能满足我们项目的UI设计需求,这时候,我们就需要自己动手丰衣足食啦。接下来先给大家介绍一些属性,备注写的都非常清楚啦,我就不啰嗦啦。
 <?xml version="1.0" encoding="utf-8"?>

 <!--android:shape属性代表绘制的图形形状 retangle;矩形,oval:椭圆 ,line:线 ring,环形-->

 <shape xmlns:android="http://schemas.android.com/apk/res/android"

     android:shape="###">

     <!--stroke主要给我们所要画的图形进行描边 color:边框颜色,width:边框宽度,dashGap:虚线框的间隔,dashWidth:虚线框的宽度-->

     <stroke

         android:width="###"

         android:color="###"

         android:dashGap="###"

         android:dashWidth="###" />

     <!--corners主要是设置我们所画图形四个角的半径 radius:四角半径 bottomLeftRadius:左下角半径,

     bottomRightRadius:右下角半径,topLeftRadius:左上角半径,topRightRadius:右上角半径-->

     <corners

         android:bottomLeftRadius="###"

         android:bottomRightRadius="###"

         android:radius="###"

         android:topLeftRadius="###"

         android:topRightRadius="###" />

     <!--padding主要设置内边距,也就是你装载的内容(大部分是Textview或者button)离图形边框的距离

     bottom:下内边距,left:左内边距,right:右内边距,top:上内边距-->

     <padding

         android:bottom="###"

         android:left="###"

         android:right="###"

         android:top="###" />

     <!--这个就不需要讲了吧-->

     <size

         android:width="###"

         android:height="###" />

     <!--主要设置你所画图形的填充色-->

     <solid

         android:color="###"/>

     <!--gradient主要指定一个渐变颜色的形状。-->

     <gradient

         android:angle="###"

         android:centerColor="###"

         android:centerX="###"

         android:centerY="###"

         android:gradientRadius="###"

         android:endColor="###"

         android:startColor="###"

         android:type="###"

         android:useLevel="###"/>

 </shape>
接下来我们看最顶上的"哈哈"与"嘻嘻"。通过corners设置左下角和左上角的半径为5dp,右上角,右下角半径为0dp,我们就可以得到左边圆角,右边直角的边框啦。
 <?xml version="1.0" encoding="utf-8"?>

 <layer-list xmlns:android="http://schemas.android.com/apk/res/android">

     <item>

         <shape android:shape="rectangle">

             <stroke

                 android:width="1.2dp"

                 android:color="#6f4189" />

             <solid android:color="#6f4189" />

             <corners

                 android:bottomLeftRadius="5dp"

                 android:bottomRightRadius="0dp"

                 android:topLeftRadius="5dp"

                 android:topRightRadius="0dp" />

             <padding

                 android:bottom="2dp"

                 android:left="12dp"

                 android:right="12dp"

                 android:top="2dp" />

         </shape>

     </item>

 </layer-list>
下面一样,通过corners设置右下角和右上角的半径为5dp,左上角,左下角半径为0dp,我们即可得到左边直角,右边圆角的边框。
 <layer-list xmlns:android="http://schemas.android.com/apk/res/android" >

     <item>

         <shape>

             <stroke

                 android:width="1.2dp"

                 android:color="#6f4189" />

             <corners

                 android:bottomLeftRadius="0dp"

                 android:bottomRightRadius="5dp"

                 android:topLeftRadius="0dp"

                 android:topRightRadius="5dp" />

             <solid android:color="#00000000" />

             <padding

                 android:bottom="2dp"

                 android:left="12dp"

                 android:right="12dp"

                 android:top="2dp" />

         </shape>

     </item>

 </layer-list>
它俩再加上viewpager就可以实现很多App上都有的左右滑动翻页效果啦。
我们再看图中的用户名和密码输入框,至于整个框框就不说啦,和上面的'嘻嘻','哈哈'一个原理,主要给大家介绍一下中间的红线。实现很简单,我们只需要设置android:shape="line",然后通过stoke的android:width设置直线的宽度,android;color设置直线的颜色即可。
 <?xml version="1.0" encoding="utf-8"?>

 <shape xmlns:android="http://schemas.android.com/apk/res/android"

     android:shape="line">

    <stroke

        android:width="1.2dp"

        android:color="#ff4323"/>

 </shape>
让其在页面的显示代码如下
 <LinearLayout

             android:id="@+id/straight_line"

             android:layout_width="fill_parent"

             android:layout_height="2dp"

             android:background="@drawable/line"

             android:orientation="vertical"/>
其实设置直线还有种跟直观的方法,通过<view/>来设置,在这里就不细讲,大家可以自行百度。
接下来我们看看下面的三个登录框框,重点给大家讲讲最后面那个"断点"虚线框框。下面最后一个代码模块是"断点"虚线框框的代码,其中color是定义虚线的颜色,dashGap定义的是虚线的间隔,width定义的是虚线的大小,dashWidth定义虚线的宽度。
 <?xml version="1.0" encoding="utf-8"?>

 <shape xmlns:android="http://schemas.android.com/apk/res/android"

     android:shape="rectangle">

     <corners

         android:radius="5dp"/>

     <solid

         android:color="#E67e22"/>

 </shape>
 <?xml version="1.0" encoding="utf-8"?>

 <shape xmlns:android="http://schemas.android.com/apk/res/android"

     android:shape="rectangle">

     <corners

         android:radius="5dp"/>

     <stroke

         android:color="#E67e22"

         android:width="1.0dp"/>

 </shape>
 <?xml version="1.0" encoding="utf-8"?>

 <shape xmlns:android="http://schemas.android.com/apk/res/android"

     android:shape="rectangle">

     <corners android:radius="5dp" />

     <stroke

         android:color="#E67e22"

         android:dashGap="5dp"

         android:width="2dp"

         android:dashWidth="1.0dp" />

 </shape>
android自定义圆角实线边框,圆角虚线边框,直实线,虚实线,半圆角边框的更多相关文章
- android自定义listview实现圆角
在项目中我们会经常遇到这种圆角效果,因为直角的看起来确实不那么雅观,可能大家会想到用图片实现,试想上中下要分别做三张图片,这样既会是自己的项目增大也会增加内存使用量,所以使用shape来实现不失为一种 ...
- android shape的使用详解以及常用效果(渐变色、分割线、边框、半透明阴影效果等)
shape使用.渐变色.分割线.边框.半透明.半透明阴影效果. 首先简单了解一下shape中常见的属性.(详细介绍参看 api文档 ) 转载请注明:Rflyee_大飞: http://blog.cs ...
- (转)[原] Android 自定义View 密码框 例子
遵从准则 暴露您view中所有影响可见外观的属性或者行为. 通过XML添加和设置样式 通过元素的属性来控制其外观和行为,支持和重要事件交流的事件监听器 详细步骤见:Android 自定义View步骤 ...
- [原] Android 自定义View 密码框 例子
遵从准则 暴露您view中所有影响可见外观的属性或者行为. 通过XML添加和设置样式 通过元素的属性来控制其外观和行为,支持和重要事件交流的事件监听器 详细步骤见:Android 自定义View步骤 ...
- android 自定义Button,抛弃写shape文件
标签: android 控件 自定义 2017年05月27日 17:52:13 611人阅读 评论(0) 收藏 举报 分类: 自定义View(2) 作者同类文章 X 版权声明:本文为博主原创文章 ...
- Android 自定义View合集
自定义控件学习 https://github.com/GcsSloop/AndroidNote/tree/master/CustomView 小良自定义控件合集 https://github.com/ ...
- Android 自定义 view(三)—— onDraw 方法理解
前言: 上一篇已经介绍了用自己定义的属性怎么简单定义一个view<Android 自定义view(二) -- attr 使用>,那么接下来我们继续深究自定义view,下一步将要去简单理解自 ...
- Android 自定义shape圆形按钮
Shape的属性: solid 描述:内部填充 属性:android:color 填充颜色 size 描述:大小 属性: android:width 宽 android:height 高 gradie ...
- 【Android - 自定义View】之自定义View浅析
1.概述 Android自定义View / ViewGroup的步骤大致如下: 1) 自定义属性: 2) 选择和设置构造方法: 3) 重写onMeasure()方法: 4) 重写onDraw()方法: ...
- CSS不用背景图片实现优惠券样式反圆角,凹圆角,反向半圆角,并且背景渐变
日常开发过程中,特别是商城相关应用开发过程中,时常会遇到花里胡哨的设计图,比如优惠券样式,上图: 实现思路如下: 1.先写一个外容器,实现背景色渐变: Html: 1 <div clas ...
随机推荐
- Leetcode148-Sort_List
Sort_List 在LeetCode 里面,因为只有归并排序的时间复杂度为O(1),所以快速排序用不了,前面两个都没用直接看最后一个归并排序. 冒泡排序(超时了) public ListNode s ...
- windows上传文件到 linux的hdfs
一.windows上传文件到 linux的hdfs 1.先在 centos 上开启 hdfs, 用 jps 可以看到下面信息, 说明完成开启 2.在win上配置 hadoop (https://www ...
- zz【清华NLP】图神经网络GNN论文分门别类,16大应用200+篇论文最新推荐
[清华NLP]图神经网络GNN论文分门别类,16大应用200+篇论文最新推荐 图神经网络研究成为当前深度学习领域的热点.最近,清华大学NLP课题组Jie Zhou, Ganqu Cui, Zhengy ...
- 深度学习的encoder和decoder
所谓编码,就是将输入序列转化成一个固定长度的向量:解码,就是将之前生成的固定向量再转化成输出序列.
- C++ string 字符串函数详解
运算符重载 + 和 +=:连接字符串 =:字符串赋值 >.>=.< 和 <=:字符串比较(例如a < b, aa < ab) ==.!=:比较字符串 << ...
- K12
K12,教育类专用名词(kindergarten through twelfth grade),是学前教育至高中教育的缩写,现在普遍被用来代指基础教育. K-12教育是美国基础教育的统称.“K12”中 ...
- ios、安卓的兼容性
日期转换成时间戳: 安卓下可以使用 Date.parse(new Date('2019-11-18 12:00:00')) 直接转换,结果为 1574049600000 ios下 Date.parse ...
- [LeetCode] 658. Find K Closest Elements 寻找K个最近元素
Given a sorted array, two integers k and x, find the k closest elements to x in the array. The resul ...
- django实战(三)--删除和批量删除
上一节我们完成了带分页的模糊查询,本节我们继续删除操作. 同样的,先给出各个模块的代码(上一节的就不在贴出了):urls.py path('curd/delete/',views.curd_delet ...
- SpringBoot 第一篇:入门篇
作者:追梦1819 原文:https://www.cnblogs.com/yanfei1819/p/10819728.html 版权声明:本文为博主原创文章,转载请附上博文链接! 前言 博主从去年 ...