springMVC-6-restful_CRUD
1、大体框架
POJO层代码
Employee
@Data

public class Employee {

    private Integer id;

    private String lastName;

    private String email;

    private int gender;

    private Department department;

    public Employee() {

    }

    public Employee(Integer id, String lastName, String email, int gender, Department department) {

        this.id = id;

        this.lastName = lastName;

        this.email = email;

        this.gender = gender;

        this.department = department;

    }

}
Department
@Data

public class Department {

    private Integer departmentId;

    private String departmentName;

    public Department() {

    }

    public Department(Integer departmentId, String departmentName) {

        this.departmentId = departmentId;

        this.departmentName = departmentName;

    }

}
Dao层代码
EmployeeDao
@Repository //组件,即:在IOC容器中会有一个实例化好的EmployeeDao实例

public class EmployeeDao {

    //生成一个map用来做数据库

    private static Map<Integer, Employee> employees = null;

    @Autowired  //根据名字自动装配

    private DepartmentDao departmentDao;

    //静态代码块

    //这些静态数据模拟的就是数据库

    static{

        employees = new HashMap<Integer, Employee>();

        employees.put(1001, new Employee(1001, "E-AA", "aa@163.com", 1, new Department(101, "D-AA")));

        employees.put(1002, new Employee(1002, "E-BB", "bb@163.com", 1, new Department(102, "D-BB")));

        employees.put(1003, new Employee(1003, "E-CC", "cc@163.com", 0, new Department(103, "D-CC")));

        employees.put(1004, new Employee(1004, "E-DD", "dd@163.com", 0, new Department(104, "D-DD")));

        employees.put(1005, new Employee(1005, "E-EE", "ee@163.com", 1, new Department(105, "D-EE")));

    }

    //这个用于在save保存方法中

    private static Integer initId = 1006;

    //在数据库中保存新增键值对,传入实例化好的employee即可

    public void save(Employee employee){

        if(employee.getId() == null){

            employee.setId(initId++);

        }

        employee.setDepartment(departmentDao.getDepartment(employee.getDepartment().getDepartmentId()));

        employees.put(employee.getId(), employee);

    }

    //在数据库中获取全部值,并返回一个list

    public Collection<Employee> getAll(){

        return employees.values();

    }

    //在数据库中获取这个id对应的值

    public Employee get(Integer id){

        return employees.get(id);

    }

    //在数据库中删除这个这个id的值

    public void delete(Integer id){

        employees.remove(id);

    }

}
DepartmentDao
@Repository

public class DepartmentDao {

    private static Map<Integer, Department> departments = null;

    static{

        departments = new HashMap<Integer, Department>();

        departments.put(101, new Department(101, "D-AA"));

        departments.put(102, new Department(102, "D-BB"));

        departments.put(103, new Department(103, "D-CC"));

        departments.put(104, new Department(104, "D-DD"));

        departments.put(105, new Department(105, "D-EE"));

    }

    //获取全部department信息

    public Collection<Department> getDepartments(){

        return departments.values();

    }

    //通过id获取department信息

    public Department getDepartment(Integer id){

        return departments.get(id);

    }

}
思路
先在index.jsp页面中有一个跳转
跳转到一个control控制器
返回一个展示全部数据的地方
就可以进行input、post、delete请求
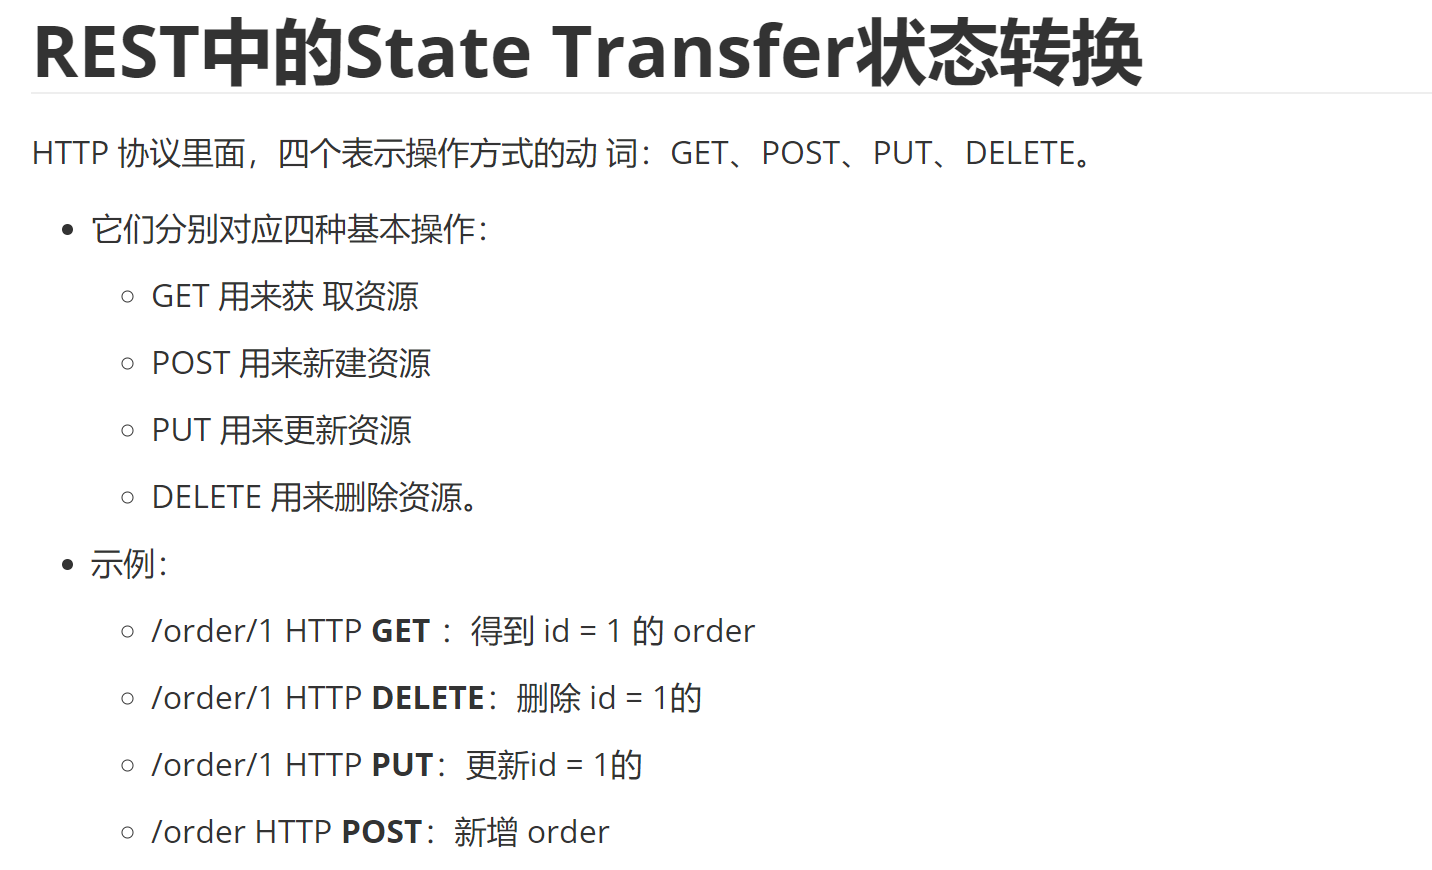
rest风格url写法
2、展示全部数据
control
@Controller

@RequestMapping(value ="rest")

public class EmployeeControl {

    @Autowired

    private EmployeeDao employeeDao;

    @RequestMapping(value ="list")

    public String list(HashMap<String, Object> map){

        //把我们需要的数据从自动装配的employee实例化对象中取出

        //再放到request域中的map中,用employees这个键对应我们返回来的list

        map.put("employees",employeeDao.getAll());

        return "list";

    }

}
list.jsp
//头文件

<%@ taglib prefix="c" uri="http://java.sun.com/jsp/jstl/core" %>

<c:if test="${empty requestScope.employees}">

    !!!没有员工信息

</c:if>

<c:if test="${!empty requestScope.employees}">

    <table border="1" cellpadding="10" cellspacing="0">

        <%--第一行--%>

        <tr>

            <th>ID</th>

            <th>LastName</th>

            <th>Email</th>

            <th>Gender</th>

            <th>Department</th>

            <th>Edit</th>

            <th>Delete</th>

        </tr>

        <c:forEach items="${requestScope.employees}" var="employee">

            <tr>

                <th>${employee.id}</th>

                <th>${employee.lastName}</th>

                <th>${employee.email}</th>

                <th>${employee.gender == 0? 'Female':'Male'}</th>

                <th>${employee.department.departmentName}</th>

                <th>

                    Edit

                </th>

                <th>

                    Delete

                </th>

            </tr>

        </c:forEach>

    </table>

</c:if>
3、添加员工数据
代码修改
control中
//这个control控制转向添加员工的那个页面

//那个页面添加员工是需要有部门信息的,所以我们需要在那个页面的请求域中放入department的信息

@RequestMapping(value = "add",method = RequestMethod.GET)

public String add(HashMap<String,Object> map){

    map.put("departments",departmentDao.getDepartments());

    map.put("employee",new Employee());

    return "add";

}
add.jsp
<%@ page import="java.util.Map" %>

<%@ page import="java.util.HashMap" %>

<%@ taglib prefix="form" uri="http://www.springframework.org/tags/form" %>

<%@ page contentType="text/html;charset=UTF-8" language="java" isErrorPage="true" %>

<%@ taglib prefix="c" uri="http://java.sun.com/jsp/jstl/core" %>

<!doctype html>

<html lang="en">

<head>

    <title>修改/添加员工信息</title>

</head>

<body>

<%--为什么需要使用form标签?

    1、开速开发出页面

    2、可以快速回显数据

--%>

<%--@elvariable id="employee" type="com.wang.POJO.Employee"--%>

<form:form action="/employee" method="post"  modelAttribute="employee">

    <!-- path 属性对应 html 表单标签的 name 属性值 -->

    <c:if test="${employee.id == null }">

        <!-- path 属性对应 html 表单标签的 name 属性值 -->

        LastName: <form:input path="lastName"/>

        <br>

    </c:if>

    <c:if test="${employee.id != null }">

        <form:hidden path="id"/>

        <input type="hidden" name="_method" value="PUT"/>

        <%-- 对于 _method 不能使用 form:hidden 标签, 因为 modelAttribute 对应的 bean 中没有 _method 这个属性 --%>

        <%--

        <form:hidden path="_method" value="PUT"/>

        --%>

    </c:if>

    email:    <form:input path="email"/><br>

    <%--这里的items可以放:集合/map--%>

    <%

        //当输入框中的值为1时,jstl就会自动把Male传递给path属性

        //注意:这个genders需要放到request域对象下面的radiobuttons才能访问到

            HashMap<Integer , String> genders = new HashMap<>();

            genders.put(1, "男");

            genders.put(0, "女");

            request.setAttribute("genders", genders);

    %>

    gender:     <form:radiobuttons path="gender" items="${genders}"/><br>

    department: <form:select path="department.departmentId" items="${departments}"

                             itemLabel="departmentName"

                             itemValue="departmentId"/><br>

    <input type="submit" value="submit">

</form:form>

</body>

</html>
注意问题
我们这里之所以需要在request域中放一个new Employee()是因为在初始化form:form表单中是需要一个回显的员工的数据的,(如果我们没在request域中放,表单就会去session域中取寻找),而且在form表单中我们需要设置使用哪个数据作为回显数据的(默认为commond)
但是回显还是失败了(不需要了解)
4、删除员工数据
代码修改
list.jsp中修改
<%@ page contentType="text/html;charset=UTF-8" language="java"  isErrorPage="true" %>

<%@ taglib prefix="c" uri="http://java.sun.com/jsp/jstl/core" %>

<!doctype html>

<html lang="en">

<head>

    <title>list</title>

    <%--为什么会访问不到静态资源:

            因为,优雅的 REST 风格的资源URL 不希望带 .html 或 .do 等后缀

                所以静态资源的访问也会通过dispatcher:

                但是我们没有在dispatcher中配置静态资源的mapper:

                所以如果我们没有特殊设置是访问不到静态资源的

        解决方法:需要在springmvc的配置文件中配置:<mvc:default-servlet-handler/>

            --%>

    <%--引入样式--%>

    <script src="${pageContext.request.contextPath}/static/js/jquery-3.5.1.min.js"></script>

    <link rel="stylesheet" href="${pageContext.request.contextPath}/static/bootstrap-3.4.1-dist/css/bootstrap.min.css">

    <script src="${pageContext.request.contextPath}/static/bootstrap-3.4.1-dist/js/bootstrap.min.js"></script>

    <script type="text/javascript">

        $(function(){

            $(".delete").click(function(){

                //获取对应a超链接的href属性

                var href = $(this).attr("href");

                //再把这个href赋值给的form标签的actions属性,并提交

                $("form").attr("action",href).submit();

                //返回false表示这个a标签将不会跳转

                return false;

            })

        })

    </script>

</head>

<body>

<form action="" method="post">

    <input type="hidden" name="_method" value="DELETE">

</form>

    <c:if test="${empty requestScope.employees}">

        !!!没有员工信息

    </c:if>

    <c:if test="${!empty requestScope.employees}">

        <div class="container">

            <div class="row">

                <div class="col-md-4">

                    <h1>员工管理系统</h1>

                <button class="btn btn-primary"><a style="color: #0f0f0f" href="/rest/add">添加员工</a></button>

            </div>

        </div>

        <div class="row">

            <table class="table table-hover">

                <tr>

                    <th>#</th>

                    <th>lastName</th>

                    <th>Email</th>

                    <th>Gender</th>

                    <th>Department</th>

                    <th>操作</th>

                </tr>

                <c:forEach items="${requestScope.employees}" var="employee">

                    <tr>

                        <th>${employee.id}</th>

                        <th>${employee.lastName}</th>

                        <th>${employee.email}</th>

                        <th>${employee.gender == 0? 'Female':'Male'}</th>

                        <th>${employee.department.departmentName}</th>

                        <th><button class="btn btn-primary">Edit</button></th>

                        <%--这里的a发送的是get请求

                            但是我们需要在control层把这个请求转换成delete请求,

                            需要请求是post才能转换:

                            解决方法:导入jquery静态资源,

                                用js来解决这个问题--%>

                        <th><button class="btn btn-danger"><a class="delete" href="/rest/employee/${employee.id}" style="color: #0f0f0f">Delete</a></button></th>

                    </tr>

                </c:forEach>

            </table>

        </div>

    </div>

</c:if>

</body>

</html>
control
//删除的超链接上加上id值即可到这里来删除这个数据

@RequestMapping(value="/employee/{id}",method = RequestMethod.DELETE)

public String delete(@PathVariable("id")Integer id){

    employeeDao.delete(id);

    return "redirect:/rest/list";

}
注意问题:
1、记得添加转换post请求的过滤器
<!--配置过滤器-->

<!--tomcat不支持put、delete请求,所以我们需要一个过滤器处理这些post请求-->

<filter>

    <filter-name>HiddenHttpMethodFilter</filter-name>

    <filter-class>org.springframework.web.filter.HiddenHttpMethodFilter</filter-class>

</filter>
2、用jquery把a超链接转换成post请求
<script type="text/javascript">

    $(function(){

        $(".delete").click(function(){

            //获取对应a超链接的href属性

            var href = $(this).attr("href");

            //再把这个href赋值给的form标签的actions属性,并提交

            $("form").attr("action",href).submit();

            //返回false表示这个a标签将不会跳转

            return false;

        })

    })

</script>
3、静态资源可能会加载不了
<%--引入样式--%>

<script src="${pageContext.request.contextPath}/static/js/jquery-3.5.1.min.js"></script>

<link rel="stylesheet" href="${pageContext.request.contextPath}/static/bootstrap-3.4.1-dist/css/bootstrap.min.css">

<script src="${pageContext.request.contextPath}/static/bootstrap-3.4.1-dist/js/bootstrap.min.js"></script>

<!-- 该配置将在SpringMVC上下文中定义一个

    DefaultServletHttpRequestHandler,它会对进入 DispatcherServlet 的

    请求进行筛查,如果发现是没有经过映射的请求,就将该请求交由 WEB

    应用服务器默认的 Servlet 处理,如果不是静态资源的请求,才由

    DispatcherServlet 继续处理-->

    <mvc:default-servlet-handler/>
4、会报tomcat不支持delete,put请求
在目标jsp头文件上添加isErrorPage="true"
5、修改员工数据
input.jsp
<%@ page import="java.util.Map" %>

<%@ page import="java.util.HashMap" %>

<%@ taglib prefix="form" uri="http://www.springframework.org/tags/form" %>

<%@ page contentType="text/html;charset=UTF-8" language="java" isErrorPage="true" %>

<%@ taglib prefix="c" uri="http://java.sun.com/jsp/jstl/core" %>

<!doctype html>

<html lang="en">

<head>

    <title>修改/添加员工信息</title>

</head>

<body>

<%--为什么需要使用form标签?

    1、开速开发出页面

    2、可以快速回显数据

--%>

<%--@elvariable id="employee" type="com.wang.POJO.Employee"--%>

<form:form action="${pageContext.request.contextPath}/employee" method="post"  modelAttribute="employee">

    <!-- path 属性对应 html 表单标签的 name 属性值 -->

    <c:if test="${employee.id == null }">

        <!-- path 属性对应 html 表单标签的 name 属性值 -->

        LastName: <form:input path="lastName"/>

        <br>

    </c:if>

    <c:if test="${employee.id != null }">

        <form:hidden path="id"/>

        <input type="hidden" name="_method" value="PUT"/>

        <%-- 对于 _method 不能使用 form:hidden 标签, 因为 modelAttribute 对应的 bean 中没有 _method 这个属性 --%>

        <%--

        <form:hidden path="_method" value="PUT"/>

        --%>

    </c:if>

    email:    <form:input path="email"/><br>

    <%--这里的items可以放:集合/map--%>

    <%

        //当输入框中的值为1时,jstl就会自动把Male传递给path属性

        //注意:这个genders需要放到request域对象下面的radiobuttons才能访问到

            HashMap<Integer , String> genders = new HashMap<>();

            genders.put(1, "男");

            genders.put(0, "女");

            request.setAttribute("genders", genders);

    %>

    gender:     <form:radiobuttons path="gender" items="${genders}"/><br>

    department: <form:select path="department.departmentId" items="${departments}"

                             itemLabel="departmentName"

                             itemValue="departmentId"/><br>

    <input type="submit" value="submit">

</form:form>

</body>

</html>
control
@RequestMapping(value = "/employee",method = RequestMethod.PUT)

public String put(Employee employee){

    employeeDao.save(employee);

    return "redirect:/employees";

}

//拦截"/employee"的请求,在真正访问到put方法前把先获取到这个id对应的employee,

// 再把jsp那的来的数据覆盖我们从dao中获取到的数据

@ModelAttribute(value = "/employee")

public void getEmployee(@RequestParam(value = "id",required = false)Integer id,Map<String, Object> map){

    map.put("employee",employeeDao.get(id));

}
注意问题:
1、rest风格的put

jsp中发送数据
<%----%>

<form:form action="${pageContext.request.contextPath}/employee" method="post"  modelAttribute="employee">

<form:hidden path="id"/>

        <input type="hidden" name="_method" value="PUT"/>
control接受数据
@RequestMapping(value = "/employee",method = RequestMethod.PUT)
2、用ModelAttribute实现数据覆盖
在springmvc-4-springMVC-4-处理模型数据笔记寻@ModelAttribute修饰入参
springMVC-6-restful_CRUD的更多相关文章
- 【分享】标准springMVC+mybatis项目maven搭建最精简教程
文章由来:公司有个实习同学需要做毕业设计,不会搭建环境,我就代劳了,顺便分享给刚入门的小伙伴,我是自学的JAVA,所以我懂的.... (大图直接观看显示很模糊,请在图片上点击右键然后在新窗口打开看) ...
- Springmvc数据校验
步骤一:导入四个jar包 <?xml version="1.0" encoding="UTF-8"?> <beans xmlns=" ...
- 为什么做java的web开发我们会使用struts2,springMVC和spring这样的框架?
今年我一直在思考web开发里的前后端分离的问题,到了现在也颇有点心得了,随着这个问题的深入,再加以现在公司很多web项目的控制层的技术框架由struts2迁移到springMVC,我突然有了一个新的疑 ...
- 【SSM框架】Spring + Springmvc + Mybatis 基本框架搭建集成教程
本文将讲解SSM框架的基本搭建集成,并有一个简单demo案例 说明:1.本文暂未使用maven集成,jar包需要手动导入. 2.本文为基础教程,大神切勿见笑. 3.如果对您学习有帮助,欢迎各种转载,注 ...
- 快速搭建springmvc+spring data jpa工程
一.前言 这里简单讲述一下如何快速使用springmvc和spring data jpa搭建后台开发工程,并提供了一个简单的demo作为参考. 二.创建maven工程 http://www.cnblo ...
- redis集成到Springmvc中及使用实例
redis是现在主流的缓存工具了,因为使用简单.高效且对服务器要求较小,用于大数据量下的缓存 spring也提供了对redis的支持: org.springframework.data.redis.c ...
- 流程开发Activiti 与SpringMVC整合实例
流程(Activiti) 流程是完成一系列有序动作的概述.每一个节点动作的结果将对后面的具体操作步骤产生影响.信息化系统中流程的功能完全等同于纸上办公的层级审批,尤其在oa系统中各类电子流提现较为明显 ...
- springMVC学习笔记--知识点总结1
以下是学习springmvc框架时的笔记整理: 结果跳转方式 1.设置ModelAndView,根据view的名称,和视图渲染器跳转到指定的页面. 比如jsp的视图渲染器是如下配置的: <!-- ...
- springMVC初探--环境搭建和第一个HelloWorld简单项目
注:此篇为学习springMVC时,做的笔记整理. MVC框架要做哪些事情? a,将url映射到java类,或者java类的方法上 b,封装用户提交的数据 c,处理请求->调用相关的业务处理—& ...
- springmvc的拦截器
什么是拦截器 java里的拦截器是动态拦截action调用的对象.它提供了一种机制可以使 ...
随机推荐
- CUDA 8混合精度编程
CUDA 8混合精度编程 Mixed-Precision Programming with CUDA 8 论文地址:https://devblogs.nvidia.com/mixed-precisio ...
- Nucleus 实时操作系统中断(下)
Nucleus 实时操作系统中断(下) Nucleus RTOS兼容性 由于中断在Nucleus SE中的实现方式与Nucleus rto截然不同,因此不应期望有特定的兼容性.Nucleus RTOS ...
- redis 记一次搭建高可用redis集群过程,问题解决;Node 192.168.184.133:8001 is not configured as a cluster node
------------恢复内容开始------------ 步骤 1:每台redis服务器启动之后,需要将这几台redis关联起来, 2: 关联命令启动之后 报错: Node 192.168.184 ...
- jquery给动态生成的元素绑定事件,on函数
首先先解释一下什么是动态生成的元素:动态生成的元素即我们用jquery的内部插入函数append()所生成的html代码.相对的也有静态生成的元素:即直接编写在页面的html代码. 下面通过例子来讲解 ...
- 前端 JS 之 AJAX 简介及使用
概述 AJAX 是一个缩写,它的全名是 Asynchronous JavaScript and XML,意思就是异步 JavaScript 和 XML,即用JavaScript执行异步网络请求. AJ ...
- Redis五种基础与三种高级数据结构解析
记得点赞+关注呦. 前言 在 Redis 最重要最基础就属 它丰富的数据结构了,Redis 之所以能脱颖而出很大原因是他数据结构丰富,可以支持多种场景.并且 Redis 的数据结构实现以及应用场景在面 ...
- python实现机器学习笔记
#课程链接 https://www.imooc.com/video/20165 一.机器学习介绍以及环境部署 1.机器学习介绍及其原理 1)什么是人工智能 人工智能就其本质而言,是机器对人的思维信息过 ...
- css基本内容笔记(学习整理)
一.css简介 1.什么是css 层叠样式表. 层叠:层层叠加,若果有冲突应用优先级高,不冲突的部分共同作用 样式表:就是css属性样式的集合: 2.作用 a.修饰html,使得html样式更好看 b ...
- 【题解】Luogu P3123 [USACO15OPEN]贝茜说哞Bessie Goes Moo
Luogu P3123 [USACO15OPEN]贝茜说哞Bessie Goes Moo 题目描述 Farmer John and Bessie the cow love to exchange ma ...
- Mysql8关于hashjoin的代码处理方式
Mysql8关于hashjoin的代码处理方式 目录 Mysql8关于hashjoin的代码处理方式 1 表的Schema如下所示: 2 HashJoin代码实现 3 总结 1 表的Schema如下所 ...