Linux命令学习总结:cp命令
命令简介:
cp命令用来复制文件或目录。指令英文原义:copy
指令所在路径:/bin/cp
命令语法:
Usage: cp [OPTION]... [-T] SOURCE DEST
or: cp [OPTION]... SOURCE... DIRECTORY
or: cp [OPTION]... -t DIRECTORY SOURCE...
命令参数:
此命令参数是Red Hat Enterprise Linux Server release 5.7下cp命令参数,不同版本Linux的cp命令参数有可能不同。
|
参数 |
长参数 |
描叙 |
|
-a |
等同于-dR |
|
|
-b |
若删除或者覆盖目标文件,将对目标文件进行备份,备份文件以备份的字符串结尾 |
|
|
-d |
复制符号链接 |
|
|
-f |
强制复制 |
|
|
-h |
强制cp命令复制符号链接。缺省值是跟随符号链接,也就是将文件复制到符号链接指向处。 |
|
|
-i |
交互式模式。覆盖目标文件之前先要进行询问 |
|
|
-l |
建立硬链接,而非复制 |
|
|
-p |
源目录或者文件的属性保留 |
|
|
-P |
源目录或者文件的路劲保留 |
|
|
-r/-R |
处理指定目录以及子目录 |
|
|
-v |
--verbose |
显示命令执行的详细信息 |
|
--help |
显示命令在线帮助 |
|
|
--version |
显示命令版本信息 |
使用示例:
1: 查看rmdir命令的帮助信息
[root@DB-Server ~]# cp --help
Usage: cp [OPTION]... [-T] SOURCE DEST
or: cp [OPTION]... SOURCE... DIRECTORY
or: cp [OPTION]... -t DIRECTORY SOURCE...
Copy SOURCE to DEST, or multiple SOURCE(s) to DIRECTORY.
Mandatory arguments to long options are mandatory for short options too.
-a, --archive same as -dR --preserve=all
--backup[=CONTROL] make a backup of each existing destination file
-b like --backup but does not accept an argument
--copy-contents copy contents of special files when recursive
-d same as --no-dereference --preserve=link
-f, --force if an existing destination file cannot be
opened, remove it and try again
-i, --interactive prompt before overwrite
-H follow command-line symbolic links
-l, --link link files instead of copying
-L, --dereference always follow symbolic links
-P, --no-dereference never follow symbolic links
-p same as --preserve=mode,ownership,timestamps
--preserve[=ATTR_LIST] preserve the specified attributes (default:
mode,ownership,timestamps), if possible
additional attributes: context, links,
xattr, all
-c same as --preserve=context
--no-preserve=ATTR_LIST don't preserve the specified attributes
--parents use full source file name under DIRECTORY
-R, -r, --recursive copy directories recursively
--remove-destination remove each existing destination file before
attempting to open it (contrast with --force)
--sparse=WHEN control creation of sparse files
--strip-trailing-slashes remove any trailing slashes from each SOURCE
argument
-s, --symbolic-link make symbolic links instead of copying
-S, --suffix=SUFFIX override the usual backup suffix
-t, --target-directory=DIRECTORY copy all SOURCE arguments into DIRECTORY
-T, --no-target-directory treat DEST as a normal file
-u, --update copy only when the SOURCE file is newer
than the destination file or when the
destination file is missing
-v, --verbose explain what is being done
-x, --one-file-system stay on this file system
-Z, --context=CONTEXT set security context of copy to CONTEXT
--help display this help and exit
--version output version information and exit
By default, sparse SOURCE files are detected by a crude heuristic and the
corresponding DEST file is made sparse as well. That is the behavior
selected by --sparse=auto. Specify --sparse=always to create a sparse DEST
file whenever the SOURCE file contains a long enough sequence of zero bytes.
Use --sparse=never to inhibit creation of sparse files.
The backup suffix is `~', unless set with --suffix or SIMPLE_BACKUP_SUFFIX.
The version control method may be selected via the --backup option or through
the VERSION_CONTROL environment variable. Here are the values:
none, off never make backups (even if --backup is given)
numbered, t make numbered backups
existing, nil numbered if numbered backups exist, simple otherwise
simple, never always make simple backups
As a special case, cp makes a backup of SOURCE when the force and backup
options are given and SOURCE and DEST are the same name for an existing,
regular file.
Report bugs to bug-coreutils@gnu.org.
或
[root@DB-Server ~]# man cp
2: 拷贝文件file1并更名为file2
[root@DB-Server kerry]# ls
file1
[root@DB-Server kerry]# cp file1 file2
[root@DB-Server kerry]# ls
file1 file2
[root@DB-Server kerry]#
3:拷贝kerry目录下文件到tmp目录下
[root@DB-Server ~]# cp /home/kerry/* /tmp
[root@DB-Server ~]# cd /tmp
4:将目录下的所有目录包括子目录陆续复制到另外一个目录
[root@DB-Server ~]#cp -r /home/tomcat/ /tmp/bak
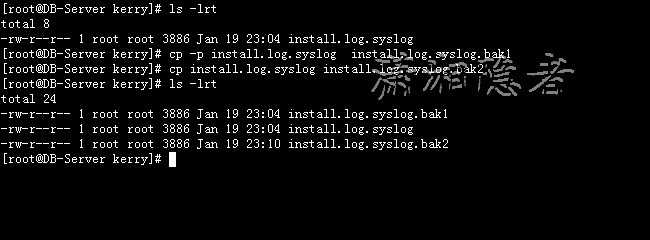
5: 复制时保留文件属性(保存与源文件相关联的修改日期、时间和访问控制列表等)
[root@DB-Server kerry]# ls -lrt
total 8
-rw-r--r-- 1 root root 3886 Jan 19 23:04 install.log.syslog
[root@DB-Server kerry]# cp -p install.log.syslog install.log.syslog.bak1
[root@DB-Server kerry]# cp install.log.syslog install.log.syslog.bak2
[root@DB-Server kerry]# ls -lrt
total 24
-rw-r--r-- 1 root root 3886 Jan 19 23:04 install.log.syslog.bak1
-rw-r--r-- 1 root root 3886 Jan 19 23:04 install.log.syslog
-rw-r--r-- 1 root root 3886 Jan 19 23:10 install.log.syslog.bak2
6: 以交换形式拷贝文件
[root@DB-Server kerry]# cp -i /var/log/* ./
cp: overwrite `./acpid'? n
cp: overwrite `./anaconda.log'? n
cp: overwrite `./anaconda.syslog'? y
cp: overwrite `./anaconda.xlog'? n
cp: omitting directory `/var/log/audit'
cp: overwrite `./boot.log'? n
cp: overwrite `./boot.log.1'? n
cp: overwrite `./boot.log.2'? n
Linux命令学习总结:cp命令的更多相关文章
- [转] 在 Linux 中怎样使用cp命令合并目录树
PS:通过cp -r --link a/* b/* merged 硬链接不需要复制 怎样将两个布局相似的目录树合并成一个新的目录树?为理解该问题让我们思考下面的例子. 假设 dir1 和 dir2 目 ...
- Linux学习笔记--cp命令(复制)
cp:英文名copy,复制的意思. 1. 命令格式: cp [选项] 源文件或文件夹 目标文件或文件夹 cp [选项] 源文件1 源文件2 源文件3 ... 目标文件夹 2. 经常使用选项: &quo ...
- Linux下如何使CP命令不提示覆盖
在Linux下使用CP命令,经常会提示是否覆盖,如果是太批量的文件覆盖,老是这么提示,会很烦的.那如何解决这个问题呢? 我们先来看一下原因吧! 一般我们使用的命令是cp -rf sourcefile ...
- linux每天一小步---cp命令详解
1 命令功能 cp命令用于复制文件或者目录,cp是copy的缩写. 2 命令语法 cp [参数] 源文件或者目录 目的文件或者目录 3 命令参数 -a 等同于-dRp,保存所有 -d ...
- linux shell 学习笔记--内部命令学习
.基本命令 新手必须要掌握的初级命令 ls 基本的列出所有文件的命令.但是往往就是因为这个命令太简单,所以我们总是低估它.比如 ,用 -R 选项,这是递归选项,ls 将会以目录树的形式列出所有文件, ...
- LINUX基础学习之基础命令(4)和 文件的inode信息 --2019-11-28
一.inode是什么? 理解inode,要从文件储存说起. 文件储存在硬盘上,硬盘的最小存储单位叫做”扇区”(Sector).每个扇区储存512字节(相当于0.5KB). 操作系统读取硬盘的时候,不会 ...
- Linux命令学习神器!命令看不懂直接给你解释!
大家都知道,Linux 系统有非常多的命令,而且每个命令又有非常多的用法,想要全部记住所有命令的所有用法,恐怕是一件不可能完成的任务. 一般情况下,我们学习一个命令时,要么直接百度去搜索它的用法,要么 ...
- Linux 下mv和cp命令
注意事项:mv与cp的结果不同,mv好像文件"搬家",文件个数并未增加.而cp对文件进行复制,文件个数增加了. 一.cp命令 cp命令用来将一个或多个源文件或者目录复制到指定的目的 ...
- linux每日命令(9):cp命令
一.命令格式: cp [参数] source dest 或 cp [参数] source... directory 二.命令功能: 将源文件复制至目标文件,或将多个源文件复制至目标目录. 三. 命令参 ...
- Linux命令学习之xargs命令
xargs命令是给其他命令传递参数的一个过滤器,也是组合多个命令的一个工具.它擅长将标准输入数据转换成命令行参数,xargs能够处理管道或者stdin并将其转换成特定命令的命令参数.xargs也可以将 ...
随机推荐
- SSH整合时执行hibernate查询报错:java.lang.ClassCastException: com.ch.hibernate.Department_$$_javassist_0 cannot be cast to javassist.util.proxy
今天在整合ssh三个框架时,有一个功能,是查询所有员工信息,且员工表和部门表是多对一的映射关系,代码能正常运行到查询得到一个List集合,但在页面展示的时候,就报异常了, java.lang.Clas ...
- struts2学习笔记--上传单个和批量文件示例
struts2提供了对上传文件的支持,将上传后的文件封装为java.io.File对象,开发者只需要在Action中定义一个File类型的变量,然后直接使用该变量,将它复制到目的目录即可. 单个文件上 ...
- 浅析JS中的模块规范(CommonJS,AMD,CMD)
如果你听过js模块化这个东西,那么你就应该听过或CommonJS或AMD甚至是CMD这些规范咯,我也听过,但之前也真的是听听而已. 现在就看看吧,这些规范到底是啥东西,干嘛的. 一.CommonJS ...
- 【JVM】JVM系列之类加载机制(四)
一.前言 前面分析了class文件具体含义,接着需要将class文件加载到虚拟机中,这个过程是怎样的呢,下面,我们来仔细分析. 二.什么是类加载机制 把class文件加载到内存,并对数据进行校验.转换 ...
- 从零开始学习jQuery (五) 事件与事件对象
本系列文章导航 从零开始学习jQuery (五) 事件与事件对象 一.摘要 事件是脚本编程的灵魂. 所以本章内容也是jQuery学习的重点. 本文将对jQuery中的事件处理以及事件对象进行详细的讲解 ...
- Redis在windows下安装过程
一.下载windows版本的Redis 去官网找了很久,发现原来在官网上可以下载的windows版本的,现在官网以及没有下载地址,只能在github上下载,官网只提供linux版本的下载 官网下载地址 ...
- MySQL数据迁移到MSSQL-以小米数据库为例-测试828W最快可达到2分11秒
这里采用.NET Framework 4.0以上版本中新出现的 ConcurrentQueue<T> 类 MSDN是这样描述的: ConcurrentQueue<T> 类是一个 ...
- 【Unity】第13章 光照贴图和光影效果
分类:Unity.C#.VS2015 创建日期:2016-05-19 一.简介 在Unity 5中,Lighting是—种增强场景光照和阴影效果的技术,它可以通过较少的性能消耗使静态场景看上去更真实. ...
- 详解SQLServer 存储过程
Sql Server的存储过程是一个被命名的存储在服务器上的Transacation-Sql语句集合,是封装重复性工作的一种方法,它支持用户声明的变量.条件执行和其他强大的编程功能. 存储过程相对于其 ...
- C# 常用加密解密帮助类
public static class EncryptUtil { #region MD5加密 /// <summary> /// MD5加密 /// </summary> p ...