
Ubuntu16.04搭建kubernetes v1.11.2集群
1、节点介绍
master cluster-1 cluster-2 cluster-3
hostname k8s-55 k8s-54 k8s-53 k8s-52
ip 10.2.49.55 10.2.49.54 10.2.49.53 10.2.49.52
2、配置网络,配置/etc/hosts 略过。。。。
3、安装kubernets
 sudo apt-get update && apt-get install -y apt-transport-https

 sudo curl https://mirrors.aliyun.com/kubernetes/apt/doc/apt-key.gpg | apt-key add -

 sudo cat <<EOF >/etc/apt/sources.list.d/kubernetes.list

   deb https://mirrors.aliyun.com/kubernetes/apt/ kubernetes-xenial main

   EOF

 sudo apt-get update
查看源中的软件版本 sudo apt-cache madison kubelet
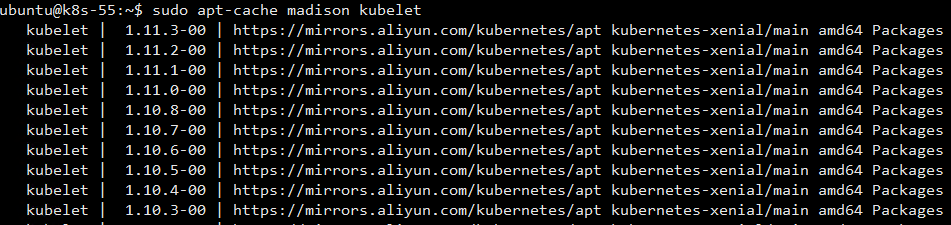
一般不安装最新的,也不会安装最老的,我们先安装1.11.2的
sudo apt install kubelet=1.11.- kubeadm=1.11.- kubectl=1.11.-
至此kubernetes的二进制部分安装成功
3、安装docker
由于是用Kubernetes管理docker ,docker的版本要兼容kubernetes,去网站找兼容性列表,网站https://github.com/kubernetes/kubernetes,查看安装的是哪个版本,就看哪个版本的changlog,本文中安装的是1.11.2版本,
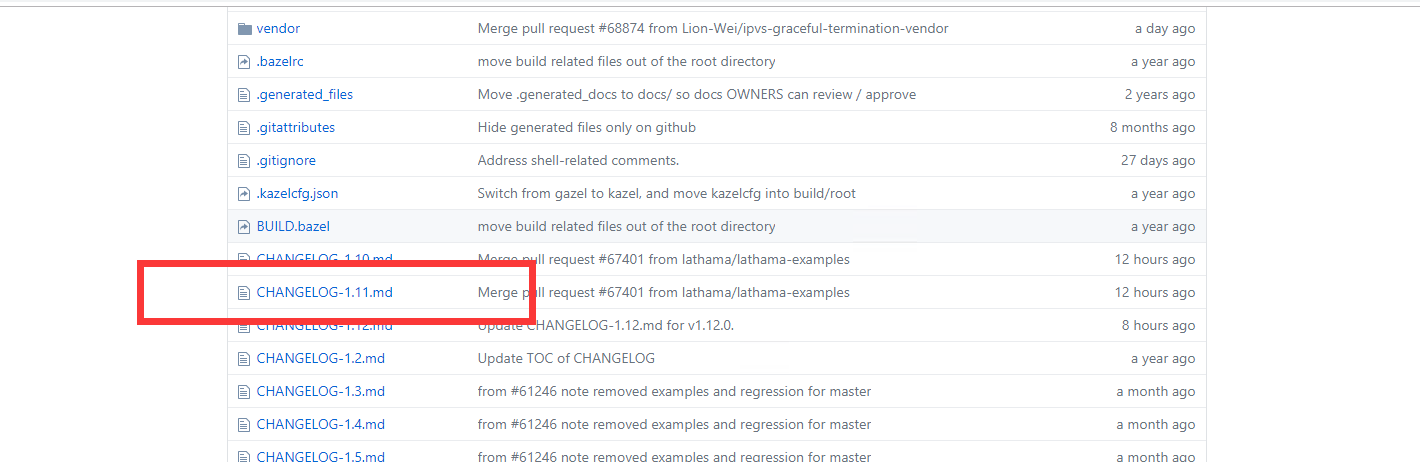
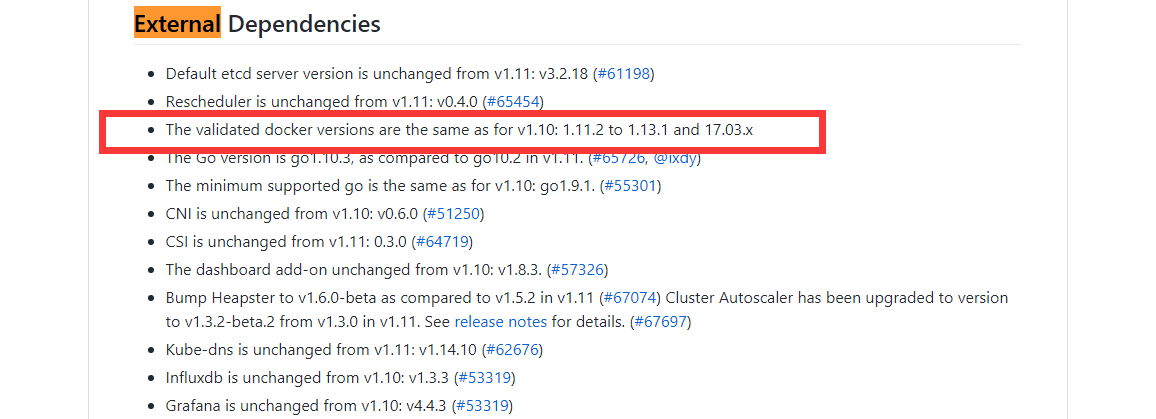
从这里可以看出来兼容最高版本的docker是17.03.x,docker版本尽量装新版本
安装docker
 sudo apt-get update

 sudo apt-get -y install apt-transport-https ca-certificates curl software-properties-common

 curl -fsSL http://mirrors.aliyun.com/docker-ce/linux/ubuntu/gpg | sudo apt-key add -

 sudo add-apt-repository "deb [arch=amd64] http://mirrors.aliyun.com/docker-ce/linux/ubuntu $(lsb_release -cs) stable"

 sudo apt-get -y update
查看docker版本

 sudo apt install docker-ce=17.03.~ce-~ubuntu-xenial

 sudo systemctl enable docker
如果需要配置加速器,请编辑/etc/systemd/system/multi-user.target.wants/docker.service文件
4、拉取kubernetes初始化镜像
查看初始镜像要求
kubeadm config images list
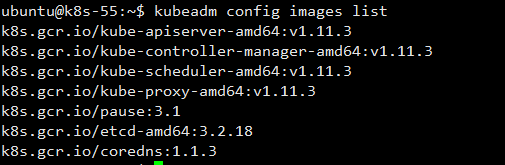
由于国内无法直接拉取google镜像,可以使用别人的镜像,也可以自己通过阿里云等制作。本文使用anjia的镜像源,给出脚本
 #!/bin/bash

 KUBE_VERSION=v1.11.3

 KUBE_PAUSE_VERSION=3.1

 ETCD_VERSION=3.2.

 DNS_VERSION=1.1.

 username=anjia0532

 images="google-containers.kube-proxy-amd64:${KUBE_VERSION}

 google-containers.kube-scheduler-amd64:${KUBE_VERSION}

 google-containers.kube-controller-manager-amd64:${KUBE_VERSION}

 google-containers.kube-apiserver-amd64:${KUBE_VERSION}

 pause:${KUBE_PAUSE_VERSION}

 etcd-amd64:${ETCD_VERSION}

 coredns:${DNS_VERSION}

 "

 for image in $images

 do

     docker pull ${username}/${image}

     docker tag ${username}/${image} k8s.gcr.io/${image}

     #docker tag ${username}/${image} gcr.io/google_containers/${image}

     docker rmi ${username}/${image}

 done

 unset ARCH version images username

 docker tag  k8s.gcr.io/google-containers.kube-apiserver-amd64:${KUBE_VERSION}   k8s.gcr.io/kube-apiserver-amd64:${KUBE_VERSION}

 docker rmi k8s.gcr.io/google-containers.kube-apiserver-amd64:${KUBE_VERSION}

 docker tag  k8s.gcr.io/google-containers.kube-controller-manager-amd64:${KUBE_VERSION}  k8s.gcr.io/kube-controller-manager-amd64:${KUBE_VERSION}

 docker rmi k8s.gcr.io/google-containers.kube-controller-manager-amd64:${KUBE_VERSION}

 docker tag  k8s.gcr.io/google-containers.kube-scheduler-amd64:${KUBE_VERSION}  k8s.gcr.io/kube-scheduler-amd64:${KUBE_VERSION}

 docker rmi k8s.gcr.io/google-containers.kube-scheduler-amd64:${KUBE_VERSION}

 docker tag k8s.gcr.io/google-containers.kube-proxy-amd64:${KUBE_VERSION}   k8s.gcr.io/kube-proxy-amd64:${KUBE_VERSION}

 docker rmi k8s.gcr.io/google-containers.kube-proxy-amd64:${KUBE_VERSION}
执行sh pull.sh,会自动将所需镜像拉取
5、初始化Kubernetes
sudo kubeadm init --kubernetes-version=v1.11.3 --pod-network-cidr=10.244.0.0/ --apiserver-advertise-address 10.2.49.55
--kubernetes-version 用来指定版本
--pod-network-cidr 用于后期采用flannel作为网络组建而准备
--apiserver-advertise-address  如果机器上只有单个网卡,可以不进行指定

初始化成功的结果
 [init] Using Kubernetes version: vX.Y.Z

 [preflight] Running pre-flight checks

 [kubeadm] WARNING: starting in 1.8, tokens expire after  hours by default (if you require a non-expiring token use --token-ttl )

 [certificates] Generated ca certificate and key.

 [certificates] Generated apiserver certificate and key.

 [certificates] apiserver serving cert is signed for DNS names [kubeadm-master kubernetes kubernetes.default kubernetes.default.svc kubernetes.default.svc.cluster.local] and IPs [10.96.0.1 10.138.0.4]

 [certificates] Generated apiserver-kubelet-client certificate and key.

 [certificates] Generated sa key and public key.

 [certificates] Generated front-proxy-ca certificate and key.

 [certificates] Generated front-proxy-client certificate and key.

 [certificates] Valid certificates and keys now exist in "/etc/kubernetes/pki"

 [kubeconfig] Wrote KubeConfig file to disk: "admin.conf"

 [kubeconfig] Wrote KubeConfig file to disk: "kubelet.conf"

 [kubeconfig] Wrote KubeConfig file to disk: "controller-manager.conf"

 [kubeconfig] Wrote KubeConfig file to disk: "scheduler.conf"

 [controlplane] Wrote Static Pod manifest for component kube-apiserver to "/etc/kubernetes/manifests/kube-apiserver.yaml"

 [controlplane] Wrote Static Pod manifest for component kube-controller-manager to "/etc/kubernetes/manifests/kube-controller-manager.yaml"

 [controlplane] Wrote Static Pod manifest for component kube-scheduler to "/etc/kubernetes/manifests/kube-scheduler.yaml"

 [etcd] Wrote Static Pod manifest for a local etcd instance to "/etc/kubernetes/manifests/etcd.yaml"

 [init] Waiting for the kubelet to boot up the control plane as Static Pods from directory "/etc/kubernetes/manifests"

 [init] This often takes around a minute; or longer if the control plane images have to be pulled.

 [apiclient] All control plane components are healthy after 39.511972 seconds

 [uploadconfig] Storing the configuration used in ConfigMap "kubeadm-config" in the "kube-system" Namespace

 [markmaster] Will mark node master as master by adding a label and a taint

 [markmaster] Master master tainted and labelled with key/value: node-role.kubernetes.io/master=""

 [bootstraptoken] Using token: <token>

 [bootstraptoken] Configured RBAC rules to allow Node Bootstrap tokens to post CSRs in order for nodes to get long term certificate credentials

 [bootstraptoken] Configured RBAC rules to allow the csrapprover controller automatically approve CSRs from a Node Bootstrap Token

 [bootstraptoken] Creating the "cluster-info" ConfigMap in the "kube-public" namespace

 [addons] Applied essential addon: CoreDNS

 [addons] Applied essential addon: kube-proxy

 Your Kubernetes master has initialized successfully!

 To start using your cluster, you need to run (as a regular user):

   mkdir -p $HOME/.kube

   sudo cp -i /etc/kubernetes/admin.conf $HOME/.kube/config

   sudo chown $(id -u):$(id -g) $HOME/.kube/config

 You should now deploy a pod network to the cluster.

 Run "kubectl apply -f [podnetwork].yaml" with one of the addon options listed at:

   http://kubernetes.io/docs/admin/addons/

 You can now join any number of machines by running the following on each node

 as root:

   kubeadm join --token <token> <master-ip>:<master-port> --discovery-token-ca-cert-hash sha256:<hash>
 mkdir -p $HOME/.kube

 sudo cp -i /etc/kubernetes/admin.conf $HOME/.kube/config

 sudo chown $(id -u):$(id -g) $HOME/.kube/config
6、安装flannel网络组件
 wget https://raw.githubusercontent.com/coreos/flannel/v0.10.0/Documentation/kube-flannel.yml

 kubectl apply -f kube-flannel.yml
查看kube-flannel.yml,使用的镜像是quay.io/coreos/flannel:v0.10.0-amd64
如果一直卡顿,可以自行下载
安装组建结束后正常情况下执行,一般都是正常,如果有错误,那就是某些镜像没有下载成功

7、安装客户端
加载内核模块
modprobe ip_vs ip_vs_rr ip_vs_wrr ip_vs_sh
加入kubenetes集群,执行的是kubeadm初始化最后显示的token部分
sudo kubeadm join --token <token> <master-ip>:<master-port> --discovery-token-ca-cert-hash sha256:<hash>
mster节点执行kubectl get node
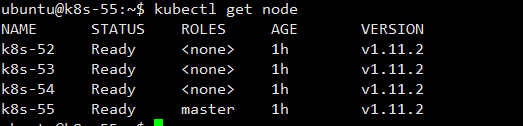
ready状态是正常的,如果不正常,一般是某些镜像没有下载成功,一般是pause镜像比较难下载,可以采用前文pull.sh方法进行下载
mster节点执行kubectl get pod --all-namespaces -o wide
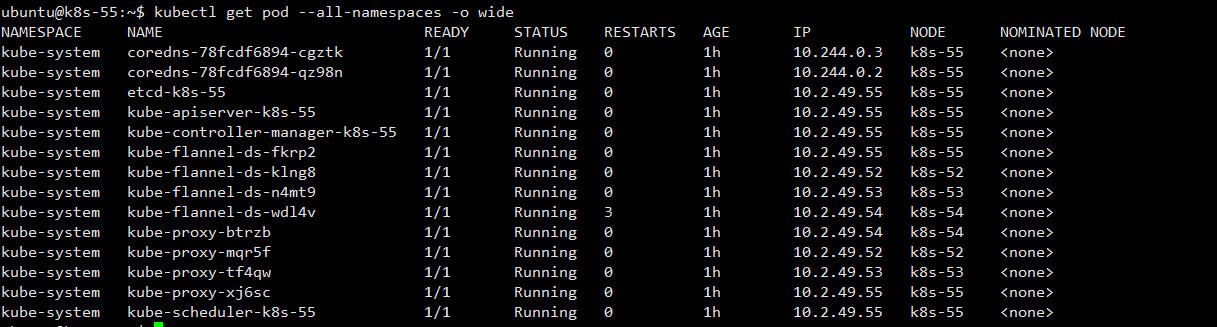
如上图,为集群创建成功,并能够正常运行。
创建CA证书等下次分享。
Ubuntu16.04搭建kubernetes v1.11.2集群的更多相关文章
- kubeadm安装kubernetes V1.11.1 集群
之前测试了离线环境下使用二进制方法安装配置Kubernetes集群的方法,安装的过程中听说 kubeadm 安装配置集群更加方便,因此试着折腾了一下.安装过程中,也有一些坑,相对来说操作上要比二进制方 ...
- ubuntu18.04搭建 kubernetes(k8s)集群
下面使用kubeadm来创建k8s cluster1. 所有主机节点上都需要安装docker # sudo apt-get update # sudo apt-get install \ apt-tr ...
- 使用Kubeadm搭建Kubernetes(1.12.2)集群
Kubeadm是Kubernetes官方提供的用于快速安装Kubernetes集群的工具,伴随Kubernetes每个版本的发布都会同步更新,在2018年将进入GA状态,说明离生产环境中使用的距离越来 ...
- 使用国内的镜像源搭建 kubernetes(k8s)集群
1. 概述 老话说的好:努力学习,提高自己,让自己知道的比别人多,了解的别人多. 言归正传,之前我们聊了 Docker,随着业务的不断扩大,Docker 容器不断增多,物理机也不断增多,此时我们会发现 ...
- Kubeadm搭建高可用(k8s)Kubernetes v1.24.0集群
文章转载自:https://i4t.com/5451.html 背景 Kubernetes 1.24新特性 从kubelet中移除dockershim,自1.20版本被弃用之后,dockershim组 ...
- ubuntu 使用阿里云镜像源快速搭建kubernetes 1.15.2集群
一.概述 搭建k8s集群时,需要访问google,下载相关镜像以及安装软件,非常麻烦. 正好阿里云提供了k8s的更新源,国内用户就可以直接使用了. 二.环境介绍 操作系统 主机名 IP地址 功能 配置 ...
- 使用kubeadm搭建Kubernetes(1.10.2)集群(国内环境)
目录 目标 准备 主机 软件 步骤 (1/4)安装 kubeadm, kubelet and kubectl (2/4)初始化master节点 (3/4) 安装网络插件 (4/4)加入其他节点 (可选 ...
- CentOS 7.4 安装 K8S v1.11.0 集群所遇到的问题
0.引言 最近打算将现有项目的 Docker 部署到阿里云上面,但是之前是单机部署,现在阿里云上面有 3 台机器,所以想做一个 Docker 集群.之前考虑是用 Docker Swarm 来做这个事情 ...
- CentOS 7.4搭建Kubernetes 1.8.5集群
环境介绍 角色 操作系统 IP 主机名 Docker版本 master,node CentOS 7.4 192.168.0.210 node210 17.11.0-ce node CentOS 7.4 ...
随机推荐
- python连接mysql数据库简单例子
今天用pyhton2连接本地的mysql数据库,总的来说比较简单,但还是遇到一些小问题 代码如下: # -*- coding: utf-8 -*- import os import MySQLdb i ...
- POJ 2608
#include<iostream> #include<stdio.h> #include<string> #include<set> using na ...
- 课程一(Neural Networks and Deep Learning),第一周(Introduction to Deep Learning)—— 0、学习目标
1. Understand the major trends driving the rise of deep learning.2. Be able to explain how deep lear ...
- 多线程的实现及常用方法_DAY23
1:多线程(理解) (1)如果一个应用程序有多条执行路径,则被称为多线程程序. 进程:正在执行的程序. 线程:程序的执行路径,执行单元. 单线程:如果一个应用程序只有一条执行路径,则被称为单线程程序. ...
- CentOS7下搭建FastDfs(V5.11)+Keepalived分布式集群部署
FastDfs介绍 http://kb.cnblogs.com/page/82280/ 1.准备 系统 CentOS7 最小化安装. #VIP虚拟IP 10.1.6.218 #Keepalived 1 ...
- Kafka中的zookeeper-shell.sh
连接 zookeeper bin/zookeeper-shell. 常用命令 connect host:port get path [watch] ls path [watch] set path d ...
- mpvue图片轮播遇到的问题
小程序官方写法: <swiper indicator-dots="{{indicatorDots}}" autoplay="{{autoplay}}" i ...
- CCF 201509-3 模版生成系统
试题编号: 201509-3 试题名称: 模板生成系统 时间限制: 1.0s 内存限制: 256.0MB 问题描述 成成最近在搭建一个网站,其中一些页面的部分内容来自数据库中不同的数据记录,但是页面的 ...
- CentOS7 下编译安装 Samba,什么是 SMB/CIFS 协议
目录 一.关于 Samba 1. SMB 2. Samba 二.yum 安装 Samba 1. 安装 Samba 2. 查看版本 3. 查看配置文件 4. 启动服务 5. 本地客户端验证 6. Win ...
- mongodb操作技巧
1.添加字段或更新值 db.getCollection('test').updateMany( {}, { $set:{ 'createTime':'2017-06-29 08:08', 'updat ...