Spring Boot -05- 多模块结构项目构建与测试(详细图文教程)IDEA 版
Spring Boot -05- 多模块结构项目构建与测试(详细图文教程)IDEA 版
百度很多博客都不详细,弄了半天才把 Spring Boot 多模块项目构建开发整的差不多,特地重新创建配置,记录一下,也分享给有需要的人
本篇也会非常详细的介绍涉及的基础知识点,更多都写在注释上了
先放成功截图:
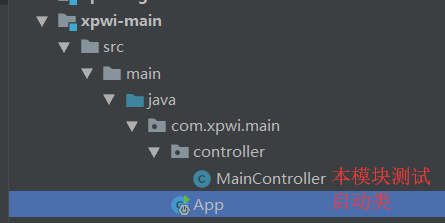
(1)项目结构:

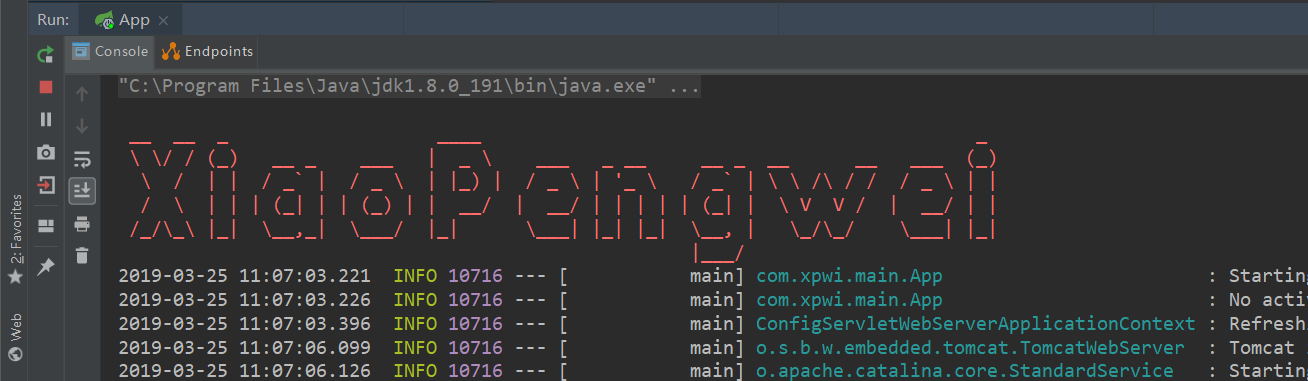
(2)启动:
(3)测试主子模块:

(4)测试子模块依赖:

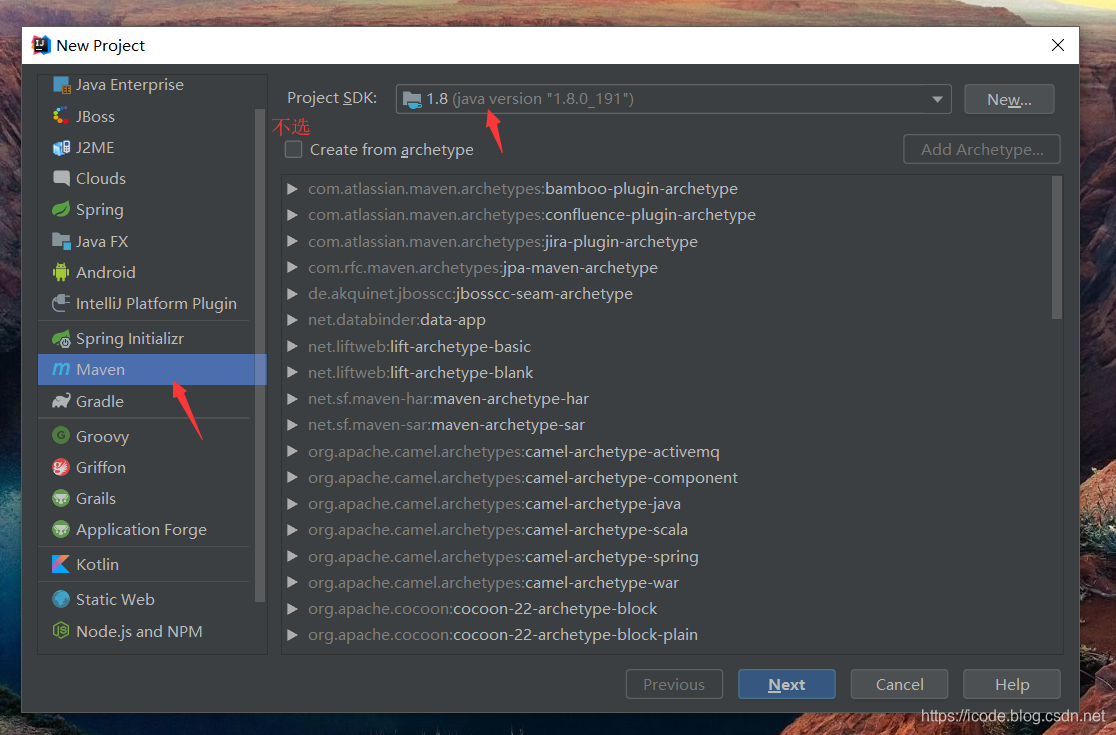
第一步:创建父模块,子模块
(1)打开创建项目窗口,点击 Create New Project
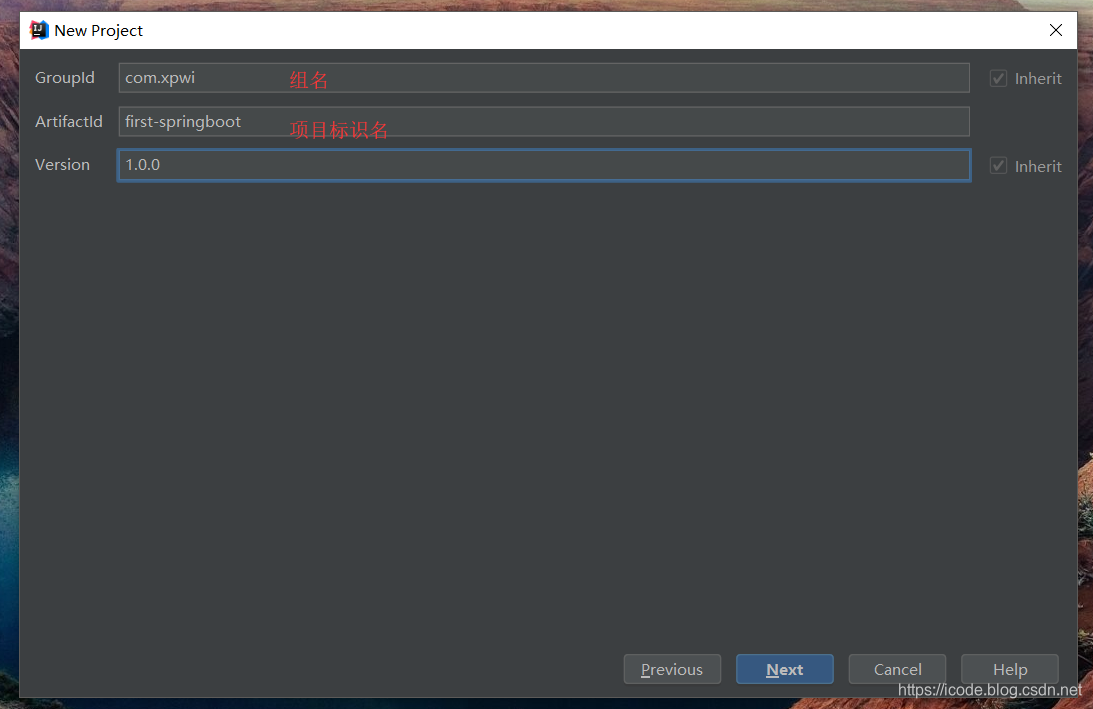
(2)填写
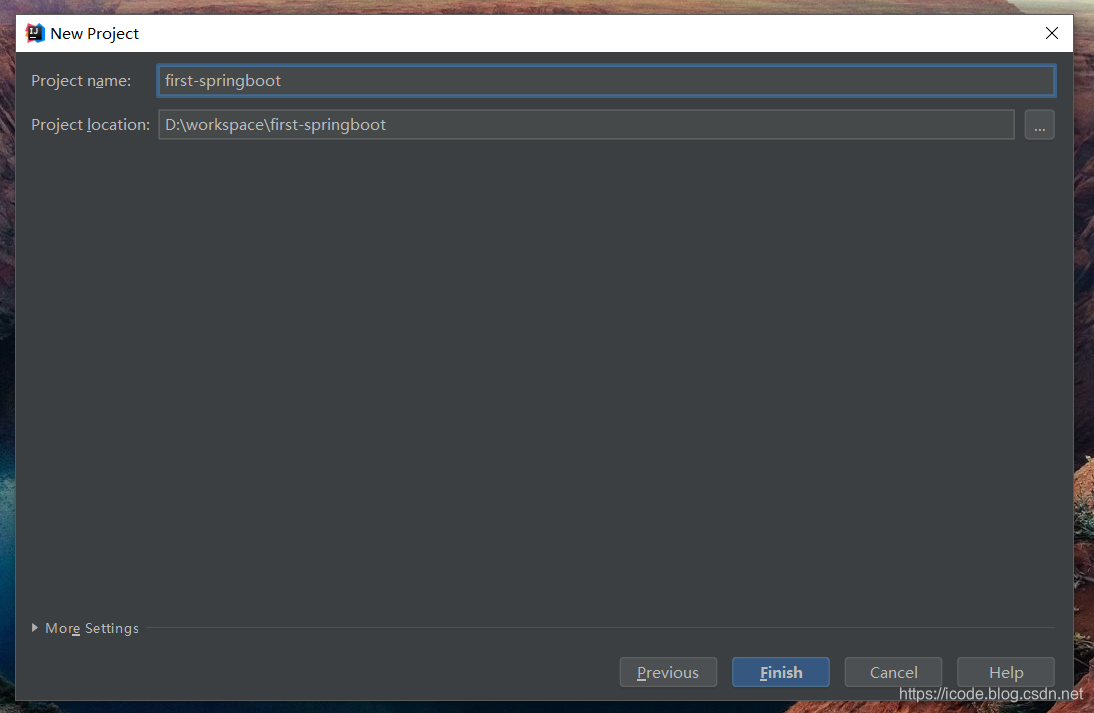
(3)填写
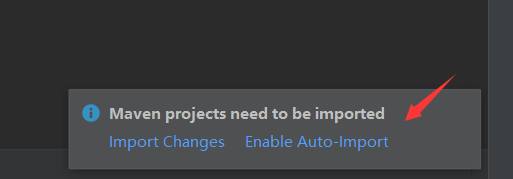
(4)Maven 自动导入
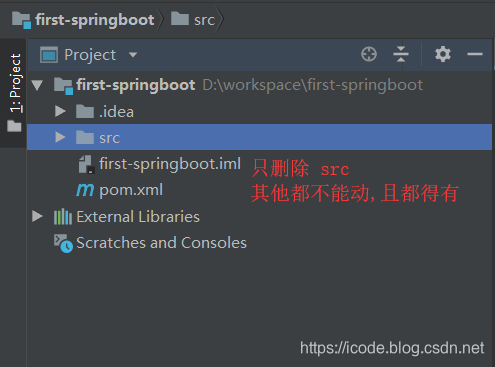
(5)没有 iml 文件,请重新创建,请看截图:
(6)在父项目上,右键新建模块

(7)这里用 xpwi-main
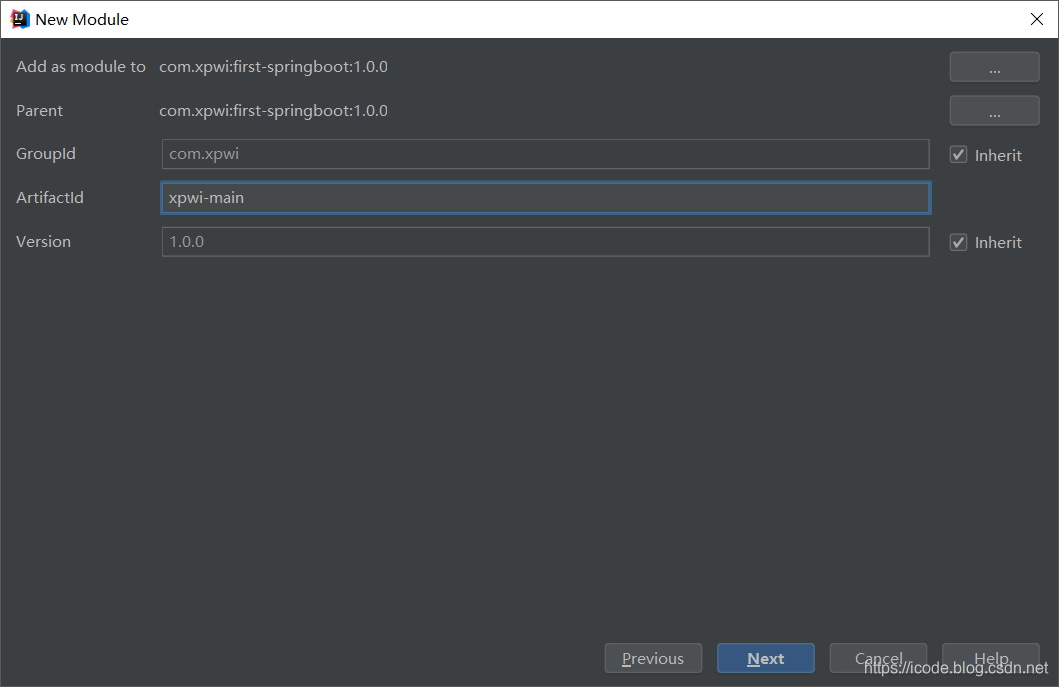
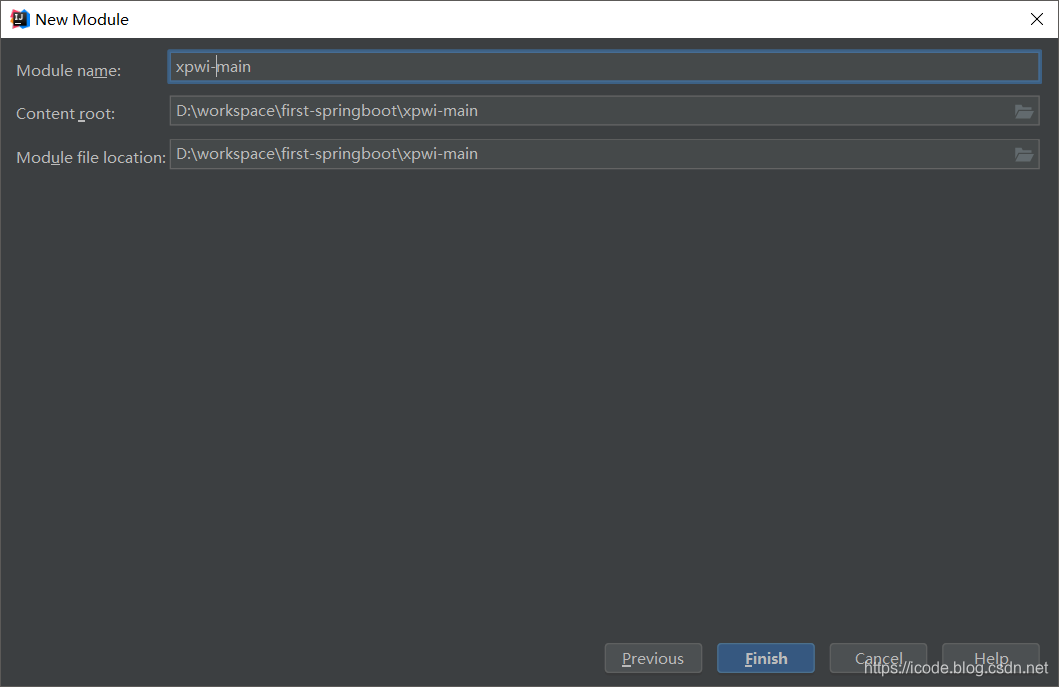
(8)填写
(提示:这个名字建议个上面的一致,不然项目名和文件夹名不一致哈)
(9)依次类推,创建自己需要的子模块
(10)然后去创建包,示例:

第二步:父 pom.xml 配置
请查看详细注释,根据自己的项目修改
注意:
- 子模块那个是不需要配置的,由创建时自动生成
- dependencyManagement 也在注释上讲解了
<?xml version="1.0" encoding="UTF-8"?>

<project xmlns="http://maven.apache.org/POM/4.0.0"

         xmlns:xsi="http://www.w3.org/2001/XMLSchema-instance"

         xsi:schemaLocation="http://maven.apache.org/POM/4.0.0 http://maven.apache.org/xsd/maven-4.0.0.xsd">

    <modelVersion>4.0.0</modelVersion>

    <!--基本信息-->

    <description>Spring Boot 多模块构建示例</description>

    <groupId>com.xpwi</groupId>

    <artifactId>first-springboot</artifactId>

    <!--父 pom 的 packing 必须为 pom,请核查-->

    <packaging>pom</packaging>

    <version>1.0.0</version>

    <!--指定整个项目的父项目-->

    <parent>

        <groupId>org.springframework.boot</groupId>

        <artifactId>spring-boot-starter-parent</artifactId>

        <version>2.0.5.RELEASE</version>

    </parent>

    <!--模块:这里声明多个子模块 -->

    <!--注意,这个不用手动自己去写,因为创建的时候是会自动生成的-->

    <modules>

        <module>xpwi-test</module>

        <module>xpwi-main</module>

        <module>xpwi-login</module>

    </modules>

    <!--属性变量配置-->

    <properties>

        <java.version>1.8</java.version>

    </properties>

    <!--加载依赖管理-->

    <!--注意:如果使用dependencyManagement,只是对版本进行管理,不会直接引入jar  -->

    <!--是为了在这里配置版本,为了让子模块pom或者本pom的直接dependencies不单独配置版本 -->

    <!--如果没有版本,会先到这里找版本号,以免版本冲突  -->

    <dependencyManagement>

        <dependencies>

            <dependency>

                <groupId>org.springframework.boot</groupId>

                <artifactId>spring-boot-starter-web</artifactId>

                <version>2.0.5.RELEASE</version>

            </dependency>

        </dependencies>

    </dependencyManagement>

    <!--公共模块加载,非公共模块请一般放在子pom进行加载-->

    <dependencies>

        <dependency>

            <groupId>org.springframework.boot</groupId>

            <artifactId>spring-boot-starter-web</artifactId>

        </dependency>

    </dependencies>

    <build>

        <plugins>

            <plugin>

                <!--插件-->

                <groupId>org.springframework.boot</groupId>

                <artifactId>spring-boot-maven-plugin</artifactId>

                <version>2.0.1.RELEASE</version>

                <executions>

                    <execution>

                        <goals>

                            <goal>repackage</goal>

                        </goals>

                    </execution>

                </executions>

            </plugin>

        </plugins>

    </build>

</project>
第三步:子 pom.xml 配置
请查看详细注释,根据自己的项目修改
注意:
- 父模块依赖
- 子模块与子模块依赖
<?xml version="1.0" encoding="UTF-8"?>

<project xmlns="http://maven.apache.org/POM/4.0.0"

         xmlns:xsi="http://www.w3.org/2001/XMLSchema-instance"

         xsi:schemaLocation="http://maven.apache.org/POM/4.0.0 http://maven.apache.org/xsd/maven-4.0.0.xsd">

    <parent>

        <artifactId>first-springboot</artifactId>

        <groupId>com.xpwi</groupId>

        <version>1.0.0</version>

    </parent>

    <modelVersion>4.0.0</modelVersion>

    <artifactId>xpwi-main</artifactId>

    <dependencies>

        <!--这个已经移动到父 pom 了-->

        <!--<dependency>-->

        <!--<groupId>org.springframework.boot</groupId>-->

        <!--<artifactId>spring-boot-starter-web</artifactId>-->

        <!--</dependency>-->

        <!--现在是去加载自己创建的模块-->

        <!--就是加载子模块对子模块的依赖-->

        <dependency>

            <groupId>com.xpwi</groupId>

            <artifactId>xpwi-test</artifactId>

            <version>1.0.0</version>

        </dependency>

        <dependency>

            <groupId>com.xpwi</groupId>

            <artifactId>xpwi-login</artifactId>

            <version>1.0.0</version>

        </dependency>

    </dependencies>

</project>
第四步:创建启动类,本模块测试类
(1)创建两个文件
(2)启动类 App.java 源代码:
package com.xpwi.main;

import org.springframework.boot.SpringApplication;

import org.springframework.boot.autoconfigure.SpringBootApplication;

import org.springframework.context.annotation.ComponentScan;

import org.springframework.web.bind.annotation.RestController;

import java.util.Date;

/**

 * 描述:Spring Boot 多模块测试项目

 * @author Xiao Pengwei

 * @since  2019-03-25

 */

@SpringBootApplication

@RestController

//扫描 main,test 模块中的下的所有包

//在 pom 加载子模块依赖才可以骚包

@ComponentScan({"com.xpwi.main","com.xpwi.test"})

public class App {

    public static void main(String[] args) {

        //启动 Web 容器

        SpringApplication.run(App.class, args);

        System.out.println("[启动成功]"+new Date());

    }

}
(3)MainController.java 文件源代码:
package com.xpwi.main.controller;

import org.springframework.web.bind.annotation.RequestMapping;

import org.springframework.web.bind.annotation.RestController;

/**

 * 描述:本模块测试类

 * @author Xiao Pengwei

 * @since  2019-03-25

 */

@RestController

@RequestMapping("/main")

public class MainController {

    //请求映射,当请求 /main/test 时执行该方法

    @RequestMapping("/test")

    public String home() {

        return "Hello Main!";

    }

}
第五步:子模块依赖测试类
(1)结构:

(2)TestController 文件源代码:
package com.xpwi.test.controller;

import org.springframework.web.bind.annotation.RequestMapping;

import org.springframework.web.bind.annotation.RestController;

/**

 * 描述:子模块依赖测试

 * @author Xiao Pengwei

 * @since  2019-03-25

 */

@RestController

@RequestMapping("test")

public class TestController {

    //请求映射,当请求 /home 时执行该方法

    @RequestMapping("/test")

    public String home() {

        return "Hello Test!";

    }

}
第六步:启动与测试
(1)启动:

(2)测试主子模块:

(3)测试子模块依赖:

自定义 banner
一键加技术朋友群
Spring Boot -05- 多模块结构项目构建与测试(详细图文教程)IDEA 版的更多相关文章
- [转] 使用Spring Boot和Gradle创建项目
Spring Boot 是由 Pivotal 团队提供的全新框架,其设计目的是用来简化新 Spring 应用的初始搭建以及开发过程.该框架使用了特定的方式来进行配置,从而使开发人员不再需要定义样板化的 ...
- spring boot / cloud (三) 集成springfox-swagger2构建在线API文档
spring boot / cloud (三) 集成springfox-swagger2构建在线API文档 前言 不能同步更新API文档会有什么问题? 理想情况下,为所开发的服务编写接口文档,能提高与 ...
- 八个开源的 Spring Boot 前后端分离项目,一定要收藏!
八个开源的 Spring Boot 前后端分离项目 最近前后端分离已经在慢慢走进各公司的技术栈,不少公司都已经切换到这个技术栈上面了.即使贵司目前没有切换到这个技术栈上面,我们也非常建议大家学习一下前 ...
- spring cloud和spring boot两个完整项目
spring cloud和spring boot两个完整项目 spring cloud 是基于Spring Cloud的云分布式后台管理系统架构,核心技术采用Eureka.Fegin.Ribbon.Z ...
- Spring Boot 创建hello world项目
Spring Boot 创建hello world项目 1.创建项目 最近在学习Spring Boot,这里记录使用IDEA创建Spring Boot的的过程 在1出勾选,选择2,点击Next 这里填 ...
- Spring Boot 2+gRPC 学习系列1:搭建Spring Boot 2+gRPC本地项目
Spring Boot 2+gRPC 学习系列1:搭建Spring Boot 2+gRPC本地项目 https://blog.csdn.net/alinyua/article/details/8303 ...
- 10个Spring Boot快速开发的项目,接私活利器(快速、高效)
本文为大家精选了 码云 上优秀的 Spring Boot 语言开源项目,涵盖了企业级系统框架.文件文档系统.秒杀系统.微服务化系统.后台管理系统等,希望能够给大家带来一点帮助:) 1.项目名称:分布式 ...
- Spring Boot + JPA 多模块项目无法注入 JpaRepository 接口
问题描述 Spring Boot + JPA 多模块项目,启动报异常: nested exception is org.springframework.beans.factory.NoSuchBean ...
- SpringBoot项目构建、测试、热部署、配置原理、执行流程
SpringBoot项目构建.测试.热部署.配置原理.执行流程 一.项目构建 二.测试和热部署 三.配置原理 四.执行流程
随机推荐
- 基于GTK+3 开发远程控制管理软件(C语言实现)系列三 Windows7开发环境搭建
一.介绍与准备 考虑到目标客户端基本都是windows客户端,所以此次开发环境将搭建在windows7下,相关开发工具有Msys2 和 Eclipse For C/C++ Msys2 是msys的升级 ...
- jieba分词(1)
近几天在做自然语言处理,看了一篇论文:面向知识库的中文自然语言问句的语义理解,里面提到了中文的分词,大家都知道对于英文的分词,NLTK有很好的支持,但是NLTK对于中文的分词并不是很好(其实也没有怎么 ...
- 【JAVA】异常笔记
自定义异常需要注意: 所有异常都必须是 Throwable 的子类. 如果希望写一个检查性异常类,则需要继承 Exception 类. 如果你想写一个运行时异常类,那么需要继承 RuntimeExce ...
- SQL 日期相减(间隔)datediff函数
select datediff(year, 开始日期,结束日期); --两日期间隔年 select datediff(quarter, 开始日期,结束日期); --两日期间隔季 select date ...
- tomcat8 进入不了Manager App 界面 403 Access Denied
准备 1.注释掉context.xml中的value属性 使用下面的命令: vim /usr/local/tomcats/tomcat-daily/webapps/manager/META-INF/c ...
- Linux-(telnet,wget)
telnet命令 telnet命令通常用来远程登录.telnet程序是基于TELNET协议的远程登录客户端程序.Telnet协议是TCP/IP协议族中的一员,是Internet远程登陆服务的标准协议和 ...
- 软件架构设计学习总结(3):QQ空间技术架构之详解
QQ空间作为腾讯海量互联网服务产品,经过近七年的发展,实现了从十万级到亿级同时在线的飞跃.在这个过程中,QQ空间团队遇到了哪些技术挑战?其站点前后台架构随着业务规模的变化又进行了怎样的演进与变迁?成长 ...
- Python常见问题
1. 处理中文时出现的错误'ascii' codec can't decode byte 0xe9 in position 0: ordinal not in range(128)" 解决方 ...
- JSONPath使用说明
# JSONPath - XPath for JSON A frequently emphasized advantage of XML is the availability of plenty t ...
- FFmpeg在JAVA中的使用-音频提取&字幕压缩
由于项目需求中涉及到视频中音频提取,以及字幕压缩的功能,一直在研究ffmpeg,仅仅两个功能,却深受ffmpeg的折磨. 今天谈谈ffmpeg在java中的简单使用,首先下载FFmpeg包,官方地址: ...