Data Preprocess
本文试图解决一个问题,即我们自定义的数据如何训练模型?初识深度学习,我们接触手写数字识别模型,但是批次数据是mnist已经定义好的,我们现在有自己的图片如何做成批次进行训练模型。
现在我们将准备好的原始数据放在flower_photos下的文件夹下面,里面又分类包含五种花,文件夹的名字即为类名,每种文件夹下面又有若干图片,如下图所示:

例如,daisy文件下面图片,图片的尺寸大小不一致,这在后期要处理。

数据增强
数据增强通过对图片进行一定的处理,使得训练数据量增强,防止过拟合等,这块后期完善。。
由于模型需要既定尺寸大小的图片,我们先对图片进行resize,以下代码将实现对图片调整尺寸后保存在新的地址中。本文只是解决了在一个文件下
def resize_image(base_dir, new_dir, wight, height):

    if not os.path.exists(new_dir):

        os.mkdir(new_dir)

    foldername = os.listdir(base_dir)

    for folder in foldername:

        if not os.path.exists(new_dir+'\\'+folder):

            os.mkdir(new_dir+'\\'+folder)

        imagename = os.listdir(base_dir+'\\'+folder)

        for img in imagename:

            image = Image.open(base_dir +"\\"+ folder+'\\'+img)

            image_sized = image.resize((wight, height),Image.ANTIALIAS)

            image_sized.save(new_dir +"\\"+ folder+'\\'+img)

    print('--------------Data_resized DONE-------------------')
write_tfrecord
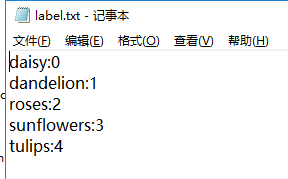
这里需要一个将类标对应成0,1,2。。的数字,建立一个label.txt,文件夹为类名,对应相应的数字。
本节理论后期完善,下面代码将会生成xx.tfrecord
def convert2example(img_dir, label):

    image=Image.open(img_dir)

    width, height = image.size

    if image.mode != 'RGB':

        image=image.convert('RGB')

    image_data=image.tobytes()

    #img_name1 = bytes(img_name, 'utf-8')

    example = tf.train.Example(features=tf.train.Features(feature={

        'image/encoded': tf.train.Feature(bytes_list=tf.train.BytesList(value=[image_data])),

        'image/height': tf.train.Feature(int64_list=tf.train.Int64List(value=[height])),

        'image/width': tf.train.Feature(int64_list=tf.train.Int64List(value=[width])),

        'image/label': tf.train.Feature(int64_list=tf.train.Int64List(value=[label]))

    }))

    return example

def writer_tfrecord(data_dir, label_txt_dir, output_dir, dataset):

    if not tf.gfile.Exists(output_dir):

        tf.gfile.MakeDirs(output_dir)

    out_file=os.path.join(output_dir, dataset+'.tfrecord')

    num_samples=0

    with tf.python_io.TFRecordWriter(out_file) as tfWriter:

        label_dict = {}

        with open(label_txt_dir,'r') as f:

            for line in f.readlines():

                folder = line.strip().split(':')[0]

                label = line.strip().split(':')[1]

                label_dict[folder] = label

        image_list, label_list = [], []

        for folder in os.listdir(data_dir):

            dir_path = os.path.join(data_dir,folder,'*.jpg')

            for image in glob.glob(dir_path):

                image_list.append(image)

                label_list.append(int(label_dict[folder]))

                label = int(label_dict[folder])

                example=convert2example(image, label)

                tfWriter.write(example.SerializeToString())

                num_samples+=1

    print("Number of samples: {}".format(num_samples))
Get_batch
首先read_tfrecord读取上文生成的tfrecord文件,之后shuffle生成batch,test文件是测试的,
def read_tfrecord(filename_queue):

    feature = {'image/encoded': tf.FixedLenFeature([], tf.string),

               'image/height': tf.FixedLenFeature([], tf.int64),

               'image/width': tf.FixedLenFeature([], tf.int64),

               'image/label': tf.FixedLenFeature([], tf.int64)}

    reader = tf.TFRecordReader()

    _, serialized_example = reader.read(filename_queue)

    features = tf.parse_single_example(serialized_example, features=feature)

    image  = tf.decode_raw(features['image/encoded'], tf.uint8)

    image  = tf.cast(image, tf.float32)

    height = tf.cast(features['image/height'],tf.int32)

    width  = tf.cast(features['image/width'], tf.int32)

    label  = tf.cast(features['image/label'], tf.int32)

    img = tf.reshape(image, [height, width, 3])

    # preprocess

    # subtract mean valu

    rgb_mean=np.array([123.68, 116.779, 103.939])

    img = tf.subtract(img, rgb_mean)

    # red, green, blue = tf.split(3, 3, img)

    # img = tf.concat(3, [

    #     tf.subtract(red , bgr_mean[2]),

    #     tf.subtract(green , bgr_mean[1]),

    #     tf.subtract(blue , bgr_mean[0]),

    # ])

    # center_crop

    img = tf.image.resize_images(img, [256, 256])

    j = int(round((256 - 224) / 2.))

    i = int(round((256 - 224) / 2.))

    img = img[j:j+224, i:i+224, :]

    # scale to 1

    img = tf.cast(img, tf.float32) * 0.017

    return img, label

def get_batch(infile, batch_size, num_threads=4, shuffle=False, min_after_dequeue=None):

    # 使用batch,img的shape必须是静态常量

    image, label = read_tfrecord(infile)

    if min_after_dequeue is None:

        min_after_dequeue = batch_size * 10

    capacity = min_after_dequeue + 3 * batch_size

    if shuffle:

        img_batch, label_batch = tf.train.shuffle_batch([image, label], batch_size=batch_size,

                                                    capacity=capacity,num_threads=num_threads,

                                                    min_after_dequeue=min_after_dequeue)

    else:

        img_batch, label_batch = tf.train.batch([image, label], batch_size,

                                                capacity=capacity, num_threads=num_threads,

                                                allow_smaller_final_batch=True)

    return img_batch, label_batch

def test_tfrecord(dataset_dir,batch_size):

    glob_pattern = os.path.join(dataset_dir, '*.tfrecord')

    tfrecords_list = glob.glob(glob_pattern)

    filename_queue = tf.train.string_input_producer(tfrecords_list, num_epochs=None)

    img_batch, label_batch = get_batch(filename_queue, batch_size)

    print('-----img_batch:------',type(img_batch))

    print('-----label_batch:------',type(label_batch))
main 测试
通过下面的代码我们测试下数据。
生成的batch为tensor,这为后期placeholder占位符送入的数据非tensor,需要转换成列表或者其他都可以,有两种方式:
 with tf.Session() as sess:

        print('-----img_batch:------',type(img_batch))

        print('-----label_batch:------',type(label_batch))
     #第一种 tensor在run后变成array

        #img_batch, label_batch = sess.run([img_batch, label_batch])
     # 第二种,eval()方法可以将tensor变为array
     # 同里,将array变为tensor可以用convert_to_tensor()

        img_batch = img_batch.eval()

        label_batch = label_batch.eval()

        print('-----img_batch:------',type(img_batch))

        print('-----label_batch:------',type(label_batch))
def main():

    label_txt_dir = 'label.txt'

    data_dir = './resized_flower_photos'

    base_dir = './flower_photos'

    new_dir = './resized_flower_photos'

    resize_wight = 224

    resize_height = 224

    output_dir = './tfrecord'

    dataset = 'mobilenetv2_data'

    #resize_image(base_dir,new_dir,resize_wight,resize_height)

    #image_list, label_list = read_file(label_txt_dir,data_dir)

    #writer_tfrecord(data_dir, label_txt_dir, output_dir, dataset)

    img_batch, label_batch = test_tfrecord(output_dir,64)

    with tf.Session() as sess:

        print('-----img_batch:------',type(img_batch))

        print('-----label_batch:------',type(label_batch))

        img_batch, label_batch = sess.run([img_batch, label_batch])

        print('-----img_batch:------',type(img_batch))

        print('-----label_batch:------',type(label_batch))

if __name__ == '__main__':

    main()
创建txt文件
我们需要将图片和类标对应起来作为一个txt文件存在,下面的代码实现了将文件中的内容做成txt文件,这个可以在caffe中的imagedata中使用,需要的数据label_txt_dir如下图:

import tensorflow as tf

import os

import glob

def creat_txt(label_txt_dir, data_dir,txt_name):

    #将label_txt中的内容放在字典中

    label_dict = {}

    with open(label_txt_dir,'r') as f:

        for line in f.readlines():

            folder = line.strip().split(':')[0]

            label = line.strip().split(':')[1]

            label_dict[folder] = label

    #将文件中的数据放在列表中

    image_list, label_list = [], []

    for folder in os.listdir(data_dir):

        dir_path = os.path.join(data_dir,folder,'*.jpg')

        for image in glob.glob(dir_path):

            image_list.append(image)

            label_list.append(label_dict[folder])

    #将列表中内容写在文件中

    with open(txt_name,'w') as file:

        for i in range(len(image_list)):

            file.write(image_list[i])

            file.write(' ')

            file.write(label_list[i])

            file.write('\n')

        file.close()

    print("There are %d data" % (len(image_list)))

    print('-------creat_%s   Done--------'% txt_name)

#------------执行main函数-------------------#

def main():

    print('----------main-------------')

    data_dir = './resized_image'

    label_txt_dir = 'label.txt'

    txt_name = 'train.txt'

    creat_txt(label_txt_dir, data_dir,txt_name)

if __name__ == '__main__':

    main()
生成的train.txt文件如下图所示:

Data Preprocess的更多相关文章
- 文本分类实战(十)—— BERT 预训练模型
1 大纲概述 文本分类这个系列将会有十篇左右,包括基于word2vec预训练的文本分类,与及基于最新的预训练模型(ELMo,BERT等)的文本分类.总共有以下系列: word2vec预训练词向量 te ...
- 文本分类实战(九)—— ELMO 预训练模型
1 大纲概述 文本分类这个系列将会有十篇左右,包括基于word2vec预训练的文本分类,与及基于最新的预训练模型(ELMo,BERT等)的文本分类.总共有以下系列: word2vec预训练词向量 te ...
- 文本分类实战(八)—— Transformer模型
1 大纲概述 文本分类这个系列将会有十篇左右,包括基于word2vec预训练的文本分类,与及基于最新的预训练模型(ELMo,BERT等)的文本分类.总共有以下系列: word2vec预训练词向量 te ...
- 文本分类实战(七)—— Adversarial LSTM模型
1 大纲概述 文本分类这个系列将会有十篇左右,包括基于word2vec预训练的文本分类,与及基于最新的预训练模型(ELMo,BERT等)的文本分类.总共有以下系列: word2vec预训练词向量 te ...
- 文本分类实战(六)—— RCNN模型
1 大纲概述 文本分类这个系列将会有十篇左右,包括基于word2vec预训练的文本分类,与及基于最新的预训练模型(ELMo,BERT等)的文本分类.总共有以下系列: word2vec预训练词向量 te ...
- 文本分类实战(五)—— Bi-LSTM + Attention模型
1 大纲概述 文本分类这个系列将会有十篇左右,包括基于word2vec预训练的文本分类,与及基于最新的预训练模型(ELMo,BERT等)的文本分类.总共有以下系列: word2vec预训练词向量 te ...
- 文本分类实战(四)—— Bi-LSTM模型
1 大纲概述 文本分类这个系列将会有十篇左右,包括基于word2vec预训练的文本分类,与及基于最新的预训练模型(ELMo,BERT等)的文本分类.总共有以下系列: word2vec预训练词向量 te ...
- 文本分类实战(三)—— charCNN模型
1 大纲概述 文本分类这个系列将会有十篇左右,包括基于word2vec预训练的文本分类,与及基于最新的预训练模型(ELMo,BERT等)的文本分类.总共有以下系列: word2vec预训练词向量 te ...
- 文本分类实战(二)—— textCNN 模型
1 大纲概述 文本分类这个系列将会有十篇左右,包括基于word2vec预训练的文本分类,与及基于最新的预训练模型(ELMo,BERT等)的文本分类.总共有以下系列: word2vec预训练词向量 te ...
随机推荐
- python中前后端通信方法Ajax和ORM映射(form表单提交)
后端从数据库获取数据给到前端: 第一种方式: admin.py文件代码: @admin.route('/showList') def show(): # 获取数据库所有文章数据,得到一个个对象 res ...
- LOJ #6261 一个人的高三楼
生成函数和组合数学的灵活应用 LOJ #6261 题意:求一个数列的$ k$次前缀和 $ Solution:$ 我们对原数列$ a$建生成函数$ A=\sum\limits_{i=0}^{n-1} a ...
- mvc中异常页面的设置
参考原文: http://blog.csdn.net/zjlovety/article/details/48734791 这种异常处理就是说,在mvc发生未处理异常时,对用户展示的页面. 第一种能被m ...
- C - Boss Gym - 101473C (模拟)
题目链接:https://cn.vjudge.net/contest/287775#problem/C 题目大意:给你n个人,然后m条关系,会有k次询问,每一次询问包括两种类型,第一种类型是交换两个人 ...
- Light oj 1018 - Brush (IV) 状态压缩
题目大意: 给出n个点的坐标,求至少画多少掉直线才能连接所有点. 题目思路:状态压缩 首先经行预处理,求出所有状态下,那些点不在该状态内 以任意两点为端点求出这条直线的状态 枚举所有状态,找出不在当前 ...
- pythonのscrapy抓取网站数据
(1)安装Scrapy环境 步骤请参考:https://blog.csdn.net/c406495762/article/details/60156205 需要注意的是,安装的时候需要根据自己的pyt ...
- log4j - 使用教程说明
地址:http://www.codeceo.com/log4j-usage.html 日志是应用软件中不可缺少的部分,Apache的开源项目log4j是一个功能强大的日志组件,提供方便的日志记录.在a ...
- 关于iframe的相关操作
1.判断当前页面是否在iframe当中 if (top.location != self.location) { alert("in iframe") }
- MySQL主从复制报错1594处理【转】
一.问题描述 Mysql主从复制模式中,slave上报错 “relay log read failure”,导致主从同步停止. mysql> show slave status\G ****** ...
- NodeJS基础教程
关于 本书致力于教会你如何用Node.js来开发应用,过程中会传授你所有所需的“高级”JavaScript知识.本书绝不是一本“Hello World”的教程. 状态 你正在阅读的已经是本书的最终版. ...