python nose测试框架中使用allure_report框架
在使用nose自带的xunit生成xml文件生成测试报告后,领导说报告不够炫,没有百分比效果,且在web自动化时的截图不美观,html很多情况下没有显示图片(nose框架截图方法这里),正好,allure_report报告框架满足所有要求。
一、介绍
这里可以查看官方信息,http://allure.qatools.ru/,报告还支持中文
还有前辈写的实践之路:https://testerhome.com/topics/5738
二、基于nose框架
从官网介绍中,我们可以得知,allure支持python nose框架
1) 安装:
nose下allure的插件官网:https://pypi.python.org/pypi/nose-allure-plugin
这里我们使用pip安装,安装过程中会自动安装pytest、lxml、six、eunum34等插件
C:\Users\Administrator>pip install nose-allure-plugin
目前只支持python2的版本,python3的同学请绕行
如果在安装过程中出现以下问题:
Building lxml version 3.8..

Building without Cython.

ERROR: 'xslt-config' 不是内部或外部命令,也不是可运行的程序

或批处理文件。

......

    Could not find function xmlCheckVersion in library libxml2. Is libxml2 insta

lled?

    ****************************************************************************

*****

    error: command 'C:\\Users\\Administrator\\AppData\\Local\\Programs\\Common\\

Microsoft\\Visual C++ for Python\\9.0\\VC\\Bin\\cl.exe' failed with exit status
可以指定lxml版本安装:
pip install lxml==3.6.
然后再次安装
pip install nose-allure-plugin
安装完成后,可以输入nosetests -h,可能看到以下几个参数,表示安装成功
--logdir=LOGDIR

--not-clear-logdir

--feature=FEATURE

--story=STORY

--issue=ISSUE

--severity=SEVERITY
2)使用
根据官网的例子熟悉下
import nose

class TestBar(object):

    @nose.allure.severity(nose.allure.severity_level.CRITICAL)

    def test_bar(self):

        pass

    # custom severity

    @nose.allure.severity("hard")

    def test_bar(self):

        pass
运行:
nosetests -v -s allure_learn.py --with-allure --logdir=tmp --severity="critical, hard"
这里的--logdir是产生xml文件的路径,如果是在windows下请更改格式,运行完成后,在--logdir下会产生对应的xml文件

3)在web自动化下生成截图的方法
这点是allure report最方便的地方,不用指定文件名自动生成截图
看以下脚本
import nose,sys

from selenium import webdriver

from allure.constants import AttachmentType

class TestBar():

    @classmethod

    def setUpClass(cls):

        cls.driver = webdriver.Firefox()

        cls.driver.get("http://www.baidu.com")

    @nose.allure.severity(nose.allure.severity_level.CRITICAL)

    def test_bar(self):

        assert 1==2
        nose.allure.attach('screenshot',self.driver.get_screenshot_as_png(), type= AttachmentType.PNG)

    # custom severity

    @nose.allure.severity("hard")

    def test_bar_xx(self):

        assert 4==4

        #nose.allure.attach('screenshot', self.driver.get_screenshot_as_png(), type='png')   -----该方法错误

        nose.allure.attach('screenshot', self.driver.get_screenshot_as_png(), type=AttachmentType.PNG)
运行后,我们可以看到在对应的目录下生成了报xml报告且还有截图文件
但这个代码不实用,我们在实际项目中,肯定是运行测试失败后才截图,成功就不截图
这里,使用tearDown方法,并判断用例成功与否,失败则截图,
def tearDown(self):

        if sys.exc_info()[0]:

            nose.allure.attach('screenshot',self.driver.get_screenshot_as_png(), type= AttachmentType.PNG)
4)集成进jenkins生成report
jenkins怎么安装,网管上也有说明,http://wiki.qatools.ru/display/AL/Allure+Jenkins+Plugin,这里不介绍
博主在linux下安装时,发现From Maven Central一项是空是,没有版本可以选择,查看后发现,是安装插件时,在jenkins updates文件夹下没有生成对应的文件,手工添加解决
在$jenkins_home/updates查看是否存在文件ru.yandex.qatools.allure.jenkins.tools.AllureCommandlineInstaller,如果不存在,手工创建,并输入以下内容
{"list":[{"id":"2.2.1","name":"2.2.1","url":"https://dl.bintray.com/qameta/generic/io/qameta/allure/allure/2.2.1/allure-2.2.1.zip"},{"id":"2.2.0","name":"2.2.0","url":"https://dl.bintray.com/qameta/generic/io/qameta/allure/allure/2.2.0/allure-2.2.0.zip"},{"id":"2.1.1","name":"2.1.1","url":"https://dl.bintray.com/qameta/generic/io/qameta/allure/allure/2.1.1/allure-2.1.1.zip"},{"id":"2.1.0","name":"2.1.0","url":"https://dl.bintray.com/qameta/generic/io/qameta/allure/allure/2.1.0/allure-2.1.0.zip"},{"id":"2.0.1","name":"2.0.1","url":"https://dl.bintray.com/qameta/generic/io/qameta/allure/allure/2.0.1/allure-2.0.1.zip"},{"id":"2.0.0","name":"2.0.0","url":"https://dl.bintray.com/qameta/generic/io/qameta/allure/allure/2.0.0/allure-2.0.0.zip"},{"id":"1.5.4","name":"1.5.4","url":"https://oss.sonatype.org/content/repositories/releases/ru/yandex/qatools/allure/allure-commandline/1.5.4/allure-commandline-1.5.4-standalone.zip"},{"id":"1.5.3","name":"1.5.3","url":"https://oss.sonatype.org/content/repositories/releases/ru/yandex/qatools/allure/allure-commandline/1.5.3/allure-commandline-1.5.3-standalone.zip"},{"id":"1.5.2","name":"1.5.2","url":"https://oss.sonatype.org/content/repositories/releases/ru/yandex/qatools/allure/allure-commandline/1.5.2/allure-commandline-1.5.2-standalone.zip"},{"id":"1.5.1","name":"1.5.1","url":"https://oss.sonatype.org/content/repositories/releases/ru/yandex/qatools/allure/allure-commandline/1.5.1/allure-commandline-1.5.1-standalone.zip"},{"id":"1.5.0","name":"1.5.0","url":"https://oss.sonatype.org/content/repositories/releases/ru/yandex/qatools/allure/allure-commandline/1.5.0/allure-commandline-1.5.0-standalone.zip"},{"id":"1.4.23.HOTFIX1","name":"1.4.23.HOTFIX1","url":"https://oss.sonatype.org/content/repositories/releases/ru/yandex/qatools/allure/allure-commandline/1.4.23.HOTFIX1/allure-commandline-1.4.23.HOTFIX1-standalone.zip"},{"id":"1.4.23","name":"1.4.23","url":"https://oss.sonatype.org/content/repositories/releases/ru/yandex/qatools/allure/allure-commandline/1.4.23/allure-commandline-1.4.23-standalone.zip"},{"id":"1.4.22","name":"1.4.22","url":"https://oss.sonatype.org/content/repositories/releases/ru/yandex/qatools/allure/allure-commandline/1.4.22/allure-commandline-1.4.22-standalone.zip"},{"id":"1.4.21","name":"1.4.21","url":"https://oss.sonatype.org/content/repositories/releases/ru/yandex/qatools/allure/allure-commandline/1.4.21/allure-commandline-1.4.21-standalone.zip"},{"id":"1.4.20","name":"1.4.20","url":"https://oss.sonatype.org/content/repositories/releases/ru/yandex/qatools/allure/allure-commandline/1.4.20/allure-commandline-1.4.20-standalone.zip"},{"id":"1.4.19","name":"1.4.19","url":"https://oss.sonatype.org/content/repositories/releases/ru/yandex/qatools/allure/allure-commandline/1.4.19/allure-commandline-1.4.19-standalone.zip"},{"id":"1.4.18","name":"1.4.18","url":"https://oss.sonatype.org/content/repositories/releases/ru/yandex/qatools/allure/allure-commandline/1.4.18/allure-commandline-1.4.18-standalone.zip"},{"id":"1.4.17","name":"1.4.17","url":"https://oss.sonatype.org/content/repositories/releases/ru/yandex/qatools/allure/allure-commandline/1.4.17/allure-commandline-1.4.17.zip"}]}
再次查看,From Maven Central中有版本选择了
构建后说明:
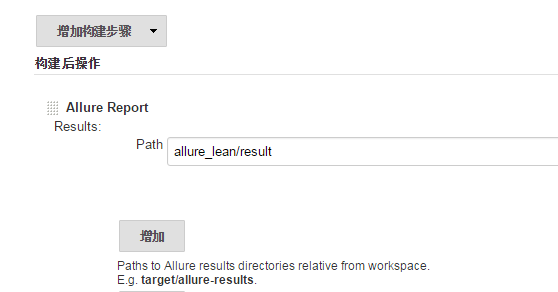
这里的path是之前使用nosetests 生成xml时对应的文件夹,但文件夹又是基于job的工作空间的相对目录,写绝对目录是不行的
5)查看结果
生成完成后,可以产生这样的效果图:
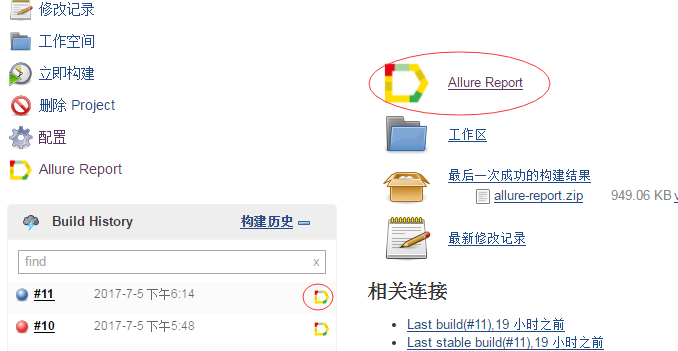
点击查看:
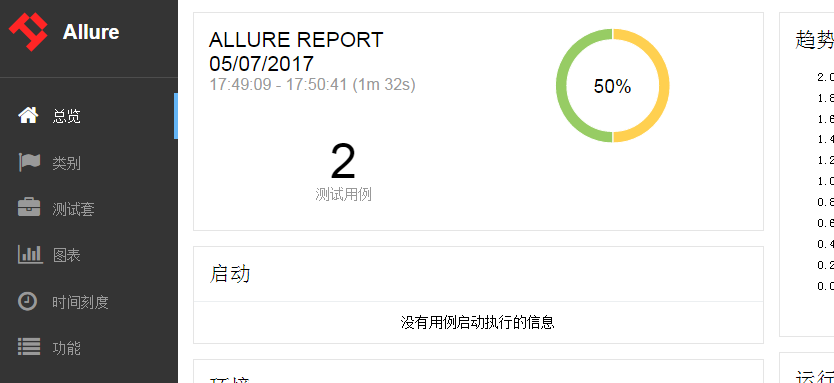
在对应失败的用例下,有截图显示,

更新一下:
有同学在使用时,不想每次用jenkins来生成数据来查看报告,可以自行下载allure commandline工具,用以下方式来生成报告:
allure generate directory-with-results/ -o directory-with-report
生成完成后,点击index.html文件,发现数据未显示出来
原来少最做一步,要开启服务才可以查看,命令如下:
allure report open
如果还觉得麻烦的,还要在运行完测试用例后直接输入以下命令:
allure serve directory-results
其中dirceotry-results是你生成xml的路径
---------------------11.16更新------------------------
在实际使用时,allure在执行时会将report生成的截图和xml删除,有时候分步骤使用时,会是一个麻烦事,
所以在nose使用时,可以使用参数:
--not-clear-logdir
来避免清空文件夹,如下:
nosetests --with-allure --logdir=results --not-clear-logdir
然后在windows下时,运行完几个测试后,还需手工清除截图及xml,这里记录下bat使用:
del /s /Q allure-results

    ----表示:只删除文件而不能删除子文件夹
---------------------2018.1.9更新------------------------
又来更新了,allure在首页界面有个环境信息,本来我觉得用处不大,但是TMD运营又提需求,多环境同时跑时,最后出的报告要看出是什么环境跑的,正好allure正好有该功能,很简单,只要在代码中加入下面一行:
nose.allure.environment(URL='http://192.168.1.1', Username=u'huzhq',project=u'afdffd')
生成的报告就有该信息
python nose测试框架中使用allure_report框架的更多相关文章
- python nose测试框架全面介绍十---用例的跳过
又来写nose了,这次主要介绍nose中的用例跳过应用,之前也有介绍,见python nose测试框架全面介绍四,但介绍的不详细.下面详细解析下 nose自带的SkipTest 先看看nose自带的S ...
- python nose测试框架全面介绍七--日志相关
引: 之前使用nose框架时,一直使用--logging-config的log文件来生成日志,具体的log配置可见之前python nose测试框架全面介绍四. 但使用一段时间后,发出一个问题,生成的 ...
- python nose测试框架全面介绍六--框架函数别名
之前python nose测试框架全面介绍二中介绍了nose框架的基本构成,但在实际应该中我们也会到setup_function等一系列的名字,查看管网后,我们罗列下nose框架中函数的别名 1.pa ...
- Jenkins自动化构建python nose测试
[本文出自天外归云的博客园] 简介 通过Jenkins自动化构建python nose测试分两步: 1. 创建节点(节点就是执行自动化测试的机器): 2. 创建任务并绑定节点(用指定的机器来跑我们创建 ...
- php框架中的phalcon框架的安装,及初步认识,从表单提交简单的数据到数据库中
php框架中的phalcon框架的安装,及初步认识,从表单提交简单的数据到数据库中 1.phalcon框架的安装: phalcon框架在windows本地安装可以利用wamp软件,安装之后可以查看对应 ...
- 框架中的导航框架 & position定位
框架中,通过链接将一个页面显示在另一个框架中: 总框架: <frameset cols="15%,*"> <frame src="xx.html ...
- python nose测试框架全面介绍五--attr介绍
之前写了一系列nose框架的,这篇介绍下attr tag 在nose框架中attr用来标识用例,使得在运行时可以通过标识来执行用例,之前在nose测试框架全面介绍四中有说明,但没有说明清楚,这里再总结 ...
- python nose测试框架全面介绍三
三.nose的测试工具集 nose.tools模块提供了一系列的小工具,包括测试执行时间.异常输出及unittest框架中所有的assert功能. 为了使写用例更加容易,nose.tools提供了部分 ...
- python nose测试框架全面介绍八---接口测试中非法参数的断言
在测接口时,会有这样的场景,输入非法的参数,校验返回的错误码及错误内容 通常做法为发请求,将错误的返回结果拿出,再进行对比匹配:但存在一个问题,需要再写错误返回分析函数,不能与之前正常发请求的函数共用 ...
随机推荐
- UITextField禁用掉编辑之后...
某些UITextField只为了摆数据,还有响应点击,为了避免频繁出现键盘,所以把UITextField的人机交互(userInteractionEnabled)给关闭了 此时,给UITextFiel ...
- 【数据分析知识点】detailed table of contents
Exploratory Data Analysis - Detailed Table of Contents http://www.itl.nist.gov/div898/handbook/eda/e ...
- Redis Crackit漏洞利用和防护
注意:本文只是阐述该漏洞的利用方式和如何预防.根据职业道德和<中华人民共和国计算机信息系统安全保护条例>,如果发现的别人的漏洞,千万不要轻易入侵,这个是明确的违法的哦!!! 目前Redis ...
- nvm安装node和npm,个人踩坑记录
我采用nvm-setup安装windows版本的nvm nvm安装node出现的问题: 1.node成功了,npm没成功 解决:在nvm 安装了node之后,输入npm找不到该命令,当时安装报错如下: ...
- Node.js版本管理工具 nvm
1. 下载安装 curl curl -o- https://raw.githubusercontent.com/creationix/nvm/v0.33.1/install.sh | bash wge ...
- 7 切片slice
include 切片 切片的日常用法 切片slice 其本身并不是数组,它指向底层的数组 作为变长数组的替代方案,可以关联底层数组的局部或者 为引用类型. 可以直接创建或从底层数组获取生成. 使用le ...
- C语言界面显示水波纹效果
工具:VS+EasyX +素材图 EasyX首页 - EasyX Library for C++ https://www.easyx.cn/ 下载安装即可.
- 织梦Dedecms系统可疑文件include/filter.inc.php扫描出漏洞,该如何解决?
今天在做网站监察的时候,发现网站出了一个问题,在对网站做木马监测的时候,扫描出一个可疑文件:/include/filter.inc.php,建议删除,但仔细检查后,发现此文件是织梦(Dedecms)系 ...
- Linux系统安装workerman,启动wss 服务
安装workerman其实很简单,只要会简单的linux口令就可以搞定, 这里我给大家演示一下如何安装workerman 进入终端的过程就不用演示了吧... 输入root及密码进入终端后找到站点根目录 ...
- nginx反向代理配置(nginx.conf+proxy_set_header)
转载:https://blog.csdn.net/bjsunwei/article/details/62231209 location / { proxy_pass http://test; prox ...