Express框架Fetch通信
最近自己弄个博客站点,前台用的React,服务器用的是node实现的,node是第一次接触,所以还在摸索,这篇mark下通信时遇到的坑。
fetch配置:
 window.fetchUtility = function (options, errorFun) {

     var request = {

         method: 'POST',

         headers: {

             'Content-Type': 'application/x-www-form-urlencoded'

         },

         // headers: {

         //     'Content-Type': 'application/x-www-form-urlencoded;charset=UTF-8',

         //     'Accept': 'application/json'

         // },

         cache: 'no-store',

         body:`userName=${options.data.userName}&password=${options.data.password}`

     };

     if (request.method.toLowerCase() === "get") {

         request.body = null;

     }

     return fetch(options.url, request)

         .then(function (response) {

             if (response.ok) {

                 if (request.download) {

                     return response;

                 }

                 else {

                     return response.text().then(function (dataString) {

                         return {

                             responseStatus: response.status,

                             responseString: dataString,

                             isParseJson: request.isParseJson,

                             isPassStatus: request.isPassStatus

                         };

                     });

                 }

             } else {

                 if (response.status == 403) {

                     window.location.href = "/error/" + response.status;

                 } else if (response.status == 409) {

                     // for simulation

                     $$.alert(true, { type: "w", content: "Sorry, currently you are in simulation mode and limited to read only access." });

                     throw new Error("simulation");

                 }

                 else {

                     if (errorFun) {

                         errorFun(response);

                     }

                     else {

                         throw new Error(response.statusText);

                     }

                 }

             }

         }).then(function (fetchResult) {

             if (request.download) { return fetchResult };

             var queryResult = null;

             try {

                 if (!fetchResult.responseString) {

                     return null;

                 }

                 if (fetchResult.isParseJson && fetchResult.responseString) {

                     if ($.isEmptyObject(fetchResult.responseString)) {

                         queryResult = "";

                     } else {

                         queryResult = JSON.parse(fetchResult.responseString);

                         if (fetchResult.isPassStatus) {

                             queryResult[FetchResponsePropName.status] = fetchResult.responseStatus;

                         }

                     }

                 } else {

                     queryResult = fetchResult.responseString;

                 }

             }

             catch (ex) {

                 $$.error("An error happened while fetching information. Error:", ex);

             }

             return queryResult;

         });

 };
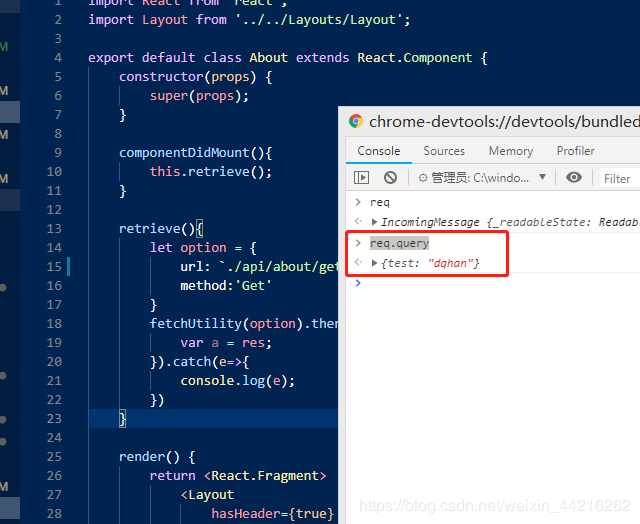
GET通信使用:
  retrieve(){

         let option = {

             url: `./api/about/getAbout?test=${'dqhan'}`,

             method:'Get'

         }

         fetchUtility(option).then(res=>{

             var a = res;

         }).catch(e=>{

             console.log(e);

         })

     }
express接受参数形式:
POST通信:
postRequest() {

        let data = {

            params: { test: 'test' }

        };

        let option = {

            url: `./api/about/postRequest`,

            method: 'Post',

            data: data

        }

        fetchUtility(option).then(res => {

            var a = res;

        }).catch(e => {

            console.log(e);

        })

    }
因为调试过程中express中接受参数时一直接收不到,所以mark下(node小白,正在努力ヾ(◍°∇°◍)ノ゙)
问题原因:
对node的不熟悉,以及对fetch的不精通。
前后台通信数据传递最基本的结构:
- header定义发送、接受的媒体类型
- 请求方式post、get等等
- body参数结构
以上三点是最基本的参数,然而我一直在纠结是不是还有什么配置错误,于是一直在这里打转转。
问题根本原因是需要在node里面使用body-parser来接受参数,这样express才能解析通信发过来的参数。
解决方法:
var bodyParser  = require('body-parser');

const app = new express();

app.use(bodyParser.urlencoded({extended: true}))
总结:
我应该好好看看node的文档。sorry~
Express框架Fetch通信的更多相关文章
- Node.js、Express框架获取客户端IP地址
Node.js //传入请求HttpRequest function getClientIp(req) { return req.headers['x-forwarded-for'] || req.c ...
- Win8.1 安装Express 框架
1.安装Windows Node.js客户端 2.安装Express框架 我本机是Win8.1的,使用命令npm install -g express安装Express,安装完成后显示一些安装明细,刚 ...
- Node.js Express 框架学习
转载:http://JavaScript.ruanyifeng.com/nodejs/express.html#toc0 感觉很牛的样子,不过觉得对初学者没太大用,里面很多例子用的api都没有详细的说 ...
- Node.js Express 框架
Node.js Express 框架 Express 简介 Express 是一个简洁而灵活的 node.js Web应用框架, 提供了一系列强大特性帮助你创建各种 Web 应用,和丰富的 HTTP ...
- express框架路由配置及congtroller自动加载
express框架在node官方推荐的一个框架,关于如何入门的文章,已经很多了,我就不在累赘了,本文的核心是如何修改文件使得更接近一个MVC的框架 express原生是通过require的方式实现了模 ...
- nodejs学习笔记二:解析express框架项目文件
上一章介绍了如何去创建一个express框架的工程项目,这章介绍一下express框架下的文件和用法解析,上一张我们创建的工程项目结构图如下: models是不属于原工程项目结构,为了实现数据模型后添 ...
- nodejs学习笔记一:安装express框架并构建工程目录
偶遇node是在一个阳光明媚的上午,无意间打开博客看到一片关于nodejs的介绍,通读全篇后,心情跌宕起伏,哎呀,这么好的东西我竟然现在才知道,这是最气的,于是马上开始制定学习nodejs计划,好了, ...
- Express框架使用以及数据库公共操作类整理(Win7下的NodeJs)
具体步骤: 1.安装开发工具WebStorm: 2.安装node/npm(下载地址:https://nodejs.org/download/)选择适合你的xxx.mis安装: 3.安装express框 ...
- express 框架之session
一.什么是session? 最近在学习node.js 的express框架,接触到了关于session方面的内容.翻阅了一些的博客,学到了不少东西,发现一篇博文讲的很好,概念内容摘抄如下: Sessi ...
随机推荐
- 基于html5海贼王单页视差滚动特效
分享一款基于html5海贼王单页视差滚动特效是一款流行滑落网页特效代码.效果图如下: 在线预览 源码下载 实现的代码: <div class="top"> < ...
- [转]oracle在删除表\表空间\用户时,如何释放磁盘空间
一.drop表 执行drop table xx 语句 drop后的表被放在回收站(user_recyclebin)里,而不是直接删除掉.这样,回收站里的表信息就可以被恢复,或彻底清除. 通过查询回收站 ...
- [notes] some code tips
genericizing-codehtml, body {overflow-x: initial !important;}html { font-size: 14px; } body { margin ...
- C语言 · 栅格打印问题
算法提高 栅格打印问题 时间限制:1.0s 内存限制:512.0MB 问题描述 编写一个程序,输入两个整数,作为栅格的高度和宽度,然后用“+”.“-”和“|”这三个字符来打印一个栅格 ...
- C语言 · 算年龄
算年龄 英国数学家德摩根出生于19世纪初叶(即18xx年). 他年少时便很有才华.一次有人问他的年龄,他回答说: “到了x的平方那年,我刚好是x岁”. 请你计算一下,德摩根到底出生在哪一年. 题中的年 ...
- led子系统
最简单的led驱动就是从端口输出0或1来关闭或点亮灯.而我们这里讲的led子系统,主要是对led事件进行了分装和优化,这里我们主要讲的是可 以实现跨平台的led驱动.不管你是使用三星的平台,还是Atm ...
- Go Revel - Templates(模板)
revel使用Go官方的模板库.它会在两个目录查找模板文件: 1.应用的`views`目录以及它的所有子目录 2.revel库自己的`templates`目录 revel为错误页面提供了模板(在`de ...
- js 控制输入文字的字数
直接上代码. <html> <head> </head> <body> <textarea id='txtArea' cols='50' rows ...
- 【oneday_onepage】——Ten Changes To Make A Difference In Your Life
When you want to change something in your life, it can feel overwhelming. Whether it’s losing 50lbs ...
- ApplicationContextAware接口的作用
1/============== 在Web应用中,Spring容器通常采用声明式方式配置产生:开发者只要在web.xml中配置一个Listener,该Listener将会负责初始化Spring容器 ...