微信小程序实现计算器功能
page {
height:100%;
}
.calculator {
width: 100%;
height: 100vh;
border:solid 1px;
background: rgb(238, 5, 5);
position: relative;
box-shadow: 0px 0px 20px 0px rgb(211, 41, 41);
display: flex;
flex-direction: column;
box-sizing: border-box;
}
.calculator-display { /*显示器背景颜色*/
background: #2c2a2c;
flex: 1;
}
/*TODO:解决文本垂直居中问题,显示器数字颜色*/
.calculator-display-text {
padding: 0 30px;
font-size: 3em;
color: rgb(245, 245, 248);
text-align: right;
}
.calculator-keypad {
display: flex;
}
.calculator .function-keys {
display: flex;
color:rgb(245, 13, 13);
}
.calculator .digit-keys {
background: #0808f7;
display: flex;
flex-direction: row;
flex-wrap: wrap-reverse;
}
.calculator-key-hover { /*按钮按下以后的颜色*/
box-shadow: inset 0px 0px 25vw 0px hsla(71, 90%, 48%, 0.898);
}
.calculator-key {
background-color:aqua;
display: block;
width: 25vw;
height: 25vw;
line-height: 25vw;
border-top: 1px solid rgb(6, 245, 78);
border-right: 1px solid rgb(19, 241, 12);
text-align: center;
box-sizing: border-box;
}
.calculator .function-keys .calculator-key {
font-size: 2em;
}
.calculator .digit-keys .calculator-key {
font-size: 3em;
}
.calculator .digit-keys .key-0 {
width: 50vw;
text-align: left;
padding-left: 9vw;
}
.calculator .digit-keys .key-dot {
padding-top: 1em;
font-size: 0.75em;
}
.calculator .operator-keys .calculator-key {
color: rgb(248, 165, 10);
border-right: 0;
font-size: 3em;
}
.calculator .function-keys {
background: linear-gradient(to bottom, rgb(6, 6, 240) 0%, rgb(52, 5, 240) 100%);
}
.calculator .operator-keys {
background: linear-gradient(to bottom, rgba(252,156,23,1) 0%, rgba(247,126,27,1) 100%);
}
.input-keys {
width: 100%;
}
.operator-keys {
width: 100%;
}
<template name="calculator-key">
<button hover-start-time="{{5}}" hover-stay-time="{{100}}" hover-class="calculator-key-hover" data-key="{{className}}" class="calculator-key {{className}}">{{display}}</button>
</template>
<view class="calculator">
<view class="calculator-display">
<view class="calculator-display-text">{{displayValue}}</view>
</view>
<view class="calculator-keypad">
<view class="input-keys">
<view class="function-keys" catchtap="onTapFunction">
<template is="calculator-key" data="{{className: 'key-clear', display: clearDisplay ? 'C' : 'C'}}"/>
<template is="calculator-key" data="{{className: 'key-sign', display: '+/-'}}"/>
<template is="calculator-key" data="{{className: 'key-percent', display: '%'}}"/>
</view>
<view class="digit-keys" catchtap="onTapDigit">
<template is="calculator-key" data="{{className: 'key-0', display: '0'}}"/>
<template is="calculator-key" data="{{className: 'key-dot', display: '●'}}"/>
<template is="calculator-key" data="{{className: 'key-1', display: '1'}}"/>
<template is="calculator-key" data="{{className: 'key-2', display: '2'}}"/>
<template is="calculator-key" data="{{className: 'key-3', display: '3'}}"/>
<template is="calculator-key" data="{{className: 'key-4', display: '4'}}"/>
<template is="calculator-key" data="{{className: 'key-5', display: '5'}}"/>
<template is="calculator-key" data="{{className: 'key-6', display: '6'}}"/>
<template is="calculator-key" data="{{className: 'key-7', display: '7'}}"/>
<template is="calculator-key" data="{{className: 'key-8', display: '8'}}"/>
<template is="calculator-key" data="{{className: 'key-9', display: '9'}}"/>
</view>
</view>
<view class="operator-keys" catchtap="onTapOperator">
<template is="calculator-key" data="{{className: 'key-divide', display: '÷'}}"/>
<template is="calculator-key" data="{{className: 'key-multiply', display: '×'}}"/>
<template is="calculator-key" data="{{className: 'key-subtract', display: '−'}}"/>
<template is="calculator-key" data="{{className: 'key-add', display: '+'}}"/>
<template is="calculator-key" data="{{className: 'key-equals', display: '='}}"/>
</view>
</view>
</view>
Page({
data: {
value: null, // 上次计算后的结果,null表示没有上次计算的结果
displayValue: '0', // 显示数值
operator: null, // 上次计算符号,null表示没有未完成的计算
waitingForOperand: false // 前一按键是否为计算符号
},
onLoad: function (options) {
this.calculatorOperations = {
'key-divide': (prevValue, nextValue) => prevValue / nextValue,
'key-multiply': (prevValue, nextValue) => prevValue * nextValue,
'key-add': (prevValue, nextValue) => prevValue + nextValue,
'key-subtract': (prevValue, nextValue) => prevValue - nextValue,
'key-equals': (prevValue, nextValue) => nextValue
}
},
/* AC操作,一下回到解放前 */
clearAll() {
this.setData({
value: null,
displayValue: '0',
operator: null,
waitingForOperand: false
})
},
/* 仅清空当前显示的输入值 */
clearDisplay() {
this.setData({
displayValue: '0'
})
},
onTapFunction: function (event) {
const key = event.target.dataset.key;
switch (key) {
case 'key-clear':
if (this.data.displayValue !== '0') {
this.clearDisplay();
} else {
this.clearAll();
}
break;
case 'key-sign':
var newValue = parseFloat(this.data.displayValue) * -1
this.setData({
displayValue: String(newValue)
})
break;
case 'key-percent':
const fixedDigits = this.data.displayValue.replace(/^-?\d*\.?/, '')
var newValue = parseFloat(this.data.displayValue) / 100
this.setData({
displayValue: String(newValue.toFixed(fixedDigits.length + 2))
});
break;
default:
break;
}
},
onTapOperator: function (event) {
const nextOperator = event.target.dataset.key;
const inputValue = parseFloat(this.data.displayValue);
if (this.data.value == null) {
this.setData({
value: inputValue
});
} else if (this.data.operator) {
const currentValue = this.data.value || 0;
const newValue = this.calculatorOperations[this.data.operator](currentValue, inputValue);
this.setData({
value: newValue,
displayValue: String(newValue)
});
}
this.setData({
waitingForOperand: true,
operator: nextOperator
});
},
onTapDigit: function (event) {
const key = event.target.dataset.key; // 根据data-key标记按键
if (key == 'key-dot') {
// 按下点号
if (!(/\./).test(this.data.displayValue)) {
this.setData({
displayValue: this.data.displayValue + '.',
waitingForOperand: false
})
}
} else {
// 按下数字键
const digit = key[key.length - 1];
if (this.data.waitingForOperand) {
this.setData({
displayValue: String(digit),
waitingForOperand: false
})
} else {
this.setData({
displayValue: this.data.displayValue === '0' ? String(digit) : this.data.displayValue + digit
})
}
}
}
})
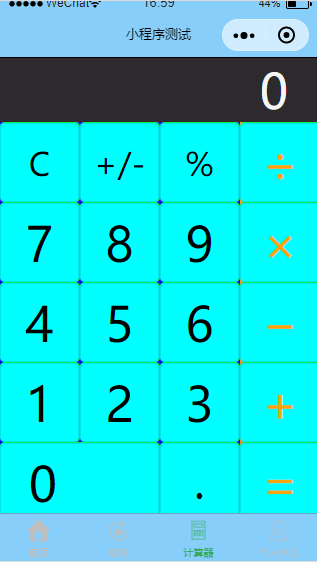
最终效果图
微信小程序实现计算器功能的更多相关文章
- 微信小程序-简易计算器
代码地址如下:http://www.demodashi.com/demo/14210.html 一.前期准备工作 软件环境:微信开发者工具 官方下载地址:https://mp.weixin.qq.co ...
- 微信小程序调用蓝牙功能控制车位锁
第一次学用微信小程序,项目需要,被逼着研究了一下,功能是调用微信小程序的蓝牙功能,连接上智能车位锁,控制升降,大概步骤及调用的小程序接口API如下: 1.打开蓝牙模块 wx.openBluetooth ...
- 微信小程序新闻列表功能(读取文件、template模板使用)
微信小程序新闻列表功能(读取文件.template) 不忘初心,方得始终.初心易得,始终难守. 在之前的项目基础上进行修改,实现读取文件内容作为新闻内容进行展示. 首先,修改 post.wxml 文件 ...
- 微信小程序实战 购物车功能
代码地址如下:http://www.demodashi.com/demo/12400.html 一.准备工作 软件环境:微信开发者工具 官方下载地址:https://mp.weixin.qq.com/ ...
- 微信小程序在线支付功能使用总结
最近需要在微信小程序中用到在线支付功能,于是看了一下官方的文档,发现要在小程序里实现微信支付还是很方便的,如果你以前开发过服务号下的微信支付,那么你会发现其实小程序里的微信支付和服务号里的开发过程如出 ...
- 微信小程序开发-蓝牙功能开发
0. 前言 这两天刚好了解了一下微信小程序的蓝牙功能.主要用于配网功能.发现微信的小程序蓝牙API已经封装的很好了.编程起来很方便.什么蓝牙知识都不懂的情况下,不到两天就晚上数据的收发了,剩下的就是数 ...
- 微信小程序之购物车功能
前言 以往的购物车,基本都是通过大量的 DOM 操作来实现.微信小程序其实跟 vue.js 的用法非常像,接下来就看看小程序可以怎样实现购物车功能. 需求 先来弄清楚购物车的需求. 单选.全选和取消, ...
- 微信小程序实现支付功能
小程序支付,没有封装支付代码:直接上一段可用的流程代码吧:微信小程序支付官网文档有详细的说明,这里我就不再赘述啦:客户端js: wx.request({ url:'https://www.xxxx.c ...
- [转]微信小程序之购物车功能
本文转自:https://www.cnblogs.com/linxin/p/6834206.html 前言 以往的购物车,基本都是通过大量的 DOM 操作来实现.微信小程序其实跟 vue.js 的用法 ...
随机推荐
- OperateResult 基础类及派生类介绍
前言 在Visual Studio 中的NuGet管理器中可以下载安装,也可以直接在NuGet控制台输入下面的指令安装: Install-Package HslCommunication NuGet安 ...
- 【oracle入门】数据模型
数据模式也是一这种模型,它是数据库中用于提供信息表示的操作手段的形式架构,是数据库中用来对现实世界惊喜抽象的工具.数据模型按不同的应用层次分为3种类型,分别为概念数据模型.逻辑数据模型.物理数据模型. ...
- Linux下截屏方法
参考百度经验 https://jingyan.baidu.com/article/48a42057c8e8dfa92525047c.html 第一种: 截屏部分画面并保存 快捷键Shift+PrtSc
- linux4.15.1编译init/mounts报错
AR init/mounts.o arm-linux-ar: illegal option -- T Usage: arm-linux-ar [emulation options] [-]{dmpqr ...
- python魔法方法
1.__call__ 实现__call__后,该类的对象可以被调用 举例如: class test_call_: def __init__(self, n): self.n = n def __cal ...
- zombodb sql functions 说明
zombodb 提供了好多方便的sql 函数工具类以及帮助函数 查看zombodb 版本zdb.version() select * from zdb.version(); version ----- ...
- nginx添加一个站点
server { listen ; server_name demo.abc.com ; root /Users/pa200318/demo.cp.com/trunk; index index.php ...
- java_lambda表达式
lambda表达式1 由来 概念 是通过策略模式来曲线实现的 lambda表达式2 语法详解 lambda表达式3 目标类型的概念 目标类型推断 ...
- vue-demo(初级)
在使用WebStorm前把字符编码等等设置好! 使用WebStorm打开vue项目等待ide索引加载完成 注意要让WebStorm可以创建vue文件需要以下步骤: <template> & ...
- TreeSet的两种排序方式,含Comparable、Comparator
1.排序的引入 由于TreeSet可以实现对元素按照某种规则进行排序,例如下面的例子 public class TreeSetDemo { public static void main(String ...