micropython驱动sh1106点亮oled
继上一帖给esp32刷入micropython之后,忍不住给以esp12e也刷了micropython
这里先说一下webrepl:
通过wifi可以和esp8266交互,以及便携的传输文件
首次使用:
 import webrepl

 webrepl.start()
中间可能让你import 一个配置模块来设置密码具体即执行上两句就知道了.
WebREPL - a prompt over WiFi

WebREPL allows you to use the Python prompt over WiFi, connecting through a browser. The latest versions of Firefox and Chrome are supported.

For your convenience, WebREPL client is hosted at http://micropython.org/webrepl . Alternatively, you can install it locally from the the GitHub repository https://github.com/micropython/webrepl .

Before connecting to WebREPL, you should set a password and enable it via a normal serial connection. Initial versions of MicroPython for ESP8266 came with WebREPL automatically enabled on the boot and with the ability to set a password via WiFi on the first connection, but as WebREPL was becoming more widely known and popular, the initial setup has switched to a wired connection for improved security:

import webrepl_setup

Follow the on-screen instructions and prompts. To make any changes active, you will need to reboot your device.

To use WebREPL connect your computer to the ESP8266’s access point (MicroPython-xxxxxx, see the previous section about this). If you have already reconfigured your ESP8266 to connect to a router then you can skip this part.

Once you are on the same network as the ESP8266 you click the “Connect” button (if you are connecting via a router then you may need to change the IP address, by default the IP address is correct when connected to the ESP8266’s access point). If the connection succeeds then you should see a password prompt.

Once you type the password configured at the setup step above, press Enter once more and you should get a prompt looking like >>>. You can now start typing Python commands!
以上参见micropython docs
初次设置好会提示重启,然后电脑就可以通过serial或者浏览器http://micropython.org/webrepl/和micropython交互了,贴张图:
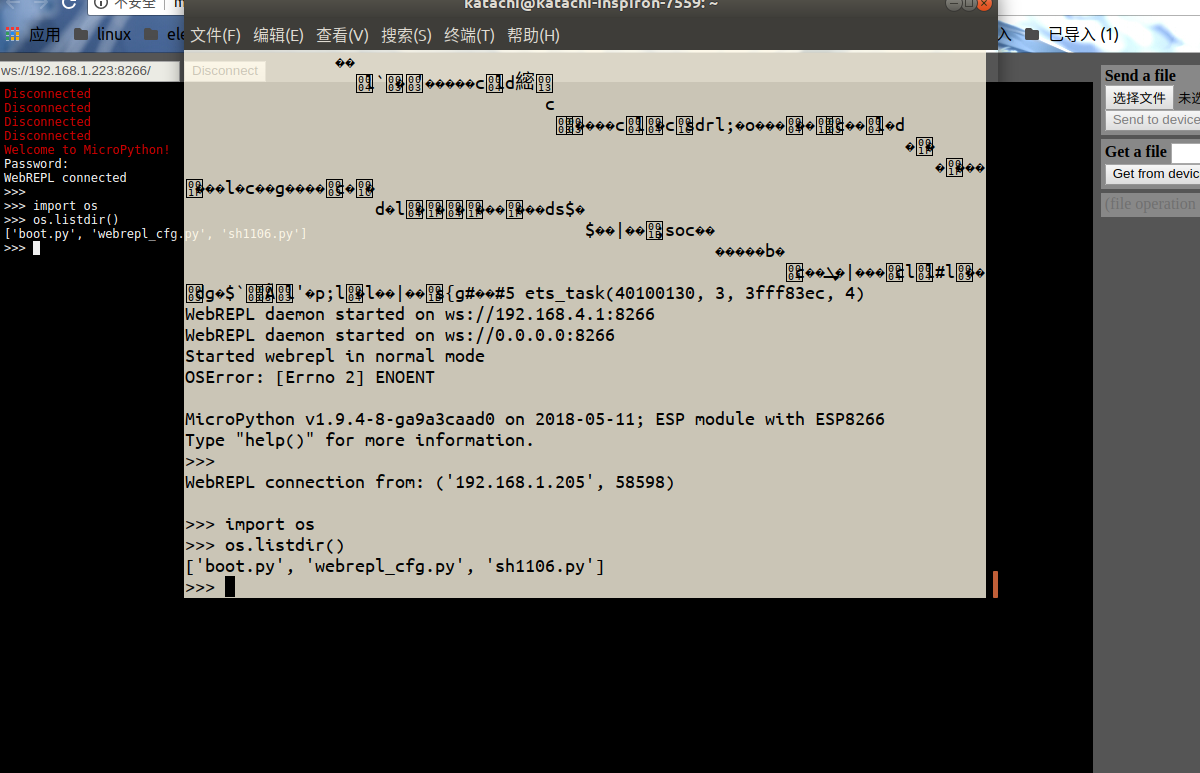
先通过repl交互,如果之前设置好网络的话,esp8266开机之后会自动连接,这一点很方便,
这里通过可以通过.ifconfig()查看IP或者进入路由器后台查看也行,然后把地址填入webrepl点击连接,输入密码即可.
可以看到两侧的信息交互是同步的,在一端输入另一端自动跟随.右侧可以上传或者下载文件.
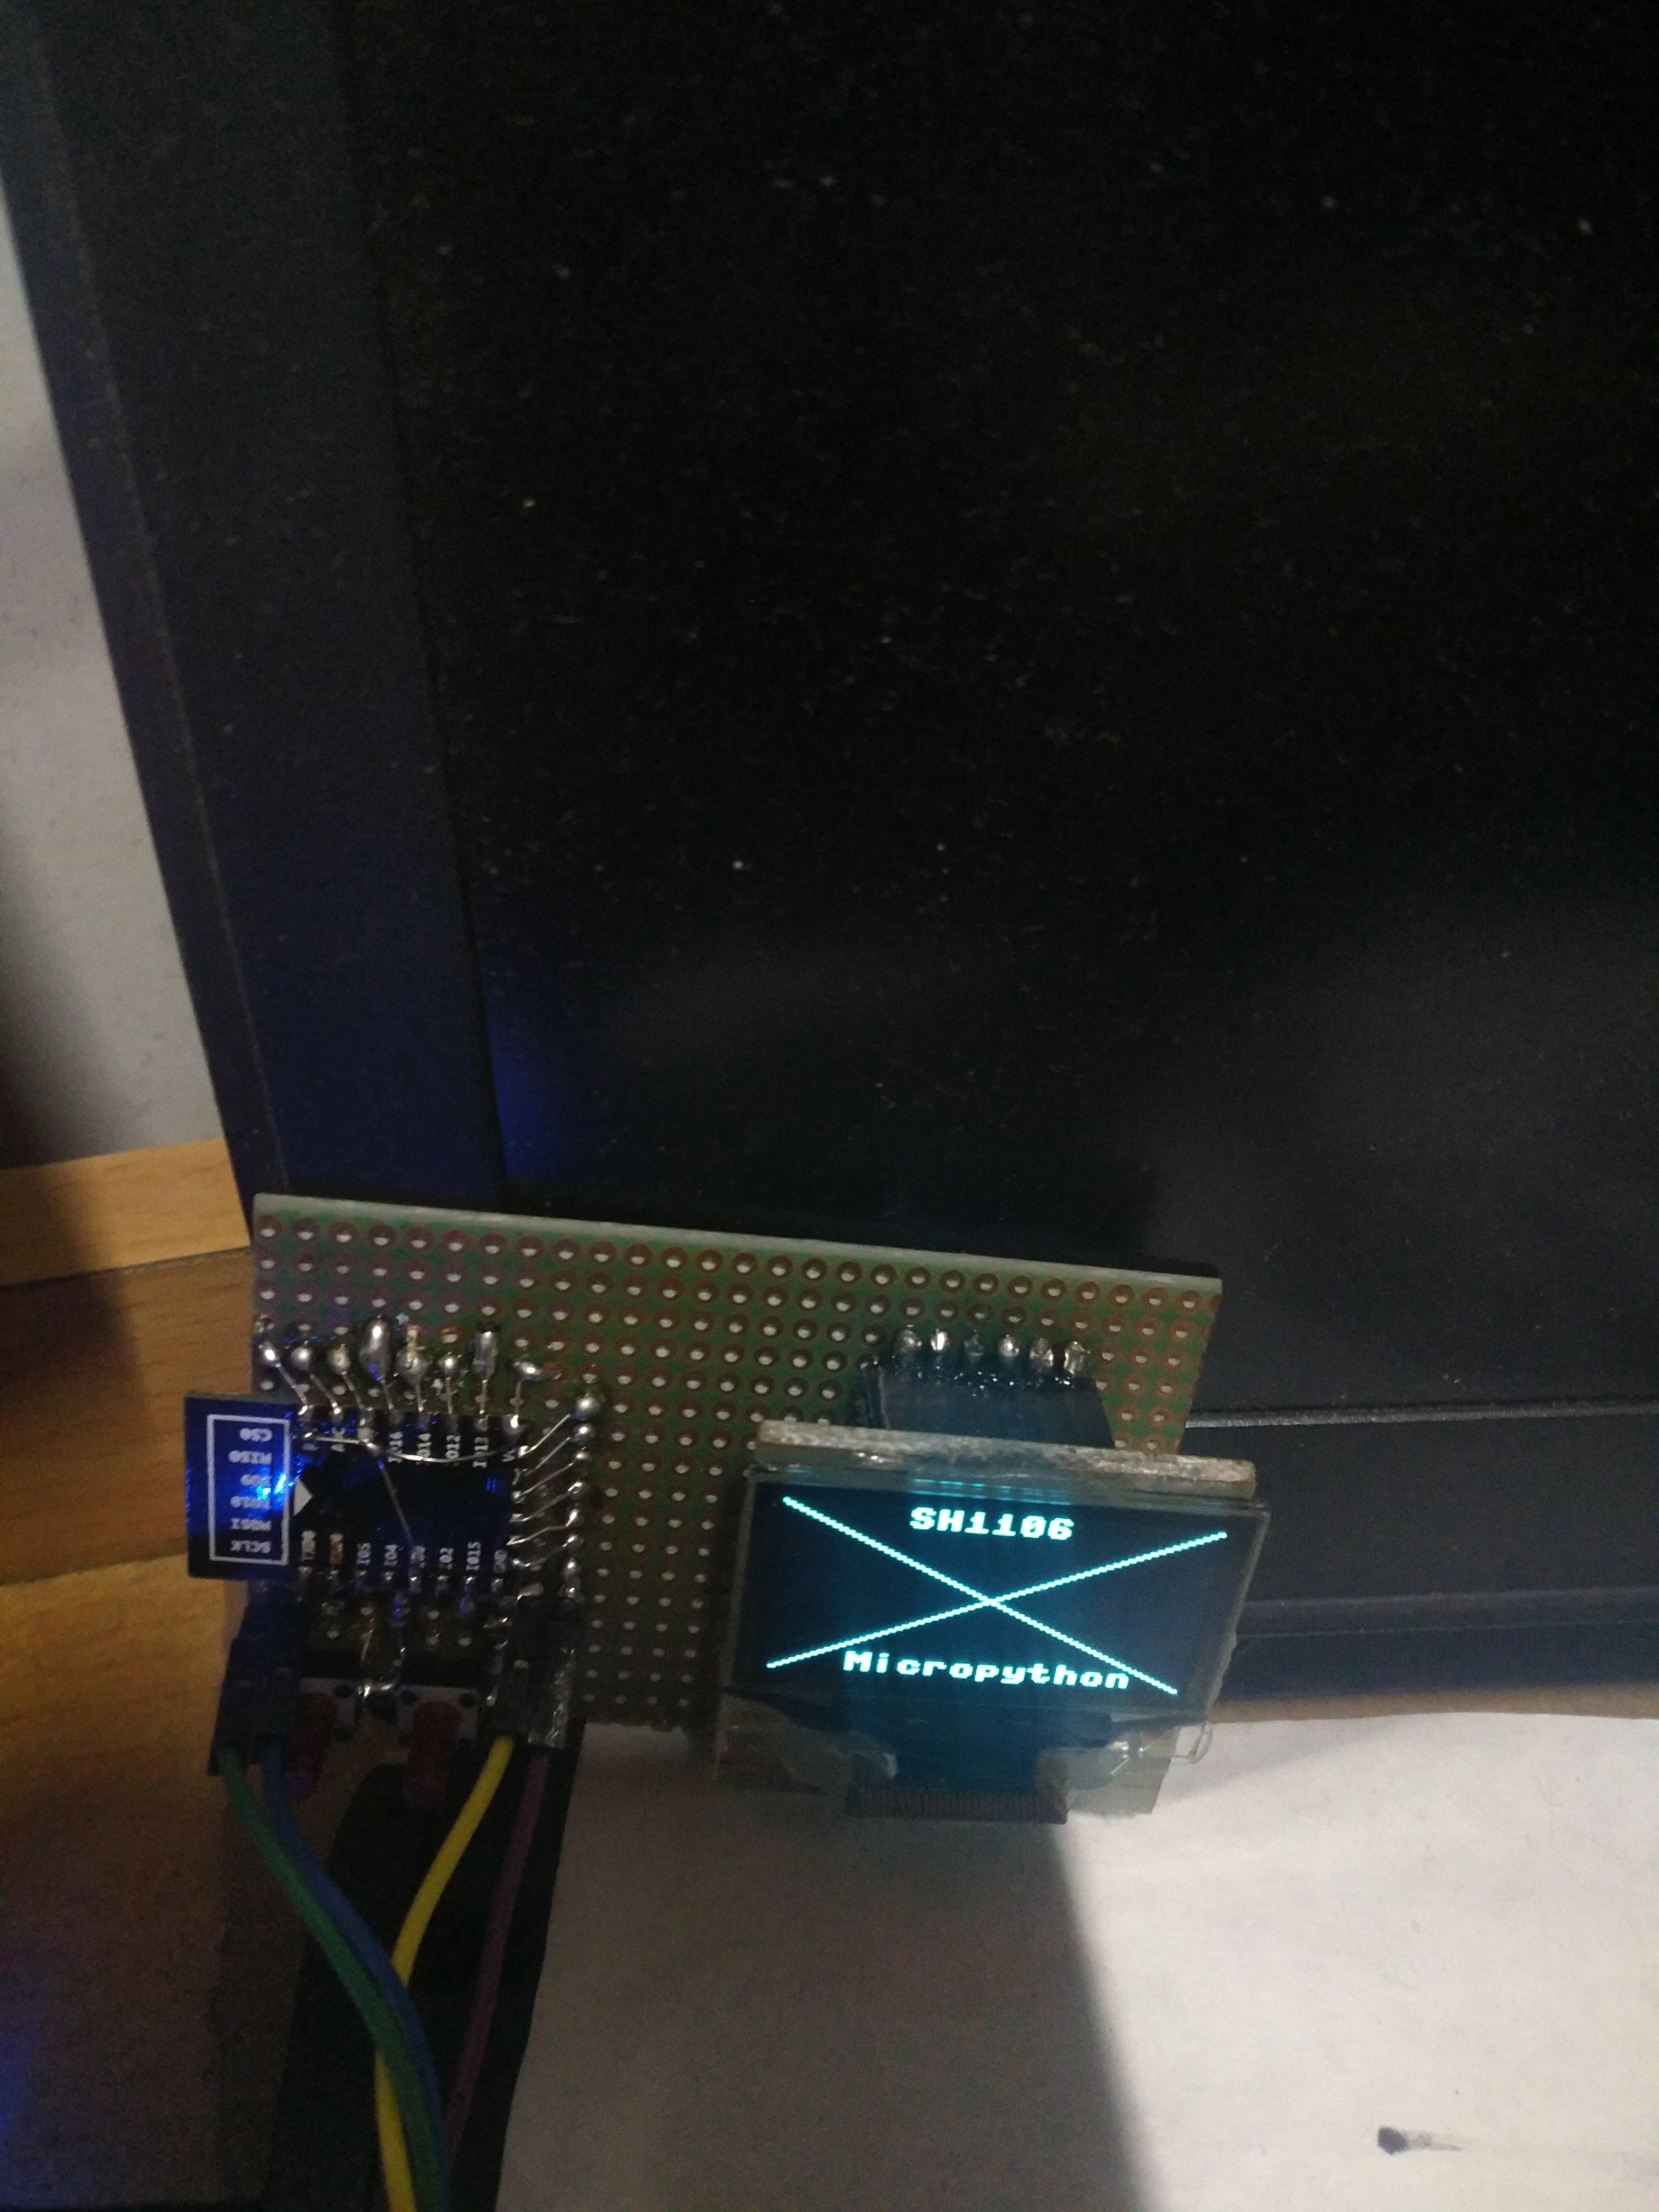
现在进入正题,micropython实现了spi iic等接口,还写了ssd1306,但是看过我之前的博文可以知道,我自己做过1.3寸oled的转接板,这用的是sh1106.
然后查了查好像micropython还没有实现,可能没工夫管这么小的地方吧,毕竟.96的ssd1306广为人知.
然后之前自己也改过ssh1306的程序,就是有偏移而已,正寻思着要不要自己改改用?百度了一下,国内好像没有,打梯子google一下,发现页首两个好像靠谱:
贴上地址吧:
https://github.com/robert-hh/SH1106 这个项目里面好像说是基于别人的,然后由于看到另一个更为直观
https://blog.boochow.com/article/453949310.html这个是个日本佬的博客,直接放出代码,我采用了这个,效果不错!
当然啦,它用的SPI那会的和现在的有点区别可能,根据traceback删掉第一个参数(你进这个地址去看,和我下面贴的程序就知道哪个参数了,就是哪个1),之后ctrl e进去 ctrl d屏幕竟然就直接点亮了,(当然这里还稍微改了改pin)
贴上我的代码:
from micropython import const

from ssd1306 import SSD1306_SPI

SET_LOW_COLUMN      = const(0x00)

SET_HIGH_COLUMN     = const(0x10)

SET_PAGE_ADDR       = const(0xb0)

SET_DISP_START_LINE = const(0x40)

class SH1106_SPI(SSD1306_SPI):

    def show(self):

        for pg in range(0, self.pages):

            for cmd in (

                SET_PAGE_ADDR | pg,

                SET_LOW_COLUMN | 2,

                SET_HIGH_COLUMN | 0,

                ):

                self.write_cmd(cmd)

            self.write_data(self.buffer[pg * 0x80:(pg + 1) * 0x80])

#sh1106_spi.py

from sh1106 import SH1106_SPI

from machine import Pin, SPI

spi = SPI(baudrate=8000000, polarity=0, phase=0, sck=Pin(14), mosi=Pin(13), miso=Pin(12))

oled = SH1106_SPI(128, 64, spi, dc=Pin(16), res=Pin(15), cs=Pin(5))

oled.line(0,0,128,64,1);oled.show()

oled.line(128,0,0,64,1);oled.show()

oled.text('SH1106',36,0);oled.show()

oled.text('Micropython',24,56);oled.show()
注释之前的保存为sh1106.py 然后上传到esp,然后下面的直接ctrl e,效果很好!
这里可以体现出前人栽树后人乘凉的好处了,也意识到梯子很有用.
这里这块板子直接用esp12e,左侧两个按键,一个复位一个io0,背面飞线接spi,就不贴图了,
我给出引脚定义:
GND VCC D0 D1 RES DC CS(我做的板子cs直接接地了)
D0接sck D1接mosi res接的io15 dc接的io16 至于程序里面dc我分配了引脚,是因为现在还没搞清楚怎样丢给它一个None,我直接赋值None不行,直接丢个空的io给它吧,之后再研究...
本来是想做个时钟,数码管io占用太多,然后想到了oled,我有两种.66和1.3,.66的太小了,也想过两块拼一起,emmm太麻烦了.
先进行到这一步吧!
ADDED:
对上面括号参数的附加解释:(仅仅是那个1)
上地址:
class machine.SPI(id, ...)

Construct an SPI object on the given bus, id. Values of id depend on a particular port and its hardware. Values 0, 1, etc. are commonly used to select hardware SPI block #0, #1, etc. Value -1 can be used for bitbanging (software) implementation of SPI (if supported by a port).
SPI.init(baudrate=1000000, *, polarity=0, phase=0, bits=8, firstbit=SPI.MSB, sck=None, mosi=None, miso=None, pins=(SCK, MOSI, MISO))

Initialise the SPI bus with the given parameters:

baudrate is the SCK clock rate.

polarity can be 0 or 1, and is the level the idle clock line sits at.

phase can be 0 or 1 to sample data on the first or second clock edge respectively.

bits is the width in bits of each transfer. Only 8 is guaranteed to be supported by all hardware.

firstbit can be SPI.MSB or SPI.LSB.

sck, mosi, miso are pins (machine.Pin) objects to use for bus signals. For most hardware SPI blocks (as selected by id parameter to the constructor), pins are fixed and cannot be changed. In some cases, hardware blocks allow 2-3 alternative pin sets for a hardware SPI block. Arbitrary pin assignments are possible only for a bitbanging SPI driver (id = -1).

pins - WiPy port doesn’t sck, mosi, miso arguments, and instead allows to specify them as a tuple of pins parameter.
也就是说,在SPI的构造里面如果给定了id那么后面的sck ,mosi, miso就不需要指定啦,反之如果没有指定id就需要了.
像这样:
 from sh1106 import SH1106_SPI

 from machine import Pin, SPI

 #spi = SPI(baudrate=8000000, polarity=0, phase=0, sck=Pin(14), mosi=Pin(13), miso=Pin(12))

 spi = SPI(1,baudrate=8000000, polarity=0, phase=0)

 oled = SH1106_SPI(128, 64, spi, dc=Pin(16), res=Pin(15), cs=Pin(5))

 oled.line(0,0,128,64,1);oled.show()

 oled.line(128,0,0,64,1);oled.show()

 oled.text('SH1106',36,0);oled.show()

 oled.text('Micropython',24,56);oled.show()
至于cs引脚,
class SSD1306_SPI(SSD1306):

    def __init__(self, width, height, spi, dc, res, cs, external_vcc=False):

        self.rate = 10 * 1024 * 1024

        dc.init(dc.OUT, value=0)

        res.init(res.OUT, value=0)

        cs.init(cs.OUT, value=1)

        self.spi = spi

        self.dc = dc

        self.res = res

        self.cs = cs

        import time

        self.res(1)

        time.sleep_ms(1)

        self.res(0)

        time.sleep_ms(10)

        self.res(1)

        super().__init__(width, height, external_vcc)
可以看到cs被传入构造,作为时序中的一个动作,不能省略啊!暂时就赋值给不用的io吧
micropython驱动sh1106点亮oled的更多相关文章
- 【NXP开发板应用—智能插排】3.驱动GPIO点亮外接LED
[前言] 首先感谢深圳市米尔科技有限公司举办的这次活动并予以本人参加这次活动的机会,以往接触过嵌入式,但那都是皮毛,最多刷个系统之类的,可以说对于嵌入式系统开发这件事情是相当非常陌生的,这次活动为我提 ...
- 联盛德 HLK-W806 (八): 4线SPI驱动SSD1306/SSD1315 128x64 OLED液晶屏
目录 联盛德 HLK-W806 (一): Ubuntu20.04下的开发环境配置, 编译和烧录说明 联盛德 HLK-W806 (二): Win10下的开发环境配置, 编译和烧录说明 联盛德 HLK-W ...
- [蓝点ZigBee] Zstack 之点亮OLED液晶 ZigBee/CC2530 视频资料
这一小节主要演示如何在Zstack 下移植液晶驱动,我们选取了目前比较流行的OLED 作为移植目标. 移植关键点 1 修改 GPIO pin, 2 如何将Zstack ...
- 驱动04.平台总线驱动模型——点亮LED灯
1 平台总线的简介 平台总线是一种虚拟的总线,相应的设备则为platform_device,而驱动则为platform_driver.总线将设备和驱动绑定,在系统每注册一个设备的时候,会寻找与之匹配的 ...
- 自定义AXI总线形式SPI接口IP核,点亮OLED
一.前言 最近花费很多精力在算法仿真和实现上,外设接口的调试略有生疏.本文以FPGA控制OLED中的SPI接口为例,重新夯实下基础.重点内容为SPI时序的RTL设计以及AXI-Lite总线分析.当然做 ...
- stm32f407 oled iic例程,成功点亮oled屏
写了好久好久,写好多好多代码,终于把oled给驱起来了.话不多说,直接上图,欲要例程的,可以加我微 lichenpoo
- SSD1306驱动的OLED实验
[转]http://bbs.21ic.com/icview-434543-1-1.html 前面几章的实例,均没涉及到液晶显示,这一章,我们将向大家介绍OLED的使用.在本章中,我们将使用战舰STM3 ...
- 基于FPGA的OLED真彩色动态图像显示的实现
源:基于FPGA的OLED真彩色动态图像显示的实现 作为第3代显示器,有机电致发光器件(Organic Light Emitting Diode,OLED)由于其主动发光.响应快.高亮度.全视角.直流 ...
- [转帖]AMOLED的技术和OLED有哪些联系和区别
AMOLED的技术和OLED有哪些联系和区别 https://display.ofweek.com/2018-06/ART-11000-2300-30243226.html 硬件资料 导读: ?虽然L ...
随机推荐
- 机器学习 —— 深度学习 —— 基于DAGNN的MNIST NET
DAGNN 是Directed acyclic graph neural network 缩写,也就有向图非循环神经网络.我使用的是由MatConvNet 提供的DAGNN API.选择这套API作为 ...
- 解决vscode更新后Ext Js插件无法使用问题
解决方案来至于https://www.sencha.com/forum/showthread.php?471410-Bug-in-VS-Code-Plugin-since-VS-Code-Update ...
- Spring的事务管理基础知识
1.数据库事务基础知识 1)数据库事务有严格的定义,它必须同时满足4个特性:原子性(Atomic).一致性(Consistency).隔离性(Isolation)和持久性(Durability ...
- socket详解(二)----实例和多线程,线程池使用
一般而言,Java 语言中的套接字有以下两种形式: TCP 套接字(由 Socket 类实现,) UDP 套接字(由 DatagramSocket 类实现) TCP 和 UDP 扮演相同角色,但做法不 ...
- template.js artTemplate 简洁语法官网下载不了 template.js artTemplate 新下载地址
参考:https://blog.csdn.net/tavatimsa/article/details/82019792
- 15 VScode 使用相关
1.生成html头文件 ①:按下!键 ②:连按两下tab键 即可
- 每个JavaScript程序员都需要知道的5个数组方法
Array.forEach() .forEach() 方法能够方便的让你 遍历数组里的每个元素,你可以在回调函数里对每个元素进行操作..forEach()方法没有返回值,你不需要在回调函数里写retu ...
- shell符号
*: 通配符 *.c : c结尾的文件 *v : v结尾的文件 v* : v开头的文件
- day15 十五、模块、from导入、起别名
一.模块的概念 1.什么是模块:一系列功能的集合体 2.定义模块:创建一个py文件就是一个模块,该py文件名就是模块名 模块的四种存在方式 使用python编写的.py文件 包:一堆py文件的集合体 ...
- torch.utils.data.DataLoader使用方法
数据加载器,结合了数据集和取样器,并且可以提供多个线程处理数据集.在训练模型时使用到此函数,用来把训练数据分成多个小组,此函数每次抛出一组数据.直至把所有的数据都抛出.就是做一个数据的初始化. 生成迭 ...