Angular07 路由的工作流程、路由参数、子路由、利用路由加载模块、模块懒加载???
1 Angular路由的工作流程
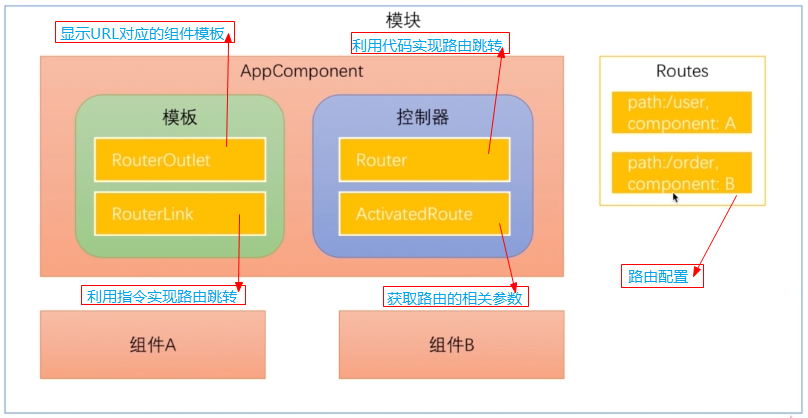
用户在浏览器输入一个URL -> Angular将获取到这个URL并将其解析成一个UrlTree实例 -> Angular会到路由配置中去寻找并激活与UrlTree实例匹配的配置项 -> 为配置项指定的组件创建实例 -> 将创建的实例组件渲染到<router-outlet>所在位置
2 Angular路由的几个核心概念
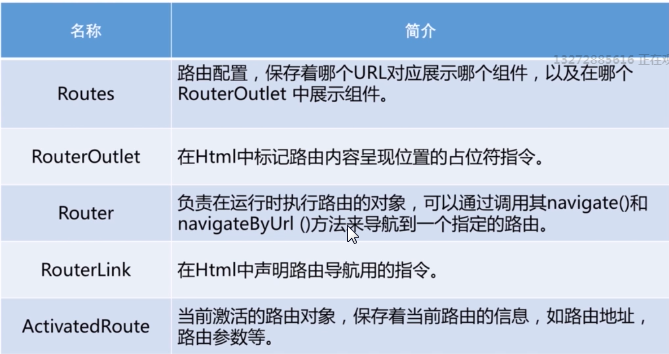
2.1 路由配置
就是一个Routes类型的数组
// 路由配置

const routeConfig: Routes = [ // 创建路由根模块需要用到的路由配置

  {path: '', component: HomeComponent},

  {path: 'stock', component: StockComponent}

];
路由想要正常工作还需要创建一个路由根模块,并将其添加到相应的模块中去
import {BrowserModule} from '@angular/platform-browser';

import {NgModule} from '@angular/core';

import {AppComponent} from './app.component';

import {FormsModule} from '@angular/forms';

import {HttpModule} from '@angular/http';

import { TestComponentComponent } from './test-component/test-component.component';

import {MyModuleModule} from './module/my-module/my-module.module';

import { HomeComponent } from './home/home.component';

import { StockComponent } from './stock/stock.component';

import {RouterModule, Routes} from '@angular/router';

// 路由配置

const routeConfig: Routes = [ // 创建路由根模块需要用到的路由配置

  {path: '', component: HomeComponent},

  {path: 'stock', component: StockComponent}

];

@NgModule({

  declarations: [ // 声明在该模块中有哪些东西(组件、指令、管道)

    AppComponent, TestComponentComponent, HomeComponent, StockComponent

  ],

  imports: [ // 声明该模块需要正常运转时需要用到哪些模块(即:该模块依赖哪些其它模块)

    BrowserModule,

    FormsModule,

    HttpModule,

    MyModuleModule,

    RouterModule.forRoot(routeConfig) // 创建路由根模块,并导入到主模块中

  ],

  providers: [], // 声明模块中的服务

  bootstrap: [AppComponent] // 声明该模块的主组件

})

export class AppModule {

}
注意:详细写法请参见《揭秘angular2》P302
2.2 RouterOutlet指令
在组件的模板中开辟一块位置来显示URL对应的组件
2.3 通过代码实现路由跳转
在控制器类中调用Router对象的相关方法来实现路由跳转
import {Component} from '@angular/core';

import {Router} from '@angular/router'; // 导入需要的东西

@Component({

  selector: 'app-root',  // 使用组件时的标签

  templateUrl: './app.component.html', // 使用组件时的模板

  styleUrls: ['./app.component.css']  // css

})

export class AppComponent { // 控制器

  constructor(private router: Router) {

  }

  toStock() { // 该事件触发时就跳转到指定的组件

    this.router.navigate(['/stock']);

  }

}
2.4 使用指令实现路由跳转
<div>

  Hello Boy

</div>

<hr />

<!--利用指令进行路由跳转-->

<a [routerLink]="['/']">主页面</a>

<!--<a [routerLink]="['/stock']">股票信息页面</a>-->

<!--触发单击事件后,在控制类中相应方法中利用代码实现路由跳转-->

<input type="button" value="股票信息页面" (click)="toStock()" />

<!--添加RouterOuter指令-->

<router-outlet></router-outlet>
2.5 利用ActivatedRoute服务获取路由的相关参数【请参见《揭秘angular2》P316】
2.5.1 获取Path参数
传入Path参数的方式1

传入Path参数的方式2

获取Path参数的方式
import {Component, OnInit, OnDestroy} from '@angular/core';

import {ActivatedRoute, Params} from '@angular/router';

@Component({

  selector: 'app-stock',

  templateUrl: './stock.component.html',

  styleUrls: ['./stock.component.css']

})

export class StockComponent implements OnInit {

  public stockId: number;

  public limit: number;

  private sub: any;

  private sub2: any;

  constructor(private data: ActivatedRoute) {

  }

  ngOnInit() {

    // 利用快照的方式读取路由参数(有bug,不推荐使用)

    // this.stockId = this.data.snapshot.params['id'];

    // 利用订阅的方式读取参数(推荐使用)

    this.sub = this.data.params.subscribe((params: Params) => {

      this.stockId = params['id'];

    });

    this.sub2 = this.data.queryParams.subscribe((params: Params) => {

      this.limit = parseInt(params['limit']);

      if (this.limit >= 100) {

        console.log('已达到上线值');

      }

      console.log(this.limit);

    });

  }

  ngOnDestroy() {

    this.sub.unsubscribe();

  }

}
2.5.2 获取Query参数
传入Query参数的方式1

传入Query参宿的方式2

获取Query参数的方式
import {Component, OnInit, OnDestroy} from '@angular/core';

import {ActivatedRoute, Params} from '@angular/router';

@Component({

  selector: 'app-stock',

  templateUrl: './stock.component.html',

  styleUrls: ['./stock.component.css']

})

export class StockComponent implements OnInit {

  public stockId: number;

  public limit: number;

  private sub: any;

  private sub2: any;

  constructor(private data: ActivatedRoute) {

  }

  ngOnInit() {

    // 利用快照的方式读取Path路由参数(有bug,不推荐使用)

    // this.stockId = this.data.snapshot.params['id'];

    // 利用订阅的方式读取Path参数(推荐使用)

    this.sub = this.data.params.subscribe((params: Params) => {

      this.stockId = params['id'];

    });

    // 获取Query参数

    this.sub2 = this.data.queryParams.subscribe((params: Params) => {

      this.limit = parseInt(params['limit']);

      if (this.limit >= 100) {

        console.log('已达到上线值');

      }

      console.log(this.limit);

    });

  }

  ngOnDestroy() {

    this.sub.unsubscribe();

  }

}
注意:Query参数都是字符串类型的
3 子路由
3.1 子路由配置
import {BrowserModule} from '@angular/platform-browser';

import {NgModule} from '@angular/core';

import {AppComponent} from './app.component';

import {FormsModule} from '@angular/forms';

import {HttpModule} from '@angular/http';

import { TestComponentComponent } from './test-component/test-component.component';

import {MyModuleModule} from './module/my-module/my-module.module';

import { HomeComponent } from './home/home.component';

import { StockComponent } from './stock/stock.component';

import {RouterModule, Routes} from '@angular/router';

import {UserInfoComponent} from "./user/user-info/user-info.component";

import { Error404Component } from './error404/error404.component';

import { BuyerComponent } from './buyer/buyer.component';

import { SellerComponent } from './seller/seller.component';

// 路由配置

const routeConfig: Routes = [ // 创建路由根模块需要用到的路由配置

  {path: '', component: HomeComponent},

  {path: 'stock', component: StockComponent,

    children: [ // 配置子路由

      {path: 'buyer', component: BuyerComponent},

      {path: 'seller', component: SellerComponent}

    ]

  },

  {path: '**', component: Error404Component}

];

@NgModule({

  declarations: [ // 声明在该模块中有哪些东西(组件、指令、管道)

    AppComponent, TestComponentComponent, HomeComponent, StockComponent, Error404Component, BuyerComponent, SellerComponent

  ],

  imports: [ // 声明该模块需要正常运转时需要用到哪些模块(即:该模块依赖哪些其它模块)

    BrowserModule,

    FormsModule,

    HttpModule,

    MyModuleModule,

    RouterModule.forRoot(routeConfig) // 创建路由根模块,并导入到主模块中

  ],

  providers: [], // 声明模块中的服务

  bootstrap: [AppComponent] // 声明该模块的主组件

})

export class AppModule {

}
3.2 子路由组件的路由跳转
<p>

  这是股票信息页面,注意:自路由的路径前面需要加一个点

</p>

<a [routerLink]="['./seller']">卖家信息列表</a>

<a [routerLink]="['./buyer']">买家信息列表</a>

<router-outlet></router-outlet>
4 附属路由
一个组件可以同时有多个路由,但是只能有一个主路由,其他的都是辅助路由
4.1 自路由配置
import {BrowserModule} from '@angular/platform-browser';

import {NgModule} from '@angular/core';

import {AppComponent} from './app.component';

import {FormsModule} from '@angular/forms';

import {HttpModule} from '@angular/http';

import {TestComponentComponent} from './test-component/test-component.component';

import {MyModuleModule} from './module/my-module/my-module.module';

import {HomeComponent} from './home/home.component';

import {StockComponent} from './stock/stock.component';

import {RouterModule, Routes} from '@angular/router';

import {UserInfoComponent} from "./user/user-info/user-info.component";

import {Error404Component} from './error404/error404.component';

import {BuyerComponent} from './buyer/buyer.component';

import {SellerComponent} from './seller/seller.component';

import {ConsultComponent} from './consult/consult.component';

// 路由配置

const routeConfig: Routes = [ // 创建路由根模块需要用到的路由配置

  {path: 'home', component: HomeComponent},

  {

    path: 'stock', component: StockComponent,

    children: [ // 配置子路由

      {path: 'buyer', component: BuyerComponent},

      {path: 'seller', component: SellerComponent}

    ]

  },

  {path: 'consult', component: ConsultComponent, outlet: 'aux'}, // 子路由配置

  {path: '**', component: Error404Component}

];

@NgModule({

  declarations: [ // 声明在该模块中有哪些东西(组件、指令、管道)

    AppComponent,

    TestComponentComponent,

    HomeComponent,

    StockComponent,

    Error404Component,

    BuyerComponent,

    SellerComponent,

    ConsultComponent

  ],

  imports: [ // 声明该模块需要正常运转时需要用到哪些模块(即:该模块依赖哪些其它模块)

    BrowserModule,

    FormsModule,

    HttpModule,

    MyModuleModule,

    RouterModule.forRoot(routeConfig) // 创建路由根模块,并导入到主模块中

  ],

  providers: [], // 声明模块中的服务

  bootstrap: [AppComponent] // 声明该模块的主组件

})

export class AppModule {

}
4.2 子路由的跳转与关闭
<div>

  Hello Boy

</div>

<hr />

<div>

  <a [routerLink]="['/home']">主页面</a>

  <input type="button" value="股票页面" (click)="toStock()" />

  <!--子路由跳转的时候同时设置主路由的跳转-->

  <a [routerLink]="[{outlets:{primary: ['home'], aux:['consult']}}]">咨询页面</a>

  <!--关闭子路由-->

  <a [routerLink]="[{outlets:{aux:null}}]">结束咨询</a>

</div>

<!--主路由-->

<router-outlet></router-outlet>

<!--辅助路由-->

<router-outlet name="aux"></router-outlet>
5 路由加载模块
5.1 需求
在实际开发中常常是每个模块中每个路由前面部分都必须保持一致,例如:客户模块中所有的路由必须都是以 /client 开头
5.2 实现方法
为每个模块都设置一个模块级别的主组件,其余组件都是该组件的子组件;在子模块中为子模块的主组件设定子路由实现
5.3 代码实现
5.3.1 创建多个模块
模块创建后为每个模块都创建一个模块路由文件
import { NgModule } from '@angular/core';

import { CommonModule } from '@angular/common';

import { Test01Component } from './test01/test01.component';

import { CoreModule } from '../core/core.module';

import { TestHomeComponent } from './test-home/test-home.component';

import { SharedModule } from '../shared/shared.module';

import { TestRoutingModule } from './test-routing.module';

import { Test02Component } from './test02/test02.component';

import { Test03Component } from './test03/test03.component';

import { TestDemoComponent } from './test-demo/test-demo.component';

import { HttpModule } from '@angular/http';

@NgModule({

  imports: [

    SharedModule,

    TestRoutingModule

  ],

  declarations: [

    TestHomeComponent,

    Test01Component,

    Test02Component,

    Test03Component,

    TestDemoComponent

  ],

  exports: [

    Test01Component

  ]

})

export class TestModule { }
测试模块

import { NgModule } from '@angular/core';

import { RouterModule, Routes } from '@angular/router';

import { CommonModule } from '@angular/common';

import { TestHomeComponent } from './test-home/test-home.component';

import { Test01Component } from './test01/test01.component';

import { Test02Component } from './test02/test02.component';

import { Test03Component } from './test03/test03.component';

import { TestDemoComponent } from './test-demo/test-demo.component';

const routes: Routes = [

    {

        path: 'test',

        component: TestHomeComponent,

        children: [

            { path: 'testDemo', component: TestDemoComponent},

            { path: 'test01', component: Test01Component },

            { path: 'test02', component: Test02Component },

            { path: 'test03', component: Test03Component }

        ]

     }

];

@NgModule({

    imports: [CommonModule, RouterModule.forChild(routes)],

    exports: [RouterModule]

})

export class TestRoutingModule {}
测试模块的路由文件
坑01:子模块的路由文件中加载路由信息是用的forChild,主模块中加载路由文件才用forRoot
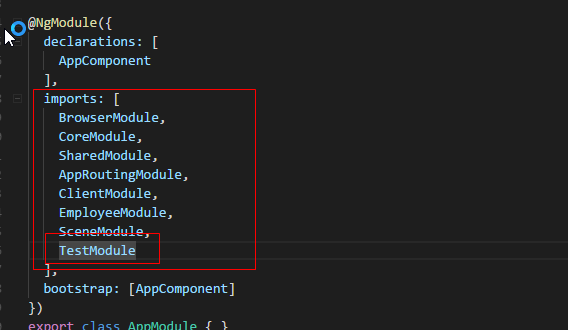
5.3.2 在主模块中导入测试子模块
由于我这种写法不是利用路由进行模块懒加载的,所以必须在主模块中将子模块进行引入
import { BrowserModule } from '@angular/platform-browser';

import { NgModule } from '@angular/core';

import { AppComponent } from './app.component';

import { TestModule } from './test/test.module';

import { CoreModule } from './core/core.module';

import { SharedModule } from './shared/shared.module';

import { AppRoutingModule } from './app-routing.module';

import { ClientModule } from './client/client.module';

import { EmployeeModule } from './employee/employee.module';

import { SceneModule } from './scene/scene.module';

@NgModule({

  declarations: [

    AppComponent

  ],

  imports: [

    BrowserModule,

    CoreModule,

    SharedModule,

    AppRoutingModule,

    ClientModule,

    EmployeeModule,

    SceneModule,

    TestModule

  ],

  bootstrap: [AppComponent]

})

export class AppModule { }
主模块
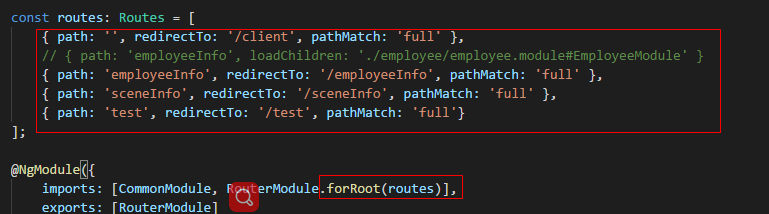
5.3.3 创建主路由
在主模块的路由文件中利用重定向来实现各个子模块的重定向
import { NgModule } from '@angular/core';

import { RouterModule, Routes } from '@angular/router';

import { CommonModule } from '@angular/common';

const routes: Routes = [

    { path: '', redirectTo: '/client', pathMatch: 'full' },

    // { path: 'employeeInfo', loadChildren: './employee/employee.module#EmployeeModule' }

    { path: 'employeeInfo', redirectTo: '/employeeInfo', pathMatch: 'full' },

    { path: 'sceneInfo', redirectTo: '/sceneInfo', pathMatch: 'full' },

    { path: 'test', redirectTo: '/test', pathMatch: 'full'}

];

@NgModule({

    imports: [CommonModule, RouterModule.forRoot(routes)],

    exports: [RouterModule]

})

export class AppRoutingModule {}
主模块的路由文件
技巧01:路由文件必须导入到模块中去
6 模块懒加载???
待更新......
2018-3-12 09:14:21
Angular07 路由的工作流程、路由参数、子路由、利用路由加载模块、模块懒加载???的更多相关文章
- vue路由懒加载及组件懒加载
一.为什么要使用路由懒加载 为给客户更好的客户体验,首屏组件加载速度更快一些,解决白屏问题. 二.定义 懒加载简单来说就是延迟加载或按需加载,即在需要的时候的时候进行加载. 三.使用 常用的懒加载方式 ...
- angular配置懒加载路由的思路
前言 本人记性不好,对于别人很容易记住的事情,我愣是记不住,所以还是靠烂笔头来帮我长长记性. 参考文章:https://blog.csdn.net/xif3681/article/details/84 ...
- Vue-Router学习第二弹动态路由\懒加载\嵌套路由
在我们做项目时肯定会有出现动态路由: 举个栗子: 一个品种的商品页面会有同类不同样的商品就要在路由的后面加一个id: Vue的路由id是这样添加的: 两种动态路由 一种是params参数添加: 首先现 ...
- Webpack实现路由懒加载的三种方式
原文指路:https://blog.csdn.net/qq_37540004/article/details/78727063 第一种: 引入方式(正常引入): const router = new ...
- Vue 路由&组件懒加载(按需加载)
当打包构建应用时,Javascript 包会变得非常大,影响页面加载速度.使用Vue路由懒加载和组件懒加载可以提升页面加载速度,减少白屏时间,提升用户体验. 用法有如下三种:(路由懒加载与组件懒加载用 ...
- vue2实现路由懒加载
一.什么是懒加载 顾名思义,懒加载就是随用随加载,什么时候需要就什么时候加载. 二.为什么需要懒加载 在单页应用中,如果没有使用懒加载,webpack打包后的文件会很大,这时进入首页时的加载时间会很长 ...
- Vue总结第五天:vue-router (使用模块化(创建Vue组件)机制编程)、router-link 标签的属性、路由代码跳转、懒加载、路由嵌套(子路由)、路由传递数据、导航守卫)
Vue总结第五天:vue-router ✿ 路由(器)目录: □ vue中路由作用 □ vue-router基本使用 □ vue-router嵌套路由 □ vue-router参数传递 □ ...
- Vue常规后台系统,路由懒加载实现基于菜单数据并解耦
路由依赖菜单 场景:文件名与路由组件名完全一致(随便大小写均可) 菜单使用一套,路由又存在一套,这样就很不舒服,于是做了如下处理: 尝试不用懒加载发现有难度,使用懒加载就很轻松了 data.js ex ...
- vue路由(一个包含重定向、嵌套路由、懒加载的main.js如下)and 路由跳转传参的query和params的异同
import Vue from 'vue'import VueRouter from 'vue-router'import App from './App'Vue.use(VueRouter)cons ...
随机推荐
- QCon2016 上海会议汇总(1) - 前端技术实践
日程传送门:http://2016.qconshanghai.com/schedule 我这里重点总结下前端.移动端.团队管理.研发支撑相关的议题,谈谈我的感受. <Vue 2.0: 渐进式前端 ...
- spring-boot4
1.1.1. Starter pom 除了官方也有其他第三方提供的starter Websocket是服务端推数据到客户端.长连接. 1.1.1.Xml 配置文件 有些时候必须使用xml配置. 1.1 ...
- 【leetcode刷题笔记】Longest Common Prefix
Write a function to find the longest common prefix string amongst an array of strings. 题解:以strs[0]为模 ...
- mysql 历史数据表迁移方案
当业务运行一段时间后,会出现有些表数据量很大,可能对系统性能产生不良的影响,常见的如订单表.登录log表等,这些数据很有时效性,比如我们一般很少去查上个月的订单,最多也就是报表统计会涉及到. 在我们的 ...
- sublime text的pylinter插件设置pylint_rc后提示错误
sublime text插件pylinter提示错误 Warning: option include-ids is deprecated and ignored. 错误本身是Python的错误,这说明 ...
- SQl Server 中登录名 、用户、角色、概念一览
转载:http://www.2cto.com/database/201306/216922.html 数据库,角色,用户,安全 登录SQL server 2008可以用w ...
- EntityFramework 学习 一 实体类型
我们为已存在的数据库创建EDM,EDM包含与数据库中表对应的实体.EF中有两种实体类型 POCO entity dynamic proxy entity POCO Entity (Plain Old ...
- 机器学习(十七)— SVD奇异值分解
奇异值分解(Singular Value Decomposition,以下简称SVD)是在机器学习领域广泛应用的算法,它不光可以用于降维算法中的特征分解,还可以用于推荐系统,以及自然语言处理等领域.是 ...
- 【leetcode刷题笔记】N-Queens II
Follow up for N-Queens problem. Now, instead outputting board configurations, return the total numbe ...
- Smali文件添加try/catch语句,出现“invalid use of move-exception”异常
插入代码如下: 捕获到以下异常: 2019-03-18 21:09:35.431 8272-8272/com.xxxx.xxxx E/AndroidRuntime: FATAL EXCEPTION: ...