
WCF寄宿(Host)之自我寄宿(Self-Hosting)简单实例【Windows应用程序宿主】
前言:
以各种应用程序做自我寄宿的宿主原理方法大同小异,故:这儿直接上案例!
步骤一:创建服务契约和服务
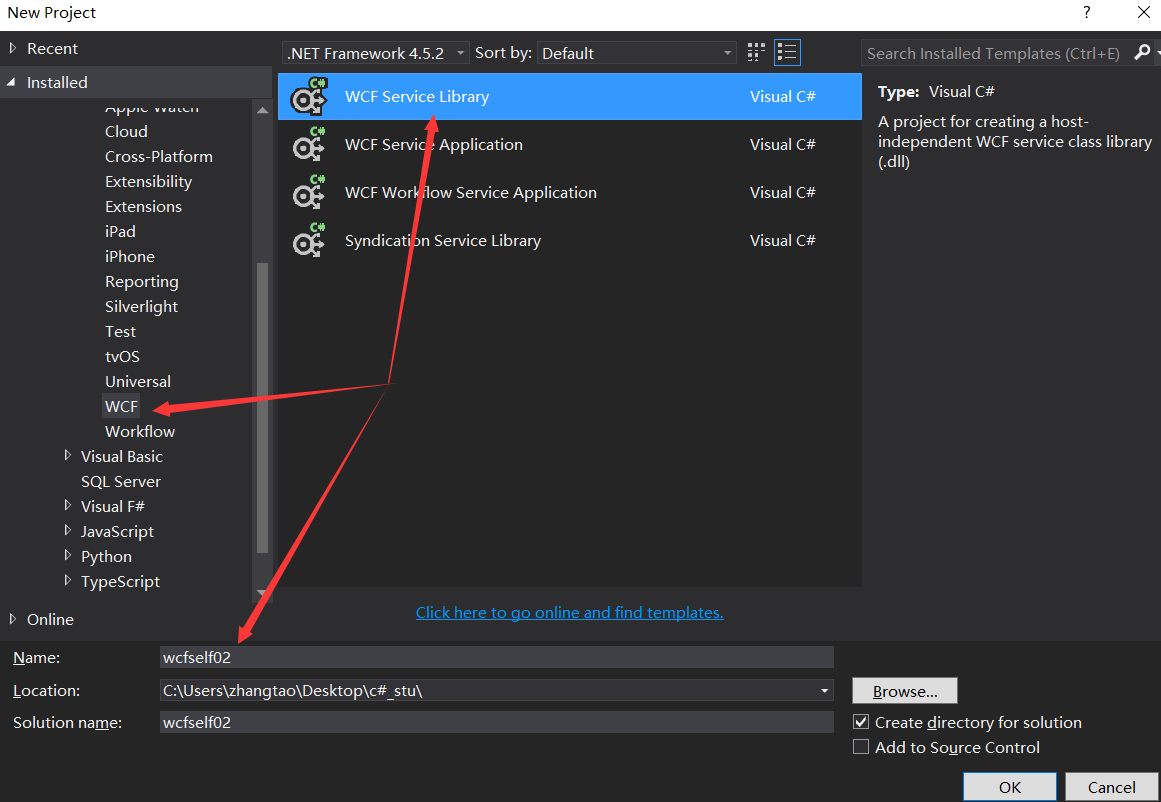
1.新建解决方案:添加WCF服务库项目。
2、为了演示,我把自动生成的接口以及实现接口的类删除,自己添加一个WCF Service


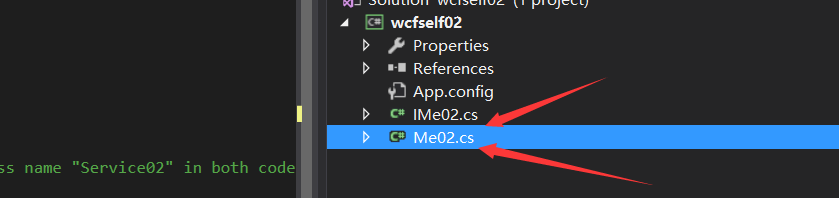
3、撰写服务函数(同时,因为将原有的自动生成的接口与类删除了,故而需要将配置文件作相应的改动:)
namespace wcfself02
{
// NOTE: You can use the "Rename" command on the "Refactor" menu to change the interface name "IService02" in both code and config file together.
[ServiceContract]
public interface IMe02
{
[OperationContract]
string showName(string str);
}
}
namespace wcfself02
{
// NOTE: You can use the "Rename" command on the "Refactor" menu to change the class name "Service02" in both code and config file together.
public class Me02 : IMe02
{
string IMe02.showName(string str)
{
string strr;
strr = str;
Console.WriteLine(strr);
return "啦啦啦" + strr;
}
}
}
步骤二:创建服务宿主
创建一个Windows应用程序来实现WCF服务的自我寄宿方式【添加Windows应用程序,引入WcfService.Library_01的引用,添加using System.ServiceModel;库文件引用。】,具体的实现以及代码如下所示:


Program.cs:
using System;
using System.Collections.Generic;
using System.Diagnostics;
using System.Linq;
using System.Security.Principal;
using System.Threading.Tasks;
using System.Windows.Forms;
namespace wcfhost02
{
static class Program
{
/// <summary>
/// The main entry point for the application.
/// </summary>
[STAThread]
static void Main()
{
Application.EnableVisualStyles();
Application.SetCompatibleTextRenderingDefault(false);
switch (CheckWindowsIdentity())
{
case 0: Application.Run(new Form1()); break;
case 1: Application.Exit(); break;
}
}
static int CheckWindowsIdentity()
{
WindowsIdentity identity = WindowsIdentity.GetCurrent();
WindowsPrincipal principal = new WindowsPrincipal(identity);
if (principal.IsInRole(WindowsBuiltInRole.Administrator)) return 0; //管理员
//普通用户,使用启动对象启动程序,以确保使用管理员身份运行创建启动对象
ProcessStartInfo startInfo = new ProcessStartInfo();
startInfo.UseShellExecute = true;
startInfo.WorkingDirectory = Environment.CurrentDirectory;
startInfo.FileName = Application.ExecutablePath;
startInfo.Verb = "runas";
try
{
Process.Start(startInfo);
return 1;//普通用户
}
catch
{
return -1;//无权运行或用户放弃
}
}
}
}
Form1.cs:
using System;
using System.Collections.Generic;
using System.ComponentModel;
using System.Data;
using System.Drawing;
using System.Linq;
using System.Net;
using System.ServiceModel;
using System.Text;
using System.Threading.Tasks;
using System.Windows.Forms;
using wcfself02;
namespace wcfhost02
{
public partial class Form1 : Form
{
Me02 MM = new Me02();
ServiceHost host = null;
public Form1()
{
InitializeComponent();
}
private void open_Click(object sender, EventArgs e)
{
if(host==null)
{
host = new ServiceHost(typeof(Me02));
host.Open();
}
}
private void close_Click(object sender, EventArgs e)
{
if(host !=null)
{
host.Close();
host = null;
}
}
private void Form1_Load(object sender, EventArgs e)
{
close_Click(sender, e);
}
}
}
利用配置文件的形式的方式进行终结点的添加和服务行为的定义
App.config[其中一种配置方式]:
<configuration>
<system.serviceModel>
<behaviors>
<serviceBehaviors>
<behavior name="metadataBehavior">
<serviceMetadata httpGetEnabled="true" httpGetUrl="http://localhost:8733/Design_Time_Addresses/wcfself02/Me02/metadata"/>
</behavior>
</serviceBehaviors>
</behaviors>
<services>
<service behaviorConfiguration="metadataBehavior" name ="wcfself02.Me02">
<endpoint address="http://localhost:8733/Design_Time_Addresses/wcfself02/Me02/"
binding="wsHttpBinding"
contract="wcfself02.IMe02"/>
</service>
</services>
</system.serviceModel>
</configuration>
编译宿主程序,在所在的文件位置处,用管理员身份打开旗.exe文件;点击“Open”输入配置文件中的地址(http://localhost:8733/Design_Time_Addresses/wcfself02/Me02/metadata),可打开,点击“Close”,无法连接,说明创建成功!!
App.config[其中第一种配置方式]:
<?xml version="1.0" encoding="utf-8" ?>
<configuration>
<appSettings>
<add key="aspnet:UseTaskFriendlySynchronizationContext" value="true" />
</appSettings>
<system.web>
<compilation debug="true" />
</system.web>
<!-- When deploying the service library project, the content of the config file must be added to the host's
app.config file. System.Configuration does not support config files for libraries. -->
<system.serviceModel>
<services>
<service name="wcfself02.Me02">
<endpoint address="" binding="basicHttpBinding" contract="wcfself02.IMe02">
<identity>
<dns value="localhost" />
</identity>
</endpoint>
<endpoint address="mex" binding="mexHttpBinding" contract="IMetadataExchange" />
<host>
<baseAddresses>
<add baseAddress="http://localhost:8733/Design_Time_Addresses/wcfself02/Me02/" />
</baseAddresses>
</host>
</service>
<service name="wcfself02.Me02">
<endpoint address="" binding="basicHttpBinding" contract="wcfself02.IMe02">
<identity>
<dns value="localhost" />
</identity>
</endpoint>
<endpoint address="mex" binding="mexHttpBinding" contract="IMetadataExchange" />
<host>
<baseAddresses>
<add baseAddress="http://localhost:8733/Design_Time_Addresses/wcfself02/Me02/" />
</baseAddresses>
</host>
</service>
</services>
<behaviors>
<serviceBehaviors>
<behavior>
<!-- To avoid disclosing metadata information,
set the values below to false before deployment -->
<serviceMetadata httpGetEnabled="True" httpsGetEnabled="True"/>
<!-- To receive exception details in faults for debugging purposes,
set the value below to true. Set to false before deployment
to avoid disclosing exception information -->
<serviceDebug includeExceptionDetailInFaults="False" />
</behavior>
</serviceBehaviors>
</behaviors>
</system.serviceModel>
</configuration>
编译宿主程序,在所在的文件位置处,用管理员身份打开旗.exe文件;点击“Open”输入配置文件中的地址(http://localhost:8733/Design_Time_Addresses/wcfself02/Me02/),可打开,点击“Close”,无法连接,说明创建成功!!

特别注意!!在运行宿主应用程序时,一定以管理员权限运行宿主应用程序!!!
步骤三:创建客户端(引用服务,验证上面创建的服务)
创建一个控制台应用程序作为客户端引用上述的服务,添加服务应用时注意使服务是开启状态!!!
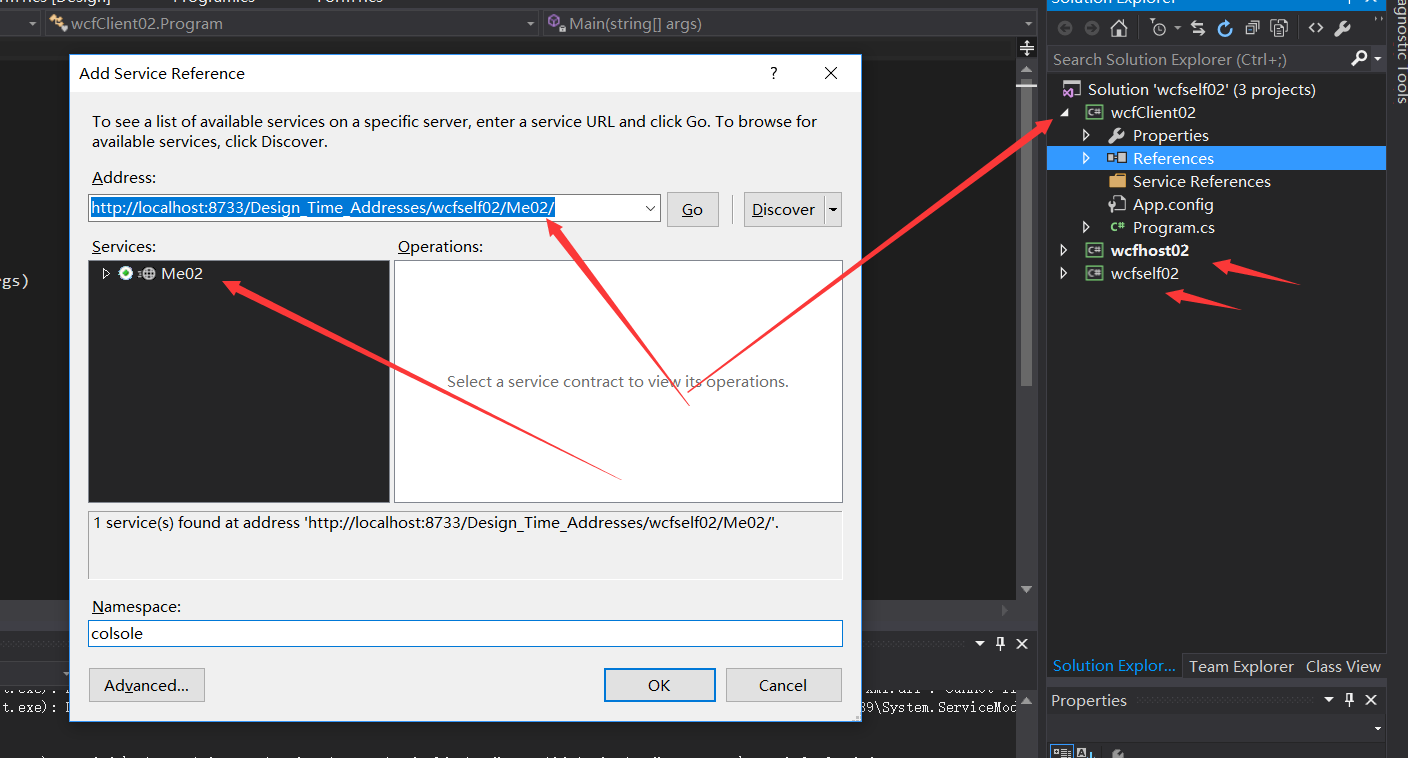
引用服务端的函数,可实现相应功能,这里不多赘述!
【欢迎转载】
转载请表明出处: 乐学习
WCF寄宿(Host)之自我寄宿(Self-Hosting)简单实例【Windows应用程序宿主】的更多相关文章
- UE4 WCF RestFul 服务器 读取JSON 数据并解析 简单实例
Note:不知道为什么通过Txt读取的JsonString,如果TXT 不是ANSI编码的话,会报JsonArrayStringToUStruct Unable to parse. bool UWg ...
- WCF寄宿(Host)之自我寄宿(Self-Hosting)简单实例【Console应用为宿主】
前言: 由于最近的项目 中需要用到WCF,所以又回头翻了翻,阅读了大量园中大神的博文,故而做个总结. 谬误之处,万望不吝指教! 闲话不叙! 一.寄宿(Host)WCF服务 1)一种是为一组WCF服务 ...
- WCF 学习总结1 -- 简单实例
从VS2005推出WCF以来,WCF逐步取代了Remoting, WebService成为.NET上分布式程序的主要技术.WCF统一的模型整合了以往的 WebService.Remoting.MSMQ ...
- 创建WCF服务自我寄宿
WCF服务的寄宿方式 WCF寄宿方式是一种非常灵活的操作,可以寄宿在各种进程之中,常见的寄宿有: IIS服务.Windows服务.Winform程序.控制台程序中进行寄宿,从而实现WCF服务的运行,为 ...
- WCF服务自我寄宿
WCF服务的寄宿方式 WCF寄宿方式是一种非常灵活的操作,可以寄宿在各种进程之中,常见的寄宿有: IIS服务.Windows服务.Winform程序.控制台程序中进行寄宿,从而实现WCF服务的运行,为 ...
- WCF服务自我寄宿 Windows服务
WCF寄宿有自我寄宿跟IIS寄宿 服务代码: [ServiceContract] ---服务契约 public interface ICustomerService { [OperationContr ...
- wcf系列(一)--- 寄宿方式
一.自我寄宿(self-hosting) 1.wcf采用基于终结点(Endpoint)的通信手段:终结点由:地址(Address)+绑定(Binding)+契约(Contract)组成: Enpoi ...
- WCF之Host宿主
Self_hosting自托管宿主. 过程:手动创建Host实例,把服务端点添加到Host实例上,把服务接口与Host关联. 一个Host只能指定一个服务类型,但是可以添加多个服务端点,也可以打开多个 ...
- wcf iis host 打开exe失败 不能显示界面
最近谷歌没法用了,我的freegate经常性的崩溃 无奈之下,用了必应,貌似也不错 http://stackoverflow.com/questions/8414514/iis7-does-not-s ...
随机推荐
- ELK之jason配置nginx文件等多个配置文件
[root@web02 ~]# cat /etc/logstash/conf.d/nginx.conf input { file { path => "/var/log/nginx/a ...
- Borg Maze - poj 3026(BFS + Kruskal 算法)
Time Limit: 1000MS Memory Limit: 65536K Total Submissions: 9821 Accepted: 3283 Description The B ...
- Frogger - poj 2253 (Dijkstra)
Time Limit: 1000MS Memory Limit: 65536K Total Submissions: 28802 Accepted: 9353 Description Fr ...
- window 添加环境变量
右击我的电脑 选择属性 点选高级选项卡 点击环境变量 在系统变量中选中path变量 点击编辑 在变量值得最后插入 ;C:\Python27\ (改为Python的实际的安装地址) 记住后面要有最后面 ...
- PowerBuilder--Aes128加解密
通过C#开发Com控件,注册到系统,然后由pb通过OLEObject进行调用 原文:https://www.cnblogs.com/eric_ibm/archive/2012/07/06/dll.ht ...
- task1-9
今天完成: Task1.参考修真院线下报名贴(学习资料-线下报名-北京报名)中报名的格式,整理出业务模型,确定需要几个对象,每个对象的属性是什么,对象和对象之间的关系是一对一,还是一对多. [参考资料 ...
- 序列DP(输出有要求)
DP Time Limit:10000MS Memory Limit:165888KB 64bit IO Format:%lld & %llu Submit Status De ...
- php自定义函数: 遍历文件夹及其子文件夹
function traverse_folder($path = '.') { $current_dir = opendir($path); while(($file = readdir($curre ...
- CSS 布局实例系列(四)如何实现容器中每一行的子容器数量随着浏览器宽度的变化而变化?
Hello,小朋友们,还记得我是谁吗?对了,我就是~超威~好啦,言归正传,今天的布局实例是: 实现一个浮动布局,红色容器中每一行的蓝色容器数量随着浏览器宽度的变化而变化,就如下图: 肯定有人心里犯嘀咕 ...
- 内存写越界导致破环堆结构引起的崩溃问题定位经验[如报错malloc(): memory corruption或free(): invalid next size]
前段时间开发的一个后端C模块上线后,线上出core,初始时,因为訪问压力不大,所以崩溃是上线3天左右出现的.当时用gdb跟进调用堆栈并检查源代码,发现出core位置的代码沒有啥问题.因为当时开发任务较 ...