
Android 系统启动过程详解
android 使用 linux 内核,一般运行在 ARM 体系架构上,android 设备启动的过程,应用层之下基本等同于linux, 从应用层第一个程序init开始有所区别,下面开始介绍。
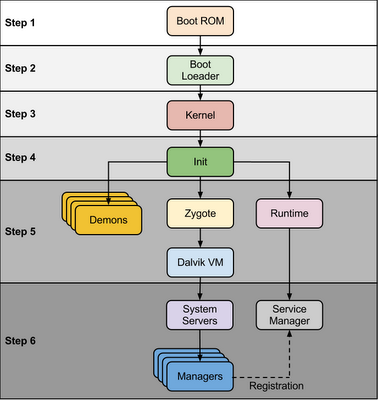
step1, boot rom 主要作用是加载 boot loader 进入内存并执行,boot rom 一般固化在芯片上,设备启动加电自检后从固定的地址开始执行
step2,boot loader 分2步执行,boot rom只加载了第一部分bootloader代码进入内存,这部分代码随即加载第二部分bootloader代码,第二部分是核心,它完成了必要的环境准备后,开始加载内核.
Bootloader is small program which runs before Android operating system running. Bootloader is first program to run so It is specific for board and processor. Device manufacturer either use popular bootloaders like redboot,uboot, qi bootloader or they develop own bootloaders, It’s not part of Android Operating System. bootloader is the place where OEMs and Carriers put there locks and restrictions.

Bootloader perform execution in two stages, first stage It to detect external RAM and load program which helps in second stage, In second stage bootloader setup network, memory, etc. which requires to run kernel, bootloader is able to provide configuration parameters or inputs to the kernel for specific purpose.

Android bootloader can be found at

<Android Source>\bootable\bootloader\legacy\usbloaderlegacy loader contain two important files that need to address here.

1. init.s - Initializes stacks, zeros the BSS segments, call _main() in main.c

2. main.c - Initializes hardware (clocks, board, keypad, console), creates Linux tags

Refer this link to know more about Android bootloader :

https://motorola-global-portal.custhelp.com/app/answers/detail/a_id/86208/~/bootloader-frequently-asked-questions
step3, android 内核启动过程与标准linux类似,完成内存子系统、保护模式、任务调度系统、驱动子系统、设备系统、文件系统等的初始化,最后运行第一个应用程序init. 与标准系统有所不同的是,android的内核增加了部分驱动及补丁,
What is the difference between the linux and android kernels?, here's a list of changes/addons that the Android Project made to the Linux kernel:


Binder: It is an Android specific interprocess communication mechanism and remote method invocation system.

ashmem:  "Android Shared Memory". It is a new shared memory allocator, similar to POSIX SHM but with a different behavior and sporting a simpler file-based API.

pmem: "Process memory allocator": It is used to manage large (-+ MB) physically contigous regions of memory shared between userspace and kernel drivers.

logger:  This is the kernel support for the logcat command.

wakelocks: It is used for power management files. It holds the machine awake on a per-event basis until wakelock is released.

oom handling: It kills processes as available memory becomes low.

alarm manager: It lets user space tell the kernel when it would like to wake up.

RAM_CONSOLE: Allows to save kernel printk messages to a buffer in RAM, so that after a kernel panic they can be viewed in the next kernel invocation.

USB gadget driver for ADB

yaffs2 flash filesystem
step4, init 进程,从这一步开始,android的启动跟其他linux发行版(如redhat,gentoo,ubuntu)就不一样了,init程序的实现、init.rc文件的格式,都是不一样的。init 进程主要功能是挂载磁盘分区,然后根据init.rc的配置解析并执行
Init is the very first process, we can say it is a root process, or the grandfather of all processes. The init process has two responsibilities.

     - Mounts directories like /sys , /dev    or /proc

     - Runs init.rc script

- The init process can be found at /init :: <android source>/system/core/init

- Init.rc file can be found at :: <android source>/system/core/rootdir/

Android has specific format and rules for init.rc files. More information about this rules can be found in: What is inside the init.rc and what is it used for.

At  this stage, you can finally see the Android logo in your screen.
init.rc主要配置项如下:
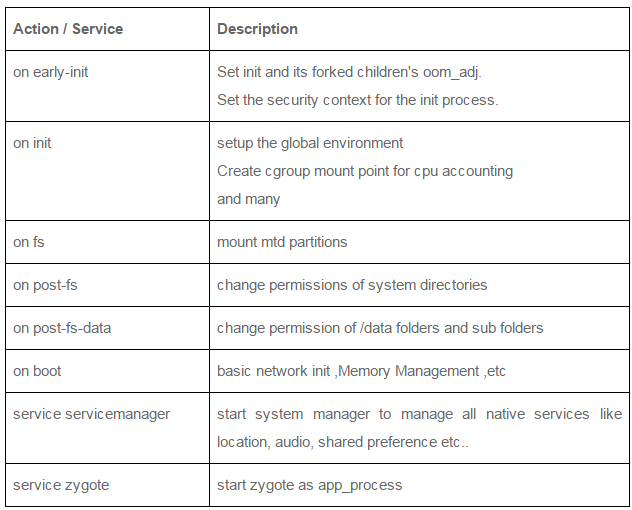
/system/bin/logd/sbin/adbd/system/bin/usbd/system/bin/debuggerd/system/bin/rild/system/bin/runtime/system/bin/dbus-daemonsystem_server- zygote
这些进程都是 init 进程 fork+execve 出来的子进程
After the above steps are completed,  Zygote launches the system services.  The Zygote forks a new process to launch the system services.

Core services:

Starting power manager

Creating the Activity Manager

Starting telephony registry

Starting package manager

Set activity manager service as system process

Starting context manager

Starting system contact providers

Starting battery service

Starting alarm manager

Starting sensor service

Starting window manager

Starting Bluetooth service

Starting mount service

Other services:

Starting status bar service

Starting hardware service

Starting NetStat service

Starting connectivity service

Starting Notification Manager

Starting DeviceStorageMonitor service

Starting Location Manager

Starting Search Service

Starting Clipboard Service

Starting checkin service

Starting Wallpaper service

Starting Audio Service

Starting HeadsetObserver

Starting AdbSettingsObserver

Now we have finally completed the booting process (system service are up and running in memory).
Android 系统启动过程详解的更多相关文章
- Android 核心分析 之八Android 启动过程详解
Android 启动过程详解 Android从Linux系统启动有4个步骤: (1) init进程启动 (2) Native服务启动 (3) System Server,Android服务启动 (4) ...
- Android编译过程详解(一)
Android编译过程详解(一) 注:本文转载自Android编译过程详解(一):http://www.cnblogs.com/mr-raptor/archive/2012/06/07/2540359 ...
- linux内核剖析(零)linux系统启动过程详解-开机加电后发生了什么
本文参考了如下文章 深入理解linux启动过程 mbr (主引导记录(Master Boot Record)) 电脑从开机加电到操作系统main函数之前执行的过程 详解linux系统的启动过程及系统初 ...
- Cocos2dx-3.0版本 从开发环境搭建(Win32)到项目移植Android平台过程详解
作为重量级的跨平台开发的游戏引擎,Cocos2d-x在现今的手游开发领域占有重要地位.那么问题来了,作为Cocos2dx的学习者,它的可移植特性我们就需要掌握,要不然总觉得少一门技能.然而这个时候各种 ...
- Ubuntu系统启动过程详解
作者:杨硕,华清远见嵌入式学院讲师. 一. Ubuntu的启动流程 ubuntu的启动流程和我们熟知的RedHat的启动方式有所区别. RedHat的启动过程如下图: 这是我们熟知的linux启动流程 ...
- Android编译过程详解(三)
前面两节讲解了自定义Android编译项和创建Product产品配置文件,除了编译和定义产品相关环境变量外,还需要定义Board相关环境变量. 1. build/core/config.mk 109 ...
- Android编译过程详解(二)
通过上篇文章,我们分析了编译android时source build/envsetup.sh和lunch命令,在执行完上述两个命令后, 我们就可以进行编译android了. 1. make 执行ma ...
- Linux系统启动过程详解
启动第一步--加载BIOS当你打开计算机电源,计算机会首先加载BIOS信息,BIOS信息是如此的重要,以至于计算机必须在最开始就找到它.这是因为BIOS中包含了CPU的相关信息.设备启动顺序信息.硬盘 ...
- Cordova 打包 Android release app 过程详解
Cordova 打包 Android release app 过程详解 时间 -- :: SegmentFault 原文 https://segmentfault.com/a/119000000517 ...
随机推荐
- 常用 Git 命令清单【转--阮一峰】
常用 Git 命令清单 感谢作者 --> 原文链接 我每天使用 Git ,但是很多命令记不住. 一般来说,日常使用只要记住下图6个命令,就可以了.但是熟练使用,恐怕要记住60-100个命令. 下 ...
- 4 Vue.js 核心理念:数据驱动界面
1 style样式放在body里面 <style type="text/css"> .ui.segment.container { width:700px; } p { ...
- 使用cloudbase-init初始化windows虚拟机
CloudBase-init简介 cloudbase-init 是 Windows 和其他系统的云初始化程序,可以设置主机名.创建用户.设置静态ip.设置密码等.对应的linux初始化程序是cloud ...
- 【志银】NYOJ《题目529》flip
题目:flip 题目链接:http://acm.nyist.net/JudgeOnline/problem.php?pid=529 吐槽Time: 由于此题槽点太多,所以没忍住... 看到这题通过率出 ...
- XGBoost——机器学习--周振洋
XGBoost——机器学习(理论+图解+安装方法+python代码) 目录 一.集成算法思想 二.XGBoost基本思想 三.MacOS安装XGBoost 四.用python实现XGBoost算法 在 ...
- 博客挪窝了 http://my.oschina.net/jrrx/blog
1. 博客园很不错: 2. 由于各种原因,挪到了 http://my.oschina.net/jrrx/blog
- 原始套接字--简易ping程序
#include <stdio.h> #include <stdlib.h> #include <string.h> #include <errno.h> ...
- VC调试篇:减少运行时错误,中断所有异常
问题简述 我在Win7下写的MFC程序,想让它在winXP下运行.一般情况下,如果所有的依赖库都可以在XP下运行的话,那么在XP下运行时没问题的.但是,结果却... 本来程序在win7下运行得好好的, ...
- hadoop2.5.2学习及实践笔记(六)—— Hadoop文件系统及其java接口
文件系统概述 org.apache.hadoop.fs.FileSystem是hadoop的抽象文件系统,为不同的数据访问提供了统一的接口,并提供了大量具体文件系统的实现,满足hadoop上各种数据访 ...
- luajit的字节码
http://blog.csdn.net/zzz3265/article/details/41146569 这里写出了luajit的字节码