纯javaScript、jQuery实现个性化图片轮播
纯javaScript实现个性化图片轮播
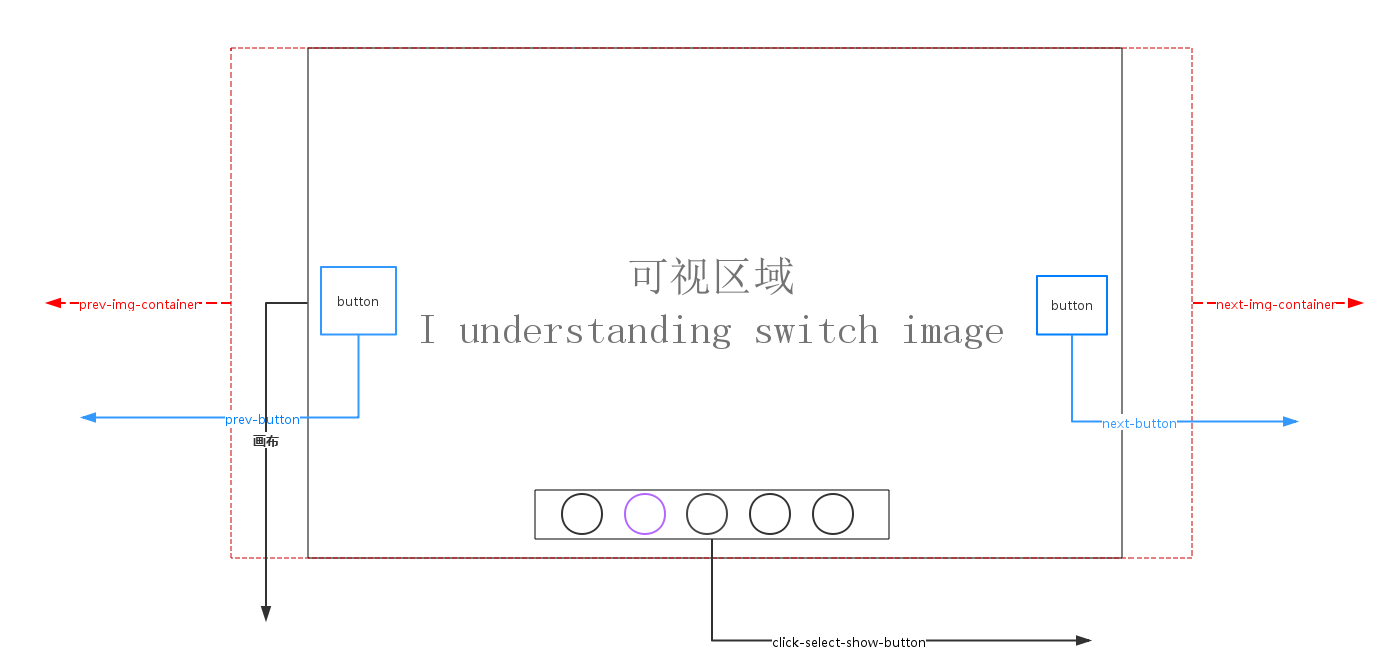
轮播原理说明<如上图所示>:
1. 画布部分(可视区域)属性说明:overflow:hidden使得超出画布部分隐藏或说不可见。position:relative 会导致自身位置的相对变化,而不会影响其他元素的位置、大小的变化。使得使用了position:absolute 元素相对于画布位置进行定位;
absolute元素脱离了文档结构,产生破坏性,导致父元素坍塌,float元素也会脱离文档结构,absolute元素会悬浮在页面上方,遮挡其他部分显示,这点和PhotoShop图层相似,所以要使用z-index控制出现顺序
2.轮播注意点:左右无限滚动
prev-button 第一张图片的前一张是最后一张图片,
next-button 最后一张图片的下一张图片是第一张,
prev-button、next-button位置的偏移是通过设置prev-img-container、next-img-container的left<相对于画布>属性值
click-select-show-button区域,点击该区域小圆圈是通过上一次图片的所在index,当前点击myIndex, 计算公式:(myIndex-index)*(-图片的宽度width)
3.动画过渡注意点:点击prev-button、next-button、click-select-show-button小圆圈,判定当前是否处于动画状态中
4.定时器setTimeout()、clearTimeout
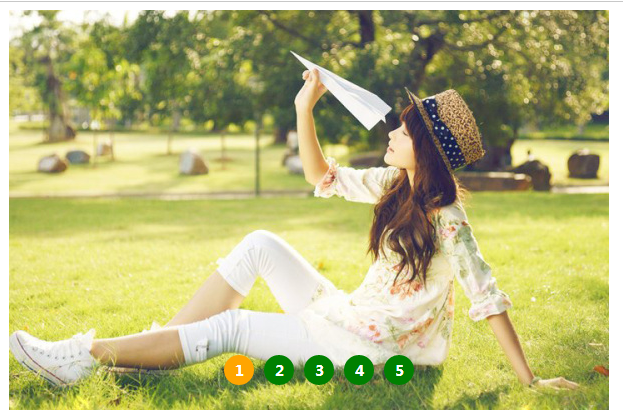
<实现效果图>
Css样式
/**CSS-style**/

/**画布大小*/

#container {

    margin: auto;

    width: 600px;

    height: 400px;

    overflow: hidden;/*超出画布部分隐藏*/

    position: relative;/*相对定位*/

    cursor: pointer;

}

/**图片容器*/

#list {

    width: 4200px;

    height: 400px;

    position: absolute;

    z-index:;

}

#list img { float: left; }

/**轮播选中按钮样式*/

#button {

 position: absolute;

 bottom: 25px;

 left: 175px;

 width: 250px;

 z-index: ;

}

#button ul li {

  list-style: none;

  width: 15px;

  border-radius: %;

  padding: .5px;

  height: 15px;

  margin-right: 10px;

  background: green;

  float: left;

  font:15px/15px "microsoft yahei";

  text-align: center;

  font-weight: bold;

  color: white;

  cursor: pointer;

}

#button ul li.chos {

    background: orange;

}

#container:hover .arrow{

    display: block;

}

#pre {

    left: 20px;

}

#next {

    right: 20px;

}

/**pre next定位*/

.arrow {

    position: absolute;

    width: 40px;

    height: 40px;

    background: black;

    z-index: ;

    top: 180px;

    text-decoration: none;

    text-align: center;

    line-height: 40px;

    font-size: 40px;

    color: white;

    opacity: 0.3;

    filter: alpha(opacity=0.3);

    display: none;

}

/**pre next按钮透明度*/

#container a:hover {

    opacity: 0.7;

    filter: alpha(opacity=0.7);

}
html代码
 <!DOCTYPE html>

 <html lang="en">

 <head>

     <meta charset="UTF-8">

     <title>纯javaScript实现个性化图片轮播</title>

     <link rel="stylesheet" type="text/css" href="styles/main.css">

     <script type="text/javascript" src="scripts/scroImg.js"></script>

 </head>

 <body>

     <div id="container">

         <div id="list" style="left:-600px">

             <img src="data:images/5.jpg">

             <img src="data:images/1.jpg">

             <img src="data:images/2.jpg">

             <img src="data:images/3.jpg">

             <img src="data:images/4.jpg">

             <img src="data:images/5.jpg">

             <img src="data:images/1.jpg">

         </div>

         <div id="button">

             <ul>

                 <li index=''></li>

                 <li index=''></li>

                 <li index=''></li>

                 <li index=''></li>

                 <li index=''></li>

             </ul>

         </div>

         <a href="#" class="arrow" id="prev"><</a>

         <a href="#" class="arrow" id="next">></a>

     </div>

 </body>

 </html>
一、javaScript实现图片轮播
 window.onload=function(){

     var container=document.getElementById('container');

     var list=document.getElementById('list');

     var buttons=document.getElementById('button').getElementsByTagName('li');

     var prev=document.getElementById('prev');

     var next=document.getElementById('next');

     var index=;

     var interval=;

     var timer=null;

     var animated=false;

     //next

     next.onclick=function(){

         if (!animated) {

             animate(-);

         };

         index+=;

         if (index>) {

             index=;

         };

         showButton();

         console.info('next'+index);

     }

     //prev

     prev.onclick=function(){

         if(!animated){

             animate();

         }

         index-=;

         if(index<){

             index=;

         }

         showButton();

         console.info('prev'+index);

     }

     //animate

     function animate(offset){

         animated=true;

         var left=parseInt(list.style.left)+offset;

         var animateTime=;//位移总时间

         var interval=;//时间间隔

         var speed=offset/(animateTime/interval);//每次位移量

         var go=function(){//animate内部函数

             if ((speed< && parseInt(list.style.left)>left) ||  (speed> && parseInt(list.style.left)<left)) {//是否位移

                 list.style.left=parseInt(list.style.left)+speed+'px';

                 setTimeout(go,interval)

             }else{

                 list.style.left=left+'px';

                 if (left<-) { //最后一张后面

                     list.style.left=-+'px'; //显示前一张

                 };

                 if(left>-){//第一张最前面

                     list.style.left=-+'px';//显示最后一张

                 }

                 animated=false;

             };

         }

         go();

     }

     //chos

     function showButton(){

         for (var i = ; i < buttons.length; i++) {

             buttons[i].className='';

         };

         buttons[index-].className='chos';

     }

     //buttons-click

     for (var i = ; i < buttons.length; i++) {

         buttons[i].onclick=function(){

             if(this.className=='chos'){

                 return;

             }

             var myIndex=parseInt(this.getAttribute('index'));

             var offset=(myIndex-index)*-; //偏移量

             animate(offset);

             index=myIndex;//set Index

             showButton();

         }

     };

     function play(){

         timer=setTimeout(function(){

             next.click();

             play();

         },interval)

     }

     function stop(){

         clearInterval(timer);

     }

     play();

     container.onmouseover=function(){

         stop();

     }

     container.onmouseout=function(){

         play();

     }

 }
二、jQuery实现图片轮播
  $(function () {

         var container = $('#container');

         var list = $('#list');

         var buttons = $('#container').find('li');

         var prev = $('#pre');

         var next = $('#next');

         var index = ;

         var len = ;

         var interval = ;

         var timer;

         function animate (offset) {

             var left = parseInt(list.css('left')) + offset;

             if (offset>) {

                 offset = '+=' + offset;

             }

             else {

                 offset = '-=' + Math.abs(offset);

             }

             list.animate({'left': offset}, , function () {

                 if(left > -){

                     list.css('left', - * len);

                 }

                 if(left < (- * len)) {

                     list.css('left', -);

                 }

             });

         }

         function showButton() {

             buttons.eq(index-).addClass('chos').siblings().removeClass('chos');

         }

         function play() {

             timer = setTimeout(function () {

                 next.trigger('click');

                 play();

             }, interval);

         }

         function stop() {

             clearTimeout(timer);

         }

         next.bind('click', function () {

             if (list.is(':animated')) {

                 return;

             }

             if (index == ) {

                 index = ;

             }

             else {

                 index += ;

             }

             animate(-);

             showButton();

         });

         prev.bind('click', function () {

             if (list.is(':animated')) {

                 return;

             }

             if (index == ) {

                 index = ;

             }

             else {

                 index -= ;

             }

             animate();

             showButton();

         });

         buttons.each(function () {

              $(this).bind('click', function () {

                  if (list.is(':animated') || $(this).attr('class')=='chos') {

                      return;

                  }

                  var myIndex = parseInt($(this).attr('index'));

                  var offset = - * (myIndex - index);

                  animate(offset);

                  index = myIndex;

                  showButton();

              })

         });

         container.hover(stop, play);

         play();

 });
学习网慕课网 http://www.imooc.com/video/665
源码下载 http://pan.baidu.com/s/1i4VA009
纯javaScript、jQuery实现个性化图片轮播的更多相关文章
- 使用javascript,jquery实现的图片轮播功能
使用javascript,jquery实现的图片轮播功能本功能采用最基础的javascript和一些简单的jquery技术实现,易理解,以修改使用,代码简易,适合刚开始接触到网站开发的朋友们参考.可以 ...
- jQuery个性化图片轮播效果
jQuery个性化图片轮播效果 购物产品展示:图片轮播器<效果如下所示> 思路说明: 每隔一段时间,实现图片的自动切换及选项卡选中效果,鼠标划入图片动画停止,划出或离开动画开始 两个区域: ...
- jQuery轻量级京东图片轮播代码等
http://sc.chinaz.com/jiaoben/jiaodiantu.html jQuery轻量级京东图片轮播代码 查看全图点击预览 顶(17)踩(4)报错评论(0)下载地址 更新时间: ...
- JQuery插件之图片轮播插件–slideBox
来源:http://www.ido321.com/852.html 今天偶然发现了一个比较好用的图片轮播插件—slideBox 先看看效果:http://slidebox.sinaapp.com/ 代 ...
- js/jquery中实现图片轮播
一,jquery方法 <!DOCTYPE html> <html> <head> <meta http-equiv="Content-Type&qu ...
- JQuery slidebox实现图片轮播
jQuery图片轮播(焦点图)插件jquery.slideBox,简单设置下参数就可以多个多种动画效果,左右,上下,速度,还可指定默认显示第N张,点击的按钮在现代浏览中可以实现圆形或圆角效果,插件代码 ...
- JavaScript对象(document对象 图片轮播)
图片轮播: 需要注意的HTML需要img标签,他和input标签一样,是非封闭的标签 <!DOCTYPE html PUBLIC "-//W3C//DTD XHTML 1.0 Tran ...
- JQuery插件开发初探——图片轮播
在熟悉了插件开发的结构以后,自己尝试着做了一个稍微复杂一点的小功能:图片轮播插件. 由于之前使用的一款图片轮播插件,性能不高,页面加载的时候需要载入全部的图片,因此速度很慢. 通过自己做这个小插件,能 ...
- 超实用的JavaScript代码段 Item3 --图片轮播效果
图片轮播效果 图片尺寸 统一设置成:490*170px; 一.页面加载.获取整个容器.所有放数字索引的li及放图片列表的ul.定义放定时器的变量.存放当前索引的变量index 二.添加定时器,每隔2秒 ...
随机推荐
- SSH实战 · 唯唯乐购项目(上)
前台需求分析 一:用户模块 注册 前台JS校验 使用AJAX完成对用户名(邮箱)的异步校验 后台Struts2校验 验证码 发送激活邮件 将用户信息存入到数据库 激活 点击激活邮件中的链接完成激活 根 ...
- HashMap与TreeMap源码分析
1. 引言 在红黑树--算法导论(15)中学习了红黑树的原理.本来打算自己来试着实现一下,然而在看了JDK(1.8.0)TreeMap的源码后恍然发现原来它就是利用红黑树实现的(很惭愧学了Ja ...
- 多线程爬坑之路-Thread和Runable源码解析
多线程:(百度百科借一波定义) 多线程(英语:multithreading),是指从软件或者硬件上实现多个线程并发执行的技术.具有多线程能力的计算机因有硬件支持而能够在同一时间执行多于一个线程,进而提 ...
- 前端性能优化的另一种方式——HTTP2.0
最近在读一本书叫<web性能权威指南>谷歌公司高性能团队核心成员的权威之作. 一直听说HTTP2.0,对此也仅仅是耳闻,没有具体研读过,这次正好有两个篇章,分别讲HTTP1.1和HTTP2 ...
- 使用NUnit为游戏项目编写高质量单元测试的思考
0x00 单元测试Pro & Con 最近尝试在我参与的游戏项目中引入TDD(测试驱动开发)的开发模式,因此单元测试便变得十分必要.这篇博客就来聊一聊这段时间的感悟和想法.由于游戏开发和传统软 ...
- Unity3D框架插件uFrame实践记录(一)
1.概览 uFrame是提供给Unity3D开发者使用的一个框架插件,它本身模仿了MVVM这种架构模式(事实上并不包含Model部分,且多出了Controller部分).因为用于Unity3D,所以它 ...
- winform异步加载数据到界面
做一个学习记录. 有两个需求: 1.点击按钮,异步加载数据,不卡顿UI. 2.把获取的数据加载到gridview上面. 对于需求1,2,代码如下: public delegate void ShowD ...
- 基于注解的bean配置
基于注解的bean配置,主要是进行applicationContext.xml配置.DAO层类注解.Service层类注解. 1.在applicationContext.xml文件中配置信息如下 &l ...
- SharePoint 2013: A feature with ID has already been installed in this farm
使用Visual Studio 2013创建一个可视web 部件,当右击项目选择"部署"时报错: "Error occurred in deployment step ' ...
- 在Centos下搭建git并可以通过windows客户端访问
亲测在本地虚拟机和远程服务器上无问题,如有不懂请留言. 注意事项:以下所有操作是在root权限下操作的.1.Centos服务器版本centos6.5 2.首先安装git,使用yum在线安装 yum i ...