基于uploadify.js实现多文件上传和上传进度条的显示
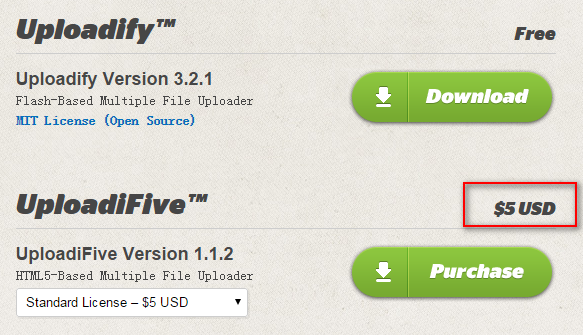
uploadify是JQuery的一个插件,主要实现文件的异步上传功能,可以自定义文件大小限制、文件类型、是否自动上传等属性,可以显示上传的进度条。官网地址是http://www.uploadify.com/,进入官网首页(不截图了,其实也没啥看的),可以看到uploadify的标语"Upload files like magic",意思是说使用uploadify上传文件如魔法一般。目前一共分为两个版本,Flash版和HTML5版,不过HTML5版是收费的,如图:
这里我们下载Flash版~~
下载完成后,解压到当前目录,可以看到如下目录:
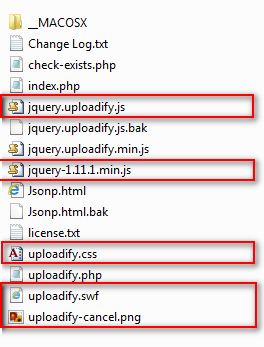
uploadify.js是基于JQuery的,所以我们也要引入JQuery,红色圈住的使我们要使用的文件,额!JQuery是我下载放进去的,大家自己下载一个吧。
新建一个Web项目,然后把上面的文件都放到项目根目录下(这样做不好,大家自己规划目录,我就不废话了),然后新建页面,引入JQuery、uploadify.js和uploadify.css,接下来该干些什么呢?没有头绪啊,打开刚刚的下载目录看看,有个index.php,打开看到是一个官方的Demo,那么就从这个Demo说起吧,下来看看问什么包里面没有JQuery,看图:

我们可以看到Demo中加载的是googleapis的JQuery,版本是1.7.1,然后看下面的代码:

一个form表单,里面有个input,type是file,下面来看看JS代码:
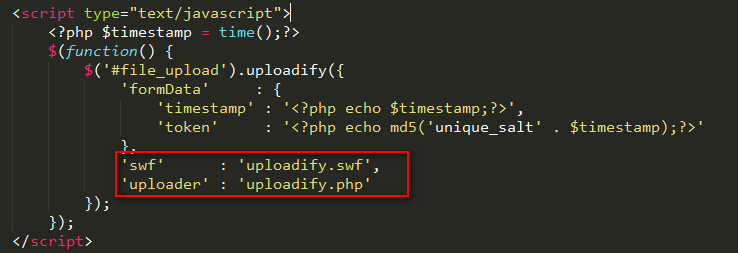
很简单,用JQuery调用了uploadify方法。其中swf和uploader指的是flash文件的地址和上传的处理程序。好,下面亲自动手来写一个试试。
既然是文件上传,我们要先有一个文件上传方法吧,新建FileUpload.ashx文件,写入以下代码:
 context.Response.ContentType = "text/plain";

        if (context.Request.Files.Count > )

        {

            HttpPostedFile file = context.Request.Files[];

            string ext = System.IO.Path.GetExtension(file.FileName);

            string fileName = DateTime.Now.Ticks + ext;

            string p = "/upload/" + fileName;

            string path = context.Server.MapPath("~/upload/" + fileName);

            file.SaveAs(path);

            context.Response.Write("1");

        }
一个简单的文件上传,有人会问文件上传成功问什么返回“1”呢?我们来看看Uploadify.php,如图:
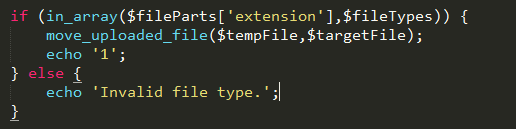
这下清楚了吧~还有要记得我们上传的目录是upload目录,记得在项目中添加则个目录。接下来我们开始写JS,实现文件的上传,模仿官方的Demo,代码如下:
<%@ Page Language="C#" AutoEventWireup="true" CodeBehind="WebForm1.aspx.cs" Inherits="Jsonp.WebForm1" %>

<!DOCTYPE html PUBLIC "-//W3C//DTD XHTML 1.0 Transitional//EN" "http://www.w3.org/TR/xhtml1/DTD/xhtml1-transitional.dtd">

<html xmlns="http://www.w3.org/1999/xhtml">

<head runat="server">

   <title></title>

   <script src="jquery-1.11.1.min.js"></script>

    <script src="jquery.uploadify.js"></script>

    <link href="uploadify.css" rel="stylesheet" type="text/css" />

</head>

<body>

   <input id="file_upload" name="file_upload" type="file" multiple="true">

</body>

</html>

<script type="text/javascript">

   $(function () {

      $("#file_upload").uploadify({

         height: 30,

         swf: 'uploadify.swf',

         uploader: 'UploadFile.ashx',

         width: 120

      });

   });

</script>
我们就是修改了uploader为我们自己的上传处理程序,然后F5运行,看看效果:

我们可以看到页面上面出现了一个按钮,点击可以打开对话框选中文件,选择一个文件,点击确定,看到文件上传成功了:
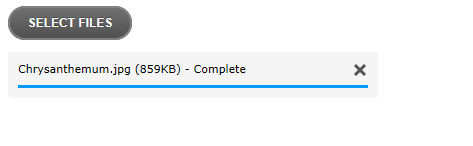
真的上传成功了吗?我们进入upload目录看看,确实上传成功了。是不是感觉很神奇?当然,我们也可以同时选则多张图片,批量上传,上传成功后,那个进度条过一段时间会一个一个自动消失。是不是突然发现文件上传竟然可以这么简单~~
文件上传是实现了,但是按钮样式和文字都不是我们想要的?下面我们来看一下如何自定义Uploadify插件,我们打开jquery.uploadify.js来看一下他的源代码:
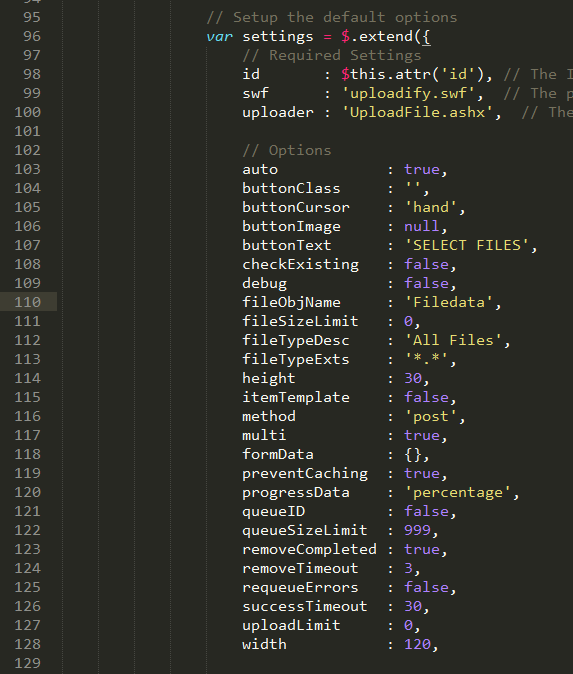
开头的一段密密麻麻的代码是用来显示flash的,不用管她。向下走,我们看到如上图的代码,width、height、swf、uploader,没错这个就是他的自定义选项,下面是我总结的这些自定义选项的含义:
    id       : $this.attr('id'), // The ID of the DOM object

    swf      : 'uploadify.swf',  // uploadify flash文件的路径

    uploader : 'UploadFile.ashx',  // 上传文件的提交地址

    // Options

    auto            : true,               // 是否自动上传文件

    buttonClass     : '',                 // 按钮的样式,这里可以自定css样式

    buttonCursor    : 'hand',             // 按钮鼠标样式

    buttonImage     : null,               // 按钮图片

    buttonText      : 'SELECT FILES',     // 按钮显示的文字

    checkExisting   : false,              // 上传前是否先检查文件是否存在

    debug           : false,              // 是否启动调试

    fileObjName     : 'Filedata',         // The name of the file object to use in your server-side script

    fileSizeLimit   : 0,                  // 文件大小限制,格式为1KB或1MB

    fileTypeDesc    : 'All Files',        // 文件类型描述

    fileTypeExts    : '*.*',              // 文件扩展名过滤

    height          : 30,                 // 按钮高度

    itemTemplate    : false,              // The template for the file item in the queue

    method          : 'post',             // 提交方式

    multi           : true,               // 是否允许多文件上传

    formData        : {},                 // An object with additional data to send to the server-side upload script with every file upload

    preventCaching  : true,               // Adds a random value to the Flash URL to prevent caching of it (conflicts with existing parameters)

    progressData    : 'percentage',       // 进度条显示,百分比

    queueID         : false,              // The ID of the DOM object to use as a file queue (without the #)

    queueSizeLimit  : 999,                // 文件上传队列的大小限制

    removeCompleted : true,               // 上传成功后移除进度条

    removeTimeout   : 3,                  // The delay in seconds before removing a queue item if removeCompleted is set to true

    requeueErrors   : false,              // Keep errored files in the queue and keep trying to upload them

    successTimeout  : 30,                 // The number of seconds to wait for Flash to detect the server's response after the file has finished uploading

    uploadLimit     : 0,                  // 可以上传文件的最大数量

    width           : 120,                // 按钮宽度

    // 这里是一些扩展的事件

    overrideEvents  : []             // (Array) A list of default event handlers to skip

    /*

    onCancel         // Triggered when a file is cancelled from the queue

    onClearQueue     // Triggered during the 'clear queue' method

    onDestroy        // Triggered when the uploadify object is destroyed

    onDialogClose    // Triggered when the browse dialog is closed

    onDialogOpen     // Triggered when the browse dialog is opened

    onDisable        // Triggered when the browse button gets disabled

    onEnable         // Triggered when the browse button gets enabled

    onFallback       // Triggered is Flash is not detected

    onInit           // Triggered when Uploadify is initialized

    onQueueComplete  // Triggered when all files in the queue have been uploaded

    onSelectError    // Triggered when an error occurs while selecting a file (file size, queue size limit, etc.)

    onSelect         // Triggered for each file that is selected

    onSWFReady       // Triggered when the SWF button is loaded

    onUploadComplete // Triggered when a file upload completes (success or error)

    onUploadError    // Triggered when a file upload returns an error

    onUploadSuccess  // Triggered when a file is uploaded successfully

    onUploadProgress // Triggered every time a file progress is updated

    onUploadStart    // Triggered immediately before a file upload starts
下面我们来写一个总和示例:
<%@ Page Language="C#" AutoEventWireup="true" CodeBehind="WebForm1.aspx.cs" Inherits="Jsonp.WebForm1" %>

<!DOCTYPE html PUBLIC "-//W3C//DTD XHTML 1.0 Transitional//EN" "http://www.w3.org/TR/xhtml1/DTD/xhtml1-transitional.dtd">

<html xmlns="http://www.w3.org/1999/xhtml">

<head runat="server">

   <title></title>

   <script src="jquery-1.11.1.min.js"></script>

    <script src="jquery.uploadify.min.js"></script>

    <link href="uploadify.css" rel="stylesheet" type="text/css" />

</head>

<body>

   <input id="file_upload" name="file_upload" type="file" multiple="true">

   <input type="button" value="上传" onclick="javascript:$('#file_upload').uploadify('upload','*')" />

   <div id="imgBox" style=" overflow:hidden; width:200px; height:200px; "></div>

</body>

</html>

<script type="text/javascript">

   $(function () {

      $("#file_upload").uploadify({

         auto: false,

         fileTypeDesc: 'Image Files',

         fileTypeExts: '*.jpg; *.png;*.gif;*.*',

         height: 30,

         buttonText: '请选择图片...',

         swf: 'uploadify.swf',

         uploader: 'UploadFile.ashx',

         width: 120,

         fileSizeLimit: '4MB',

         onUploadSuccess: function (file, data, response) {

            $("#imgBox").html(data);

         },

         onUploadError: function (file, errorCode, errorMsg, errorString) {

            alert('The file ' + file.name + ' could not be uploaded: ' + errorString);

         }

      });

   });

</script>
功能就是上传图片,上传成功后,显示上传的图片。注意这里自动上传为false,也就是说不自动上传图片,我们给按钮添加了click事件,来实现手动上传,代码如下:
$('#file_upload').uploadify('upload','*')
注意uploadify后面的参数,'*',这个参数代表上传所有文件,如果没有这个参数的话,只会上传第一张图片。
这个时候,上传文件的处理方法如下:
context.Response.ContentType = "text/plain";

        if (context.Request.Files.Count > )

        {

            HttpPostedFile file = context.Request.Files[];

            string ext = System.IO.Path.GetExtension(file.FileName);

            string fileName = DateTime.Now.Ticks + ext;

            string p = "/upload/" + fileName;

            string path = context.Server.MapPath("~/upload/" + fileName);

            file.SaveAs(path);

            context.Response.Write("<img width=\"100px\" height=\"100px\" src=\"" + p + "\" />");

        }

        else

        {

            context.Response.Write("上传错误!");

        }
作者:雲霏霏
QQ交流群:243633526
博客地址:http://www.cnblogs.com/yunfeifei/
声明:本博客原创文字只代表本人工作中在某一时间内总结的观点或结论,与本人所在单位没有直接利益关系。非商业,未授权,贴子请以现状保留,转载时必须保留此段声明,且在文章页面明显位置给出原文连接。
如果大家感觉我的博文对大家有帮助,请推荐支持一把,给我写作的动力。
基于uploadify.js实现多文件上传和上传进度条的显示的更多相关文章
- 一款基于uploadify扩展的多文件上传插件,完全适用于Html5
http://www.uploadify.com/documentation/ 官网里面有两个插件,一个是要使用flash插件才能文件上传的插件,另外一个是不需要使用要flash插件的文件上传插件完 ...
- Resumable.js – 基于 HTML5 File API 的文件上传
Resumable.js 是一个 JavaScript 库,通过 HTML5 文件 API 提供,稳定和可恢复的批量上传功能.在上传大文件的时候通过每个文件分割成小块,每块在上传失败的时候,上传会不断 ...
- JavaScript进阶(九)JS实现本地文件上传至阿里云服务器
JS实现本地文件上传至阿里云服务器 前言 在前面的博客< JavaScript进阶(八)JS实现图片预览并导入服务器功能>(点击查看详情)中,实现了JS将本地图片文件预览并上传至阿里云服务 ...
- 基于 Django的Ajax实现 文件上传
---------------------------------------------------------------遇到困难的时候,勇敢一点,找同学朋友帮忙,找导师求助. Ajax Ajax ...
- js插件---IUpload文件上传插件(包括图片)
js插件---IUpload文件上传插件(包括图片) 一.总结 一句话总结:上传插件找到真正上传位置的代码,这样就可以知道整个上传插件的逻辑了, 找资料还是github+官方 1.如何在js中找到真正 ...
- PHP 多图上传,图片批量上传插件,webuploader.js,百度文件上传插件
PHP 多图上传,图片批量上传插件,webuploader.js,百度文件上传插件(案例教程) WebUploader作用:http://fex.baidu.com/webuploader/gett ...
- 005-html+js+spring multipart文件上传
一.概述 需求:通过html+js+java上传最大500M的文件,需要做MD5 消息摘要以及SHA256签名,文件上传至云存储 1.1.理解http协议 https://www.cnblogs.co ...
- java进行文件上传,带进度条
网上看到别人发过的一个java上传的代码,自己写了个完整的,附带源码 项目环境:jkd7.tomcat7. jar包:commons-fileupload-1.2.1.jar.commons-io-1 ...
- 基于原生JS封装数组原型上的sort方法
基于原生JS封装数组原型上的sort方法 最近学习了数组的原型上内置方法的封装,加强了用原生JS封装方法的能力,也进一步理解数组方法封装的过程,实现的功能.虽然没有深入底层,了解源码.以下解法都是基于 ...
随机推荐
- ActionBarSherlock环境搭建
1.在官网http://actionbarsherlock.com/下载ActionBarSherlock包解压到. 2.创建自己的Android工程: 3.File -> New -> ...
- 123. Best Time to Buy and Sell Stock (三) leetcode解题笔记
123. Best Time to Buy and Sell Stock III Say you have an array for which the ith element is the pric ...
- Jquery实现文字向上逐条滚动
直接上代码: <!DOCTYPE html> <html> <head> <meta http-equiv="Content-Type" ...
- android接收短信——framework处理流程(android 5.1)
modem层不懂,所以直接从RIL.java开始.以电信卡接收短信为例 modem通知RIL.java中的 RILReceiver处理接收信息 class RILReceiver implements ...
- ZooKeeper事务日志记录器SyncRequestProcessor
SyncRequestProcessor作为一个ZooKeeper中的一个关键线程(ZooKeeperCriticalThread),是ZooKeeper请求处理链中的事务日志记录处理器,其主要用来将 ...
- iOS多线程 NSOperation的用法
上一篇写了 GCD 的使用,接下来就了解一下 NSOperation ,NSOperation是苹果对 GCD 的 OC 版的一个封装,但是相对于GCD来说可控性更强,并且可以加入操作依赖. NSOp ...
- UWP中GridView右击选中的实现
问题帖子 https://social.msdn.microsoft.com/Forums/windowsapps/en-US/68d0e47d-c974-47b9-a6b8-d55b4989d732 ...
- python脚本执行Scapy出现IPv6警告WARNING解决办法
安装完scapy,写了脚本执行后执行: WARNING: No route found for IPv6 destination :: (no default route?) 原因是用 from sc ...
- 想在Images.xcassets 只能用 imageNamed 加载里边的素材 其他方法 你就别费老劲了
1.Images.xcassets中的素材 (1)只支持png格式的图片 (2) 图片只支持[UIImage imageNamed]的方式实例化,但是不能从Bundle中加载 (3) 在编译时,Im ...
- Rational.Rose.Enterprise.v7.0 (2007)安装分享
很多人都在找rational软件,很多都是2003的,有的宣称是2007,但结果还是2003.也许真的不存在Rational.Rose 2007,不过有IBM.Rational.Rose.Enterp ...