
61、常规控件(4)TabLayout-便捷实现标签
 <android.support.design.widget.TabLayout

    android:id="@+id/tabs"

    android:layout_width="match_parent"

    android:layout_height="wrap_content"

  />
1  TabLayout tabs = (TabLayout) this.findViewById(R.id.tabs);

  tabs.addTab(tabs.newTab().setText("Tab1"));

  tabs.addTab(tabs.newTab().setText("Tab2"));

  tabs.addTab(tabs.newTab().setText("Tab3"));

  tabs.addTab(tabs.newTab().setText("Tab4"));

  tabs.addTab(tabs.newTab().setText("Tab5"));

注:如果Tab标签特别多的话,控件是支持自动滑动的,只需要在控件加入 app:tabMode="scrollable" 这个属性即可。
以上简单两步,就可以实现如图效果了。但是这个远远不能满足我们的需要,所以接着往下看。
给以上控件添加不同的颜色。如下图效果:
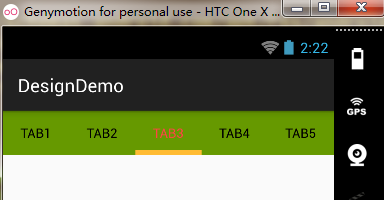
 <LinearLayout xmlns:android="http://schemas.android.com/apk/res/android"

     xmlns:app="http://schemas.android.com/apk/res-auto"

     android:layout_width="match_parent"

     android:layout_height="match_parent"

     android:orientation="vertical">

     <!--

         app:tabTextColor  未选中字体颜色

         app:tabSelectedTextColor  选中的字体颜色

         app:tabIndicatorColor  下标指示器的颜色

         app:tabIndicatorHeight  下标指示器的高度

     -->

     <android.support.design.widget.TabLayout

         android:id="@+id/tabs"

         android:layout_width="match_parent"

         android:layout_height="wrap_content"

         android:background="@android:color/holo_green_dark"

         app:tabTextColor="@android:color/black"

         app:tabSelectedTextColor="@android:color/holo_red_light"

         app:tabIndicatorColor="@android:color/holo_orange_light"

         app:tabIndicatorHeight="5dp"

         />

 </LinearLayout>
更多的使用是与ViewPager相结合来使用。
效果:Title可以左右滑动切换;同时也可以利用ViewPager左右滑动切换。

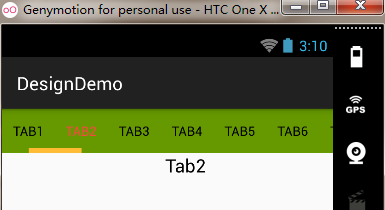
代码步骤如下:
1、MainActivity的布局文件,activity_main.xml。
 <LinearLayout xmlns:android="http://schemas.android.com/apk/res/android"

     xmlns:app="http://schemas.android.com/apk/res-auto"

     android:layout_width="match_parent"

     android:layout_height="match_parent"

     android:orientation="vertical">

     <!--

         app:tabTextColor  未选中字体颜色

         app:tabSelectedTextColor  选中的字体颜色

         app:tabIndicatorColor  下标指示器的颜色

         app:tabIndicatorHeight  下标指示器的高度

         app:tabMode="scrollable" 横向滚动

     -->

     <android.support.design.widget.TabLayout

         android:id="@+id/tabs"

         android:layout_width="match_parent"

         android:layout_height="wrap_content"

         android:background="@android:color/holo_green_dark"

         app:tabTextColor="@android:color/black"

         app:tabSelectedTextColor="@android:color/holo_red_light"

         app:tabIndicatorColor="@android:color/holo_orange_light"

         app:tabIndicatorHeight="5dp"

         app:tabMode="scrollable"

         />

     <android.support.v4.view.ViewPager

         android:id="@+id/viewpager"

         android:layout_width="match_parent"

         android:layout_height="match_parent"

         />

 </LinearLayout>
2、MainActivity.java
 package com.example.com.designdemo;

 import android.os.Bundle;

 import android.support.design.widget.TabLayout;

 import android.support.v4.app.Fragment;

 import android.support.v4.view.ViewPager;

 import android.support.v7.app.AppCompatActivity;

 import java.util.ArrayList;

 import java.util.List;

 public class MainActivity extends AppCompatActivity {

     @Override

     protected void onCreate(Bundle savedInstanceState) {

         super.onCreate(savedInstanceState);

         setContentView(R.layout.activity_main);

         TabLayout tabs = (TabLayout) this.findViewById(R.id.tabs);

         List<String> titles = new ArrayList<String>();

         List<Fragment> fragments = new ArrayList<Fragment>();

         for (int i=0; i<10; i++) {

             String title = "Tab"+ (i+1);

             tabs.addTab(tabs.newTab().setText(title));

             titles.add(title);

             Fragment fragment = new TestOneFragment(title);

             fragments.add(fragment);

         }

         ViewPager viewpager = (ViewPager) this.findViewById(R.id.viewpager);

         TestOneAdapter mAdapter = new TestOneAdapter(getSupportFragmentManager(), titles, fragments);

         viewpager.setAdapter(mAdapter);

         tabs.setupWithViewPager(viewpager);

         tabs.setTabsFromPagerAdapter(mAdapter);

     }

 }
3、新建一个TestOneFragment.java,添加ViewPager使用。
 package com.example.com.designdemo;

 import android.os.Bundle;

 import android.support.v4.app.Fragment;

 import android.view.LayoutInflater;

 import android.view.View;

 import android.view.ViewGroup;

 import android.widget.TextView;

 public class TestOneFragment extends Fragment {

     public String mTitle = null;

     public TestOneFragment(String title) {

         this.mTitle = title;

     }


     @Override

     public View onCreateView(LayoutInflater inflater, ViewGroup container,

                              Bundle savedInstanceState) {

         // Inflate the layout for this fragment

         View view = inflater.inflate(R.layout.test_one_fragment, container, false);

         TextView txt = (TextView) view.findViewById(R.id.txt);

         txt.setText(mTitle);


         return view;

     }

 }
4、Fragment适配器TestOneAdapter.java
 package com.example.com.designdemo;

 import android.support.v4.app.Fragment;

 import android.support.v4.app.FragmentManager;

 import android.support.v4.app.FragmentStatePagerAdapter;

 import java.util.List;

 public class TestOneAdapter extends FragmentStatePagerAdapter {

     List<String> titles;

     List<Fragment> fragments;

     public TestOneAdapter(FragmentManager fm, List<String> titles, List<Fragment> fragments) {

         super(fm);

         this.titles = titles;

         this.fragments = fragments;

     }

     @Override

     public Fragment getItem(int position) {

         return fragments.get(position);

     }

     @Override

     public int getCount() {

         return fragments.size();

     }

     @Override

     public CharSequence getPageTitle(int position) {

         return titles.get(position);

     }

 }
完整DEMO下载地址:http://download.csdn.net/detail/androidsj/9301597
61、常规控件(4)TabLayout-便捷实现标签的更多相关文章
- 介绍三个Android支持库控件:TabLayout+ViewPager+RecyclerView
本文主要介绍如下三个Android支持库控件的配合使用: TabLayout:android.support.design.widget.TabLayout ViewPager:android.sup ...
- chart控件怎么使x轴标签全部显示出来
在vs2012中使用chart控件事,x轴的标签过多,致使默认只能显示其中的一部分,如图 当然,我们可以通过设置,使得x轴标签全部显示. 首先,通过chart控件属性,找到 “ChartAreas ...
- 【AngularJS学习笔记】封装一些简单的控件(封装成Html标签)
bootstrap有强大的指令系统,可以自定义一些属性,基本知识请移步:http://angularjs.cn/A00r http://www.cnblogs.com/lvdabao/p/33916 ...
- 62、常规控件(5)Navigation View –美观的侧滑视图
1.main_layout.xml <android.support.v4.widget.DrawerLayout xmlns:android="http://schemas.andr ...
- QT常规控件操作备忘
QLabel设置边框和颜色: label->setFrameShape (QFrame::Box); label->setStyleSheet("border: 1px soli ...
- html学习第一讲(内容html常规控件的的使用)
<html> <head> <title> 这是网页的标题</title> </head> <body> <h2>& ...
- 60、常规控件(3)Snackbar-可操作的提示框,Toast升级版
<LinearLayout xmlns:android="http://schemas.android.com/apk/res/android" xmlns:app=&quo ...
- 59、常规控件(2)TextInputLayout-让EditText提示更加人性化
提示语用在显示. <LinearLayout xmlns:android="http://schemas.android.com/apk/res/android" andro ...
- 58、常规控件(1)Floating Action Button-浮动的圆形按钮
<LinearLayout xmlns:android="http://schemas.android.com/apk/res/android" xml ...
随机推荐
- LoadRunner访问Mysql数据库(转)
这是很久以前编写的一个测试案例,那时是为了检查大量往Mysql数据库里插入数据,看一下数据库的性能如何?服务器是否会很快就被写满了. 前期的准备工作:Mysql 数据库搭建,LoadRunner,li ...
- golang中使用mongodb
mgo简介 mongodb官方没有关于go的mongodb的驱动,因此只能使用第三方驱动,mgo就是使用最多的一种. mgo(音mango)是MongoDB的Go语言驱动,它用基于Go语法的简单API ...
- document.documentElement.scrollTop
要获取当前页面的滚动条纵坐标位置, 用: document.documentElement.scrollTop; 而不是: document.body.scrollTop; doc ...
- 【Java集合源代码剖析】TreeMap源代码剖析
转载请注明出处:http://blog.csdn.net/ns_code/article/details/36421085 前言 本文不打算延续前几篇的风格(对全部的源代码加入凝视),由于要理解透Tr ...
- 消息成功失败回调demo
) )); try {// ListenableFuture<ResponseEntity<String>> future = restTemplate.postForEnti ...
- ld -l选项注意事项
在程序中用到某个静态库,使用命令: gcc bin -llibrary.a object.o 结果发现找不到library.a中的某些函数符号 undefine reference to ... 通过 ...
- poj 1113 Wall 凸包的应用
题目链接:poj 1113 单调链凸包小结 题解:本题用到的依然是凸包来求,最短的周长,只是多加了一个圆的长度而已,套用模板,就能搞定: AC代码: #include<iostream> ...
- 李洪强iOS经典面试题32-简单介绍 ARC 以及 ARC 实现的原理
李洪强iOS经典面试题32-简单介绍 ARC 以及 ARC 实现的原理 问题 简单介绍 ARC 以及 ARC 实现的原理. 考查点 ARC 是苹果在 WWDC 2011 提出来的技术,因此很多新入行的 ...
- PLSQL Develope连接oracle数据库配置
首先我们在讲PLSQL Develope连接oracle数据库配置之前,先讲下如果不用PLSQL Develope连接oracle数据库,那该怎么办,那就是在本机安装oracle数据库,不过这个对于配 ...
- mysql之mysql、mysql-devel、mysql-server
一.引言 一直都没搞明白这三者之间的关系,于是决心查资料把这个问题搞明白,遂记录以便查阅.学习 二.关系 mysql-devel 开发用到的库以及包含文件mysql mysql 客户端mysql-se ...