【转】 为SeekBar滑块设置固定值以及自定义Seekbar,progressbar样式--不错
原文网址:http://blog.csdn.net/jdsjlzx/article/details/7804080
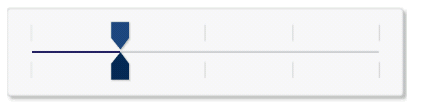
最近在项目中使用到了seekbar和progressbar,且必须按照设计要求来进行设置,如下图。要实现这个效果就必须对这两个控件进行自定义。
一,SeekBar
一开始要实现这个效果参考网上的自定义方法根本无法达到这个效果,没办法只能投机取巧了。
1,背景刻度的图片我是用了一个ImageView,然后在ImageView上放一个SeekBar。因为是个定制的平板应用,分辨率是限定的1280*768,所以我使用的是AbsoluteLayout这样ImageView和SeekBar的位置和大小都是固定的了,估计在其他布局中这样使用会有问题。
2,在布局文件中的代码如下:
- <ImageView
- android:layout_width="400dip"
- android:layout_height="95dip"
- android:layout_x="830dip"
- android:layout_y="484dip"
- android:src="@drawable/seekbar_background_5" //刻度图片
- android:scaleType="centerCrop"
- android:background="@null"
- />
- <SeekBar
- android:id="@+id/sensor_sensitivity"
- android:layout_width="360dip"
- android:layout_height="64dip"
- android:layout_x="850dip"
- android:layout_y="498dip"
- android:progressDrawable="@drawable/suretouch_seekbar_img"
- android:thumb="@drawable/suretouch_seekbar_thumb"
- style="?android:attr/progressBarStyleHorizontal"
- android:paddingLeft="5dip"
- android:paddingRight="5dip"
- android:paddingBottom="2dip"
- android:maxHeight="1dip" //注意:一定得设置进度条的高度,不然进度条会很高。
- android:minHeight="1dip"
- android:max="100"
- android:progress="0"
- />
3,自定义滑块,在drawable文件中加入自定义的xml文件。
- <?xml version="1.0" encoding="utf-8"?>
- <selector xmlns:android="http://schemas.android.com/apk/res/android">
- <!-- 按下状态 -->
- <item
- android:state_pressed="true"
- android:drawable="@drawable/seekbar_block" />
- <!-- 普通无焦点状态 -->
- <item
- android:state_focused="false"
- android:state_pressed="false"
- android:drawable="@drawable/seekbar_block" />
- </selector>
4,自定义进度条的颜色,同样在drawable中加入自定义需要的xml文件。
- <?xml version="1.0" encoding="UTF-8"?>
- <layer-list
- xmlns:android="http://schemas.android.com/apk/res/android">
- <item android:id="@android:id/progress">
- <clip>
- <shape>
- <gradient
- android:startColor="@color/big_title"
- android:centerColor="@color/big_title"
- android:endColor="@color/big_title"
- />
- </shape>
- </clip>
- </item>
- </layer-list>
5,设置滑块的位置,也就是当滑动滑块后只能让其停在刻度上,要现实这个效果我采用的方法是当滑块停止的时候判断当前的值,比如第二个刻度是25,这里在0到25中去个中间数比如13,也就是当滑块滑到大于13小于25到50的中间数时就setProgress(25),这样就设定在25的位置也就是第二个刻度位置。后面的以此类推。seekbar的事件中有个OnStopTrackingTouch,代码如下:
- public void onStopTrackingTouch(SeekBar seekBar) {
- // TODO Auto-generated method stub
- int seekProgress = mSeekBar.getProgress();
- if(seekProgress<13){
- mSeekBar.setProgress(0);
- }else if(seekProgress>=13 && seekProgress<38){
- mSeekBar.setProgress(25);
- }else if(seekProgress>=38 && seekProgress<63){
- mSeekBar.setProgress(50);
- }else if(seekProgress>=63 && seekProgress<88){
- mSeekBar.setProgress(75);
- }else if(seekProgress>=88){
- mSeekBar.setProgress(100);
- }
- }
对于ProgressBar的设置同样是采用一个ImageView为背景(外围的黑框),在ImageView上放一个ProgressBar控件,然后自定义进度条的颜色。只是在调整它们之间的位置和大小的时候比较费时点,不管怎样已经达到了想要的效果。

【转】 为SeekBar滑块设置固定值以及自定义Seekbar,progressbar样式--不错的更多相关文章
- Android课程---Android 如何用滑杆(SeekBar)组件设置图片颜色的透明度(转)
Android系统支持的颜色是由4个值组成的,前3个为RGB,也就是我们常说的三原色(红.绿.蓝),最后一个值是A,也就是Alpha.这4个值都在0~255之间.颜色值越小,表示该颜色越淡,颜色值越大 ...
- MTU介绍以及在windows和linux下怎么设置MTU值
最大传输单元MTU(Maximum Transmission Unit,MTU)是指一种通信协议的某一层上面所能通过的最大数据包大小(以字节为单位).最大传输单元这个参数通常与通信接口有关(网络接口卡 ...
- Android 设置alpha值来制作透明与渐变效果的实例
Android系统支持的颜色是由4个值组成的,前3个为RGB,也就是我们常说的三原色(红.绿.蓝),最后一个值是A,也就是Alpha.这4个值都在0~255之间.颜色值越小,表示该颜色越淡,颜色值越大 ...
- Format a Property Value 设置属性值的格式
In this lesson, you will learn how to set a display format and an edit mask to a business class prop ...
- el-cascader组件根据最后一级向上找到父级并设置默认值
vue + elementUI项目中,el-cascader级联选择器使用频率非常高,一些基本使用方法可以参考elementUI官方文档,本文主要研究当接口只返回最后一级id时,如何向上找出所有父级数 ...
- ng-option指令使用记录,设置默认值需要注意
ng-options一般有以下用法: 数组作为数据源: label for value in array select as label for value in array label group ...
- 《Entity Framework 6 Recipes》中文翻译系列 (14) -----第三章 查询之查询中设置默认值和存储过程返回多结果集
翻译的初衷以及为什么选择<Entity Framework 6 Recipes>来学习,请看本系列开篇 3-6在查询中设置默认值 问题 你有这样一个用例,当查询返回null值时,给相应属性 ...
- EF Core1.0 CodeFirst为Modell设置默认值!
当我们使用CodeFirst时,有时候需要设置默认值! 如下 ; public string AdminName {get; set;} = "admin"; public boo ...
- 使用mysql 命令行,增加 ,删除 字段 并 设置默认值 及 非空
使用mysql 命令行,增加 ,删除 字段 并 设置默认值 及 非空 添加 alter table table_name add field_name field_type; 添加,并设置默认值,及非 ...
随机推荐
- common-lang——StringUtils
1.文字省略处理 最多显示几个字 StringUtils.abbreviate("中华人民共和国", 5); // output:中华.. 2.文字中间省略 最多显示几个字符 St ...
- maven jetty运行命令
1.先运行build.xml <?xml version="1.0" encoding="UTF-8"?> <project name=&qu ...
- jquery 银行卡号验证
具体参考:https://github.com/jondavidjohn/payform 插件js: jquery.payform.js 具体操作 alert($.payform.validateCa ...
- Java环境的安装与配置
Java环境的安装与配置 环境:Java8,win10 推荐oracle官网oracle官网https://www.oracle.com/index.html下载JDK进行安装 选择自己需要的版本下载 ...
- AVAudioSession
AVAudioSession类由AVFoundation框架引入.每个IOS应用都有一个音频会话.这个会话可以被AVAudioSession类的sharedInstance类方法访问,如下: AVAu ...
- ARM架构下linux设备树加载的方法
引入设备树后bootloader加载DTB方法: 1. 标准方法 将linux kernel放到内存地址为<kernel img addr>的内存中. 将DTB放到地址为<dtb a ...
- sass编译css(转自阮一峰)
一.什么是SASS SASS是一种CSS的开发工具,提供了许多便利的写法,大大节省了设计者的时间,使得CSS的开发,变得简单和可维护. 本文总结了SASS的主要用法.我的目标是,有了这篇文章,日常的一 ...
- php 文件上传后缀名与文件类型对照表(几乎涵盖所有文件)
网上有很多php文件上传的类,文件上传处理是php的一个特色(至少手册上是将此作为php特点来展示的,个人认为php在数组方面的优异功能更有特 色),学php的人都知道文件上传怎么做,但很多人在编程中 ...
- JavaIO流——File类
1.掌握File 类的作用 2.可以使用File 类中的方法对文件进行操作 所有的 io 操作都保存在 java.io 包中. 构造方法:public File (String pathname) 直 ...
- Html5游戏框架createJs的简单用法
声明:本文为原创文章,如需转载,请注明来源WAxes,谢谢!http://www.it165.net/pro/html/201403/11105.html 楼主记忆力不好,最近刚好用了一下create ...