ActiveMQ基本配置与示例演示
一、下载ActiveMQ
去官方网站下载:http://activemq.apache.org/
二、运行ActiveMQ
将apache-activemq-5.11.1-bin.zip解压,由于本系统是32位,所以进入apache-activemq-5.11.1\bin\win32目录。
1、安装InstallService.bat,如果出现下图,也许是你电脑已经安装过该服务。
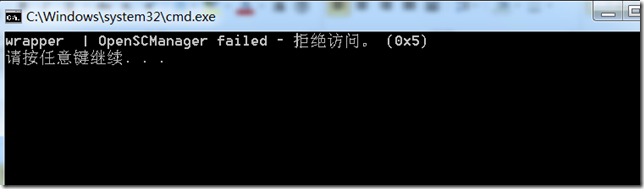
2、点击wrapper.exe,运行,如果出现下图所示,表示已经简单配置好了。

不过期间,如果你没有设置JAVA_HOME环境变量,会出错,所以,最好是建立一个JAVA_HOME环境变量,其值设置为C:\Program Files\Java\jdk1.8.0(该路径为jdk的安装路径)。
3、要想运行activemq,必须开启activemq.bat服务,点击它,让其运行。
三、使用NetBeans创建项目运行
1、JMS基本概念
JMS(Java Message Service) 即Java消息服务。它提供标准的产生、发送、接收消息的接口简化企业应用的开发。它支持两种消息通信模型:点到点(point-to-point)(P2P)模型和发布/订阅(Pub/Sub)模型。P2P模型规定了一个消息只能有一个接收者;Pub/Sub 模型允许一个消息可以有多个接收者。
对于点到点模型,消息生产者产生一个消息后,把这个消息发送到一个Queue(队列)中,然后消息接收者再从这个Queue中读取,一旦这个消息被一个接收者读取之后,它就在这个Queue中消失了,所以一个消息只能被一个接收者消费。
与点到点模型不同,发布/订阅模型中,消息生产者产生一个消息后,把这个消息发送到一个Topic中,这个Topic可以同时有多个接收者在监听,当一个消息到达这个Topic之后,所有消息接收者都会收到这个消息。
2、编程的结构
2.1消息产生者向JMS发送消息的步骤
(1)创建连接使用的工厂类JMS ConnectionFactory
(2)使用管理对象JMS ConnectionFactory建立连接Connection
(3)使用连接Connection 建立会话Session
(4)使用会话Session和管理对象Destination创建消息生产者MessageSender
(5)使用消息生产者MessageProducer发送消息
2.2消息消费者从JMS接受消息的步骤
(1)创建连接使用的工厂类JMS ConnectionFactory
(2)使用管理对象JMS ConnectionFactory建立连接Connection
(3)使用连接Connection 建立会话Session
(4)使用会话Session和管理对象Destination创建消息消费者MessageReceiver
(5)使用消息消费者MessageConsumer接受消息
3、代码
整个工程需引入activemq-all-5.11.1.jar作为类库文件。其次建立JmsSender.java与JmsReceiver.java两个文件模拟消息产生者向JMS发送消息和消息消费者从JMS接受消息。
JmsSender.java文件
/*

 * To change this license header, choose License Headers in Project Properties.

 * To change this template file, choose Tools | Templates

 * and open the template in the editor.

 */

package testactivemq;

import javax.jms.*;

import org.apache.activemq.ActiveMQConnection;

import org.apache.activemq.ActiveMQConnectionFactory;

/**

 *

 * @author LIN NP

 */

public class JmsSender

{

    private ConnectionFactory connectionFactory = null;

    private Connection connection = null;

    private Session session = null;

    private Destination destination = null;

    private MessageProducer producer = null;

    private static final int SEND_NUMBER = 5;

    /**

     *

     */

    public void init()

    {

        // 构造ConnectionFactory实例对象,此处采用ActiveMq的实现jar

        connectionFactory = new ActiveMQConnectionFactory(

                ActiveMQConnection.DEFAULT_USER,

                ActiveMQConnection.DEFAULT_PASSWORD,"tcp://localhost:61616");    // ActiveMQ默认使用的TCP连接端口是61616

        try{

            // 构造从工厂得到连接对象

            connection = connectionFactory.createConnection();

            connection.start();

            // 获取操作连接

            session = connection.createSession(Boolean.TRUE,  Session.AUTO_ACKNOWLEDGE);

            /**

            * 第一种方式:Queue

            */

//            destination = session.createQueue("xkey");        // "xkey"可以取其他的。

//            producer = session.createProducer(destination); // 得到消息生成者【发送者】

            /**

             * 第二种方式:Topic

             */

             Topic topic = session.createTopic("xkey.Topic");

             producer = session.createProducer(topic);

             /**

              *

              */

            // 设置不持久化,此处学习,实际根据项目决定

            producer.setDeliveryMode(DeliveryMode.NON_PERSISTENT);

            // 构造消息,此处写死,项目就是参数,或者方法获取

            sendMessage(session,producer);

            session.commit();

        }

        catch(Exception e)

        {

            e.printStackTrace();

        }

        finally

        {

            try

            {

                connection.close();

            }

            catch (JMSException e)

            {

                // TODO Auto-generated catch block

                e.printStackTrace();

            }

        }

    }

    private void sendMessage(Session session,MessageProducer producer) throws JMSException

    {

        for (int i = 1; i <= SEND_NUMBER; i ++)

        {

            TextMessage message = session.createTextMessage("ActiveMq 发送的消息: " + i);

            // 发送消息

            System.out.println("发送消息:" + "ActiveMq 发送的消息: " + i);

            producer.send(message);

        }

    }

    /**

     * @param args

     */

    public static void main(String[] args)

    {

        // TODO Auto-generated method stub

        JmsSender jms = new JmsSender();

        jms.init();

    }

}
JmsReceiver.java文件
/*

 * To change this license header, choose License Headers in Project Properties.

 * To change this template file, choose Tools | Templates

 * and open the template in the editor.

 */

package testactivemq;

import javax.jms.*;

import org.apache.activemq.ActiveMQConnection;

import org.apache.activemq.ActiveMQConnectionFactory;

/**

 *

 * @author LIN NP

 */

public class JmsReceiver

{

    private ConnectionFactory connectionFactory = null;

    private Connection connection = null;

    private Session session = null;

    private MessageConsumer consumer = null;

    private Destination destination = null;

    public void init()

    {

        connectionFactory = new ActiveMQConnectionFactory(

                ActiveMQConnection.DEFAULT_USER,

                ActiveMQConnection.DEFAULT_PASSWORD,"tcp://localhost:61616"); // ActiveMQ默认使用的TCP连接端口是61616

        try

        {

            // 构造从工厂得到连接对象

            connection = connectionFactory.createConnection();

            connection.start();

            // 获取操作连接

            session = connection.createSession(Boolean.TRUE,  Session.AUTO_ACKNOWLEDGE);

            /**

            * 第一种方式:Queue

            */

//            destination = session.createQueue("xkey");

//            consumer = session.createConsumer(destination);

            /**

             * 第二种方式:Topic

             */

            Topic topic = session.createTopic("xkey.Topic");

            consumer = session.createConsumer(topic);

            /**

              *

              */

            while (true)

            {

                //设置接收者接收消息的时间,为了便于测试,这里谁定为500s

                TextMessage message = (TextMessage) consumer.receive(500000);

                if (null != message)

                {

                    System.out.println("Receiver " + message.getText());

                }

                else

                {

                    break;

                }

            }

        }

        catch(Exception e)

        {

            e.printStackTrace();

        }

        finally

        {

            try

            {

                connection.close();

            }

            catch (JMSException e)

            {

                // TODO Auto-generated catch block

                e.printStackTrace();

            }

        }

    }

    /**

     * @param args

     */

    public static void main(String[] args)

    {

        // TODO Auto-generated method stub

        JmsReceiver jms = new JmsReceiver();

        jms.init();

    }

}
4、测试过程
在整个过程中,要保证activemq.bat服务是运行的。
4.1 运行JmsReceiver.java文件,testActiveMQ (run)控制台会出现
log4j:WARN No appenders could be found for logger (org.apache.activemq.transport.WireFormatNegotiator).
log4j:WARN Please initialize the log4j system properly.
log4j:WARN See http://logging.apache.org/log4j/1.2/faq.html#noconfig for more info.
4.2 运行JmsSender.java文件,testActiveMQ (run) #2控制台会出现
log4j:WARN No appenders could be found for logger (org.apache.activemq.transport.WireFormatNegotiator).
log4j:WARN Please initialize the log4j system properly.
log4j:WARN See http://logging.apache.org/log4j/1.2/faq.html#noconfig for more info.
发送消息:ActiveMq 发送的消息: 1
发送消息:ActiveMq 发送的消息: 2
发送消息:ActiveMq 发送的消息: 3
发送消息:ActiveMq 发送的消息: 4
发送消息:ActiveMq 发送的消息: 5
其中警告信息可以忽略,暂时也没去找警告来自哪里。
4.3 返回到testActiveMQ (run)控制台会出现
run:
log4j:WARN No appenders could be found for logger (org.apache.activemq.transport.WireFormatNegotiator).
log4j:WARN Please initialize the log4j system properly.
log4j:WARN See http://logging.apache.org/log4j/1.2/faq.html#noconfig for more info.
Receiver ActiveMq 发送的消息: 1
Receiver ActiveMq 发送的消息: 2
Receiver ActiveMq 发送的消息: 3
Receiver ActiveMq 发送的消息: 4
Receiver ActiveMq 发送的消息: 5
主要参考:
http://www.cnblogs.com/xwdreamer/archive/2012/02/21/2360818.html
http://www.open-open.com/lib/view/open1388994166156.html
ActiveMQ基本配置与示例演示的更多相关文章
- Django示例演示--?
引用自:https://blog.csdn.net/weixin_42950386/article/details/83143293 定义模型类 模型类被定义在"应用/models.py&q ...
- Spring常用配置使用示例
上篇介绍了Spring配置的基本情况,本篇介绍Spring常用配置具体如何使用.关于基础的配置,比如Configuration之类的就不示例,主要示例相对用的比较多同时可能比较复杂的标签或属性. 1) ...
- 转数据库分库分表(sharding)系列(一) 拆分实施策略和示例演示
本文原文连接: http://blog.csdn.net/bluishglc/article/details/7696085 ,转载请注明出处!本文着重介绍sharding切分策略,如果你对数据库sh ...
- 数据库分库分表(sharding)系列(一)拆分实施策略和示例演示
本文原文连接: http://blog.csdn.net/bluishglc/article/details/7696085 ,转载请注明出处!本文着重介绍sharding切分策略,如果你对数据库sh ...
- C#中声明、调用和配置事件的演示源码
下面的内容是关于C#中声明.调用和配置事件的演示的内容,应该能对大伙有些好处. using System;namespace MyCollections { using System.Collecti ...
- ActiveMQ安装配置及使用 转发 https://www.cnblogs.com/hushaojun/p/6016709.html
ActiveMQ安装配置及使用 ActiveMQ介绍 ActiveMQ 是Apache出品,最流行的,能力强劲的开源消息总线.ActiveMQ 是一个完全支持JMS1.1和J2EE 1.4规范的 JM ...
- 据库分库分表(sharding)系列(一) 拆分实施策略和示例演示
本文原文连接: http://blog.csdn.net/bluishglc/article/details/7696085 ,转载请注明出处!本文着重介绍sharding切分策略,如果你对数据库sh ...
- dorado 的学习位置、控件使用方法查找、示例演示地址
dorado的学习位置: http://wiki.bsdn.org/display/dorado7/Project+Home dorado的控件使用方法查找: http://dorado7.bsdn. ...
- ActiveMQ内存配置和密码设置
1.配置内存 bin中activemq.bat 中的第一行 加上 : REM 配置内存 set ACTIVEMQ_OPTS=-Xms1G -Xmx1G 2.修改控制台密码 1.打开conf/jetty ...
随机推荐
- 通过一张简单的图,让你彻底地搞懂JS的==运算
大家知道,JavaScript中的==是一种比较复杂运算,它的运算规则很奇怪,很容易让人犯错,从而成为JavaScript中“最糟糕的特性”之一. 在仔细阅读ECMAScript规范的基础上,我画了一 ...
- Redis和Memcache的对比
我这段时间在用redis,感觉挺方便的,但比较疑惑在选择内存数据库的时候到底什么时候选择redis,什么时候选择memcache,然后就查到下面对应的资料,是来自redis作者的说法(stackove ...
- PC-大概最全的黑客工具表了
纯真IP数据库查询程序 remote administrator (rar解密)ZiperelloV2.0 汉化版.zip (代理跳板)SkSockServer1.09.zip [ar ...
- oc学习之路----代理模式
今天刚学完oc的代理模式,觉得有点新奇,第一次接触,原理 A完成一件事,但是自己不能完成,于是他找个代理人B 替他完成这个事情,他们之间便有个协议 (protocol),B继承该协议来完成A代理给他的 ...
- Oracle Enterprise Linux 64-bit下安装apache-tomcat-7.0.53步骤
測试环境:VMware Workstation v9.0.2软件中安装好Oracle Enterprise Linux 5.8 64-bit虚拟机 安装软件:jdk-7u40-linux-x64.rp ...
- 【Servlet】Filter过滤器的编写和配置
Servlet的Filter介绍 在Servlet作为过滤器使用时,它可以对客户的请求进行过滤处理,当它处理完成后,它会交给下一个过滤器处理,就这样,客户的请求在过滤链里一个个处理,直到请求发送到目标 ...
- [AngularJS + Webpack] Using Webpack for angularjs
1. Install webpack & angular: npm install webpack angular 2. Create webpack.config.js file: modu ...
- [整理]Oracle LOCK 机制
数据库是一个多用户使用的共享资源.当多个用户并发地存取数据时,在数据库中就会产生多个事务同时存取同一数据的情况.若对并发操作不加控制就可能会读取和存储不正确的数据,破坏数据库的一致性.锁机制用于管理对 ...
- Nginx高性能服务器安装、配置、运维 (3) —— Nginx配置详解
四.Nginx 配置详解 YUM方式安装的Nginx默认配置文件放在/etc/nginx目录下,使用Vim编辑/etc/nginx/nginx.conf: ---------------------- ...
- pthread
pthread是UNIX操作系统中创建和控制线程的一系列API,通过了解这些API,可以更加清晰的理解线程究竟是什么. 调用pthread的API首先要包含<pthread.h>这一头文件 ...