
WebGPU学习(八):学习“texturedCube”示例
大家好,本文学习Chrome->webgpu-samplers->texturedCube示例。
上一篇博文:
WebGPU学习(七):学习“twoCubes”和“instancedCube”示例
下一篇博文:
WebGPU学习(九):学习“fractalCube”示例
学习texturedCube.ts
最终渲染结果:

该示例绘制了有一个纹理的立方体。
与“rotatingCube”示例相比,该示例增加了下面的步骤:
- 传输顶点的uv数据
- 增加了sampler和sampled-texture类型的uniform数据
下面,我们打开texturedCube.ts文件,依次分析增加的步骤:
传递顶点的uv数据
- shader加入uv attribute
代码如下:
  const vertexShaderGLSL = `#version 450

  ...

  layout(location = 0) in vec4 position;

  layout(location = 1) in vec2 uv;

  layout(location = 0) out vec2 fragUV;

  layout(location = 1) out vec4 fragPosition;

  void main() {

    fragPosition = 0.5 * (position + vec4(1.0));

    ...

    fragUV = uv;

  }

  `;

  const fragmentShaderGLSL = `#version 450

  layout(set = 0, binding = 1) uniform sampler mySampler;

  layout(set = 0, binding = 2) uniform texture2D myTexture;

  layout(location = 0) in vec2 fragUV;

  layout(location = 1) in vec4 fragPosition;

  layout(location = 0) out vec4 outColor;

  void main() {

    outColor =  texture(sampler2D(myTexture, mySampler), fragUV) * fragPosition;

  }

  `;
vertex shader传入了uv attribute数据,并将其传递给fragUV,从而传到fragment shader,作为纹理采样坐标
另外,这里可以顺便说明下:fragPosition用来实现与position相关的颜色渐变效果
- uv数据包含在verticesBuffer的cubeVertexArray中
cubeVertexArray的代码如下:
cube.ts:

export const cubeUVOffset = 4 * 8;

export const cubeVertexArray = new Float32Array([

    // float4 position, float4 color, float2 uv,

    1, -1, 1, 1,   1, 0, 1, 1,  1, 1,

    -1, -1, 1, 1,  0, 0, 1, 1,  0, 1,

    -1, -1, -1, 1, 0, 0, 0, 1,  0, 0,

    1, -1, -1, 1,  1, 0, 0, 1,  1, 0,

    1, -1, 1, 1,   1, 0, 1, 1,  1, 1,

    -1, -1, -1, 1, 0, 0, 0, 1,  0, 0,

    ...

]);
创建和设置verticesBuffer的相关代码如下:
texturedCube.ts:

  const verticesBuffer = device.createBuffer({

    size: cubeVertexArray.byteLength,

    usage: GPUBufferUsage.VERTEX | GPUBufferUsage.COPY_DST

  });

  verticesBuffer.setSubData(0, cubeVertexArray);

  ...

  return function frame() {

    ...

    passEncoder.setVertexBuffer(0, verticesBuffer);

    ...

  }
- 创建render pipeline时指定uv attribute的相关数据
代码如下:
  const pipeline = device.createRenderPipeline({

    ...

    vertexState: {

      vertexBuffers: [{

        ...

        attributes: [

        ...

        {

          // uv

          shaderLocation: 1,

          offset: cubeUVOffset,

          format: "float2"

        }]

      }],

    },

    ...

  });
增加了sampler和sampled-texture类型的uniform数据
WebGPU相对于WebGL1,提出了sampler,可以对它设置filter、wrap等参数,从而实现了texture和sampler自由组合,同一个texture能够以不同filter、wrap来采样
- fragment shader传入这两个uniform数据,用于纹理采样
代码如下:
  const fragmentShaderGLSL = `#version 450

  layout(set = 0, binding = 1) uniform sampler mySampler;

  layout(set = 0, binding = 2) uniform texture2D myTexture;

  layout(location = 0) in vec2 fragUV;

  layout(location = 1) in vec4 fragPosition;

  layout(location = 0) out vec4 outColor;

  void main() {

    outColor =  texture(sampler2D(myTexture, mySampler), fragUV) * fragPosition;

  }

  `;
- 创建bind group layout
代码如下:
  const bindGroupLayout = device.createBindGroupLayout({

    bindings: [

    ...

    {

      // Sampler

      binding: 1,

      visibility: GPUShaderStage.FRAGMENT,

      type: "sampler"

    }, {

      // Texture view

      binding: 2,

      visibility: GPUShaderStage.FRAGMENT,

      type: "sampled-texture"

    }]

  });
- 拷贝图片到texture,返回texture
代码如下,后面会进一步研究:
const cubeTexture = await createTextureFromImage(device, 'assets/img/Di-3d.png', GPUTextureUsage.SAMPLED);
- 创建sampler,指定filter
代码如下:
  const sampler = device.createSampler({

    magFilter: "linear",

    minFilter: "linear",

  });
我们看一下相关定义:
GPUSampler createSampler(optional GPUSamplerDescriptor descriptor = {});

...

dictionary GPUSamplerDescriptor : GPUObjectDescriptorBase {

    GPUAddressMode addressModeU = "clamp-to-edge";

    GPUAddressMode addressModeV = "clamp-to-edge";

    GPUAddressMode addressModeW = "clamp-to-edge";

    GPUFilterMode magFilter = "nearest";

    GPUFilterMode minFilter = "nearest";

    GPUFilterMode mipmapFilter = "nearest";

    float lodMinClamp = 0;

    float lodMaxClamp = 0xffffffff;

    GPUCompareFunction compare = "never";

};
GPUSamplerDescriptor的addressMode指定了texture在u、v、w方向的wrap mode(u、v方向的wrap相当于WebGL1的wrapS、wrapT,w方向是给3d texture用的)
mipmapFilter与mipmap有关,lodXXX与texture lod有关,compare与软阴影的Percentage Closer Filtering技术有关,我们不讨论它们
- 创建uniform bind group时传入sampler、texture的view
  const uniformBindGroup = device.createBindGroup({

    layout: bindGroupLayout,

    bindings: [

    ...

    {

      binding: 1,

      resource: sampler,

    }, {

      binding: 2,

      resource: cubeTexture.createView(),

    }],

  });
参考资料
详细分析“拷贝图片到texture”步骤
相关代码如下:
const cubeTexture = await createTextureFromImage(device, 'assets/img/Di-3d.png', GPUTextureUsage.SAMPLED);
该步骤可以分解为两步:
1.加载图片
2.拷贝解码后类型为HTMLImageElement的图片到GPU的texture中
下面依次分析:
1、加载图片
打开helper.ts文件,查看createTextureFromImage对应代码:
  const img = document.createElement('img');

  img.src = src;

  await img.decode();
这里使用decode api来加载图片。另外一种实现方式是使用img.onload:
  const img = document.createElement('img');

  img.src = src;

  img.onload = (img) => {

    ...

  };
我们来分析下这两种加载方式:
根据Pre-Loading and Pre-Decoding Images with Javascript for Better Performance的说法,图片的加载过程有两个步骤:
1.从服务器加载图片
2.解码图片
对于这两种加载图片的方式,图片的加载过程的第1步都是在其它线程上并行执行,不会阻塞主线程;
如果用onload,则浏览器会在主线程上同步执行第2步,从而阻塞主线程;
如果用decode api,则浏览器会在其它线程上并行执行第2步,不会阻塞主线程。
因为chrome和firefox浏览器都支持decode api,所以加载图片应该优先使用该API。
兼容性情况如下图所示:
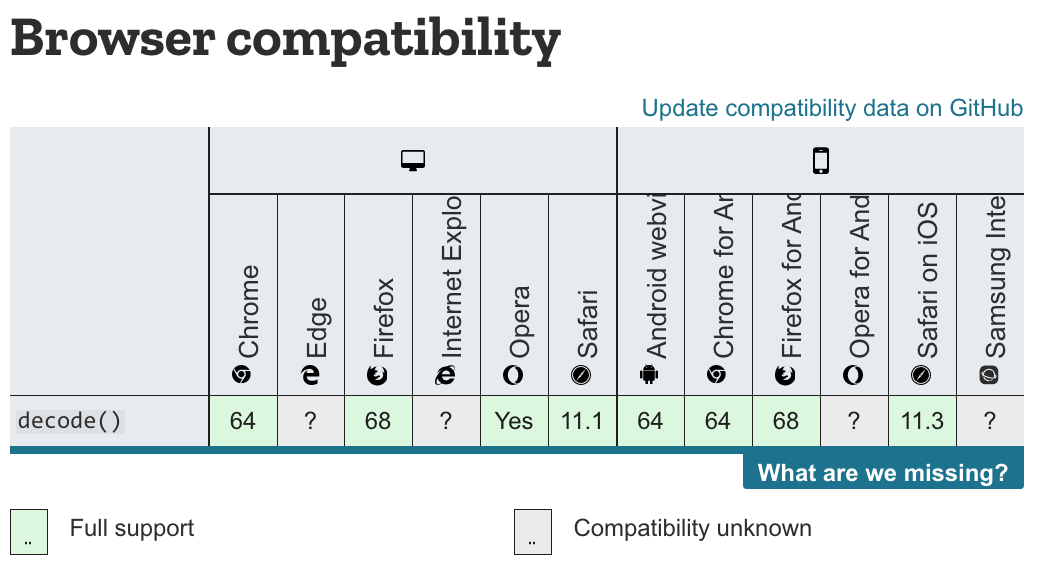
参考资料
Pre-Loading and Pre-Decoding Images with Javascript for Better Performance
Chrome 图片解码与 Image.decode API
2、拷贝图片
WebGL1只能使用texImage2D将图片上传到GPU texture中,而WebGPU能让我们更加灵活地控制上传过程。
WebGPU有两种方法上传:
- 创建图片对应的imageBitmap,将其拷贝到GPU texture中
该方法要用到copyImageBitmapToTexture函数。虽然WebGPU规范已经定义了该函数,但目前Chrome Canary不支持它,所以暂时不能用该方法上传。
参考资料
Proposal for copyImageBitmapToTexture
ImageBitmapToTexture design
- 将图片绘制到canvas中,通过getImageData获得数据,将其设置到buffer中,把buffer数据拷贝到GPU texture中
本示例使用这种方法实现上传。
我们来看下createTextureFromImage对应代码:
  const imageCanvas = document.createElement('canvas');

  imageCanvas.width = img.width;

  imageCanvas.height = img.height;

  const imageCanvasContext = imageCanvas.getContext('2d');

  //在绘制图片时将图片在Y方向反转了

  imageCanvasContext.translate(0, img.height);

  imageCanvasContext.scale(1, -1);

  imageCanvasContext.drawImage(img, 0, 0, img.width, img.height);

  const imageData = imageCanvasContext.getImageData(0, 0, img.width, img.height);
这里首先创建canvas,然后绘制图片,最后获得图片数据。
接着看后续代码:
  let data = null;

  const rowPitch = Math.ceil(img.width * 4 / 256) * 256;

  if (rowPitch == img.width * 4) {

    data = imageData.data;

  } else {

    data = new Uint8Array(rowPitch * img.height);

    for (let y = 0; y < img.height; ++y) {

      for (let x = 0; x < img.width; ++x) {

        let i = x * 4 + y * rowPitch;

        data[i] = imageData.data[i];

        data[i + 1] = imageData.data[i + 1];

        data[i + 2] = imageData.data[i + 2];

        data[i + 3] = imageData.data[i + 3];

      }

    }

  }

  const texture = device.createTexture({

    size: {

      width: img.width,

      height: img.height,

      depth: 1,

    },

    format: "rgba8unorm",

    usage: GPUTextureUsage.COPY_DST | usage,

  });

  const textureDataBuffer = device.createBuffer({

    size: data.byteLength,

    usage: GPUBufferUsage.COPY_DST | GPUBufferUsage.COPY_SRC,

  });

  textureDataBuffer.setSubData(0, data);
rowPitch需要为256的倍数(也就是说,图片的宽度需要为64px的倍数),这是因为Dx12对此做了限制(参考Copies investigation):
RowPitch must be aligned to D3D12_TEXTURE_DATA_PITCH_ALIGNMENT.
Offset must be aligned to D3D12_TEXTURE_DATA_PLACEMENT_ALIGNMENT, which is 512.
另外,关于纹理尺寸,可以参考WebGPU-6:
第一个问题是关于纹理尺寸的,回答是WebGPU没有对尺寸有特别明确的要求。sample code中最多不能比4kor8k大就行。这个也不是太难理解,OpenGL对纹理和FBO的尺寸总是有上限的。
另外,根据我的测试,buffer(代码中的textureDataBuffer)中的图片数据需要为未压缩的图片数据(它的类型为Uint8Array,length=img.width * img.height * 4(因为每个像素有r、g、b、a这4个值)),否则会报错(在我的测试中,“通过canvas->toDataURL得到图片的base64,将其转为Uint8Array,得到压缩后的图片数据,将其设置到buffer中”会报错)
继续看后续代码:
  const commandEncoder = device.createCommandEncoder({});

  commandEncoder.copyBufferToTexture({

    buffer: textureDataBuffer,

    rowPitch: rowPitch,

    imageHeight: 0,

  }, {

    texture: texture,

  }, {

    width: img.width,

    height: img.height,

    depth: 1,

  });

  device.defaultQueue.submit([commandEncoder.finish()]);

  return texture;
这里提交了copyBufferToTexture这个command到GPU,并返回texture
(注:这个command此时并没有执行,会由GPU决定什么时候执行)
WebGPU支持buffer与buffer、buffer与texture、texture与texture之间互相拷贝。
参考资料
3 channel formats
Copies investigation (+ proposals)
参考资料
WebGPU规范
webgpu-samplers Github Repo
WebGPU-6
WebGPU学习(八):学习“texturedCube”示例的更多相关文章
- WebGPU学习(七):学习“twoCubes”和“instancedCube”示例
大家好,本文学习Chrome->webgpu-samplers->twoCubes和instancedCube示例. 这两个示例都与"rotatingCube"示例差不 ...
- Python Tutorial 学习(八)--Errors and Exceptions
Python Tutorial 学习(八)--Errors and Exceptions恢复 Errors and Exceptions 错误与异常 此前,我们还没有开始着眼于错误信息.不过如果你是一 ...
- Deep Learning(深度学习)学习笔记整理系列之(八)
Deep Learning(深度学习)学习笔记整理系列 zouxy09@qq.com http://blog.csdn.net/zouxy09 作者:Zouxy version 1.0 2013-04 ...
- SVG 学习<八> SVG的路径——path(2)贝塞尔曲线命令、光滑贝塞尔曲线命令
目录 SVG 学习<一>基础图形及线段 SVG 学习<二>进阶 SVG世界,视野,视窗 stroke属性 svg分组 SVG 学习<三>渐变 SVG 学习<四 ...
- Angular 快速学习笔记(1) -- 官方示例要点
创建组件 ng generate component heroes {{ hero.name }} {{}}语法绑定数据 管道pipe 格式化数据 <h2>{{ hero.name | u ...
- 20155318 2016-2017-2 《Java程序设计》第八学习总结
20155318 2016-2017-2 <Java程序设计>第八学习总结 教材学习内容总结 学习目标 了解NIO 会使用Channel.Buffer与NIO2 会使用日志API.国际化 ...
- SQL 数据库 学习 007 通过一个示例简单介绍什么是字段、属性、列、元组、记录、表、主键、外键 (上)
SQL 数据库 学习 007 通过一个示例简单介绍什么是字段.属性.列.元组.记录.表.主键.外键 (上) 我们来介绍一下:数据库是如何存储数据的. 数据库是如何存储数据的 来看一个小例子 scott ...
- Deep Learning(深度学习)学习笔记整理系列之(五)
Deep Learning(深度学习)学习笔记整理系列 zouxy09@qq.com http://blog.csdn.net/zouxy09 作者:Zouxy version 1.0 2013-04 ...
- Deep Learning(深度学习)学习笔记整理系列之(七)
Deep Learning(深度学习)学习笔记整理系列 zouxy09@qq.com http://blog.csdn.net/zouxy09 作者:Zouxy version 1.0 2013-04 ...
随机推荐
- [CSP-S模拟测试]:硬币(博弈论+DP+拓展域并查集)
题目传送门(内部题135) 输入格式 第一行包含一个整数$T$,表示数据组数. 对于每组数据,第一行两个整数$h,w$,表示棋盘大小. 接下来$h$行,每行一个长度为$w$的字符串,每个位置由为$o, ...
- 从setContentView()源码看起
2.1 Activity::setContentView() public void setContentView(@LayoutRes int layoutResID) { getWindow(). ...
- Spring Boot使用阿里云证书启用HTTPS
1.到阿里云下载证书页面下载证书 2.根据页面内容,可以使用2种证书:PFX JKS 把对应证书放到src/main/resources目录下 在application.properties文件中加入 ...
- js style.display = "" 和style.display="none" 区别
style.display = "":是清除display样式,display将使用默认值(块元素会变成block,内联元素会变成inline)style.display=&quo ...
- HttpURLConnection 和HttpClient 哪个好
最近在研究Volley框架的源码,发现它在HTTP请求的使用上比较有意思,在Android 2.3及以上版本,使用的是HttpURLConnection,而在Android 2.2及以下版本,使用的是 ...
- 三种CSS样式
内联式css样式,直接写在现有的HTML标签中 CSS样式可以写在哪些地方呢?从CSS 样式代码插入的形式来看基本可以分为以下3种:内联式.嵌入式和外部式三种. 内联式css样式表就是把css代码直接 ...
- IDEA项目添加第三方依赖
1.在项目WEB-INF文件夹下面新建一个lib文件夹并将我们需要的第三方jar包拷贝进去: Ctrl+Shift+Alt+S打开项目配置页面: 选择我们存放jar包的文件夹: 选择我们需要引入目标依 ...
- pip安装selenium时,报错“You are using pip version 10.0.1, however version 18.0 is available.”的问题
pip安装selenium,pip install selenium 类型这样错误 1 原因可能不是以管理员身份运行cmd安装selenium 2 解决方式 也是要管理员身份运行 重点在最后一句 ...
- [doker]ubuntu18安装doker
ubuntu安装doker很简单,分4个步骤: Step1:更新资源库并安装apt-transprot-https软件包. 在安装Docker前, 首拉取最新的软件资源库 wangju@wangju- ...
- spingboot之Java邮件发送
注意: 该项目的工具类可以直接应用于项目 1.pom.xml <?xml version="1.0" encoding="UTF-8"?> < ...