python Rabbitmq编程(一)
python Rabbitmq编程(一)
实现最简单的队列通信

send端
#!/usr/bin/env python

import pika

credentials = pika.PlainCredentials("用户名","密码")

connection = pika.BlockingConnection(pika.ConnectionParameters(

    'localhost',credentials=credentials))

channel = connection.channel() #建立了rabbit协议的通道

# 声明queue

channel.queue_declare(queue='hello')

# n RabbitMQ a message can never be sent directly to the queue, it always needs to go through an exchange.

channel.basic_publish(exchange='',

                      routing_key='hello',

                      body='Hello World!')

print(" [x] Sent 'Hello World!'")

connection.close()
receive端
# _*_coding:utf-8_*_

__author__ = 'Alex Li'

import pika

credentials = pika.PlainCredentials("用户名","密码")

connection = pika.BlockingConnection(pika.ConnectionParameters(

    'localhost',credentials=credentials))

channel = connection.channel() #建立了rabbit协议的通道

# You may ask why we declare the queue again ‒ we have already declared it in our previous code.

# We could avoid that if we were sure that the queue already exists. For example if send.py program

# was run before. But we're not yet sure which program to run first. In such cases it's a good

# practice to repeat declaring the queue in both programs.

channel.queue_declare(queue='hello')

def callback(ch, method, properties, body):

    print(" [x] Received %r" % body)

# callback函数当拿到队列里的值,则调用

channel.basic_consume(callback,

                      queue='hello',

                      no_ack=True)

print(' [*] Waiting for messages. To exit press CTRL+C')

channel.start_consuming()
#注意:远程连接rabbitmq server的话,需要配置权限。
#1.设置用户与密码
# > rabbitmqctl add_user name pass

# > rabbitmqctl set_user_tags name administrator
#2.设置权限,允许从外面访问
# rabbitmqctl set_permissions -p /name ".*" ".*" ".*"
set_permissions [-p vhost] {user} {conf} {write} {read}

vhost

The name of the virtual host to which to grant the user access, defaulting to /.

user

The name of the user to grant access to the specified virtual host.

conf

A regular expression matching resource names for which the user is granted configure permissions.

write

A regular expression matching resource names for which the user is granted write permissions.

read

A regular expression matching resource names for which the user is granted read permissions.
set_permissions补充
#3.生产者与消费者添加认证信息
credentials = pika.PlainCredentials("用户名","密码")
#为什么要声明两次queue,这里hello为队列名

# channel.queue_declare(queue='hello')

# 解决发起者先启动,而接收者还没有启动,发送者先创建queue,

# 如果发起者已经声明了,接收者会检测有没有queue,如果有了,实际接收者是不会执行声明的,没有就会声明这个queue。
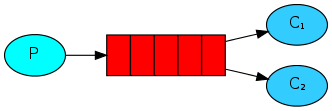
消息公平分发(循环调度)
在这种模式下,RabbitMQ会默认把p发的消息依次分发给各个消费者(c)。
轮巡公平的发送给接收者,比如第一次发送给第一个接收者,第二次发送给第二格接受者,如此。
send端
import pika

import time

credentials = pika.PlainCredentials("用户名","密码")

connection = pika.BlockingConnection(pika.ConnectionParameters(

    'localhost',credentials=credentials))

channel = connection.channel()

# 声明queue

channel.queue_declare(queue='task_queue')

# n RabbitMQ a message can never be sent directly to the queue, it always needs to go through an exchange.

import sys

message = ' '.join(sys.argv[1:]) or "Hello World! %s" % time.time()

channel.basic_publish(exchange='',

                      routing_key='task_queue',

                      body=message,

                      properties=pika.BasicProperties(

                          delivery_mode=2,  # make message persistent

                      )

                      )

print(" [x] Sent %r" % message)

connection.close()
receive端
# _*_coding:utf-8_*_

import pika, time

credentials = pika.PlainCredentials("用户名","密码")

connection = pika.BlockingConnection(pika.ConnectionParameters(

    'localhost',credentials=credentials))

channel = connection.channel()

def callback(ch, method, properties, body):

    print(" [x] Received %r" % body)

    time.sleep(20)

    print(" [x] Done")

    print("method.delivery_tag", method.delivery_tag)

    ch.basic_ack(delivery_tag=method.delivery_tag)

channel.basic_consume(callback,

                      queue='task_queue',

                      no_ack=True

                      )

print(' [*] Waiting for messages. To exit press CTRL+C')

channel.start_consuming()
消息确认
执行任务可能需要几秒钟。你可能想知道如果其中一个消费者开始一项长期任务并且只是部分完成而死亡会发生什么。使用我们当前的代码,一旦RabbitMQ向消费者传递消息,它立即将其标记为删除。在这种情况下,如果你杀死一个工人,我们将丢失它刚刚处理的消息。我们还将丢失分发给这个特定工作者但尚未处理的所有消息。
但我们不想失去任何任务。如果工人死亡,我们希望将任务交付给另一名工人。
为了确保消息永不丢失,RabbitMQ支持 消息确认。消费者发回ack(nowledgement)告诉RabbitMQ已收到,处理了特定消息,RabbitMQ可以自由删除它。
如果消费者死亡(其通道关闭,连接关闭或TCP连接丢失)而不发送确认,RabbitMQ将理解消息未完全处理并将重新排队。如果同时有其他在线消费者,则会迅速将其重新发送给其他消费者。这样你就可以确保没有消息丢失,即使工人偶尔会死亡。
没有任何消息超时; 当消费者死亡时,RabbitMQ将重新发送消息。即使处理消息需要非常长的时间,也没关系。
默认情况下,手动消息确认已打开。在前面的示例中,我们通过auto_ack = True 标志明确地将它们关闭。在我们完成任务后,是时候删除此标志并从工作人员发送适当的确认。
def callback(ch, method, properties, body):

    print " [x] Received %r" % (body,)

    time.sleep( body.count('.') )

    print " [x] Done"

    ch.basic_ack(delivery_tag = method.delivery_tag)

channel.basic_consume(callback,

                      queue='hello')
Using this code we can be sure that even if you kill a worker using CTRL+C while it was processing a message, nothing will be lost. Soon after the worker dies all unacknowledged messages will be redelivered
消息持久化
我们已经学会了如何确保即使消费者死亡,任务也不会丢失。但是如果RabbitMQ服务器停止,我们的任务仍然会丢失。
当RabbitMQ退出或崩溃时,它将忘记队列和消息,除非你告诉它不要。确保消息不会丢失需要做两件事:我们需要将队列和消息都标记为持久。
首先,我们需要确保RabbitMQ永远不会丢失我们的队列。为此,我们需要声明它是持久的:
channel.queue_declare(queue='hello', durable=True)
虽然此命令本身是正确的,但它在我们的设置中不起作用。那是因为我们已经定义了一个名为hello的队列 ,这个队列不耐用。RabbitMQ不允许您使用不同的参数重新定义现有队列,并将向尝试执行此操作的任何程序返回错误。但是有一个快速的解决方法 - 让我们声明一个具有不同名称的队列,例如task_queue:
channel.queue_declare(queue='task_queue', durable=True)
此queue_declare更改需要应用于生产者和消费者代码。
此时我们确信即使RabbitMQ重新启动,task_queue队列也不会丢失。现在我们需要将消息标记为持久性 - 通过提供值为2的delivery_mode属性。
channel.basic_publish(exchange='',

                      routing_key="task_queue",

                      body=message,

                      properties=pika.BasicProperties(

                         delivery_mode = 2, # make message persistent

                      ))
负载均衡
如果Rabbit只管按顺序把消息发到各个消费者身上,不考虑消费者负载的话,很可能出现,一个机器配置不高的消费者那里堆积了很多消息处理不完,同时配置高的消费者却一直很轻松。为解决此问题,可以在各个消费者端,
配置perfetch_count=1,意思就是告诉RabbitMQ在我这个消费者当前消息还没处理完的时候就不要再给我发新消息了。

send端
#!/usr/bin/env python

import pika

import sys

connection = pika.BlockingConnection(

    pika.ConnectionParameters(host='localhost'))

channel = connection.channel()

channel.queue_declare(queue='task_queue', durable=True)

message = ' '.join(sys.argv[1:]) or "Hello World!"

channel.basic_publish(

    exchange='',

    routing_key='task_queue',

    body=message,

    properties=pika.BasicProperties(

        delivery_mode=2,  # make message persistent

    ))

print(" [x] Sent %r" % message)

connection.close()
receive端
#!/usr/bin/env python

import pika

import time

connection = pika.BlockingConnection(

    pika.ConnectionParameters(host='localhost'))

channel = connection.channel()

channel.queue_declare(queue='task_queue', durable=True)

print(' [*] Waiting for messages. To exit press CTRL+C')

def callback(ch, method, properties, body):

    print(" [x] Received %r" % body)

    time.sleep(body.count(b'.'))

    print(" [x] Done")

    ch.basic_ack(delivery_tag=method.delivery_tag)

channel.basic_qos(prefetch_count=1)

channel.basic_consume(queue='task_queue', on_message_callback=callback)

channel.start_consuming()
python Rabbitmq编程(一)的更多相关文章
- Python并发编程-RabbitMQ消息队列
RabbitMQ队列 RabbitMQ是一个在AMQP基础上完整的,可复用的企业消息系统.他遵循Mozilla Public License开源协议. MQ全称为Message Queue, 消息队列 ...
- python网络编程--RabbitMQ
一:RabbitMQ介绍 RabbitMQ是AMPQ(高级消息协议队列)的标准实现.也就是说是一种消息队列. 二:RabbitMQ和线程进程queue区别 线程queue:不能跨进程,只能用于多个线程 ...
- Python网络编程学习_Day11
一.协程 1.理论知识 协程,又称伪线程,是一种用户态的轻量级线程. 协程拥有自己的寄存器上下文和栈,协程调度切换时,将寄存器上下文和栈保存到其他地方,在切回来的时候,恢复先前保存的寄存器上下文和栈. ...
- Python并发编程-并发解决方案概述
Python并发编程-并发解决方案概述 作者:尹正杰 版权声明:原创作品,谢绝转载!否则将追究法律责任. 一.并发和并行区别 1>.并行(parallel) 同时做某些事,可以互不干扰的同一个时 ...
- Python Socket 编程——聊天室示例程序
上一篇 我们学习了简单的 Python TCP Socket 编程,通过分别写服务端和客户端的代码了解基本的 Python Socket 编程模型.本文再通过一个例子来加强一下对 Socket 编程的 ...
- python多线程编程
Python多线程编程中常用方法: 1.join()方法:如果一个线程或者在函数执行的过程中调用另一个线程,并且希望待其完成操作后才能执行,那么在调用线程的时就可以使用被调线程的join方法join( ...
- python 面向对象编程学习
1. 问题:将所有代码放入一个py文件:无法维护 方案:如果将代码才分放到多个py文件,好处: 1. 同一个名字的变量互相不影响 2.易于维护 3.引用模块: import module 2.包:解决 ...
- Python 网络编程(二)
Python 网络编程 上一篇博客介绍了socket的基本概念以及实现了简单的TCP和UDP的客户端.服务器程序,本篇博客主要对socket编程进行更深入的讲解 一.简化版ssh实现 这是一个极其简单 ...
- Python 网络编程(一)
Python 网络编程 socket通常也称作"套接字",用于描述IP地址和端口,是一个通信链的句柄,应用程序通常通过"套接字"向网络发出请求或者应答网络请求. ...
随机推荐
- Monkeyrunner自动化测试由浅入深(第一节)
(原版)Monkeyrunner自动化测试由浅入深(第一节) 博主原创,请勿转载 第一.相关软件和环境的配置 1.Android sdk下载和配置 2.java jdk下载和配置 第二.Monkeyr ...
- 探究代码审查(Code review)
Code review 是什么 对软件源代码的系统性检查,查找软件源代码质量,结构,漏洞等问题. PS:Code review ≍ Code inspections ≥ Code walkthrou ...
- 大数据笔记(二十八)——执行Spark任务、开发Spark WordCount程序
一.执行Spark任务: 客户端 1.Spark Submit工具:提交Spark的任务(jar文件) (*)spark提供的用于提交Spark任务工具 (*)example:/root/traini ...
- HTTP协议初步认识
1.基本概念: HTML:HyperText Transfer Protocol,中文名:超文本传输协议,基于请求/响应模式,基于TCP/IP协议,是一种,无连接,无状态协议: 2.HTTP传输过程: ...
- zay大爷的神仙题目 D1T1-大美江湖
在前几天的时候,千古神犇zay(吊打zhx那个)出了一套神仙题目,所以我得来分析分析QWQ 先补个网易云链接QWQ 毕竟是T1嘛,还算是比较简单的,那道题,读完题目就发现是个中等模拟(猪国杀算大模拟的 ...
- value是列表的字典排序
# -*- coding: utf-8 -*- def dict_test(): #构造Map并对其排序 attr_tul = list(['a','b','c']) one_tul = ,],[,] ...
- JavaSE部分1.Java基础
1.为什么重写equals()还要重写hashcode()? (equals()和hashCode()是java Object中两个基本方法) 首先equals与hashcode间的关系是这样的: ...
- HTTP学习记录:一、协议基础
学习资源主要为:@小坦克HTTP相关博客 1.HTTP简介: HTTP协议是Hyper Text Transfer Portocol(超文本传输协议)的缩写,它是一种通信协议,允许将超文本(即:htm ...
- MySQL 常用报错注入原理分析
简介 这段时间学习SQL盲注中的报错注入,发现语句就是那么两句,但是一直不知道报错原因,所以看着别人的帖子学习一番,小本本记下来 (1) count() , rand() , group by 1.报 ...
- windows环境下PostgreSQL的安装
1.首先在如下链接下载PostgreSQL的压缩包,我这里下载的是postgresql-12.1-1-windows-x64-binaries.zip. https://www.enterprised ...