
模拟MVC-WebForm实现ModelBinding
(一) 前言
用ASP.NET MVC的时候,我们都知道在提交表单的时候可以自动模型绑定到对应的实体上,这样开发者就不需要手动将表单数据转换成对应的model了。
然而,在WebForm中没有提供现成的方法让我们自动绑定模型,所以,我就通过反射写了一个泛型方法进行自动的模型绑定,同时还提供基本的数据验证。
(二) 编写ModelBinding方法
我们在BasePage类(此类继承自System.Web.UI.Page)中编写ModelBing方法。
代码如下:
 #region 模型绑定

         //模型绑定的错误消息

         public Dictionary<string, string> ErrorMsgs = new Dictionary<string, string>();

         //是否验证通过

         public bool IsValidated { get; set; }

         /// <summary>

         /// 手写模型绑定器--添加编辑数据时使用--对数据的验证不是很精确,主要还要依赖前台验证

         /// </summary>

         /// <typeparam name="T"></typeparam>

         /// <returns></returns>

         public T ModelBinding<T>(params T[] entityP)

         {

             object entity = Activator.CreateInstance(typeof(T));//添加

             if (entityP != null && entityP.Length > )//编辑

             {

                 entity = entityP[];

             }

             Type types = entity.GetType();

             var pros = types.GetProperties();

             Dictionary<string, System.Reflection.PropertyInfo> proNames = new Dictionary<string, System.Reflection.PropertyInfo>();

             foreach (var p in pros)

             {

                 proNames.Add(p.Name, p);

             }

             var forms = Request.Form;

             var keys = forms.AllKeys;

             foreach (var key in keys)

             {

                 if (proNames.Keys.Contains(key))

                 {

                     var pro = proNames[key];

                     var type = pro.PropertyType;

                     var columnValue = forms[key];

                     if (string.IsNullOrEmpty(columnValue))//数据表列值不为空

                     {

                         continue;

                     }

                     try

                     {

                         if (type.IsEnum)//若果属性是枚举类型

                         {

                             pro.SetValue(entity, Enum.ToObject(type, columnValue), null);

                         }

                         else

                         {

                             if (type.IsGenericType && type.Name.StartsWith("Nullable"))//泛型类型

                             {

                                 type = Nullable.GetUnderlyingType(type);

                             }

                             pro.SetValue(entity, Convert.ChangeType(columnValue, type), null);

                         }

                     }

                     catch (Exception ex)

                     {

                         ErrorMsgs.Add(key, ex.Message);

                     }

                 }

             }

             IsValidated = ErrorMsgs.Count >  ? false : true;

             return (T)entity;

         }

         #endregion
说明:上述代码利用反射、泛型实现了简单的模型绑定和数据非法性的验证。
其中,表单数据的name必须和数据库表对应的列名一致。
(三) 表单aspx页面的约束
说明:表单数据的验证先在前台通过validate.js验证一遍,然后在服务端再次自动验证一遍。
因为是模拟ASP.NET MVC进行的模型绑定,所以在此页面上就完全不需要服务端控件了,这也极大的提高服务器了性能。
表单页面代码如下:
<%@ Page Language="C#" AutoEventWireup="true" ValidateRequest="false" CodeFile="NoticeEdit.aspx.cs" Inherits="Information_NoticeEdit" %> <!DOCTYPE html> <html xmlns="http://www.w3.org/1999/xhtml">
<head id="Head1" runat="server">
<meta http-equiv="Content-Type" content="text/html; charset=utf-8" />
<title></title>
<%--基础样式--%>
<link rel="stylesheet" type="text/css" href="../Styles/admin-all.css" />
<link rel="stylesheet" type="text/css" href="../Styles/base.css" />
<link rel="stylesheet" type="text/css" href="../Styles/formui.css" />
<link href="../Styles/ui-lightness/jquery-ui-1.8.22.custom.css" rel="stylesheet" /> <script src="../Scripts/JQuery/jquery-1.7.2.min.js"></script>
<script src="../Scripts/JQuery/jquery-ui-1.8.22.custom.min.js"></script>
<%--表格特效--%>
<script src="../Scripts/tb.js"></script> <!--JBOX弹出插件-->
<script src="../Scripts/JBox/jquery.jBox-2.3.min.js" type="text/javascript"></script>
<!--JBOX弹出插件样式-->
<link href="../Scripts/JBox/Skins/Blue/jbox.css" rel="stylesheet" type="text/css" />
<!--JBOX全局默认值-->
<script src="../Scripts/JBox/i18n/jquery.jBox-zh-CN.js" type="text/javascript"></script> <!--验证-->
<link href="../Scripts/validate/validate.css" rel="stylesheet" />
<!--验证-->
<script src="../Scripts/validate/jquery.validate.js"></script>
<!--汉化验证信息-->
<script src="../Scripts/validate/messages_cn.js"></script>
<!--日期控件-->
<%--<script src="../Scripts/My97DatePicker/WdatePicker.js"></script>--%>
<%--kindeditor--%>
<link href="../Scripts/kindeditor-4.1.10/themes/default/default.css" rel="stylesheet" />
<script src="../Scripts/kindeditor-4.1.10/kindeditor-min.js"></script>
<script src="../Scripts/kindeditor-4.1.10/lang/zh_CN.js"></script>
<script type="text/javascript">
$(function () {
var vForm = $("#form1").validate({
errorElement: "span",
rules: {
Title: {required:true,maxlength:64},
Contents: {required:true,maxlength:64},
AddUserName: {required:true,maxlength:16},
FromWhere: { required: true,maxlength:64 },
Sort: {digits:true},
Remark: { maxlength: 256 } },
messages: {
Title: {required:"必填信息",maxlength:"最大长度64"},
Contents: {required:"必填信息",maxlength:"最大长度64"},
AddUserName: {required:"必填信息",maxlength:"最大长度16"},
FromWhere: {required:"必填信息",maxlength:"最大长度64"},
Sort: {number:"必须是整数"},
Remark: { maxlength: "最大长度256" } }
});
}) var content = null;
KindEditor.ready(function (K) {
content = K.create("#Contents", {
cssPath: '../kindeditor-4.1.10/plugins/code/prettify.css',
uploadJson: '../kindeditor-4.1.10/asp.net/upload_json.ashx',
fileManagerJson: '../kindeditor-4.1.10/asp.net/file_manager_json.ashx',
allowFileManager: true,
afterCreate: function () {
this.sync();
},
afterBlur: function () {
this.sync();
}
});
prettyPrint();
}); </script> </head>
<body>
<form id="form1" runat="server">
<div class="alert alert-info">当前位置<b class='tip'></b><%=ListTitle %></div>
<%-- 刷新返回--%>
<table class="tb">
<tr height="45">
<th>
<input type="button" class="btn" onclick='window.location.href=window.location.href;' value="刷新" />
<input type="button" class="btn" onclick='window.location.href="<%=ListUrl %> ";' value="返回" />
</th>
</tr>
</table> <%--表单--%>
<table class="tbform">
<tbody> <tr height="38">
<td class="tdl" width="80">标题</td>
<td class="detail">
<input type="text" id="Title" name="Title" value='<%=entity.Title %>' class="required width300 " />
</td>
</tr>
<tr height="38">
<td class="tdl">内容</td>
<td class="detail">
<textarea name="Contents" id="Contents" style="width:670px;height:350px;visibility:hidden;" ><%=entity.Contents %></textarea>
</td>
</tr>
<tr height="38">
<td class="tdl">作者</td>
<td class="detail">
<input type="text" id="AddUserName" name="AddUserName" value='<%=entity.AddUserName %>' class="required width300" />
</td>
</tr>
<tr height="38">
<td class="tdl">来源</td>
<td class="detail">
<input type="text" id="FromWhere" name="FromWhere" value='<%=entity.FromWhere %>' class="required width300" />
</td>
</tr>
<tr height="38">
<td class="tdl">排序</td>
<td class="detail">
<input type="text" id="Sort" name="Sort" value='<%=entity.Sort==null?"50":entity.Sort.Value.ToString() %>' class="ipt width300" />
</td>
</tr>
<tr height="38">
<td class="tdl">备注</td>
<td class="detail">
<textarea id="Remark" name="Remark" cols="48" rows="5"><%=entity.Remark %></textarea>
</td>
</tr>
</tbody>
</table> <%--提交返回--%>
<table class="tb">
<tr height="45">
<th align="left">
<input class="btn btn-success" id="find" type="submit" value="提交" />
<input type="button" class="btn" onclick='window.location.href="<%=ListUrl %> ";' value="返回" />
</th> </tr>
</table>
<input type="hidden" id="hiddenId" name="hiddenId" value='<%=entity.Id==0?"":entity.Id.ToString() %>' />
</form>
</body>
</html>
aspx页面代码
(四) 表单后台的自动添加修改
说明:由于是实现模型的自动绑定,所以就不能再手动的进行表单的组装了,通过下面可以看到,再也没有事件驱动了,表单数据也清爽了很多。
 using System;

 using System.Collections.Generic;

 using System.Linq;

 using System.Web;

 using System.Web.UI;

 using System.Web.UI.WebControls;

 public partial class Information_NoticeEdit : WebBase.BasePage

 {

     protected string ListTitle = "信息管理<b class='tip'></b>公告编辑";

     protected string EditUrl = "NoticeEdit.aspx";

     protected string ListUrl = "NoticeList.aspx";

     protected BLL.Info_NoticeBLL bll = BLL.BLLSession.Info_NoticeBLL;//当前数据访问网关

     protected Model.Info_Notice entity = null;

     protected void Page_Load(object sender, EventArgs e)

     {

         //权限验证

         CheckUserPermission("NoticeManager", WebBase.BaseEnum.ActionEnum.View);

         if (!IsPostBack)

         {

             LoadData();

         }

         else

         {

             if (!string.IsNullOrEmpty(GetFormString("hiddenId")))

             {

                 ModifyData();

             }

             else

             {

                 AddData();

             }

         }

     }

     //修改时加载数据

     protected void LoadData()

     {

         entity = bll.GetEntityById(GetQueryInt("id"));

         if (entity == null)

         {

             entity = new Model.Info_Notice();

         }

     }

     //添加数据

     protected void AddData()

     {

         //添加时,模型绑定

         entity = ModelBinding<Model.Info_Notice>();

         entity.AddUser = GetUser().Id;

         entity.AddTime = DateTime.Now;

         entity.Deleted = false;

         if (IsValidated&&bll.AddEntity(entity))

         {

             ShowJbox("添加成功", ListUrl, "success");

         }

         else

         {

             ShowJbox("添加失败", "error");

         }

     }

     //修改数据

     protected void ModifyData()

     {

         entity = bll.GetEntityById(GetFormInt("hiddenId"));

         //修改时,模型绑定

         entity = ModelBinding<Model.Info_Notice>(entity);

         entity.ModUser = GetUser().Id;

         entity.ModTime = DateTime.Now;

         if (IsValidated && bll.ModifyEntity(entity))

         {

             ShowJbox("修改成功", ListUrl, "success");

         }

         else

         {

             ShowJbox("修改失败", "error");

         }

     }

 }
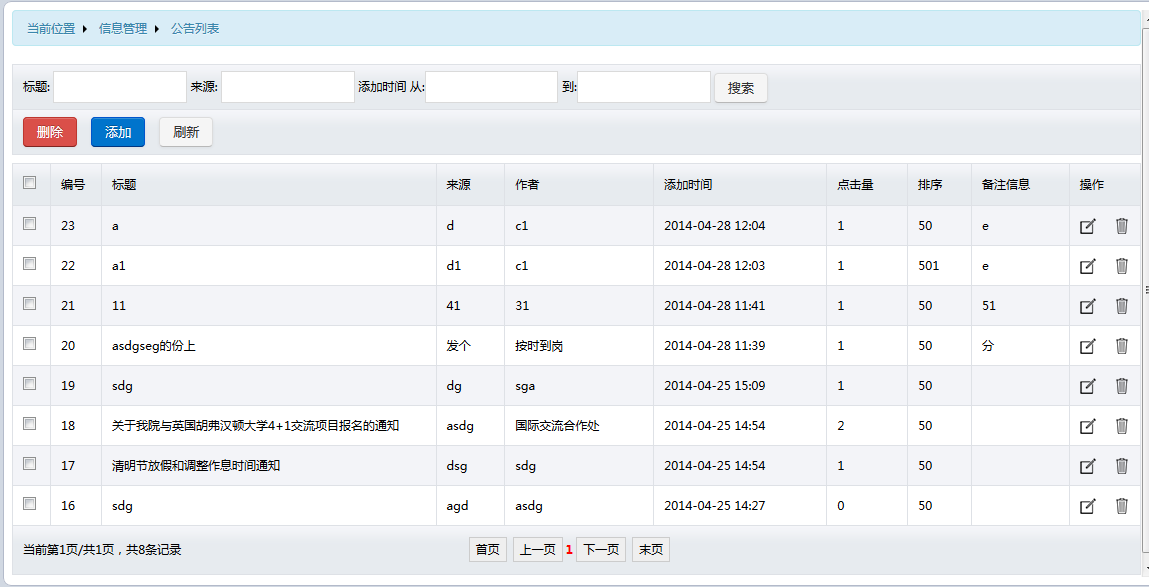
(五) 运行演示
1.列表页面如下:
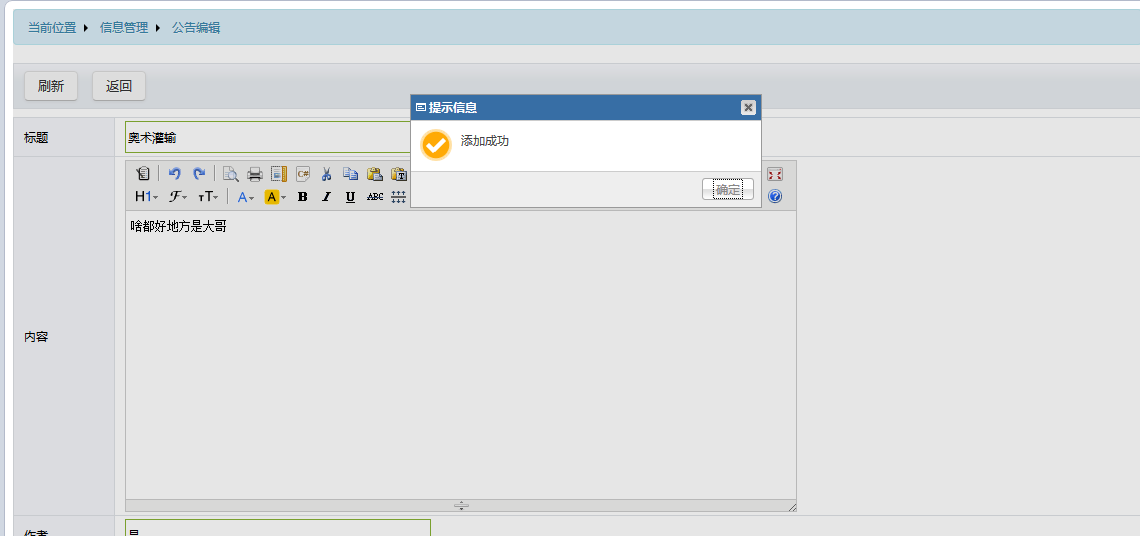
2.添加编辑页面如下:

3.添加 成功如图:
(六) 小结
以上叙述,就完成了在webform中的模型绑定功能的实现。如有错误或者不妥之处,欢迎指正。
模拟MVC-WebForm实现ModelBinding的更多相关文章
- MVC&WebForm对照学习:文件下载
说完了WebForm和MVC中的文件上传,就不得不说用户从服务器端下载资源了.那么今天就扯扯在WebForm和MVC中是如何实现文件下载的.说起WebForm中的文件上传,codeshark在他的博文 ...
- MVC&WebForm对照学习:文件上传(以图片为例)
原文 http://www.tuicool.com/articles/myM7fe 主题 HTMLMVC模式Asp.net 博客园::首页:: :: :: ::管理 5 Posts :: 0 ...
- springBoot单元测试-模拟MVC测试
1)模拟mvc测试,和基础测试是一样的, 都需要在pom文件中引入junit的支持. 略 2)编写测试类 Application1TestMVC 在类头上除啦加入之前的@RunWith(SpringR ...
- asp.net mvc webform和razor的page基类区别
接触过asp.net mvc的都知道,在传统的webform的模式下,page页面的基类是这样声明的: <%@ Page Language="C#" MasterPageFi ...
- .net的WebForm模拟MVC进行模型绑定,让自己少操劳
一.前言 用过MVC的兄弟们都知道,MVC有模型绑定表单提交的数据功能,那么我也想偷个懒也写个WebForm版的模型绑定.这里主要定义一个泛型方法,然后通过反射把表单上对应属性名字的值赋值到反射创建类 ...
- 验证码的种类与实现 C#封装类 - .NET MVC WEBFORM
验证码方式 1.随机字母或者数字,纯文本验证码 这种非常容易破解 ,市场上有大量的现成接口或者工具,背景越复杂难度越高. 2.题库验证码 要破解这种验证码,需要人工收集题库才可以破解,可以免疫不是专门 ...
- MVC&WebForm对照学习:传值方式
刚从webform开发转到mvc,如果说像路由这样稍微复杂一点的知识点还可以暂时先放一放(前提是默认的路由规则基本满足大部分需求),那有个问题在快速开发中,我想是必须要当即解决的,那就是webform ...
- MVC&WebForm对照学习:ajax异步请求
写在前面:由于工作需要,本人刚接触asp.net mvc,虽然webform的项目干过几个.但是也不是很精通.抛开asp.net webform和asp.net mvc的各自优劣和诸多差异先不说.我认 ...
- SharpZipLib.dll 压缩文件,可以应用于MVC, webform. C# windows application 等等地方
Nuget 安装:Install-Package ICSharpCode.SharpZipLib.dll private void WriteZipFile(string[] filesToZip, ...
- Autofc与Mvc,WebForm,Weiapi,Owin整合源码分析
主要分析一下的几个项目: Autofac.Integration.Mvc Autofac.Integration.WebApi Autofac.Integration.Owin Autofac.Int ...
随机推荐
- MongoDB ServerStatus返回信息
ServerStatus返回信息 ServerStatus返回mongodb中很多信息 http://docs.mongodb.org/manual/reference/command/serverS ...
- SQL Server 内存相关博文
Don’t confuse error 823 and error 832 本文大意: 错误832: A page that should have been const ...
- Java Se:Java Security
Java API中有很多都使用了SecurityManager,这到底是什么玩意?最近看公司的产品的源码,也有不少SecurityManager.AccessControlContext等相关的代码, ...
- SSIS技巧--优化数据流缓存
问题 我们经常遇到一种情况,在SSMS中运行很慢的一个查询,当把查询转化成从源到目的数据库的SSIS数据流以后,需要花费几倍的时间!源和数据源都没有任何软硬件瓶颈,并且没有大量的格式转换.之前看了很多 ...
- mysql截取longblob类型字段内一小块数据的方法
由于longblob类型的字段内容一般都好大,最大限制是4G,所以在数据查询中读取一整块数据的方式是不现实的,这需要要截取的方法来获取需要的数据. 方法如下: hex(substring(A, ind ...
- 无穷滚动(Infinite scroll)的实现原理
1 无穷滚动(无限加载)与分页的比较 现在越来越多的网站或者博客的列表页开始抛弃传统的分页技术,大致的原因在于,分页明显地增加了用户的操作行为以及页面加载等待的时间,而网页浏览者往往没什么耐心. 而无 ...
- Linux开机启动(bootstrap)
计算机开机是一个神秘的过程.我们只是按了开机键,就看到屏幕上的进度条或者一行行的输出,直到我们到达登录界面.然而,计算机开机又是个异常脆弱的过程,我们满心期望的登录界面可能并不会出现,而是一个命令行或 ...
- JAVA-android 更改APP名称与图标
首先要在你的资源文件放入你想换的图标图片拖到drawable-XX文件夹下,然后你打开AndroidManifest.xml这个配置清单文件找到application标签里的这句android:ico ...
- git pull
今天在服务器上git pull是出现以下错误: error: Your local changes to the following files would be overwritten by mer ...
- CSS3魔法堂:CSS3滤镜及Canvas、SVG和IE滤镜替代方案详解[转]
一.前言 IE特有的滤镜常常作为CSS3各种新特性的降级处理补充,而Adobe转向HTML5后与Chrome合作推出CSS3的Filter特性,因此当前仅Webkit内核的浏览器支持CSS3 F ...