
android开发--布局三(微信布局)
微信主界面

我们布局应该从局来看,如上图,我们可以分为三个大的LinearLayout,再从LinearLayout嵌套其它布局,从而做出界面
文件
主界面代码:
<LinearLayout xmlns:android="http://schemas.android.com/apk/res/android"

    android:layout_width="match_parent"

    android:layout_height="match_parent"

    android:orientation="vertical" >

    <!-- 头部 -->

    <LinearLayout

        android:layout_width="match_parent"

        android:layout_height="wrap_content" >

        <include layout="@layout/top"/><!--引用其它布局-->

    </LinearLayout>

    <!-- 中间 -->

    <LinearLayout

        android:layout_width="match_parent"

        android:layout_height="wrap_content"

        android:layout_weight="1">

    </LinearLayout>

    <!-- 底部 -->

    <LinearLayout

        android:layout_width="match_parent"

        android:layout_height="wrap_content" >

        <include layout="@layout/buttonr"/><!--引用其它布局-->

    </LinearLayout>

</LinearLayout>
为了代码的维护和简洁,我们可以引用其它的布局,如上图, <include layout="@layout/buttonr"/>引用已经完成的布局
顶部
我们添加一个LinearLayout布局的文件


顶部界面

这个布局我们可以用一个大的LinearLayout再嵌套一个小LinearLayout
代码
<?xml version="1.0" encoding="utf-8"?>

<LinearLayout xmlns:android="http://schemas.android.com/apk/res/android"

    android:layout_width="match_parent"

    android:layout_height="50dp"

    android:background="#21292c"//背景色

    android:orientation="horizontal" >

    <TextView

        android:id="@+id/textView1"

        android:layout_width="wrap_content"

        android:layout_height="wrap_content"

        android:textSize="22sp"//字体大小

        android:textColor="#FFFFFF"//字体颜色

       android:padding="10dp"

       android:text="@string/app_name" />

     <TextView

        android:layout_width="0dp"

        android:layout_height="wrap_content"

        android:layout_weight="1"

    />

  <LinearLayout

        android:layout_width="wrap_content"

        android:layout_height="match_parent"

        android:gravity="center" >

        <ImageView

            android:id="@+id/imageView2"

            android:layout_width="30dp"

            android:layout_height="30dp"

            android:layout_marginRight="10dp"

            //图片

            android:src="@drawable/fdj" />

        <ImageView

            android:id="@+id/imageView1"

            android:layout_width="30dp"

            android:layout_height="30dp"

            //图片

            android:src="@drawable/barbuttonicon_add" />

    </LinearLayout>

</LinearLayout>
底部界面:如上所示添加LinearLayout布局文件,会涉及到一个控件的运用RadioGroup控件

RadioButton和RadioGroup的关系:
1、RadioButton表示单个圆形单选框,而RadioGroup是可以容纳多个RadioButton的容器
2、每个RadioGroup中的RadioButton同时只能有一个被选中
3、不同的RadioGroup中的RadioButton互不相干,即如果组A中有一个选中了,组B中依然可以有一个被选中
4、大部分场合下,一个RadioGroup中至少有2个RadioButton
5、大部分场合下,一个RadioGroup中的RadioButton默认会有一个被选中,并建议您将它放在RadioGroup中的起始位置
主要代码
<RelativeLayout xmlns:android="http://schemas.android.com/apk/res/android"

    android:layout_width="match_parent"

    android:layout_height="match_parent" >

<LinearLayout

    android:layout_width="match_parent"

    android:layout_height="wrap_content"

    android:orientation="horizontal"//水平

     android:layout_alignParentTop="true"

    >

     <RadioGroup android:orientation="horizontal"//水平

             android:layout_width="match_parent" android:layout_height="wrap_content">

             <RadioButton

                 android:layout_width="0dp"

                 android:layout_weight="1"//权重

                 android:layout_height="wrap_content"

                 android:drawableTop="@drawable/four"//引用外部文件

                 android:checked="true"

                 android:text="@string/xiao"

                 style="@style/text"

                 android:button="@null"//去掉前面的圆点

                 android:gravity="center"//居中

                 />

             <RadioButton

                 android:layout_width="0dp"

                 android:layout_weight="1"//权重

                 android:layout_height="wrap_content"

                 android:drawableTop="@drawable/tuo"//引用外部文件

                 android:text="@string/tong"

                 style="@style/text"

                 android:button="@null"//去掉前面的圆点

                 android:gravity="center"//居中

                 />

             <RadioButton

                 android:layout_width="0dp"

                 android:layout_weight="1"//权重

                 android:layout_height="wrap_content"

                 android:drawableTop="@drawable/three"//引用外部文件

                 android:text="@string/ss"

                 style="@style/text"

                 android:button="@null"//去掉前面的圆点

                 android:gravity="center"//居中

                 />

             <RadioButton

                 android:layout_width="0dp"

                 android:layout_weight="1"//权重

                 android:layout_height="wrap_content"

                 android:drawableTop="@drawable/one"//引用外部文件

                 android:text="@string/wo"

                 style="@style/text"

                 android:button="@null"//去掉前面的圆点

                 android:gravity="center"//居中

                 />

         </RadioGroup>

</LinearLayout>

</RelativeLayout>
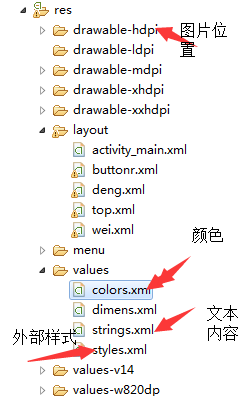
添加外部文件
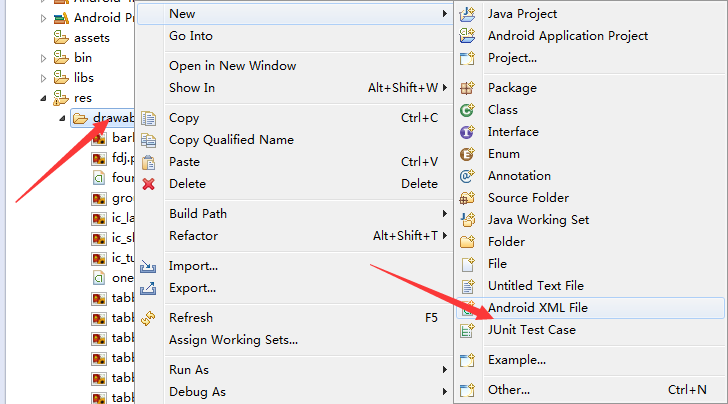

外部文件内容:添加四个这样的文件,分别对应四张图片,如果选中的的话,图片会变动
<?xml version="1.0" encoding="utf-8"?>

<selector xmlns:android="http://schemas.android.com/apk/res/android" >

    <item

        android:state_checked="true"//选中是tabbar_mehl这个图片

        android:drawable="@drawable/tabbar_mehl"></item>

<item

    //没有选中是tabbar_me图片

    android:drawable="@drawable/tabbar_me"></item>

</selector>
添加字体变色的文件,如上添加
颜色文件代码
<?xml version="1.0" encoding="utf-8"?>

<selector xmlns:android="http://schemas.android.com/apk/res/android" >

    <item android:state_checked="true"

        android:color="@color/green"></item>

    <item

        android:color="@color/grey"></item>

</selector>
添加外部样式

字体颜色
<?xml version="1.0" encoding="utf-8"?>

<resources>

    <color name="grey">#999999</color>

    <color name="green">#07bb07</color>

</resources>
  <style name="text">

        <item name="android:textColor">@drawable/text</item>

    </style>
底部就做好了
在主界面布局分别引用这些分布局,界面就做好了。我们应该多多实践,多看下关于属性的书和资料.
android开发--布局三(微信布局)的更多相关文章
- .Net程序猿玩转Android开发---(3)登陆页面布局
这一节我们来看看登陆页面如何布局.对于刚接触到Android开发的童鞋来说.Android的布局感觉比較棘手.须要结合各种属性进行设置,接下来我们由点入面来 了解安卓中页面如何布局,登陆页面非常eas ...
- .Net程序猿乐Android开发---(4)注册页面布局
接下来我们介绍的登陆页面布局,在本节中,我们看一下注册页面布局,页面布局大同小异,来一起熟悉下基本控件的使用方法. 效果图: 1.加入注冊页面 右键选中layout目录,加入注冊页面.例如以下图 点击 ...
- android 开发 写一个RecyclerView布局的聊天室,并且添加RecyclerView的点击事件
实现思维顺序: 1.首先我们需要准备2张.9的png图片(一张图片为左边聊天泡泡,一个图片为右边的聊天泡泡),可以使用draw9patch.bat工具制作,任何图片导入到drawable中. 2.需要 ...
- android开发 RecyclerView 瀑布列表布局
1.写一个内容的自定义小布局: <?xml version="1.0" encoding="utf-8"?> <LinearLayout xm ...
- android学习笔记三--Activity 布局
1.线性布局 标签 :<LinearLayout></LinearLayout> 方向:android:orientation, 垂直:vertical 水平:Horizont ...
- CSS布局 - 三栏布局
CSS布局技术可谓是前端技术中最基础的技术,就是因为基础,所以我认为要更加熟练,深入的去掌握,去梳理. 一. 传统 ---> 浮动实现的三栏布局 采用浮动实现的三栏布局有以下特点及注意事项: · ...
- 简单的CSS网页布局--三列布局
三列布局其实不难,不过要用到position:absolute这个属性,因为这个属性是基于浏览器而言,左右部分各放在左右侧,空出中间一列来实现三列布局. (一)三列布局自适应 <!DOCTYPE ...
- Android 开发中三种多线程
在开发工程中线程可以帮助我们提高运行速度,Android开发中我知道的线程有四个一个是老生长谈的Thread,第二个是asyncTask,第三个:TimetTask,第四个是Looper,四个多线程各 ...
- CSS布局——三栏布局
说到三栏布局,很多都会提到圣杯布局和双飞翼布局这两个经典的三栏布局方式.于是,我在网上搜了一些相关资料,阅读并跟着代码敲了一遍,发现在处理三栏布局上,他们采用的都是两边栏固定,中间栏自适应的策略.在处 ...
随机推荐
- 在MacOX下安装python-opencv
下载好opencv之后 1. 在文件夹下新建一个release或build的文件夹: 2. cmake . make 3.在该build文件夹下 nano .bash_profile 把python的 ...
- HDU 1254
http://acm.hdu.edu.cn/showproblem.php?pid=1254 暴搜,状态是四维的(箱子和人的坐标),向一个方向推箱子还要判断人能否走到推的位置,1A #include ...
- C#中的委托
public delegate void SayHello(string name); class Program { static void Main(string[] args) { SayHel ...
- 数据库update死锁
比较常见的死锁场景,并发批量update时的一个场景: update cross_marketing set gmtModified = NOW(), pageview = pageview+ #ex ...
- maxscript, 批量导出物体
1,将场景中所有选中物体整体导出为一个fbx文件 exportfile filename #noprompt selectedOnly:true using:FBXEXP 2,将场景中所有选中物体各导 ...
- SQL阻塞原因造成系统多功能无响应的分析解决思路
最近遇到一个sqlserver项目,月底会出现多个财务相关功能出现不定期操作无响应问题 通过查询SQL阻塞信息,定位到阻塞源头spid.该会话的状态.等待事件及执行的SQL脚本 根据spid查询该会话 ...
- 用JS编写日历的简单思路
提要:本文以写当前时间环境下当月的日历表为例,用最简单的方法实现JavaScript日历,旨在展示JS世界中实用为本.简单为上的解决问题的思路. Web页中的日历一般离不开表格,通常都使用表格装载指定 ...
- Redis应用场景
Redis开创了一种新的数据存储思路,使用Redis,我们不用在面对功能单调的数据库时,把精力放在如何把大象放进冰箱这样的问题上,而是利用Redis灵活多变的数据结构和数据操作,为不同的大象构建不同的 ...
- IOS启动页设置适应ios8/9
直接上截图 1. 添加对应尺寸的图 2.设置三项 3.去掉默认设置 4.特别的xcode 7 需 通过在p.list配置文件中增加节点: Launch image 类型为String 设置值为Defa ...
- bootstrap-图文混排 media
<!-- media 图文混排 media-left(right) 图片的区域 在左边显示(右边) media-body 内容区域 media-heading 内容区域里的标题 media-mi ...