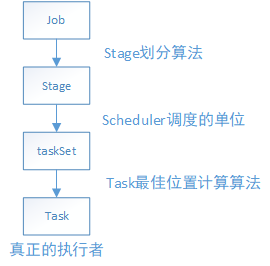
Spark之Task原理分析
override def receive: PartialFunction[Any, Unit]
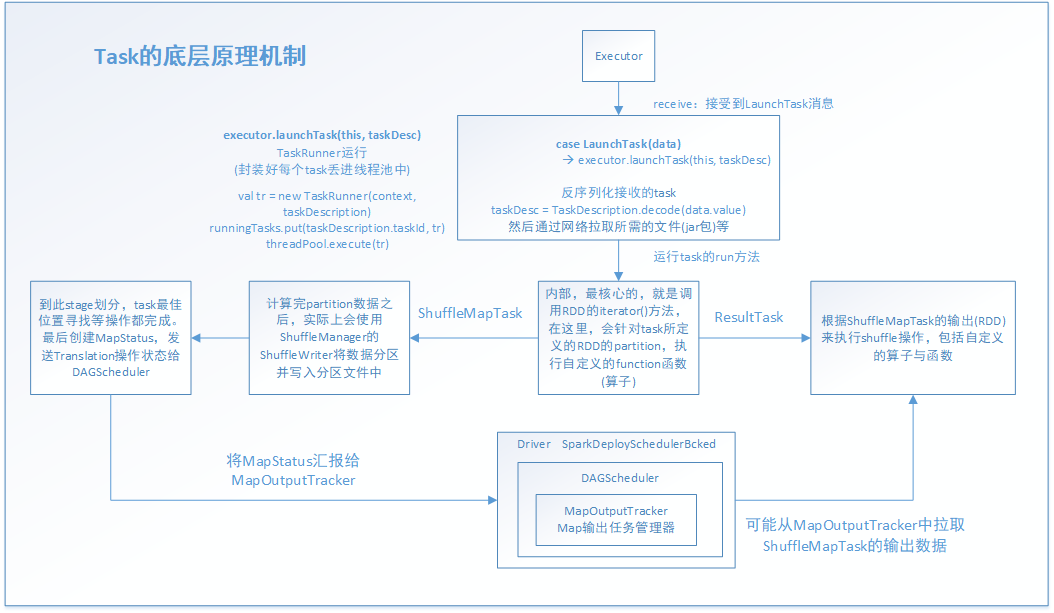
executor接受到这个事件消息后,task才真正开始工作。其中的executor.launchTask(this, taskDesc)就是主要的实现函数体
case LaunchTask(data) =>

      if (executor == null) {

        exitExecutor(, "Received LaunchTask command but executor was null")

      } else {

        val taskDesc = TaskDescription.decode(data.value)

        logInfo("Got assigned task " + taskDesc.taskId)

        executor.launchTask(this, taskDesc)

      }
launchTask方法,主要是new出一个TaskRunner线程,并把它放进java的线程池中运行。通过这里也知道其实Spark的底层是依赖Java和Scala共同实现的。
def launchTask(context: ExecutorBackend, taskDescription: TaskDescription): Unit = {

    val tr = new TaskRunner(context, taskDescription)

    runningTasks.put(taskDescription.taskId, tr)

    threadPool.execute(tr)

  }
通过看TaskRunner的实现,知道它是继承Runnable的,因此,就知道线程真正的运行体是run()方法。
class TaskRunner(

      execBackend: ExecutorBackend,

      private val taskDescription: TaskDescription)

    extends Runnable

    下面是run( )方法的主要部分源码。

override def run(): Unit = {

      threadId = Thread.currentThread.getId

      Thread.currentThread.setName(threadName)

      val threadMXBean = ManagementFactory.getThreadMXBean

      val taskMemoryManager = new TaskMemoryManager(env.memoryManager, taskId)

      val deserializeStartTime = System.currentTimeMillis()

      val deserializeStartCpuTime = if (threadMXBean.isCurrentThreadCpuTimeSupported) {

        threadMXBean.getCurrentThreadCpuTime

      } else 0L

      Thread.currentThread.setContextClassLoader(replClassLoader)

      val ser = env.closureSerializer.newInstance()

      logInfo(s"Running $taskName (TID $taskId)")

      execBackend.statusUpdate(taskId, TaskState.RUNNING, EMPTY_BYTE_BUFFER)

      var taskStart: Long =

      var taskStartCpu: Long =

      startGCTime = computeTotalGcTime()

      try {

        // Must be set before updateDependencies() is called, in case fetching dependencies

        // requires access to properties contained within (e.g. for access control).

        //对序列化的数据,进行反序列化

        Executor.taskDeserializationProps.set(taskDescription.properties)

        //通过网络通信的方法,把task运行所需要的文件、资源、jar等拉取过来

        updateDependencies(taskDescription.addedFiles, taskDescription.addedJars)

        //最后,通过正式的反序列化操作,将整个task的数据集拉取过来

        //这里用ClassLoader的原因是通过指定的上下文资源,进行加载和读取。(当然,反射还有另外的功能:通过反射放射动态加载一个类,创建类的对象)

        task = ser.deserialize[Task[Any]](

          taskDescription.serializedTask, Thread.currentThread.getContextClassLoader)

        task.localProperties = taskDescription.properties

        task.setTaskMemoryManager(taskMemoryManager)

        // If this task has been killed before we deserialized it, let's quit now. Otherwise,

        // continue executing the task.

        val killReason = reasonIfKilled

        if (killReason.isDefined) {

          // Throw an exception rather than returning, because returning within a try{} block

          // causes a NonLocalReturnControl exception to be thrown. The NonLocalReturnControl

          // exception will be caught by the catch block, leading to an incorrect ExceptionFailure

          // for the task.

          throw new TaskKilledException(killReason.get)

        }

        logDebug("Task " + taskId + "'s epoch is " + task.epoch)

        env.mapOutputTracker.updateEpoch(task.epoch)

        // Run the actual task and measure its runtime.

        //计算task开始的时间

        taskStart = System.currentTimeMillis()

        taskStartCpu = if (threadMXBean.isCurrentThreadCpuTimeSupported) {

          threadMXBean.getCurrentThreadCpuTime

        } else 0L

        var threwException = true

        /**

          * value 对于ShuffleMapTask来说,就是MapStatus

          * 封装了ShuffleMapTask计算的数据,输出的位置

          * 后面的ShuffleMapTask会去联系MapOutputTracker来获取一个ShuffleMapTask的输出位置,通过网络网络拉取数据

          * ResultTask也是这样的,只不过是查询ShuffleMapTask的结果MapStatus的位置

                    *  总的来说 MapOutputTracker(Map输出任务管理器),把map和action联系起来了。

          */

        val value = try {

            //真正的task的线程执行方法,下面会详细分析

          val res = task.run(

            taskAttemptId = taskId,

            attemptNumber = taskDescription.attemptNumber,

            metricsSystem = env.metricsSystem)

          threwException = false

          res

        } finally {

          val releasedLocks = env.blockManager.releaseAllLocksForTask(taskId)

          val freedMemory = taskMemoryManager.cleanUpAllAllocatedMemory()

          if (freedMemory >  && !threwException) {

            val errMsg = s"Managed memory leak detected; size = $freedMemory bytes, TID = $taskId"

            if (conf.getBoolean("spark.unsafe.exceptionOnMemoryLeak", false)) {

              throw new SparkException(errMsg)

            } else {

              logWarning(errMsg)

            }

          }

          if (releasedLocks.nonEmpty && !threwException) {

            val errMsg =

              s"${releasedLocks.size} block locks were not released by TID = $taskId:\n" +

                releasedLocks.mkString("[", ", ", "]")

            if (conf.getBoolean("spark.storage.exceptionOnPinLeak", false)) {

              throw new SparkException(errMsg)

            } else {

              logInfo(errMsg)

            }

          }

        }

        task.context.fetchFailed.foreach { fetchFailure =>

          // uh-oh.  it appears the user code has caught the fetch-failure without throwing any

          // other exceptions.  Its *possible* this is what the user meant to do (though highly

          // unlikely).  So we will log an error and keep going.

          logError(s"TID ${taskId} completed successfully though internally it encountered " +

            s"unrecoverable fetch failures!  Most likely this means user code is incorrectly " +

            s"swallowing Spark's internal ${classOf[FetchFailedException]}", fetchFailure)

        }

        //task结束的时间

        val taskFinish = System.currentTimeMillis()

        val taskFinishCpu = if (threadMXBean.isCurrentThreadCpuTimeSupported) {

          threadMXBean.getCurrentThreadCpuTime

        } else 0L

        // If the task has been killed, let's fail it.

        task.context.killTaskIfInterrupted()

        //对MapStatus进行各种序列化和封装,后面要发送给MapOutputTracker

        val resultSer = env.serializer.newInstance()

        val beforeSerialization = System.currentTimeMillis()

        val valueBytes = resultSer.serialize(value)

        val afterSerialization = System.currentTimeMillis()

        // Deserialization happens in two parts: first, we deserialize a Task object, which

        // includes the Partition. Second, Task.run() deserializes the RDD and function to be run.

        /**

          * 计算出task的一些统计信息,运行时间/反序列化消耗的时间/Java虚拟机 GC消耗的时间/反序列化消耗的时间

          */

        task.metrics.setExecutorDeserializeTime(

          (taskStart - deserializeStartTime) + task.executorDeserializeTime)

        task.metrics.setExecutorDeserializeCpuTime(

          (taskStartCpu - deserializeStartCpuTime) + task.executorDeserializeCpuTime)

        // We need to subtract Task.run()'s deserialization time to avoid double-counting

        task.metrics.setExecutorRunTime((taskFinish - taskStart) - task.executorDeserializeTime)

        task.metrics.setExecutorCpuTime(

          (taskFinishCpu - taskStartCpu) - task.executorDeserializeCpuTime)

        task.metrics.setJvmGCTime(computeTotalGcTime() - startGCTime)

        task.metrics.setResultSerializationTime(afterSerialization - beforeSerialization)

        // Note: accumulator updates must be collected after TaskMetrics is updated

        val accumUpdates = task.collectAccumulatorUpdates()

        // TODO: do not serialize value twice

        val directResult = new DirectTaskResult(valueBytes, accumUpdates)

        val serializedDirectResult = ser.serialize(directResult)

        val resultSize = serializedDirectResult.limit

        // directSend = sending directly back to the driver

        //下面是对map结果做序列化和对其做位置等信息的封装,方便网络传输和位置查找。注意,BlockManager 是Spark底层的内存,数据,磁盘数据管理的组件

        val serializedResult: ByteBuffer = {

          if (maxResultSize >  && resultSize > maxResultSize) {

            logWarning(s"Finished $taskName (TID $taskId). Result is larger than maxResultSize " +

              s"(${Utils.bytesToString(resultSize)} > ${Utils.bytesToString(maxResultSize)}), " +

              s"dropping it.")

            ser.serialize(new IndirectTaskResult[Any](TaskResultBlockId(taskId), resultSize))

          } else if (resultSize > maxDirectResultSize) {

            val blockId = TaskResultBlockId(taskId)

            env.blockManager.putBytes(

              blockId,

              new ChunkedByteBuffer(serializedDirectResult.duplicate()),

              StorageLevel.MEMORY_AND_DISK_SER)

            logInfo(

              s"Finished $taskName (TID $taskId). $resultSize bytes result sent via BlockManager)")

            ser.serialize(new IndirectTaskResult[Any](blockId, resultSize))

          } else {

            logInfo(s"Finished $taskName (TID $taskId). $resultSize bytes result sent to driver")

            serializedDirectResult

          }

        }

        //调用executor所在的ScoresGrainedExecutorBackend的statusUpdate,更新状态信息

        setTaskFinishedAndClearInterruptStatus()

        execBackend.statusUpdate(taskId, TaskState.FINISHED, serializedResult)

      } catch {

        case t: Throwable if hasFetchFailure && !Utils.isFatalError(t) =>

          val reason = task.context.fetchFailed.get.toTaskFailedReason

          if (!t.isInstanceOf[FetchFailedException]) {

            // there was a fetch failure in the task, but some user code wrapped that exception

            // and threw something else.  Regardless, we treat it as a fetch failure.

            val fetchFailedCls = classOf[FetchFailedException].getName

            logWarning(s"TID ${taskId} encountered a ${fetchFailedCls} and " +

              s"failed, but the ${fetchFailedCls} was hidden by another " +

              s"exception.  Spark is handling this like a fetch failure and ignoring the " +

              s"other exception: $t")

          }

          setTaskFinishedAndClearInterruptStatus()

          execBackend.statusUpdate(taskId, TaskState.FAILED, ser.serialize(reason))
executor的task.run,底层主要是task的run方法,很明显看出来,主要工作是创建一个context,把task运行过程中的上下文记录下来。其中关键的是调用抽象方法,runTask。
final def run(

    taskAttemptId: Long,

    attemptNumber: Int,

    metricsSystem: MetricsSystem): T = {

  SparkEnv.get.blockManager.registerTask(taskAttemptId)

  //创建 context ,task的执行上下文,里面记录task执行的全局性的数据

  //重试次数,task属于哪个stage,task要处理的是哪个rdd,哪个partition等

  context = new TaskContextImpl(

    stageId,

    partitionId,

    taskAttemptId,

    attemptNumber,

    taskMemoryManager,

    localProperties,

    metricsSystem,

    metrics)

  TaskContext.setTaskContext(context)

  taskThread = Thread.currentThread()

  if (_reasonIfKilled != null) {

    kill(interruptThread = false, _reasonIfKilled)

  }

  new CallerContext(

    "TASK",

    SparkEnv.get.conf.get(APP_CALLER_CONTEXT),

    appId,

    appAttemptId,

    jobId,

    Option(stageId),

    Option(stageAttemptId),

    Option(taskAttemptId),

    Option(attemptNumber)).setCurrentContext()

  try {

    //调用抽象方法,runTask

    runTask(context)

  } catch {

    case e: Throwable =>

      // Catch all errors; run task failure callbacks, and rethrow the exception.

      try {

        context.markTaskFailed(e)

      } catch {

        case t: Throwable =>

          e.addSuppressed(t)

      }

      context.markTaskCompleted(Some(e))

      throw e

  } finally {

    try {

      // Call the task completion callbacks. If "markTaskCompleted" is called twice, the second

      // one is no-op.

      context.markTaskCompleted(None)

    } finally {

      try {

        Utils.tryLogNonFatalError {

          // Release memory used by this thread for unrolling blocks

          SparkEnv.get.blockManager.memoryStore.releaseUnrollMemoryForThisTask(MemoryMode.ON_HEAP)

          SparkEnv.get.blockManager.memoryStore.releaseUnrollMemoryForThisTask(

            MemoryMode.OFF_HEAP)

          // Notify any tasks waiting for execution memory to be freed to wake up and try to

          // acquire memory again. This makes impossible the scenario where a task sleeps forever

          // because there are no other tasks left to notify it. Since this is safe to do but may

          // not be strictly necessary, we should revisit whether we can remove this in the

          // future.

          val memoryManager = SparkEnv.get.memoryManager

          memoryManager.synchronized { memoryManager.notifyAll() }

        }

      } finally {

        // Though we unset the ThreadLocal here, the context member variable itself is still

        // queried directly in the TaskRunner to check for FetchFailedExceptions.

        TaskContext.unset()

      }

    }

  }

}
task是抽象方法,意味着这个类只是模板类,仅仅封装了一些子类通用的属性和方法,依赖于子类实现它们,来确定具体的功能。 前面说过task的有两个子类ShuffleMapTask和ResultTask。有了它们,才能运行定义的算子和逻辑
def runTask(context: TaskContext): T

def preferredLocations: Seq[TaskLocation] = Nil

// Map output tracker epoch. Will be set by TaskSetManager.

var epoch: Long = -

// Task context, to be initialized in run().

@transient var context: TaskContextImpl = _

// The actual Thread on which the task is running, if any. Initialized in run().

@volatile @transient private var taskThread: Thread = _

// If non-null, this task has been killed and the reason is as specified. This is used in case

// context is not yet initialized when kill() is invoked.

@volatile @transient private var _reasonIfKilled: String = null

protected var _executorDeserializeTime: Long =

protected var _executorDeserializeCpuTime: Long =

/**

* If defined, this task has been killed and this option contains the reason.

*/

def reasonIfKilled: Option[String] = Option(_reasonIfKilled)

/**

* Returns the amount of time spent deserializing the RDD and function to be run.

*/

def executorDeserializeTime: Long = _executorDeserializeTime

def executorDeserializeCpuTime: Long = _executorDeserializeCpuTime

/**

* Collect the latest values of accumulators used in this task. If the task failed,

* filter out the accumulators whose values should not be included on failures.

*/

def collectAccumulatorUpdates(taskFailed: Boolean = false): Seq[AccumulatorV2[_, _]] = {

  if (context != null) {

    // Note: internal accumulators representing task metrics always count failed values

    context.taskMetrics.nonZeroInternalAccums() ++

      // zero value external accumulators may still be useful, e.g. SQLMetrics, we should not

      // filter them out.

      context.taskMetrics.externalAccums.filter(a => !taskFailed || a.countFailedValues)

  } else {

    Seq.empty

  }

}
到此,task整个运行流程已分析一遍,最后,调用下面的函数来更新状态信息
setTaskFinishedAndClearInterruptStatus()

execBackend.statusUpdate(taskId, TaskState.FINISHED, serializedResult)
最后来总结一下,task的运行一开始不是直接调用底层的task的run方法直接处理job-->stage-->taskSet-->task这条路线的task任务的,它是通过分层和分工的思想来完成。task会派生出两个子类ShuffleMapTask和ResultTask分别完成对应的工作,ShuffleMapTask主要是对task所拥有的的RDD的partition做对应的RDD转换工作,ResultTask主要是根据action动作触发,并拉取ShuffleMapTask阶段的结果做进一步的算子和逻辑函数对数据的进一步处理。这两个阶段是通过MapOutputTracker来连接起来的。
Spark之Task原理分析的更多相关文章
- 小记--------spark的worker原理分析及源码分析
- 小记--------spark内核架构原理分析
首先会将jar包上传到机器(服务器上) 1.在这台机器上会产生一个Application(也就是自己的spark程序) 2.然后通过spark-submit(shell) 提交程序 ...
- [Spark性能调优] 第一章:性能调优的本质、Spark资源使用原理和调优要点分析
本課主題 大数据性能调优的本质 Spark 性能调优要点分析 Spark 资源使用原理流程 Spark 资源调优最佳实战 Spark 更高性能的算子 引言 我们谈大数据性能调优,到底在谈什么,它的本质 ...
- spark 性能调优(一) 性能调优的本质、spark资源使用原理、调优要点分析
转载:http://www.cnblogs.com/jcchoiling/p/6440709.html 一.大数据性能调优的本质 编程的时候发现一个惊人的规律,软件是不存在的!所有编程高手级别的人无论 ...
- 性能调优的本质、Spark资源使用原理和调优要点分析
本课主题 大数据性能调优的本质 Spark 性能调优要点分析 Spark 资源使用原理流程 Spark 资源调优最佳实战 Spark 更高性能的算子 引言 我们谈大数据性能调优,到底在谈什么,它的本质 ...
- Spark原理分析目录
1 Spark原理分析 -- RDD的Partitioner原理分析 2 Spark原理分析 -- RDD的shuffle简介 3 Spark原理分析 -- RDD的shuffle框架的实现概要分析 ...
- 20、Task原理剖析与源码分析
一.Task原理 1.图解 二.源码分析 1. ###org.apache.spark.executor/Executor.scala /** * 从TaskRunner开始,来看Task的运行的工作 ...
- Spark中Task数量的分析
本文主要说一下Spark中Task相关概念.RDD计算时Task的数量.Spark Streaming计算时Task的数量. Task作为Spark作业执行的最小单位,Task的数量及运行快慢间接决定 ...
- 深度剖析Spark分布式执行原理
让代码分布式运行是所有分布式计算框架需要解决的最基本的问题. Spark是大数据领域中相当火热的计算框架,在大数据分析领域有一统江湖的趋势,网上对于Spark源码分析的文章有很多,但是介绍Spark如 ...
随机推荐
- 【转自IT虾米网:www.itxm.net】外部应用和drools-wb6.1集成解决方案
一.手把手教你集成外部应用和drools workbench6.1 1. 首先按照官方文档安装workbench ,我用的是最完整版的jbpm6-console的平台系统,里面既包含j ...
- java socket通信-传输文件图片--传输图片
ClientTcpSend.java client发送类 package com.yjf.test; import java.io.DataOutputStream; import java.io ...
- Django管理工具django-admin.py创建项目
安装Django之后就安装了可用的管理工具django-admin.py,可以使用它来创建项目,运行django-admin.py来查看命令介绍:
- PyQt4文件对话框QFileDialog
文件对话框允许用户选择文件或文件夹,被选择的文件可进行读或写操作. #!/usr/bin/python # -*- coding: utf-8 -*- import sys from PyQt4 im ...
- 《转》python学习(7) -列表
转自 http://www.cnblogs.com/BeginMan/p/3153842.html 一.序列类型操作符 1.切片[]和[:] 2.成员关系操作符(in ,not in ) 1: s1 ...
- java基础---->java调用oracle存储过程
存储过程是在大型数据库系统中,一组为了完成特定功能的SQL 语句集,存储在数据库中,经过第一次编译后再次调用不需要再次编译,用户通过指定存储过程的名字并给出参数(如果该存储过程带有参数)来执行它.今天 ...
- JavaIO简单代码实例
最近又复习了下JavaIO写了些实例代码都很简单但是能体现大部分方法的用法. IO流实现文件的拷贝 几种不同的方法: package com.wxisme.TestIO; import java. ...
- 转移wordpress到另一台主机
做项目的代码是两个人,我想把另一个小伙伴做的转移到自己的linux系统上(主要是linux下一片空白,从头做太浪费时间了) 这个过程其实也可以用来类比从本地到服务器的过程(可能略有不同,真上线的时候会 ...
- c# Use NAudio Library to Convert MP3 audio into WAV audio(将Mp3格式转换成Wav格式)
Have you been in need of converting mp3 audios to wav audios? If so, the skill in this article prov ...
- Android搜索自动提示功能 AutocompleteTextView
1.配置main.xml中自动提示控件: <AutoCompleteTextView android:id="@+id/autotv_searchresult" androi ...