
thinkjs之页面跳转-同步异步
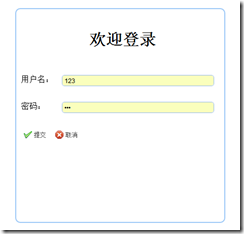
对于刚入手thinkjs项目的新手来说,时常会犯的一个错误就是“混用”各种代码逻辑,比如:我们经常在做后台管理系统的时候用到的登录框,
 ,
,
其实它原本是有一个路由专门存放自己的代码逻辑,而在点击提交按钮的时候,要达到的效果便是账号密码正确的时候,正常跳转页面,而错误的时候给出提示;为了发现问题,就先把源代码贴出来吧:
<!DOCTYPE html>

<html xmlns="http://www.w3.org/1999/xhtml">

<head>

  <meta http-equiv="Content-Type" content="text/html; charset=utf-8" />

  <title>用户登录</title>

</head>

<style>

  *{ margin:0px; padding:0px; list-style:none;}

  body,html{ height:100%;font:12px/1.5 \5FAE\8F6F\96C5\9ED1,tahoma,arial,sans-serif;}

  html{ background:url(/static/img/bg.gif) repeat-x;}

  body{ background:url(/static/img/ftbg.png) 0 bottom repeat-x;}

  .main{ background:url(/static/img/mbg.png) no-repeat center bottom;position: absolute;width:100%;height:500px;top:50%;

    margin-left:0;margin-top:-290px; z-index:99}

  .loginbox{ width:410px;  height:375px;background:url(/static/img/borderbg.png); position: absolute; left:50%; top:50%; margin-left:-200px; margin-top:-200px; border-radius:8px;-moz-border-radius: 8px; -webkit-border-radius:8px; z-index:999;}

  .loginbg{ width:310px;padding:40px; margin:0 auto; margin-top:10px; background-color:#fff; border-radius:8px;-moz-border-radius: 8px; -webkit-border-radius:8px;}

  .loginbox h3{ font-size:18px; font-weight:normal; color:#333; padding-bottom:15px; text-align:center;}

  .loginbox input{ width:260px; height:46px; border:1px solid #dbdbdb; padding:0 5px; font-size:14px; color:#666;border-radius:5px rgba(0,0,0,0.5);-moz-border-radius: 5px; -webkit-border-radius:5px; padding-left:45px; line-height:46px;}

  .loginbox ul li{ padding:15px 0; position:relative;}

  .loginbox .user{ background:url(/static/img/lgicon.png) 0 0 no-repeat; display:inline-block; position:absolute; width:19px; height:20px; left:15px; top:27px;}

  .loginbox .pwd{ background:url(/static/img/lgicon.png) 0 bottom no-repeat; display:inline-block; position:absolute; width:19px; height:22px; left:15px; top:27px;}

  .loginbox input.lgbtn{ width:312px; background-color:#f86c6b; border:0px; color:#fff; font-size:18px; font-family:\5FAE\8F6F\96C5\9ED1;line-height:46px; text-align:center; cursor:pointer; text-indent:0px; padding:0px;}

  .main h2{ margin-top:-40px; font-size:30px; text-align:center; color:#fff; font-weight:normal;}

  .footer{ position:fixed; z-index:9; bottom:0px; text-align:center; color:#666; width:100%; padding-bottom:20px; font-size:14px;}

</style>

<body>

<div class="main">

  <h2>用户登录</h2>

  <div class="loginbox">

    <div class="loginbg">

      <h3>用户登录</h3>

      <form id="fm" action="/index/login" method="post">

        <ul>

          <li><span class="user" ></span><input type="text"  name="name" required="true"  value=""></li>

          <li><span class="pwd" ></span><input type="password" name="pwd" required="true" value=""><span style="color: red;position: absolute;top: 70px;left: 10px" id="msg">{{msg}}</span></li>

          <li><input type="submit" value="登录" class="lgbtn"/></li>

        </ul>

      </form>

    </div>

  </div>

</div>

<!--<div class="footer">陕西钢谷电子商务股份有限公司 版权所有2016</div>-->

</body>

</html>
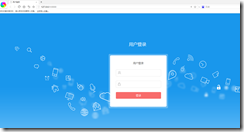
页面效果:
而正常的后台处理逻辑也便是:
'use strict';

/**

 * author: xxx

 * create: 2017-02-05

 * update: 2017-02-05

 * desc: 登录controller

 */

import Base from './base.js';

import cf from '../../common/config/config';

export default class extends Base {

    indexAction() {//登录页面

        //auto render template file index_index.html

        return this.display();

    };

    /**

     * 登录方法

     * @returns {*}

     */

    async loginAction() {

            let result = await this.model('admin').where({name: this.post().name, pwd: think.md5(this.post().pwd)}).select();

            if (result&&result.length > 0) {

                if(result[0].state==1){

                    let adminrole= await this.model('adminroles').where({id:result[0].rids}).select();

                    if(adminrole&&adminrole[0].state!=1){

                        this.assign('msg', '该用户的身份已经被禁用或删除,请联系管理员!');

                        return this.display("index");//错误信息渲染至登录页面

                    }else{

                        let acresult = await this.model('adminaction').where({rid: result[0].rids}).field('action').select();//查询该权限id的集合

                        result[0]['actions'] = acresult;//把集合赋予session

                        await this.session(cf.sessionKey, result[0]);

                        await this.model('adminlog').add({uid: result[0].id, createtime: new Date().getTime() / 1000, ip: this.ip()})//添加登录日志

                        return this.redirect('/main');//跳转main路由(主要是修改页面显示url)

                    }

                }else{

                    this.assign('msg', '该用户已经被停用或删除,请联系管理员!');

                    return this.display("index");//错误信息渲染至登录页面

                }

            } else {

                this.assign('msg', '用户名或密码错误!');

                return this.display("index");//错误信息渲染至登录页面

            }

    }

    /**

     * 退出方法

     * @returns {promise|*|void|PreventPromise}

     */

    async loginoutAction() {

            await this.session();//清除session

            return this.redirect('/');//跳转登录页面

    }

}
原本这样处理下来的代码算是最简洁的方式。但是对于新手来说,因为在easyui官网上看到的demo比较多,于是在不太清楚各个之间的区别时,就容易出现“互相冗杂”在一起的现象,于是就出现了这样的情况:
<!DOCTYPE html>

<html>

<head>

    <meta charset="UTF-8">

    <title>用户登录</title>

    <style>

        .form-group {

            margin-bottom: 30px;

        }

        .form-group > label {

            float: left;

            width: 80px;

        }

        .form-group > input {

            float: right;

        }

        h1 {

            text-align: center;

            margin-bottom: 50px;

        }

    </style>

    <link rel="stylesheet" href="/static/js/jquery-easyui/themes/default/easyui.css">

    <link rel="stylesheet" href="/static/js/jquery-easyui/themes/icon.css">

    <!--easyui js-->

    <script src="/static/js/jquery-easyui/jquery.min.js"></script>

    <script src="/static/js/jquery-easyui/jquery.easyui.min.js"></script>

    <script src="/static/js/jquery-easyui/locale/easyui-lang-zh_CN.js"></script>

</head>

<body>

<div>

    <div style="width:400px;height:400px;margin: 200px auto ;border: 2px solid #9cc8f7;border-radius: 10px;padding:20px 0 0 10px"

         id="login1" buttons="#dlg-buttons">

        <h1>用户登录</h1>

        <form id="ff1" method="post" url="/index/login">

            <div class="form-group">

                <label>用户名:</label>

                <input class="easyui-textbox" name="name" style="width:300px" data-options="required:true">

            </div>

            <div class="form-group">

                <label>密码:</label>

                <input class="easyui-textbox" type="password" name="pwd" style="width:300px"

                       data-options="required:true">

            </div>

        </form>

        <div id="dlg-buttons">

            <!--<a href="javascript:submitForm()" class="easyui-linkbutton" iconCls="icon-ok" plain="true">提交</a>-->

            <a href="javascript:void(0)" class="easyui-linkbutton" onclick="submitForm()" iconCls="icon-ok"

               plain="true">提交</a>

            <a href="javascript:void(0)" class="easyui-linkbutton" onclick="clearForm()" iconCls="icon-cancel"

               plain="true">取消</a>

        </div>

        <!--<b id="msg" style="display: none;"></b>-->

        {{msg}}

    </div>

</div>

<script>

    function submitForm() {

        jQuery.ajax({

            url: "/index/login",

            async: false,

            method:"POST",

            data:{

                name:"123",

                pwd:"123"

            }

        });

    }

    function clearForm() {

        jQuery('#ff1').form('clear');

    }

</script>

</body>

</html>
后台的处理逻辑:
'use strict';

import Base from './base.js';

export default class extends Base {

  /**

   * index action

   * @return {Promise} []

   */

  indexAction(){

    //auto render template file index_index.html

    return this.display();

  }

  async loginAction(){

      // return this.redirect('/login');

      console.log(this.post());

      let name=this.post().name;

    let pwd=this.post().pwd;

    let model=this.model('user');

    let data = await model.where({name:name,pwd:pwd}).find();

    if(!think.isEmpty(data)){

      console.log("//////////");

      return this.redirect('/login888');

      // return this.json({'succ':true});

    }else{

      this.assign('msg','账号或者密码错误!');

      return this.display('index');

        // return this.json({'succ':false,'msg':'账号或者密码错误!'});

    }

  }

}
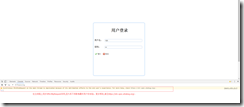
而这样处理的结果却是:
 ,
,
出现了浏览器自身报错:此方法已被弃用。新手因为接触thinkjs的并不是很多,所以时常会混淆其中,以为这样很正确,其实在浏览器自身的js运行机制中,该方法是行不通的。因此建议初接触thinkjs的小伙伴们,在写页面跳转的逻辑,比如用到redirect或assign渲染时,前台就不要使用ajax提交;而后台用json返回时,就不要使用sumbit()提交。而这种非常隐蔽的问题,一般初学者也不会意识到问题存在哪里,因此还是需要小伙伴们多多看看相关的教程,增长自己的经验。
thinkjs之页面跳转-同步异步的更多相关文章
- thinkjs之页面跳转
对于刚入手thinkjs项目的新手来说,时常会犯的一个错误就是“混用”各种代码逻辑,比如:我们经常在做后台管理系统的时候用到的登录框,,其实它原本是有一个路由专门存放自己的代码逻辑,而在点击提交按钮的 ...
- 【jQuery】(7)---jQueryAjax同步异步区别
jQueryAjax同步异步 今天在项目开发过程中,要实现这么一个功能 <!-- 当我点击就业的时候,触发onclick时间,check()方法里通过ajax请求返回数据, 如果该用户已经毕业可 ...
- 微信小程序开发3之保存数据及页面跳转
第一 保存本地数据 1.异步保存本地数据 wx.setStorage({ key:keyStr, data:dataStr, success: function(e){}, fail: functi ...
- 前端开发--ppt展示页面跳转逻辑实现
1. 工程地址:https://github.com/digitalClass/web_page 网站发布地址: http://115.28.30.25:8029/ 2. 今天遇到一个小问题, 同组的 ...
- Ajax发送POST请求SpringMVC页面跳转失败
问题描述:因为使用的是SpringMVC框架,所以想使用ModelAndView进行页面跳转.思路是发送POST请求,然后controller层中直接返回相应ModelAndView,但是这种方法不可 ...
- AJAX请求详解 同步异步 GET和POST
AJAX请求详解 同步异步 GET和POST 上一篇博文(http://www.cnblogs.com/mengdd/p/4191941.html)介绍了AJAX的概念和基本使用,附有一个小例子,下面 ...
- 同步异步,阻塞非阻塞 和nginx的IO模型
同步与异步 同步和异步关注的是消息通信机制 (synchronous communication/ asynchronous communication).所谓同步,就是在发出一个*调用*时,在没有得 ...
- IE下angularJS页面跳转的bug
用Angularjs做项目的过程中遇到一种情况:就是在IE浏览器下,当访问网站页面后,点击浏览器中的向左和向右(返回和前进)按钮时,需要点击两次才能正确跳转,但是在chrome及其他浏览器下该bug没 ...
- 通过javascript库JQuery实现页面跳转功能代码
通过javascript库JQuery实现页面跳转功能代码的四段代码实例如下. 实例1: 1 2 3 4 $(function(){ var pn = $("#gotopagenum&quo ...
随机推荐
- python多线程的使用
最近在做爬虫,经常用到多线程.这里总结一下我的多线程的使用习惯,方便取用 1.创建信号量: mutex=threading.Lock() 2.信号锁与释放 mutex.acquire() #临界区 m ...
- TOMCAT8源码分析——SESSION管理分析(上)
前言 对于广大java开发者而已,对于J2EE规范中的Session应该并不陌生,我们可以使用Session管理用户的会话信息,最常见的就是拿Session用来存放用户登录.身份.权限及状态等信息.对 ...
- tomcat事件处理机制
最近在阅读“how tomcat works”这本书,结合tomcat7的源码进行学习.对于学习的收获,将通过“tomcat学习系列”记录下来,和大家一起分享和交流,也算对自己学习的一种促进.闲话不多 ...
- Yii CDbCriteria 常用方法
一.一个sql拼装的情况 $criteria = new CDbCriteria; //函数方式 $criteria->addCondition("id=1"); //查询条 ...
- 怎样使用 RMAN 增量备份恢复 data guard log gap(日志断档)
主库查询最小scn 信息: SQL> col current_scn for 999999999999999 SQL> SELECT CURRENT_SCN FROM V$DATABAS ...
- iOS边练边学--通知机制和键盘处理小练习
一.发送通知 NSNotification *note = [NSNotification notificationWithName:@"通知的名称,随便写,例如:你妈叫你回家吃饭" ...
- 探索Java语言与JVM中的Lambda表达式
Lambda表达式是自Java SE 5引入泛型以来最重大的Java语言新特性,本文是2012年度最后一期Java Magazine中的一篇文章,它介绍了Lamdba的设计初衷,应用场景与基本语法.( ...
- RL Problems
1.Delayed, sparse reward(feedback), Long-term planning Hierarchical Deep Reinforcement Learning, Sub ...
- Batch Normalization原理及其TensorFlow实现——为了减少深度神经网络中的internal covariate shift,论文中提出了Batch Normalization算法,首先是对”每一层“的输入做一个Batch Normalization 变换
批标准化(Bactch Normalization,BN)是为了克服神经网络加深导致难以训练而诞生的,随着神经网络深度加深,训练起来就会越来越困难,收敛速度回很慢,常常会导致梯度弥散问题(Vanish ...
- (转)音频输出PCM与LPCM有什么不同
多声道LPCM:无损音轨原始存在格式,概念上等效于wave文件,并不需要运算解码,可直接输入功放进行DA转换,光纤和同轴接口只能传输2声道LPCM,多声道LPCM需要HDMI接口传输. PCM: ...