
[二十一]SpringBoot 之 导入xml配置
SpringBoot理念就是零配置编程,但是如果绝对需要使用XML的配置,我们建议您仍旧从一个@Configuration类开始,你可以使用@ImportResouce注解加载XML配置文件,我拿一个例子来进行讲解:
这个例子的大体步骤如下:
(1)新建一个工程;
(2)在App.Java类编写HelloService2;
(3)在App.java类无法扫描的包下编写HelloService;
(4)编写application-bean.xml注入HelloService;
(5)编写ConfigClass注入配置文件application-bean.xml;
(6)编写App.java启动类进行测试;
(7)其它说明
(1)新建一个工程;
参照我前面的例子
(2)在App.java类包路径下编写TestService;
首先我们这里有几个包:me.shijunjie,com.test,我们这里打算把App.java启动类放到me.shijunjie中,根据Spring Boot扫描(根包到子包的原则),我们把TestService写在Spring Boot可以扫描的位置, TestService2写在Spring Boot无法扫描到的位置,那么我们使用配置文件bean的方式进行引入,具体代码如下:
package me.shijunjie.service;

import org.springframework.stereotype.Service;

@Service

public class TestService {

    public TestService() {

        System.out.println("me.shijunjie.service");

        System.out.println("TestService");

    }

}
(3)在App.java类无法扫描的包下编写TestService2;
注意这个类是写在Spring Boot无法自动扫描的位置,正常启动之后,如果引入TestService2的话肯定会报异常的,因为它根本没有被注入成功,具体代码如下:
package com.test.service;

import org.springframework.stereotype.Service;

@Service

public class TestService2 {

    public TestService2() {

        System.out.println("com.test.service");

        System.out.println("TestService2");

    }

}
(4)编写application-bean.xml注入TestService2;
在src/main/resouces下编写配置文件application-bean.xml文件:
<?xml version="1.0" encoding="UTF-8"?>

<beans xmlns="http://www.springframework.org/schema/beans"

    xmlns:xsi="http://www.w3.org/2001/XMLSchema-instance" xmlns:mvc="http://www.springframework.org/schema/mvc"

    xmlns:p="http://www.springframework.org/schema/p" xmlns:context="http://www.springframework.org/schema/context"

    xmlns:aop="http://www.springframework.org/schema/aop" xmlns:tx="http://www.springframework.org/schema/tx"

    xsi:schemaLocation="http://www.springframework.org/schema/beans

            http://www.springframework.org/schema/beans/spring-beans-3.0.xsd

            http://www.springframework.org/schema/context

            http://www.springframework.org/schema/context/spring-context-3.0.xsd

            http://www.springframework.org/schema/aop

            http://www.springframework.org/schema/aop/spring-aop-3.0.xsd

            http://www.springframework.org/schema/tx

            http://www.springframework.org/schema/tx/spring-tx-3.0.xsd

            http://www.springframework.org/schema/mvc

            http://www.springframework.org/schema/mvc/spring-mvc-3.0.xsd

            http://www.springframework.org/schema/context

            http://www.springframework.org/schema/context/spring-context-3.0.xsd">

       <bean id="testService2" class="com.test.service.TestService2"></bean>

</beans>
(5)编写ConfigClass注入配置文件application-bean.xml;
在me.shijunjie.config包下编写类ConfigClass,这个确保能被Spring Boot可以扫描到,不然一切都付之东流了,具体代码如下:
package me.shijunjie.config;

import org.springframework.context.annotation.Configuration;

import org.springframework.context.annotation.ImportResource;

@Configuration

@ImportResource(locations={"classpath:application-bean.xml"})

public class ConfigClass {

}
(6)编写App.java启动类进行测试;
这个类Spring Boot正常的启动代码:
package me.shijunjie;

import org.springframework.boot.SpringApplication;

import org.springframework.boot.autoconfigure.SpringBootApplication;

@SpringBootApplication

public class App

{

    public static void main( String[] args )

    {

       SpringApplication.run(App.class, args);

    }

}
在App.java 右键 Run As JavaApplication观察控制台输出可以看到:
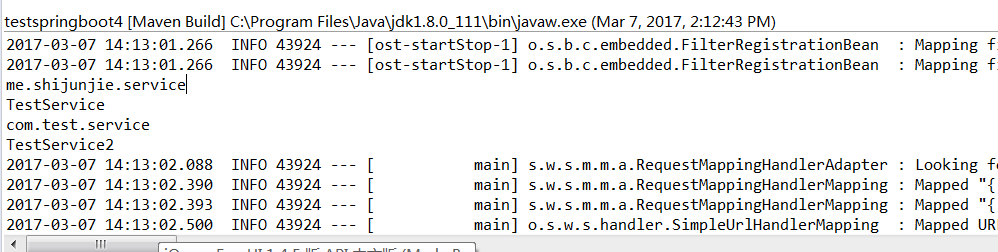
(7)其它说明
ImportResouce有两种常用的引入方式:classpath和file,具体查看如下的例子:
classpath路径:locations={"classpath:application-bean1.xml","classpath:application-bean2.xml"}
file路径:locations= {"file:d:/test/application-bean1.xml"};
[二十一]SpringBoot 之 导入xml配置的更多相关文章
- 玩转Spring Boot 自定义配置、导入XML配置与外部化配置
玩转Spring Boot 自定义配置.导入XML配置与外部化配置 在这里我会全面介绍在Spring Boot里面如何自定义配置,更改Spring Boot默认的配置,以及介绍各配置的优先 ...
- 2015年12月10日 spring初级知识讲解(二)最小化Spring XML配置 注解
序,随着Spring容器管理Bean数量增加,XML文件会越来越大,而且纯手工配置XML很繁琐,Spring和JAVA都提供了一些注解方式用以简化XML配置. 目录 一.自动装配(autowiring ...
- 003-SpringBoot导入xml配置
SpringBoot理念就是零配置编程,但是如果绝对需要使用XML的配置,我们建议您仍旧从一个@Configuration类开始,你可以使用@ImportResouce注解加载XML配置文件,我拿一个 ...
- 模拟Springboot一:(零xml配置搭建SSM项目)
在spring官网文档中无论是spring的基础文档,还是spring-mvc文档都推荐我们使用javaconfig的方式来搭建项目 间接说明 (优点:javaconfig配置>xml配置) 其 ...
- SpringBoot基础学习(二) SpringBoot全局配置文件及配置文件属性值注入
全局配置文件 全局配置文件能够对一些默认配置值进行修改.SpringBoot 使用一个名为 application.properties 或者 application.yaml的文件作为全局配置文件, ...
- geotrellis使用(二十一)自动导入数据
目录 前言 整体介绍 前台界面 后台控制 总结 一.前言 之前Geotrellis数据导入集群采用的是命令行的方式,即通过命令行提交spark任务来ingest数据,待数据导入完毕再启动 ...
- (31)Spring Boot导入XML配置【从零开始学Spring Boot】
[来也匆匆,去也匆匆,在此留下您的脚印吧,转发点赞评论: 您的认可是我最大的动力,感谢您的支持] Spring Boot理念就是零配置编程,但是如果绝对需要使用XML的配置,我们建议您仍旧从一个@Co ...
- cocos2d-x的初步学习二十一之iosandroid跨平台环境配置
这篇文章中,我们将来构建下跨平台开发的环境配置,我自己也是参考了别人了文章,折腾了几个小时,尤其是android的配置相对麻烦些.... 参考自子龙山人:http://www.cnblogs.com/ ...
- spring框架学习(二)使用注解代替xml配置
注解 1.使用注解配置spring 1)开启使用注解代理配置文件 <?xml version="1.0" encoding="UTF-8"?> &l ...
随机推荐
- QTC++监控USB插拔
#if defined(Q_OS_WIN) #include <qt_windows.h> #include <QtCore/qglobal.h> #include <d ...
- day 9 名字管理系统
1 while True ##### 布尔值:True or False In [8]: a = 19 In [6]: a > 18 Out[6]: True In [7]: a < 18 ...
- 【BZOJ2754】[SCOI2012]喵星球上的点名
[BZOJ2754][SCOI2012]喵星球上的点名 题面 bzoj 洛谷 题解 这题有各种神仙做法啊,什么暴力\(AC\)自动机.\(SAM\)等等五花八门 我这个蒟蒻在这里提供一种复杂度正确且常 ...
- 面向忙碌开发者的 Android
面向忙碌开发者的 Android passiontim 关注 2016.11.19 21:41* 字数 4013 阅读 2967评论 2喜欢 92 面向忙碌开发者的 Android 视频教程(Tuts ...
- WCF中数据契约之已知类型的几种公开方式
WCF中传输的数据不想传统的面向对象编程,它只传递了一些对象的属性,但是自身并不知道自己属于什么对象,所以,他没有子类和父类的概念,因而也就没有Is-a的关系,所以在WCF中,如果想维持这种继承关系, ...
- Scrapy爬取美女图片续集 (原创)
上一篇咱们讲解了Scrapy的工作机制和如何使用Scrapy爬取美女图片,而今天接着讲解Scrapy爬取美女图片,不过采取了不同的方式和代码实现,对Scrapy的功能进行更深入的运用.(我的新书< ...
- EF6+MVC5之Oracleo数据库的CodeFirst方式实现
http://www.oracle.com/technetwork/topics/dotnet/whatsnew/index.htm http://www.knowsky.com/887470.htm ...
- Python列表推导式和嵌套的列表推导式
列表推导式提供了一个更简单的创建列表的方法.常见的用法是把某种操作应用于序列或可迭代对象的每个元素上,然后使用其结果来创建列表,或者通过满足某些特定条件元素来创建子序列. 例如,假设我们想创建一个平方 ...
- POJ-2018(二分)
//意是在一个数组里,寻找一段连续和,使其平均和最大,但是长度不能小于F, //首先可以看出是满足单调性的,但是怎么二分呢, //我们先枚举一个可能的数. //然后数组里的值全部减去这个值(结果会有正 ...
- javascript中的取反再取反~~
操作符~, 是按位取反的意思,表面上~~(取反再取反)没有意义,实际上在JS中可以将浮点数变成整数. <html> <script> var myArray = new Arr ...