
Struts2学习(2)
1.结果嗯配置
(1)全局结果页面
(2)局部结果页面
(3)result标签type属性
2.在action获取表单提交数据
(1)使用ActionContext类获取
(2)使用ServletActionContext类获取
(3)使用接口注入方式获取
3.struts2提供获取表单数据方式
(1)属性封装
(2)模型驱动封装
4.struts2获取数据封装到集合中
(1)封装到list集合
(2)封装到map集合
5.扩展,表达式封装和模型驱动比较
结果页面配置
全局结果页面
1 result标签配置action方法的返回值到不同的路径页面里面
2 创建两个action,执行默认的方法execute方法,让两个action的方法都返回success,返回success之后,配置到同一个页面中。
<package name="demo1" extends="struts-default" namespace="/">

        <!-- 全局结果页面的配置 -->

        <global-results>

            <result name="success">/hello.jsp</result>

        </global-results>

        <action name="book" class="cn.itcast.action.BookAction">

            <!-- <result name="success">/hello.jsp</result> -->

        </action>

        <action name="orders" class="cn.itcast.action.OrderAction">

            <!-- <result name="success">/hello.jsp</result> -->

        </action>

</package>
Result标签的type属性
1 result标签里面除了name属性之外,还有一个属性type属性
(1)type属性:如何到路径里面(转发还是重定向)
2.type属性值
(1)默认值,做转发操作,值是dispatcher(地址栏不会发生改变)
<result name="success" type="dispatcher">/world.jsp</result>
(2)做重定向操作,值是redirect。
ctrl+f5是无缓存刷新。
<action name="book" class="cn.itcast.action.BookAction">

            <result name="success" type="dispatcher">/world.jsp</result>

        </action>

        <action name="orders" class="cn.itcast.action.OrdersAction">

            <result name="success" type="redirect">/hello.jsp</result>

        </action>
转发操作地址栏不会发生改变,而重定向地址栏会发生改变。
输入book.action,内容改变了,但是地址栏没有发生改变。

输入orders.action,地址栏发生改变。

(2)上面两个值dispatcher、redirect,这两个值一般针对到页面中配置。
配置到其他的action里面。
-chain:转发到action,一般不用,缓存问题。
-redirectAction:重定向到action。
加入了redirectAction后,页面就跳转到其他action中去了。
<action name="book" class="cn.itcast.action.BookAction">

            <!-- action访问名称 -->

            <result name="success" type="redirectAction">orders</result>

        </action>

        <action name="orders" class="cn.itcast.action.OrdersAction">

            <result name="success">/hello.jsp</result>

        </action>
运行如下所示:

使用chain,地址没有发生改变(一般不用)。
<action name="book" class="cn.itcast.action.BookAction">

            <!-- action访问名称 -->

            <result name="success" type="chain">orders</result>

        </action>

        <action name="orders" class="cn.itcast.action.OrdersAction">

            <result name="success">/hello.jsp</result>

        </action>

redirectAction和redirect,跳转到其他页面进行处理。
使用场景:
Action获取表单提交数据
1 之前web阶段,提交表单到servlet里面,在servlet里面使用request对象里面的方法获取,getParameter,getParameterValues,getParameterMap。
2 提交表单到action,但是action没有request对象,不能直接使用request对象。
3 action获取表单提交数据主要有三种方式
(1)使用ActionContext类
(2)使用ServletActionContext类
(3)使用接口注入方式
使用ActionContext类获取

(1)因为方法不是静态的方法,需要创建ActionContext类
(2)这个ActionContext类对象不是new出来的,是通过类的静态方法获取实例的。

1 具体演示
(1)创建表单,提交表单到action里面
(2)在action使用ActionContext获取数据
public class Form1DemoAction extends ActionSupport {

    @Override

    public String execute() throws Exception{

        //第一种方式 使用ActionContext类获取

        //1.获取ActionContext对象

        ActionContext context = ActionContext.getContext();

        //2.调用方法得到表单数据

        Map<String,Object> map = context.getParameters();

        Set<String> keys = map.keySet();

        for(String key : keys){

            //根据key得到value

            //数组形式:因为输入项里面可能有复选框的情况

            Object []obj = (Object[])map.get(key);

            System.out.println(Arrays.toString(obj));

        }

        return NONE;

    }

}
在struts.xml中是这样写的
<!-- 获取表单提交的数据 -->

    <package name="demo2" extends="struts-default" namespace="/">

    <action name="form1" class="cn.itcast.form.Form1DemoAction"></action>

    </package>
form1.jsp中这样写
<body>

    <form action="${pageContext.request.contextPath }/form1.action" method="post">

    username:<input type="text" name="username"/><br/>

    password:<input type="text" name="password"/><br/>

    address:<input type="text" name="address"/><br/>

    <input type="submit" value="提交"/>

    </form>

  </body>
使用ServletActionContext类获取

(1)调用类里面静态方法,得到request对象
public class Form1DemoAction extends ActionSupport {

    @Override

    public String execute() throws Exception{

        //第一种方式 使用ActionContext类获取

        //1.获取ActionContext对象

        ActionContext context = ActionContext.getContext();

        //2.调用方法得到表单数据

        Map<String,Object> map = context.getParameters();

        Set<String> keys = map.keySet();

        for(String key : keys){

            //根据key得到value

            //数组形式:因为输入项里面可能有复选框的情况

            Object []obj = (Object[])map.get(key);

            System.out.println(Arrays.toString(obj));

        }

        return NONE;

    }

}
在form1.jsp页面中只需要做这样的修改就可以了。
<form action="${pageContext.request.contextPath }/form2.action" method="post">
没有乱码:在struts2中有一个常量,如果表单提交方式是post,那么提交数据就不会出现乱码问题。
为了防止struts的乱码,可以在struts.xml中加入
<constant name="struts.i18n.encoding" value="utf-8"/>
使用接口注入技术
1 让action实现接口,为了得到request对象
public class Form3DemoAction extends ActionSupport implements ServletRequestAware{

    private HttpServletRequest request;

    @Override

    public String execute() throws Exception{

        request.getParameter("");

        return NONE;

    }

    @Override

    public void setServletRequest(HttpServletRequest request) {

        this.request = request;

    }

}
实现列表功能
在action操作域对象
1 request、session、servletContext域对象
2 使用ServletActionContext类操作
3 ServletContext
在execute()方法中使用三个域对象如下所示:
//操作三个域对象

        //1 request

        HttpServletRequest request = ServletActionContext.getRequest();

        request.setAttribute("req","reqValue");

        //2 sessino域

        HttpSession session = request.getSession();

        session.setAttribute("sess", "sessValue");

        //3 ServletContext域

        ServletContext context = ServletActionContext.getServletContext();

        context.setAttribute("contextName", "contextValue");
struts2封装获取表单数据方式
使用原始方式获取表单封装到实体对象
越原始的方式越强大,越原始的方式越有效,就是比较麻烦而已。
所以这种这种原始方需要掌握,框架就是把这些原始的方法封装了。
原始步骤:
public class Form4DemoAction extends ActionSupport{

    public String execute() throws Exception{

        //1 获取表单数据

        HttpServletRequest request = ServletActionContext.getRequest();

        String username = request.getParameter("username");

        String password = request.getParameter("password");

        String address = request.getParameter("address");

        //2 封装到实体类对象里面

        User user = new User();

        user.setUsername(username);

        user.setPassword(password);

        user.setAddress(address);

        System.out.println(user.toString());

        System.out.println("hello");

        return NONE;

    }

}
属性封装
1 直接把表单提交属性封装到action的属性里面
2 实现步骤
(1)在action成员变量位置定义变量
-变量名称和表单输入项的name属性值一样(类中变量名要和表单中的数据变量名一致)。
(2)生成变量的set方法(把set和get方法都写出来)
封装了方法,帮我们自动实现。
public class DataDemo1Action extends ActionSupport {

    //1 定义表单

    //变量的名称要和表单输入项name属性值一样

    private String username;

    private String password;

    private String address;

    //2生成变量的get和set方法

    public String getUsername() {

        return username;

    }

    public void setUsername(String username) {

        this.username = username;

    }

    public String getPassword() {

        return password;

    }

    public void setPassword(String password) {

        this.password = password;

    }

    public String getAddress() {

        return address;

    }

    public void setAddress(String address) {

        this.address = address;

    }

    public String execute() throws Exception{

        System.out.println(username + ": " + password + ": " + address);

        return NONE;

    }

}
这样就可以直接得到数据。
3 使用属性封装获取表单数据到属性里面,不能把数据直接封装到实体类对象里面。
模型驱动封装(重点)
这种方式用的最多
1 使用模型驱动方式,可以直接把表单数据封装到实体类对象里面
里面的底层代码实际上就是第一种方式即原始方式,只不过它帮我们封装好了,我们可以直接使用。
2 实现步骤
(1)action实现接口 ModelDriven
public class DataDemo2Action extends ActionSupport implements ModelDriven<User> {

    @Override

    public User getModel() {

        // TODO Auto-generated method stub

        return null;

    }

}
(2)在action里面创建实体对象
(3)实现接口里面的方法 getMethod方法
-把创建对象返回
//创建对象

    private User user = new User();

    public User getModel() {

        //返回创建user对象

        return user;

    }
运行
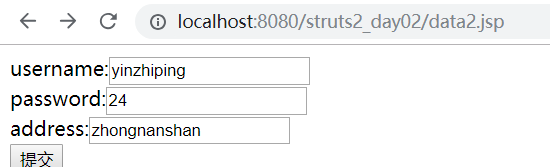
结果

这里成功地把数据封装到了user中。
3 使用模型驱动和属性封装注意问题:
(1)在一个action中,获取表单数据可以属性封装,使用模型封装,不能同时使用属性封装和模型驱动封装同时获取数据。如果两个都用,它只会执行模型驱动。
如

使用属性封装就无法获得属性值了。
表达式封装(会用)
有的书也叫属性封装
1 实现过程
(1)使用表达式封装可以把表单数据封装到实体类对象里面
第一步 在action里面声明实体类
第二步 生成实体类变量的set和get方法
第三步 在表单输入项的name属性值里面写表达式形式。
页面中代码是:
<body>

    <form action="${pageContext.request.contextPath }/data3.action" method="post">

    username:<input type="text" name="user.username"/><br/>

    password:<input type="text" name="user.password"/><br/>

    address:<input type="text" name="user.address"/><br/>

    <input type="submit" value="提交"/>

    </form>

  </body>
action中代码是:
public class DataDemo3Action extends ActionSupport {

    // 1 声明实体类

    private User user;

    // 2 生成实体类变量的set和get方法

    public User getUser() {

        return user;

    }

    public void setUser(User user) {

        this.user = user;

    }

    public String execute() throws Exception {

        return NONE;

    }

}
代码可以运行成功。
2 把表达式封装归类到属性封装里面
比较表达式封装和模型驱动封装
1 使用表达式封装和模型驱动封装都可以把数据封装到实体类对象里面
2 不同点:
(1)使用模型驱动只能把数据封装到一个实体类对象里面
-在一个action里面不能使用模型驱动把数据封装到不同的实体类对象里面
(2)使用表达式封装可以把数据封装到不同的实体类对象里面
使用表达式封装不同实体类对象示例如下所示:
 <body>

    <form action="${pageContext.request.contextPath }/data3.action" method="post">

    username:<input type="text" name="user.username"/><br/>

    password:<input type="text" name="user.password"/><br/>

    address:<input type="text" name="user.address"/><br/>

    bname:<input type="text" name="book.bname"/><br/>

    <input type="submit" value="提交"/>

    </form>

  </body>
action里写
public class DataDemo3Action extends ActionSupport {

    // 1 声明实体类

    private User user;

    private Book book;

    public Book getBook() {

        return book;

    }

    public void setBook(Book book) {

        this.book = book;

    }

    // 2 生成实体类变量的set和get方法

    public User getUser() {

        return user;

    }

    public void setUser(User user) {

        this.user = user;

    }

    public String execute() throws Exception {

        System.out.println(user.toString());

        System.out.println(book.getBname());

        return NONE;

    }

}
运行之后

成功。
封装到集合里面
封装数据到List集合
第一步 在action声明List
第二步 生成list变量的set和get方法
第三步 在表单输入下里面写表达式
<body>

    <form action="${pageContext.request.contextPath }/list.action" method="post">

    <!-- list[0] 表示list集合中第一个user对象 -->

    username:<input type="text" name="list[0].username"/><br/>

    password:<input type="text" name="list[0].password"/><br/>

    address:<input type="text" name="list[0].address"/><br/>

    username:<input type="text" name="list[1].username"/><br/>

    password:<input type="text" name="list[1].password"/><br/>

    address:<input type="text" name="list[1].address"/><br/>

    <input type="submit" value="提交"/>

    </form>

  </body>
action中
public class ListAction extends ActionSupport {

    // 1 声明List变量

    private List<User> list;

    // 2 生成set和get方法

    public List<User> getList() {

        return list;

    }

    public void setList(List<User> list) {

        this.list = list;

    }

    public String execute() throws Exception {

        System.out.println(list);

        return NONE;

    }

}
在struts.xml中做修改就是了。
运行成功后

封装数据到Map集合
第一步 声明map集合
第二步 生成get和set犯法
第三步 在表单输入项的name属性值里面写表达式
map.jsp
<body>

    <form action="${pageContext.request.contextPath }/map.action" method="post">

    <!-- 设置key值 map['key值'] -->

    username:<input type="text" name="map['one'].username"/><br/>

    password:<input type="text" name="map['one'].password"/><br/>

    address:<input type="text" name="map['one'].address"/><br/>

    <br/>

    username:<input type="text" name="map['two'].username"/><br/>

    password:<input type="text" name="map['two'].password"/><br/>

    address:<input type="text" name="map['two'].address"/><br/>

    <input type="submit" value="提交"/>

    </form>

  </body>
action里
public class MapAction extends ActionSupport {

    // 1 声明List变量

    private Map<String,User> map;

    // 2 生成set和get方法

    public Map<String, User> getMap() {

        return map;

    }

    public void setMap(Map<String, User> map) {

        this.map = map;

    }

    public String execute() throws Exception {

        System.out.println(map);

        return NONE;

    }

}
运行过程如下所示:

运行结果如下所示:

Struts2学习(2)的更多相关文章
- [原创]java WEB学习笔记75:Struts2 学习之路-- 总结 和 目录
本博客的目的:①总结自己的学习过程,相当于学习笔记 ②将自己的经验分享给大家,相互学习,互相交流,不可商用 内容难免出现问题,欢迎指正,交流,探讨,可以留言,也可以通过以下方式联系. 本人互联网技术爱 ...
- [原创]java WEB学习笔记66:Struts2 学习之路--Struts的CRUD操作( 查看 / 删除/ 添加) 使用 paramsPrepareParamsStack 重构代码 ,PrepareInterceptor拦截器,paramsPrepareParamsStack 拦截器栈
本博客的目的:①总结自己的学习过程,相当于学习笔记 ②将自己的经验分享给大家,相互学习,互相交流,不可商用 内容难免出现问题,欢迎指正,交流,探讨,可以留言,也可以通过以下方式联系. 本人互联网技术爱 ...
- Struts2学习笔记⑧
今天是Struts2学习笔记的最后一篇文章了.用什么做结尾呢,这两天其实还学了很多东西,没有记录下,今天就查漏补缺一下. 文件上传与下载.FreeMarker以及昨天没做完的例子 文件上传与下载 文件 ...
- Struts2学习笔记①
Struts2 学习笔记① 所有的程序学习都从Hello World开始,今天先跟着书做一个HW的示例. Struts2是一套MVC框架,使用起来非常方便,接触到现在觉得最麻烦的地方是配置文件.我的一 ...
- Struts2学习笔记NO.1------结合Hibernate完成查询商品类别简单案例(工具IDEA)
Struts2学习笔记一结合Hibernate完成查询商品类别简单案例(工具IDEA) 1.jar包准备 Hibernate+Struts2 jar包 struts的jar比较多,可以从Struts官 ...
- Struts2学习:interceptor(拦截器)的使用
对于需要登陆验证.权限验证等功能的网站,每一次请求,每一个action都写一段验证的代码,未免显得冗余且不易维护.struts2提供了拦截器interceptor,为这些页面提供一个切面,或者说公共组 ...
- Struts2 学习笔记(概述)
Struts2 学习笔记 2015年3月7日11:02:55 MVC思想 Strust2的MVC对应关系如下: 在MVC三个模块当中,struts2对应关系如下: Model: 负责封装应用的状态,并 ...
- Java后台处理框架之struts2学习总结
Java后台处理框架之struts2学习总结 最近我在网上了解到,在实际的开发项目中struts2的使用率在不断降低,取而代之的是springMVC.可能有很多的朋友看到这里就会说,那还不如不学str ...
- struts2学习之旅三 权限管理和导航设计
1,权限管理的db设计和dao实现,尽量简单快速有效: db的设计如下:权限按照角色来赋给用户: 权限对应每一个具体的功能,有菜单级别的,有导航级别的,还有页面级别的功能: 涉及到权限的敏感操作一般都 ...
- struts2 学习记录 过滤器 国际化
struts2接触不是一天两天了,但是一直没有用它做什么项目,但老师确一直说它有很大的学习价值,所以还是把我学习到的东西给记录一下,记录的东西没有规律,只是给自己留个备份, struts2中最关键的是 ...
随机推荐
- ASP非法赋值
Microsoft VBScript 运行时错误 错误 '800a01f5' 非法赋值: 'isCloudSpeedupMz' /records/config/class-records.asp,行 ...
- camke GUI工具 选择 vs2017 时,如何指定工具集 v140 而不是默认的 v141?
在参数位置加入 v140 即可,不需要加 -T
- HTML代码的美感
每当我访问精美的网站,我都情不自禁地会去查看源代码.这就好比你拥有一副X光眼镜,能够看到任何人--甚至透视他们的遮羞布.这简直是天经地义的事情嘛!我迫不及待地想了解,这个精美的网站,是不是由同样具有美 ...
- LinuxCentos系统安装Mariadb过程记录
MariaDB数据库简介 MariaDB数据库管理系统是MySQL的一个分支,主要由开源社区在维护,采用GPL授权许可. 开发这个分支的原因之一是:甲骨文公司收购了MySQL后,有将MySQL闭源的潜 ...
- python面试题(七)
1 什么是局域网.广域网.城域网? ①局域网LAN(Local Area Network):一般指覆盖范围在10公里以内,一座楼房或一个单位内部的网络.由于传输距离直接影响传输速度,因此,局域网内的通 ...
- InnoDB 与 MyISAM 区别
1.myisam可以对索引进行压缩,innodb不压缩 2.索引都用b-tree, innodb使用 b+tree,NDB Cluster使用 T-Tree. 3.myisam 表级锁, inno ...
- boost之算法
STL里的算法已经很好了,在boost里有几个小的算法 1.BOOST_FOREACH使用方法,定义一个容器里内部类型数据,容器作为参数传递. #include <iostream> #i ...
- Percona备份mysql全库及指定数据库(完整备份与增量备份)
Percona Xtrabackup备份mysql全库及指定数据库(完整备份与增量备份) Xtrabackup简介 Percona XtraBackup是开源免费的MySQL数据库热备份软件,它能对I ...
- Computer Information
Lab: lxw@lxw-PC:python$ df -h 文件系统 容量 已用 可用 已用% 挂载点 /dev/sda7 190G .4G 175G % / none .0K .0K % /sys/ ...
- Python基础(6)_函数
一 为何要有函数? 不加区分地将所有功能的代码垒到一起,问题是: 代码可读性差 代码冗余 代码可扩展差 如何解决? 函数即工具,事先准备工具的过程是定义函数,拿来就用指的就是函数调用 结论:函数使用必 ...