Android———最详细的系统对话框(AlertDialog)详解

在实际应用开发中,用到系统对话框中的情况几乎是没有的。按开发流程来说,UI工程师都会给出每一个弹窗的样式,故而在实际开发中都是自定义弹窗的。
即使用到的地方不多,但是我们也是需要了解并且能熟练的运用它,下面为大家奉上各种系统对话框的实现。
目录
系统对话框的几种类型与实现
在项目的实际开发中,用到的系统对话框几乎是没有的。原因大概包含以下几点:
- 样式过于单一,不能满足大部分实际项目中的需求。
- 对话框的样式会根据手机系统版本的不同而变化。不能达到统一的样式。
- 能实现的功能过于简单。
在这里先附上下面代码中出现文本的string.xml文件。
<string name="dialog_normal_content">我是普通dialog</string>

<string name="dialog_normal_more_button_content">我是普通多按钮dialog</string>

<string name="dialog_btn_confirm_text">确定</string>

<string name="dialog_btn_cancel_text">取消</string>

<string name="dialog_btn_neutral_text">忽略</string>

<string name="dialog_btn_confirm_hint_text">您点击了确定按钮</string>

<string name="dialog_btn_cancel_hint_text">您点击了取消按钮</string>

<string name="dialog_btn_neutral_hint_text">您点击了忽略按钮</string>
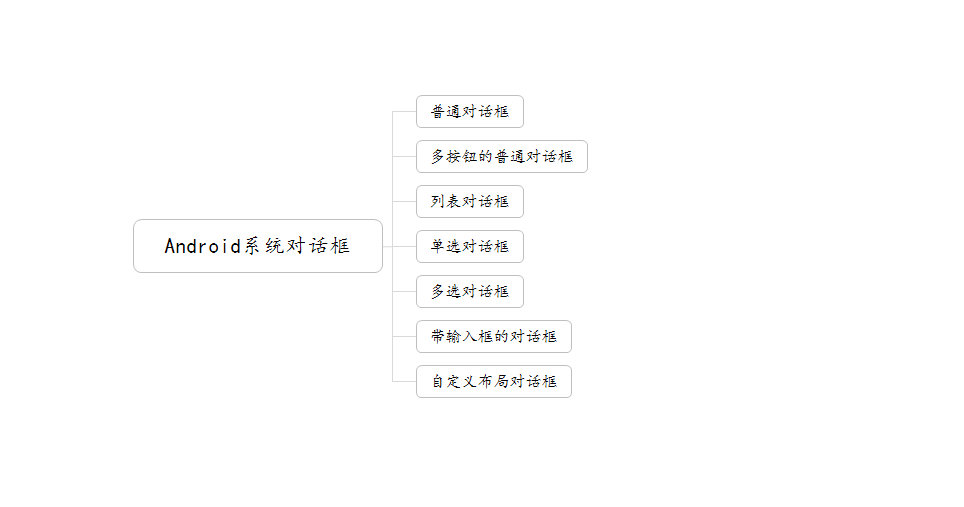
1、普通对话框
在实际项目开发中,此类型对话框中用到的地方要比其他类型的对话框多一些。但是考虑UI统一问题,也会很少用。
运行截图:
代码:
  private void showNormalDialog(){

    //创建dialog构造器

    AlertDialog.Builder normalDialog = new AlertDialog.Builder(this);

    //设置title

    normalDialog.setTitle(getString(R.string.dialog_normal_text));

    //设置icon

    normalDialog.setIcon(R.mipmap.ic_launcher_round);

    //设置内容

    normalDialog.setMessage(getString(R.string.dialog_normal_content));

    //设置按钮

    normalDialog.setPositiveButton(getString(R.string.dialog_btn_confirm_text)

            , new DialogInterface.OnClickListener() {

        @Override

        public void onClick(DialogInterface dialog, int which) {

            Toast.makeText(DialogActivity.this,getString(R.string.dialog_btn_confirm_hint_text)

                    ,Toast.LENGTH_SHORT).show();

            dialog.dismiss();

        }

    });

    //创建并显示

    normalDialog.create().show();

  }
系统对话框都是支持链式调用的,举例:
    new AlertDialog.Builder(this)

            .setTitle(getString(R.string.dialog_normal_text))

            .setIcon(R.mipmap.ic_launcher_round)

            .setMessage(getString(R.string.dialog_normal_content))

            .setPositiveButton(getString(R.string.dialog_btn_confirm_text)

                    , new DialogInterface.OnClickListener() {

                @Override

                public void onClick(DialogInterface dialog, int which) {

                    Toast.makeText(DialogActivity.this,getString(R.string.dialog_btn_confirm_hint_text)

                            ,Toast.LENGTH_SHORT).show();

                    dialog.dismiss();

                }

            })

            .create()

            .show();
下面的代码都是可以用链式调用的,这里就不展示了。
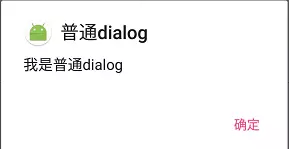
2、普通对话框(多按钮)
在系统对话框中最多出现三个按钮,即PositiveButton(确定)、NegativeButton(取消)、NeutralButton(忽略)。
运行截图:
代码:
  private void showNormalMoreButtonDialog(){

    AlertDialog.Builder normalMoreButtonDialog = new AlertDialog.Builder(this);

    normalMoreButtonDialog.setTitle(getString(R.string.dialog_normal_more_button_text));

    normalMoreButtonDialog.setIcon(R.mipmap.ic_launcher_round);

    normalMoreButtonDialog.setMessage(getString(R.string.dialog_normal_more_button_content));

    //设置按钮

    normalMoreButtonDialog.setPositiveButton(getString(R.string.dialog_btn_confirm_text)

            , new DialogInterface.OnClickListener() {

                @Override

                public void onClick(DialogInterface dialog, int which) {

                    Toast.makeText(DialogActivity.this

                            ,getString(R.string.dialog_btn_confirm_hint_text),Toast.LENGTH_SHORT).show();

                    dialog.dismiss();

                }

            });

    normalMoreButtonDialog.setNegativeButton(getString(R.string.dialog_btn_cancel_text)

            , new DialogInterface.OnClickListener() {

                @Override

                public void onClick(DialogInterface dialog, int which) {

                    Toast.makeText(DialogActivity.this,

                            getString(R.string.dialog_btn_cancel_hint_text),Toast.LENGTH_SHORT).show();

                    dialog.dismiss();

                }

            });

    normalMoreButtonDialog.setNeutralButton(getString(R.string.dialog_btn_neutral_text)

            , new DialogInterface.OnClickListener() {

                @Override

                public void onClick(DialogInterface dialog, int which) {

                    Toast.makeText(DialogActivity.this,

                            getString(R.string.dialog_btn_neutral_hint_text),Toast.LENGTH_SHORT).show();

                    dialog.dismiss();

                }

            });

    normalMoreButtonDialog.create().show();

  }
也可以用下面的实现方式,和上面的代码效果是一样的。
  private void showNormalMoreButtonDialog(){

    DialogInterface.OnClickListener setListener = null;

    AlertDialog.Builder normalMoreButtonDialog = new AlertDialog.Builder(this);

    normalMoreButtonDialog.setTitle(getString(R.string.dialog_normal_more_button_text));

    normalMoreButtonDialog.setIcon(R.mipmap.ic_launcher_round);

    normalMoreButtonDialog.setMessage(getString(R.string.dialog_normal_more_button_content));

    setListener = new DialogInterface.OnClickListener() {

        @Override

        public void onClick(DialogInterface dialog, int which) {

            switch (which){

                case DialogInterface.BUTTON_POSITIVE:

                    Toast.makeText(DialogActivity.this,

                            getString(R.string.dialog_btn_confirm_hint_text),Toast.LENGTH_SHORT).show();

                    dialog.dismiss();

                    break;

                case DialogInterface.BUTTON_NEUTRAL:

                    Toast.makeText(DialogActivity.this

                            ,getString(R.string.dialog_btn_neutral_hint_text),Toast.LENGTH_SHORT).show();

                    dialog.dismiss();

                    break;

                case DialogInterface.BUTTON_NEGATIVE:

                    Toast.makeText(DialogActivity.this

                            ,getString(R.string.dialog_btn_cancel_hint_text),Toast.LENGTH_SHORT).show();

                    dialog.dismiss();

                    break;

            }

        }

    };

    normalMoreButtonDialog.setPositiveButton(getString(R.string.dialog_btn_confirm_text),setListener);

    normalMoreButtonDialog.setNegativeButton(getString(R.string.dialog_btn_cancel_text),setListener);

    normalMoreButtonDialog.setNeutralButton(getString(R.string.dialog_btn_neutral_text),setListener);

    normalMoreButtonDialog.create().show();

  }
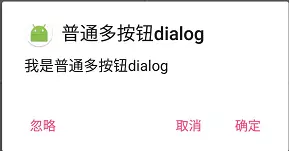
3、普通列表对话框
此种类型的对话框能实现简单的列表。
运行截图:
代码:
  /**

   * 普通列表dialog

   */

  private void showListDialog(){

    final String listItems[] = new String[]{"listItems1","listItems2","listItems3",

            "listItems4","listItems5","listItems6"};

    AlertDialog.Builder listDialog = new AlertDialog.Builder(this);

    listDialog.setTitle(getString(R.string.dialog_list_text));

    listDialog.setIcon(R.mipmap.ic_launcher_round);

    /*

        设置item 不能用setMessage()

        用setItems

        items : listItems[] -> 列表项数组

        listener -> 回调接口

    */

    listDialog.setItems(listItems,new DialogInterface.OnClickListener() {

        @Override

        public void onClick(DialogInterface dialog, int which) {

            Toast.makeText(DialogActivity.this,listItems[which],Toast.LENGTH_SHORT).show();

        }

    });

    //设置按钮

    listDialog.setPositiveButton(getString(R.string.dialog_btn_confirm_text)

            , new DialogInterface.OnClickListener() {

                @Override

                public void onClick(DialogInterface dialog, int which) {

                    dialog.dismiss();

                }

            });

    listDialog.create().show();

  }
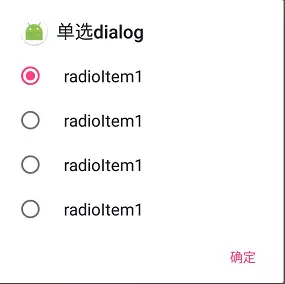
4、单选对话框
运行截图:
代码:
  private void showRadioDialog(){

    final String radioItems[] = new String[]{"radioItem1","radioItem1","radioItem1","radioItem1"};

    AlertDialog.Builder radioDialog = new AlertDialog.Builder(this);

    radioDialog.setTitle(getString(R.string.dialog_radio_text));

    radioDialog.setIcon(R.mipmap.ic_launcher_round);

    /*

        设置item 不能用setMessage()

        用setSingleChoiceItems

        items : radioItems[] -> 单选选项数组

        checkItem : 0 -> 默认选中的item

        listener -> 回调接口

    */

    radioDialog.setSingleChoiceItems(radioItems, 0, new DialogInterface.OnClickListener() {

        @Override

        public void onClick(DialogInterface dialog, int which) {

            Toast.makeText(DialogActivity.this,radioItems[which],Toast.LENGTH_SHORT).show();

        }

    });

    //设置按钮

    radioDialog.setPositiveButton(getString(R.string.dialog_btn_confirm_text)

            , new DialogInterface.OnClickListener() {

                @Override

                public void onClick(DialogInterface dialog, int which) {

                    dialog.dismiss();

                }

            });

    radioDialog.create().show();

  }
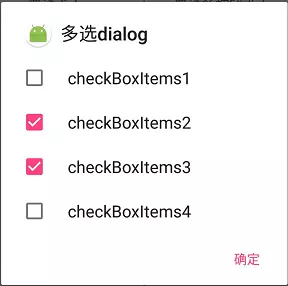
5、多选对话框
运行截图:
代码:
private void showCheckBoxDialog(){
    final String checkBoxItems[] = new String[]{"checkBoxItems1","checkBoxItems2",

            "checkBoxItems3","checkBoxItems4"};

    final boolean isCheck[] = new boolean[]{false,true,true,false};

    AlertDialog.Builder checkBoxDialog = new AlertDialog.Builder(this);

    checkBoxDialog.setTitle(getString(R.string.dialog_check_box_text));

    checkBoxDialog.setIcon(R.mipmap.ic_launcher_round);

    /*

        设置item 不能用setMessage()

        用setMultiChoiceItems

        items : radioItems[] -> 多选选项数组

        checkItems : isCheck[] -> 是否选中数组

        listener -> 回调接口

    */

    checkBoxDialog.setMultiChoiceItems(checkBoxItems, isCheck

            , new DialogInterface.OnMultiChoiceClickListener() {

        @Override

        public void onClick(DialogInterface dialog, int which, boolean isChecked) {

            if (isChecked){

                Toast.makeText(DialogActivity.this,

                        checkBoxItems[which] + "   选中",Toast.LENGTH_SHORT).show();

            }else {

                Toast.makeText(DialogActivity.this,

                        checkBoxItems[which] + "   未选中",Toast.LENGTH_SHORT).show();

            }

        }

    });

    //设置按钮

    checkBoxDialog.setPositiveButton(getString(R.string.dialog_btn_confirm_text)

            , new DialogInterface.OnClickListener() {

                @Override

                public void onClick(DialogInterface dialog, int which) {

                    dialog.dismiss();

                }

            });

    checkBoxDialog.create().show();

  }
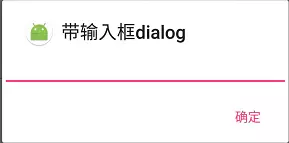
6、带输入框的弹窗
运行截图:
代码:
private void showEditDialog(){
    final EditText edit = new EditText(this);

    AlertDialog.Builder editDialog = new AlertDialog.Builder(this);

    editDialog.setTitle(getString(R.string.dialog_edit_text));

    editDialog.setIcon(R.mipmap.ic_launcher_round);

    //设置dialog布局

    editDialog.setView(edit);

    //设置按钮

    editDialog.setPositiveButton(getString(R.string.dialog_btn_confirm_text)

            , new DialogInterface.OnClickListener() {

                @Override

                public void onClick(DialogInterface dialog, int which) {

                    Toast.makeText(DialogActivity.this,

                            edit.getText().toString().trim(),Toast.LENGTH_SHORT).show();

                    dialog.dismiss();

                }

            });

    editDialog.create().show();

  }
7、自定义布局的对话框
此类型的对话框在实际项目开发中用到的地方比提示对话框用到的地方要多一些,不过在项目几乎上都是自定义的对话框...
运行截图:
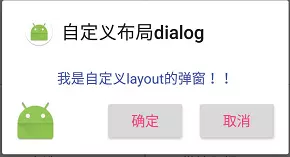
布局文件:custom_dialog_layout.xml
      <TextView

           android:id="@+id/dialog_text"

           android:layout_width="match_parent"

           android:layout_height="wrap_content"

           android:textSize="15sp"

           android:textColor="@color/colorPrimary"

           android:gravity="center"

           android:padding="12dp"/>

      <RelativeLayout

           android:layout_width="match_parent"

           android:layout_height="wrap_content">

           <ImageView

               android:layout_width="wrap_content"

               android:layout_height="wrap_content"

               android:src="@mipmap/ic_launcher"/>

          <Button

              android:id="@+id/dialog_btn_confirm"

              android:layout_width="wrap_content"

              android:layout_height="wrap_content"

              android:textColor="@color/colorAccent"

              android:textSize="15sp"

              android:text="@string/dialog_btn_confirm_text"

              android:layout_centerHorizontal="true"/>

          <Button

              android:id="@+id/dialog_btn_cancel"

              android:layout_width="wrap_content"

              android:layout_height="wrap_content"

              android:textColor="@color/colorAccent"

              android:textSize="15sp"

              android:text="@string/dialog_btn_cancel_text"

              android:layout_centerHorizontal="true"

              android:layout_alignParentRight="true"/>

      </RelativeLayout>

  </LinearLayout>
代码:
  private void showLayoutDialog() {

    //加载布局并初始化组件

    View dialogView = LayoutInflater.from(this).inflate(R.layout.custom_dialog_layout,null);

    TextView dialogText = (TextView) dialogView.findViewById(R.id.dialog_text);

    Button dialogBtnConfirm = (Button) dialogView.findViewById(R.id.dialog_btn_confirm);

    Button dialogBtnCancel = (Button) dialogView.findViewById(R.id.dialog_btn_cancel);

    final AlertDialog.Builder layoutDialog = new AlertDialog.Builder(this);

    layoutDialog.setTitle(getString(R.string.dialog_custom_layout_text));

    layoutDialog.setIcon(R.mipmap.ic_launcher_round);

    layoutDialog.setView(dialogView);

    //设置组件

    dialogText.setText("我是自定义layout的弹窗!!");

    dialogBtnConfirm .setOnClickListener(new View.OnClickListener() {

        @Override

        public void onClick(View v) {

            Toast.makeText(DialogActivity.this,"我是自定义layout的弹窗!!",Toast.LENGTH_SHORT).show();

        }

    });

    dialogBtnConfirm .setOnClickListener(new View.OnClickListener() {

        @Override

        public void onClick(View v) {

            layoutDialog.setOnDismissListener(new DialogInterface.OnDismissListener() {

                @Override

                public void onDismiss(DialogInterface dialog) {

                    dialog.dismiss();

                }

            });

        }

    });

    layoutDialog.create().show();

  }
以上就是Android系统弹窗的几种实现方式,几乎涵盖了能解决各种简单需求。其中自定义布局的方式奠定了自定义弹窗的基本实现。
尾语
可以看出上面的几种实现方式都是通过AlertDialog类实现的。有兴趣的可以看Android源码中的AlertDialog类实现。
我的个人博客:Jetictors
我的掘金:Jetictors
Github:Jetictors
欢迎各位大佬进群共同研究、探索
QQ群号:497071402
Android———最详细的系统对话框(AlertDialog)详解的更多相关文章
- Android———最详细的系统对话框使用
在实际应用开发中,用到系统对话框中的情况几乎是没有的.按开发流程来说,UI工程师都会给出每一个弹窗的样式,故而在实际开发中都是自定义弹窗的. 即使用到的地方不多,但是我们也是需要了解并且能熟练的运用它 ...
- 【转】【Android UI设计与开发】之详解ActionBar的使用,androidactionbar
原文网址:http://www.bkjia.com/Androidjc/895966.html [Android UI设计与开发]之详解ActionBar的使用,androidactionbar 详解 ...
- 分享我开发的网络电话Android手机APP正式版,图文详解及下载
分享我开发的网络电话Android手机APP正式版,图文详解及下载 分享我开发的网络电话Android手机APP正式版 实时语音通讯,可广域网实时通讯,音质清晰流畅! 安装之后的运行效果: 第一次安装 ...
- Android 颜色渲染(九) PorterDuff及Xfermode详解
版权声明:本文为博主原创文章,未经博主允许不得转载. Android 颜色渲染(九) PorterDuff及Xfermode详解 之前已经讲过了除ComposeShader之外Shader的全部子类 ...
- Android ADB命令教程二——ADB命令详解
Android ADB命令教程二——ADB命令详解 转载▼ 原文链接:http://www.tbk.ren/article/249.html 我们使用 adb -h 来看看,adb命令里面 ...
- Android 中各种权限深入体验及详解
Android 中各种权限深入体验及详解 分类: Android2012-07-15 19:27 2822人阅读 评论(0) 收藏 举报 androidpermissionsinstallersyst ...
- Android低功耗蓝牙(BLE)使用详解
代码地址如下:http://www.demodashi.com/demo/13390.html 与普通蓝牙相比,低功耗蓝牙显著降低了能量消耗,允许Android应用程序与具有更严格电源要求的BLE设备 ...
- Android逆向之旅---SO(ELF)文件格式详解(转)
第一.前言 从今天开始我们正式开始Android的逆向之旅,关于逆向的相关知识,想必大家都不陌生了,逆向领域是一个充满挑战和神秘的领域.作为一名Android开发者,每个人都想去探索这个领域,因为一旦 ...
- Android SDK中的Support兼容包详解
这篇文章主要介绍了Android SDK中的Support兼容包详解,本文详细区分了Support Library的版本区别.各种Theme的概念和使用注意事项等内容,需要的朋友可以参考下 背景 来自 ...
随机推荐
- Splunk 会议回想: 大数据的关键是机器学习
作者 Jonathan Allen ,译者 张晓鹏 Splunk的用户大会已经接近尾声.三天时间的会议里,共进行了160多个主题研讨.涵盖了从安全.运营到商业智能.甚至包含物联网,会议中一遍又一遍出现 ...
- struts2入门示例(hello world)
1. 环境搭建 按照之前的文章配置好myeclipse的jdk和tomcat,并新建一个web项目后,可开始动手配置与struts2相关的地方了.首先去struts的官网下载好最新的struts2代码 ...
- node.js 学习01
PHP开发技术栈(LAMP) Linux Apache MySql PHPnode.js 全栈开发技术栈(MEAN): MongoDB Express Angular Node.js 现阶 ...
- HDU5374 Tetris (2015年多校比赛第7场)大模拟
思路: 先写好了几个函数.旋转,四种操作,推断能否够进行合并消除 题中有好几处要考虑的细节问题,如 自然下落究竟部时不进行合并的推断,而是当自然下落非法时才推断 假设消除一行,这一行上面的所以方块仅仅 ...
- 237. Delete Node in a Linked List【easy】
237. Delete Node in a Linked List[easy] Write a function to delete a node (except the tail) in a sin ...
- AES中几种加密模式的区别:ECB、CBC、CFB、OFB、CTR
AES: aes是基于数据块的加密方式,也就是说,每次处理的数据时一块(16字节),当数据不是16字节的倍数时填充,这就是所谓的分组密码(区别于基于比特位的流密码),16字节是分组长度 分组加密的几种 ...
- jQuery EasyUI DataGrid在MVC中的运用-基本属性并实现分页
※ datagrid的基本属性和方法 ※ datagrid分页在前后台的实现 最终效果: 与视图显示对应的view model public class Book public strin ...
- hdu 4786 Fibonacci Tree(最小生成树)
Fibonacci Tree Time Limit: 4000/2000 MS (Java/Others) Memory Limit: 32768/32768 K (Java/Others) T ...
- spring 第一篇(1-3):鸟瞰spring蓝图
如你所见,spring框架的核心是关注于如何使用DI.AOP和模板来让企业级java开发变得更简单.spring确实也是这样做的,所以很值得你去使用它.不过spring内容可能比你所能看到的要多很多. ...
- typescript 接口的新认识
interface 用于接收服务器的数据. eg: interface mmmmm { x: string, y: number, z: number, select: KnockoutObserva ...