
SpringBoot之自定义验证码
项目介绍
Spring Security是一个能够为基于Spring的企业应用系统提供声明式的安全访问控制解决方案的安全框架。它提供了一组可以在Spring应用上下文中配置的Bean,为应用系统提供声明式的安全访问控制功能,减少了为企业系统安全控制编写大量重复代码的工作。

Spring Security的核心功能就是对用户进行身份认证和授权。而他的认证机制就是通过Spring Security一系列的过滤器链,当一个请求来的时候,首先要通过过滤器链的校验,校验通过之后才会访问用户各种信息
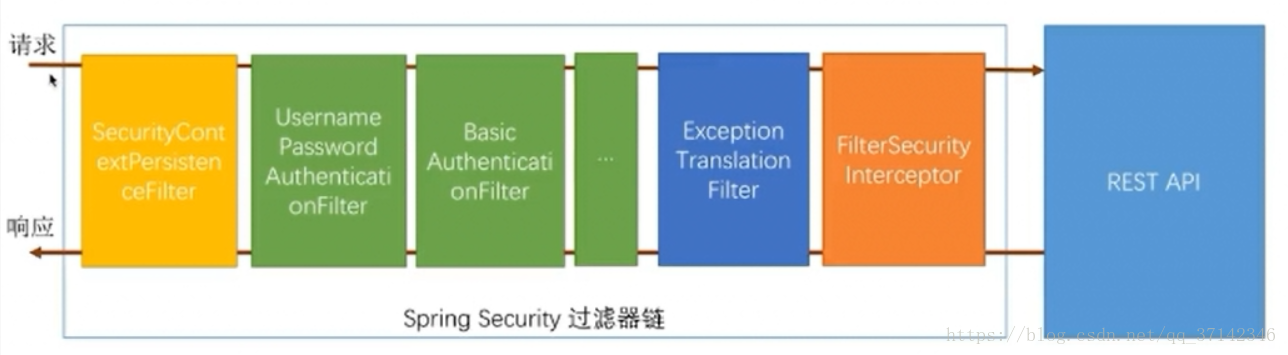 。
。
但是在进行一些登录,注册等操作的时候,往往还需要使用验证码来进行校验。本案例采用的面向接口编程,将自定义的验证码过滤器添加到Spring Security的过滤器链上来实现灵活的,可扩展,可重用,可配置的验证码验证。
项目结构
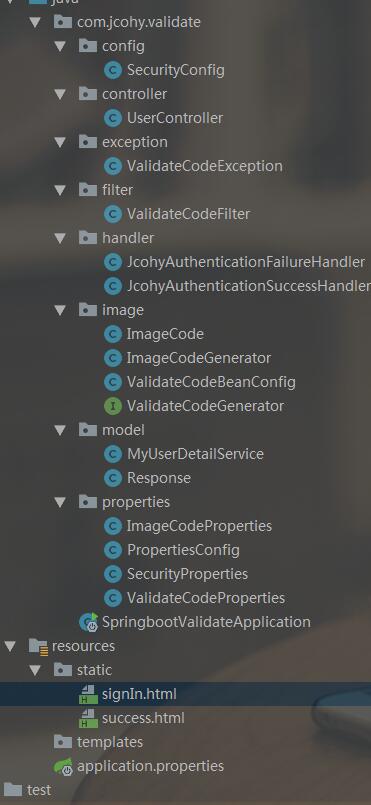
项目实现过程
1. 首先,定义图片验证码实体类。用来封装验证码相关信息
public class ImageCode{

    private BufferedImage image;

	//失效时间

    private LocalDateTime expireTime;

	//验证码

    private String code;

    public ImageCode(BufferedImage image, String code, int expireIn){

        this.code = code;

        this.expireTime = LocalDateTime.now().plusSeconds(expireIn);

        this.image = image;

    }

    public String getCode() {

        return code;

    }

    public void setCode(String code) {

        this.code = code;

    }

    public LocalDateTime getExpireTime() {

        return expireTime;

    }

    public void setExpireTime(LocalDateTime expireTime) {

        this.expireTime = expireTime;

    }

    public BufferedImage getImage() {

        return image;

    }

    public void setImage(BufferedImage image) {

        this.image = image;

    }

    public boolean isExpried() {

        return LocalDateTime.now().isAfter(expireTime);

    }

}
2.验证码属性配置。
- 系统配置
 @ConfigurationProperties(prefix = "jcohy.security")

public class SecurityProperties {

    /**

     * 验证码配置

     */

    private ValidateCodeProperties validateCode = new ValidateCodeProperties();

    public ValidateCodeProperties getValidateCode() {

        return validateCode;

    }

    public void setValidateCode(ValidateCodeProperties validateCode) {

        this.validateCode = validateCode;

    }

}
- 验证码配置。方便大家进行扩展。如要添加其他验证配置,添加其他配置属性类即可
public class ValidateCodeProperties {

    /**

     * 图片验证码选项

     */

    private ImageCodeProperties imageCode = new ImageCodeProperties();

    public ImageCodeProperties getImageCode() {

        return imageCode;

    }

    public void setImageCode(ImageCodeProperties imageCode) {

        this.imageCode = imageCode;

    }

}
- 图片验证码配置
public class ImageCodeProperties{

    private int length = 4;

    private int expireIn = 60;

    /**

     * 验证码的宽

     */

    private int width = 67;

    /**

     * 验证码的高

     */

    private int height = 23;

    public int getLength() {

        return length;

    }

    public void setLength(int length) {

        this.length = length;

    }

    public int getExpireIn() {

        return expireIn;

    }

    public void setExpireIn(int expireIn) {

        this.expireIn = expireIn;

    }

    public int getWidth() {

        return width;

    }

    public void setWidth(int width) {

        this.width = width;

    }

    public int getHeight() {

        return height;

    }

    public void setHeight(int height) {

        this.height = height;

    }

}
- 使配置生效
 @Configuration

@EnableConfigurationProperties(SecurityProperties.class)

public class PropertiesConfig {

}
3.关于验证码配置的说明
- 验证码的配置分为三个级别,
- 默认配置:当什么都不配置时,采用默认配置
- 应用级配置:配置在application.properties文件中。例如:jcohy.security.validateCode.imageCode.width=100
- 请求级配置:在请求中携带验证码相关参数。例如:"/code/image?width=100"。说明指定验证码图片宽度为100px。
其优先级如下:请求级配置>应用级配置>默认配置。当前一个存在时,会覆盖后面的配置。
4.好了,前面已经对验证码的基本属性和配置已经编写完成,接下来根据配置文件属性生成验证码图片。此处采用的是面向接口编程的方法,方便大家定制不同的验证码生成策略,多种方式验证。使用更高级的验证码策略等。我这里只提供了一种简单的实现。
public interface ValidateCodeGenerator {

    /**

     * 图形验证码实现方法接口

     * @param request

     * @return

     */

    ImageCode generate(ServletWebRequest request);

}
public class ImageCodeGenerator implements ValidateCodeGenerator{

    /**

     * 系统配置

     */

    @Autowired

    private SecurityProperties securityProperties;

    @Override

    public ImageCode generate(ServletWebRequest request) {

     ....

	 ....

	 //绘制并生成图片验证码过程

	 ....

	 ....

    }

    public SecurityProperties getSecurityProperties() {

        return securityProperties;

    }

    public void setSecurityProperties(SecurityProperties securityProperties) {

        this.securityProperties = securityProperties;

    }

}
5.图片验证码生成的过程已经完成,接下来就是对验证码进行验证了。我们使用过滤器来进行验证
@Component("validateCodeFilter")

public class ValidateCodeFilter extends OncePerRequestFilter implements InitializingBean {

    /**

     * 验证码校验失败处理器

     */

    private AuthenticationFailureHandler authenticationFailureHandler;

    private SecurityProperties securityProperties;

    private SessionStrategy sessionStrategy = new HttpSessionSessionStrategy();

   //需要进行验证的的请求地址。

    private Set<String> urls = new HashSet<>();

    /**

     * 验证请求url与配置的url是否匹配的工具类

     */

    private AntPathMatcher pathMatcher = new AntPathMatcher();

    @Override

    public void afterPropertiesSet() throws ServletException {

        super.afterPropertiesSet();

		//“/authentication/form”为登录请求。

        urls.add("/authentication/form");

    }

    @Override

    protected void doFilterInternal(HttpServletRequest request, HttpServletResponse response, FilterChain chain)

            throws ServletException, IOException {

        boolean action = false;

        for(String url:urls){

            if(pathMatcher.match(url,request.getRequestURI())){

                action = true;

            }

        }

        if(action){

            try{

                validate(new ServletWebRequest(request));

            }catch (ValidateCodeException e){

                authenticationFailureHandler.onAuthenticationFailure(request,response,e);

                return;

            }

        }

        chain.doFilter(request, response);

    }

    private void validate(ServletWebRequest request) throws ServletRequestBindingException {

        ImageCode codeInSession = (ImageCode) sessionStrategy.getAttribute(request, UserController.SESSION_KEY);

        String codeInRequest;

        try {

            codeInRequest = ServletRequestUtils.getStringParameter(request.getRequest(),

                    "imageCode");

        } catch (ServletRequestBindingException e) {

            throw new ValidateCodeException("获取验证码的值失败");

        }

        if (StringUtils.isBlank(codeInRequest)) {

            throw new ValidateCodeException("imageCode:验证码的值不能为空");

        }

        if (codeInSession == null) {

            throw new ValidateCodeException("imageCode:验证码不存在");

        }

        if (codeInSession.isExpried()) {

            sessionStrategy.removeAttribute(request,UserController.SESSION_KEY);

            throw new ValidateCodeException("imageCode: 验证码已过期");

        }

        if (!StringUtils.equals(codeInSession.getCode(), codeInRequest)) {

            throw new ValidateCodeException("imageCode:验证码不匹配");

        }

        sessionStrategy.removeAttribute(request,UserController.SESSION_KEY);

    }

    public AuthenticationFailureHandler getAuthenticationFailureHandler() {

        return authenticationFailureHandler;

    }

    public void setAuthenticationFailureHandler(AuthenticationFailureHandler authenticationFailureHandler) {

        this.authenticationFailureHandler = authenticationFailureHandler;

    }

    public SecurityProperties getSecurityProperties() {

        return securityProperties;

    }

    public void setSecurityProperties(SecurityProperties securityProperties) {

        this.securityProperties = securityProperties;

    }

}
- 将生成验证码的Bean加入到容器中
@Configuration

public class ValidateCodeBeanConfig {

    @Autowired

    private SecurityProperties securityProperties;

	//条件匹配。此处可扩展其他的验证条件和相应生成器

    @Bean

    @ConditionalOnMissingBean(name = "imageCodeGenerator")

    public ValidateCodeGenerator imageCodeGenerator(){

        ImageCodeGenerator imageCodeGenerator = new ImageCodeGenerator();

        imageCodeGenerator.setSecurityProperties(securityProperties);

        return imageCodeGenerator;

    }

}
6。将过滤器添加到过滤器链上
@Configuration

public class SecurityConfig extends WebSecurityConfigurerAdapter {

    /**

     * 验证码校验失败处理器

     */

    @Autowired

    private AuthenticationFailureHandler authenticationFailureHandler;

    @Autowired

    private AuthenticationSuccessHandler JcohyAuthenticationSuccessHandler;

    /**

     * 系统配置信息

     */

    @Autowired

    private SecurityProperties securityProperties;

    @Bean

    public PasswordEncoder passwordEncoder() {

        return new BCryptPasswordEncoder();

    }

    @Override

    protected void configure(HttpSecurity http) throws Exception {

        ValidateCodeFilter validateCodeFilter = new ValidateCodeFilter();

        validateCodeFilter.setAuthenticationFailureHandler(authenticationFailureHandler);

        validateCodeFilter.setSecurityProperties(securityProperties);

        validateCodeFilter.afterPropertiesSet();

        http.addFilterBefore(validateCodeFilter, UsernamePasswordAuthenticationFilter.class)

            .formLogin()

            .loginPage("/signIn.html")

            .loginProcessingUrl("/authentication/form")

            .successHandler(JcohyAuthenticationSuccessHandler)

            .and()

            .authorizeRequests()

            .antMatchers("/signIn.html"

            ,"/code/image").permitAll()

            .anyRequest()

            .authenticated()

            .and()

            .csrf().disable();

    }

}
项目运行
- 本项目使用IntelliJ IDEA工具。使用maven构建。下载后导入到工具中可直接运行
- 运行成功后访问http://localhost:8080,出现如下界面
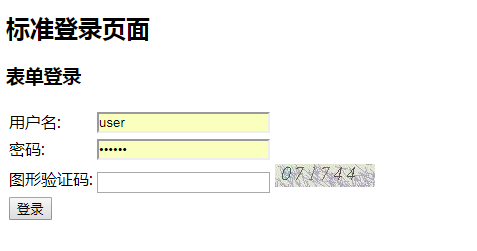
- 本项目主要侧重于验证码的生成和验证,用户部分比较简单,用户名随便写,密码是123456,想要修改密码可以在MyUserDetailService类中修改。
SpringBoot之自定义验证码
注:本文著作权归作者,由demo大师代发,拒绝转载,转载需要作者授权
SpringBoot之自定义验证码的更多相关文章
- Springboot 之 自定义配置文件及读取配置文件
本文章来自[知识林] 读取核心配置文件 核心配置文件是指在resources根目录下的application.properties或application.yml配置文件,读取这两个配置文件的方法有两 ...
- Springboot 之 自定义配置文件及读取配置文件注意:配置文件中的字符串不要有下划线 .配置中 key不能带下划线,value可以(下划线的坑,坑了我两天..特此纪念)
注意:配置文件中的字符串不要有下划线 .配置中 key不能带下划线,value可以 错误的.不能读取的例子: mySet .ABAP_AS_POOLED = ABAP_AS_WITH_P ...
- springboot扫描自定义的servlet和filter代码详解_java - JAVA
文章来源:嗨学网 敏而好学论坛www.piaodoo.com 欢迎大家相互学习 这几天使用spring boot编写公司一个应用,在编写了一个filter,用于指定编码的filter,如下: /** ...
- SpringBoot Jpa 自定义查询
SpringBoot Jpa 自定义查询 持久层Domain public interface BaomingDao extends JpaRepository<BaomingBean,Inte ...
- 详解Springboot中自定义SpringMVC配置
详解Springboot中自定义SpringMVC配置 WebMvcConfigurer接口 这个接口可以自定义拦截器,例如跨域设置.类型转化器等等.可以说此接口为开发者提前想到了很多拦截层面的需 ...
- SpringBoot系列——自定义统一异常处理
前言 springboot内置的/error错误页面并不一定适用我们的项目,这时候就需要进行自定义统一异常处理,本文记录springboot进行自定义统一异常处理. 1.使用@ControllerAd ...
- js自定义验证码
分享一个js自定义的验证码 window.onload = function () { var code; $('.changePassword').click(function () ...
- SpringBoot编写自定义的starter 专题
What’s in a name All official starters follow a similar naming pattern; spring-boot-starter-*, where ...
- springboot读取自定义配置文件节点
今天和大家分享的是自定义配置信息的读取:近期有写博客这样的计划,分别交叉来写springboot方面和springcloud方面的文章,因为springboot预计的篇章很多,这样cloud的文章就需 ...
随机推荐
- 转:如何解决“My mac 64-bit”问题
童鞋们都知道Xcode会根据当前SDK在Run按钮旁边的选项栏中显示适合的Simulator供开发者选择,如下图: 但是有时候则错误显示“My mac 64-bit” ,这个明显不是我们想要的,如下图 ...
- mac 下 outlook 邮箱 服务器端口设置
- C#编程(一)
第一个简单的C#程序 using System; using System.Collections.Generic; using System.Linq; using System.Text; usi ...
- 基于Android的ELF PLT/GOT符号重定向过程及ELF Hook实现(by 低端码农 2014.10.27)
引言 写这篇技术文的原因,主要有两个: 其一是发现网上大部分描写叙述PLT/GOT符号重定向过程的文章都是针对x86的.比方<Redirecting functions in shared EL ...
- TH文字编辑器开发的第一个游戏,唐伯虎泡妞
使用TH编辑器开发. 游戏是我女朋友用编辑器制作的. 下载地址: http://tieba.baidu.com/p/3015237996
- [Linux] Systemd 入门教程:命令篇
reference : http://www.ruanyifeng.com/blog/2016/03/systemd-tutorial-commands.html Systemd 是 Linux 系统 ...
- MySQL冷知识
问题:在网站后台添加了扩展字段后,对于数据库表不太熟悉的,可能会花较长时间查找,如何有效提高我们的工作效率呢? 解决方法:利用SQL语句来查询字段所在的表
- Java 动态向 JTable 中添加数据
import java.awt.Toolkit; import javax.swing.SwingUtilities; import javax.swing.UIManager; import jav ...
- Informatica 常用组件Lookup缓存之一 概述
可以配置查找转换以高速缓存查找表.PowerCenter 将在处理高速缓存查找转换中的第一个数据行时在存储器中建立高速缓存.它将根据您在转换或会话特性中配置的数量来分配高速缓存区内存.PowerCen ...
- vb.net结构化异常处理和“邪用”
vb.net中的错误处理包括两种:非结构化异常处理技术和结构化异常处理.非结构化异常处理技术在vb 6.0中使用的比较普遍,即通过Err对象和ON Error.Go To.Resume等语句来实现.这 ...