读源码 | metisMenu侧边栏插件
—————————————————————————————————————————————————————————
使用方法
实现效果
引入文件
<link rel="stylesheet" href="vendor/bootstrap/css/bootstrap.css"> // bootstrap样式
<link href="vendor/font-awesome/css/font-awesome.min.css" rel="stylesheet" type="text/css"> // 图标使用font-awesome
<link rel="stylesheet" href="vendor/metisMenu/metisMenu.css"> // 插件样式
<script src="vendor/jquery/jquery.js"></script> // 基于jquery实现
<script src="vendor/bootstrap/js/bootstrap.min.js"></script> // 使用bootstrap的collapse插件
<script src="vendor/metisMenu/metisMenu.min.js"></script> // 插件代码
调用方法
<script type="text/javascript">

$(function() {

    $('#side-menu').metisMenu(); // ul.nav#side-menu

})

</script>
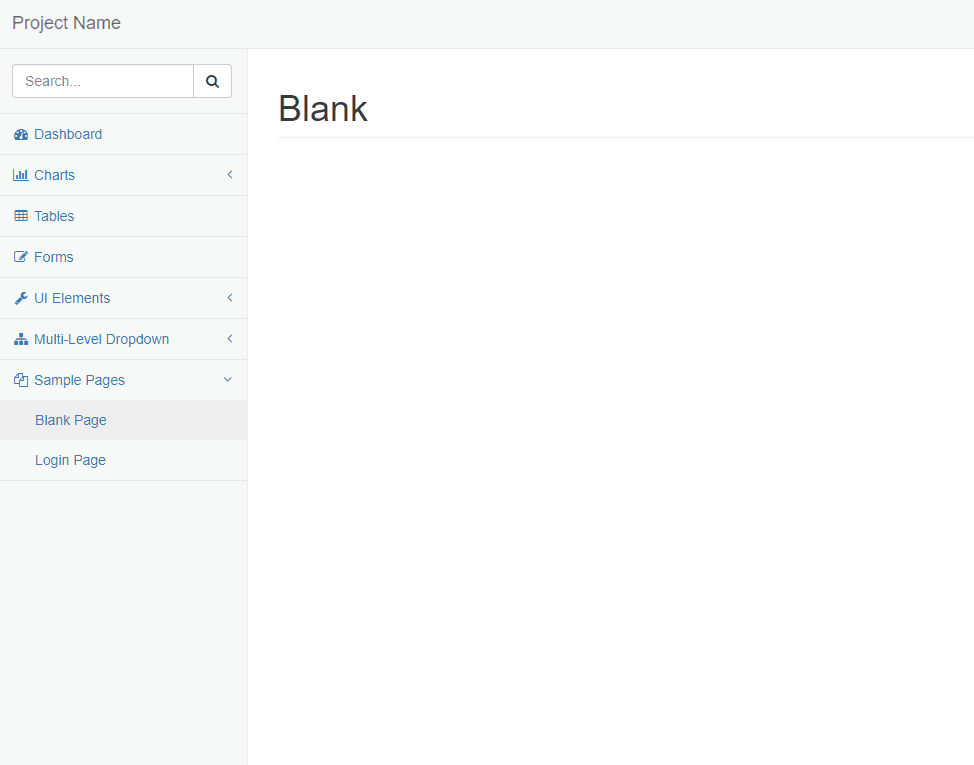
使用样例
<<Demo.html>>
<nav class="navbar navbar-default navbar-static-top">

    <div class="navbar-default sidebar" role="navigation">

        <div class="sidebar-nav navbar-collapse">

            <ul class="nav" id="side-menu">

                <li class="sidebar-search">

                    <div class="input-group custom-search-form">

                        <input type="text" class="form-control" placeholder="Search...">

                        <span class="input-group-btn">

                            <button class="btn btn-default" type="button">

                                <i class="fa fa-search"></i>

                            </button>

                        </span>

                    </div>

                </li>

                <li>

                    <a href=""><i class="fa fa-dashboard fa-fw"></i> Dashboard</a>

                </li>

                <li>

                    <a href="#"><i class="fa fa-bar-chart-o fa-fw"></i> Charts<span

                                class="fa arrow"></span></a>

                    <ul class="nav nav-second-level">

                        <li>

                            <a href="">Flot Charts</a>

                        </li>

                        <li>

                            <a href="">Morris.js Charts</a>

                        </li>

                    </ul>

                </li>

                <li>

                    <a href=""><i class="fa fa-table fa-fw"></i> Tables</a>

                </li>

                <li>

                    <a href=""><i class="fa fa-edit fa-fw"></i> Forms</a>

                </li>

                <li>

                    <a href="#"><i class="fa fa-wrench fa-fw"></i> UI Elements<span

                                class="fa arrow"></span></a>

                    <ul class="nav nav-second-level">

                        <li>

                            <a href="">Panels and Wells</a>

                        </li>

                        <li>

                            <a href="">Buttons</a>

                        </li>

                        <li>

                            <a href="">Notifications</a>

                        </li>

                        <li>

                            <a href="">Typography</a>

                        </li>

                        <li>

                            <a href=""> Icons</a>

                        </li>

                        <li>

                            <a href="">Grid</a>

                        </li>

                    </ul>

                </li>

                <li>

                    <a href="#"><i class="fa fa-sitemap fa-fw"></i> Multi-Level Dropdown<span

                                class="fa arrow"></span></a>

                    <ul class="nav nav-second-level">

                        <li>

                            <a href="#">Second Level Item</a>

                        </li>

                        <li>

                            <a href="#">Second Level Item</a>

                        </li>

                        <li>

                            <a href="#">Third Level <span class="fa arrow"></span></a>

                            <ul class="nav nav-third-level">

                                <li>

                                    <a href="#">Third Level Item</a>

                                </li>

                                <li>

                                    <a href="#">Third Level Item</a>

                                </li>

                                <li>

                                    <a href="#">Third Level Item</a>

                                </li>

                                <li>

                                    <a href="#">Third Level Item</a>

                                </li>

                            </ul>

                        </li>

                    </ul>

                </li>

                <li class="active">

                    <a href="#"><i class="fa fa-files-o fa-fw"></i> Sample Pages<span

                                class="fa arrow"></span></a>

                    <ul class="nav nav-second-level">

                        <li>

                            <a class="active" href="#">Blank Page</a>

                        </li>

                        <li>

                            <a href="#">Login Page</a>

                        </li>

                    </ul>

                </li>

            </ul>

        </div>

    </div>

</nav>
<<blank.css>>
@media (min-width: 768px) {

    .sidebar {position: absolute;width: 250px;margin-top: 51px;z-index:;}

}

.sidebar .sidebar-search {padding: 15px;}

.sidebar ul li a.active {background-color: #eee;}

.sidebar ul li {background: #f8f8f8;border-bottom: #e7e7e7 1px solid;}

.nav-second-level li {border-bottom: 0 !important;}

.nav-second-level li a {padding-left: 38px;}
树形图
p.s.自定义样式用下划线表示

—————————————————————————————————————————————————————————
源码解读
调用
使用$.fn.extend(object)的方式为jquery类添加成员方法,功能封装在原型中,能够全局调用;
通过$("#side-menu")生成的jquery类实例来调用该方法;
初始配置
全局定义插件名称pluginName,定义对象defaults存放toggle(展开/闭合)与doubleTapToGo(双击事件)的开关;
样式
使用font-awesome来扩展侧边栏图标和展开标识(三角),引入font-awesome.css后只需要通过i.fa.fa-***来调用就可以了
基础布局通过bootstrap类实现,详细分支情况见属性图
初始化展开
借助bootstrap内置的collapse插件来实现;
通过检测<li.active>来标识当前页对应的列表,在metisMenu.js中检查是否需要展开的列表;
判断激活的标签栏是否有子列表,如果有则添加.collapse.in类(bootstrap.css),实际为添加样式{display:block};
未被激活的标签栏如果有子列表则添加.collapse类(boostrap.css),{display:none};
监听点击事件
监听方法借助bootstrap的collapse插件;
绑定事件时需要遵循collapse插件规则.on("click"+"."+pluginName,function(e){});
为点击的标签栏添加激活样式.active,如果有子列表则展开/关闭,使用collapse插件方法.collapse("toggle");
闭合其他所有有子列表的标签栏,使用.collapse("hide");
—————————————————————————————————————————————————————————
简单版 v1.0
功能
仅实现基础效果
复写代码
<<metisMenu-demo1.js>>
/**

 * Created by hughd on 2017/8/9.

 * 简单版 - v1.0

 * 仅实现基础折叠

 */

;(function ($, window, document, undefined) {

    var pluginName = "metisMenu";

    var toggle = true;

    function Plugin(element, options) {

        this.element = $(element);

        this.init();

    }

    Plugin.prototype = {

        init: function () {

            var $this = this.element;

            // var obj = this;

            $this.find("li.active").has("ul").children("ul").addClass('collapse in');// 初始激活的元素的后代全部展开

            $this.find('li').not(".active").has("ul").children("ul").addClass('collapse');// 未激活的元素显示隐藏

            // 监听点击事件

            $this.find("li").children("a").on("click." + pluginName, function () {

                //被点击的元素激活样式并展开

                $(this).parent('li').toggleClass('active').children("ul").collapse("toggle");

                if (toggle) {

                    //将其他被展开的元素闭合

                    $(this).parent("li").siblings().removeClass("active").children("ul").collapse("hide");

                }

            });

        }

    }

    $.fn[pluginName] = function (options) {

        // 实例化Plugin对象,并存放在元素<ul#side-menu>._proto_.metisMenu中

        this.data(pluginName, new Plugin(this, options));

        return this;

    }

})(jQuery, window, document);
实现思路
- 初始化
获取当前激活的标签,将该标签的内容显示(如果没有子标签则不显示)
未激活的标签,所有子列表隐藏
- 点击事件(通过boostrap的collapse插件)
当前点击的标签获取激活样式,子列表展开
除点击标签之外的其他标签移除激活样式,并闭合
—————————————————————————————————————————————————————————
完整插件
功能
IE浏览器兼容情况;
移除已有metisMenu数据情况
双击标题事件
源码
<<metisMenu.js>>
/*

 * metismenu - v1.1.3

 * Easy menu jQuery plugin for Twitter Bootstrap 3

 * https://github.com/onokumus/metisMenu

 *

 * Made by Osman Nuri Okumus

 * Under MIT License

 */

;(function($, window, document, undefined) {

    var pluginName = "metisMenu",

        defaults = {

            toggle: true,

            doubleTapToGo: false

        };

    function Plugin(element, options) {

        this.element = $(element);

        this.settings = $.extend({}, defaults, options);

        this._defaults = defaults;

        this._name = pluginName;

        this.init();

    }

    Plugin.prototype = {

        init: function() {

            var $this = this.element,

                $toggle = this.settings.toggle,

                obj = this;

            if (this.isIE() <= 9) {

                $this.find("li.active").has("ul").children("ul").collapse("show");

                $this.find("li").not(".active").has("ul").children("ul").collapse("hide");

            } else {

                $this.find("li.active").has("ul").children("ul").addClass("collapse in");

                $this.find("li").not(".active").has("ul").children("ul").addClass("collapse");

            }

            //add the "doubleTapToGo" class to active items if needed

            if (obj.settings.doubleTapToGo) {

                $this.find("li.active").has("ul").children("a").addClass("doubleTapToGo");

            }

            $this.find("li").has("ul").children("a").on("click" + "." + pluginName, function(e) {

                e.preventDefault();

                //Do we need to enable the double tap

                if (obj.settings.doubleTapToGo) {

                    //if we hit a second time on the link and the href is valid, navigate to that url

                    if (obj.doubleTapToGo($(this)) && $(this).attr("href") !== "#" && $(this).attr("href") !== "") {

                        e.stopPropagation();

                        document.location = $(this).attr("href");

                        return;

                    }

                }

                $(this).parent("li").toggleClass("active").children("ul").collapse("toggle");

                if ($toggle) {

                    $(this).parent("li").siblings().removeClass("active").children("ul.in").collapse("hide");

                }

            });

        },

        isIE: function() { //https://gist.github.com/padolsey/527683

            var undef,

                v = 3,

                div = document.createElement("div"),

                all = div.getElementsByTagName("i");

            while (

                div.innerHTML = "<!--[if gt IE " + (++v) + "]><i></i><![endif]-->",

                all[0]

            ) {

                return v > 4 ? v : undef;

            }

        },

        //Enable the link on the second click.

        doubleTapToGo: function(elem) {

            var $this = this.element;

            //if the class "doubleTapToGo" exists, remove it and return

            if (elem.hasClass("doubleTapToGo")) {

                elem.removeClass("doubleTapToGo");

                return true;

            }

            //does not exists, add a new class and return false

            if (elem.parent().children("ul").length) {

                 //first remove all other class

                $this.find(".doubleTapToGo").removeClass("doubleTapToGo");

                //add the class on the current element

                elem.addClass("doubleTapToGo");

                return false;

            }

        },

        remove: function() {

            this.element.off("." + pluginName);

            this.element.removeData(pluginName);

        }

    };

    $.fn[pluginName] = function(options) {

        this.each(function () {

            var el = $(this);

            if (el.data(pluginName)) {

                el.data(pluginName).remove();

            }

            el.data(pluginName, new Plugin(this, options));

        });

        return this;

    };

})(jQuery, window, document);
<<metisMenu.css>>
/*

 * metismenu - v1.1.3

 * Easy menu jQuery plugin for Twitter Bootstrap 3

 * https://github.com/onokumus/metisMenu

 *

 * Made by Osman Nuri Okumus

 * Under MIT License

 */

.arrow {

    float: right;

    line-height: 1.42857;

}

.glyphicon.arrow:before {

    content: "\e079";

}

.active > a > .glyphicon.arrow:before {

    content: "\e114";

}

/*

 * Require Font-Awesome

 * http://fortawesome.github.io/Font-Awesome/

*/

.fa.arrow:before {

    content: "\f104";

}

.active > a > .fa.arrow:before {

    content: "\f107";

}

.plus-times {

    float: right;

}

.fa.plus-times:before {

    content: "\f067";

}

.active > a > .fa.plus-times {

    filter: progid:DXImageTransform.Microsoft.BasicImage(rotation=1);

    -webkit-transform: rotate(45deg);

    -moz-transform: rotate(45deg);

    -ms-transform: rotate(45deg);

    -o-transform: rotate(45deg);

    transform: rotate(45deg);

}

.plus-minus {

    float: right;

}

.fa.plus-minus:before {

    content: "\f067";

}

.active > a > .fa.plus-minus:before {

    content: "\f068";

}

读源码 | metisMenu侧边栏插件的更多相关文章
- 读源码【读mybatis的源码的思路】
✿ 需要掌握的编译器知识 ★ 编译器为eclipse为例子 调试准备工作(步骤:Window -> Show View ->...): □ 打开调试断点Breakpoint: □ 打开变量 ...
- [一起读源码]走进C#并发队列ConcurrentQueue的内部世界
决定从这篇文章开始,开一个读源码系列,不限制平台语言或工具,任何自己感兴趣的都会写.前几天碰到一个小问题又读了一遍ConcurrentQueue的源码,那就拿C#中比较常用的并发队列Concurren ...
- Java读源码之ReentrantLock
前言 ReentrantLock 可重入锁,应该是除了 synchronized 关键字外用的最多的线程同步手段了,虽然JVM维护者疯狂优化 synchronized 使其已经拥有了很好的性能.但 R ...
- Java读源码之ReentrantLock(2)
前言 本文是 ReentrantLock 源码的第二篇,第一篇主要介绍了公平锁非公平锁正常的加锁解锁流程,虽然表达能力有限不知道有没有讲清楚,本着不太监的原则,本文填补下第一篇中挖的坑. Java读源 ...
- Java读源码之CountDownLatch
前言 相信大家都挺熟悉 CountDownLatch 的,顾名思义就是一个栅栏,其主要作用是多线程环境下,让多个线程在栅栏门口等待,所有线程到齐后,栅栏打开程序继续执行. 案例 用一个最简单的案例引出 ...
- 阅读源码很重要,以logback为例,分享一个小白都能学会的读源码方法
作为一个程序员,经常需要读一些开源项目的源码.同时呢,读源码对我们也有很多好处: 1.提升自己 阅读优秀的代码,第一可以提升我们自身的编码水平,第二可以开拓我们写代码的思路,第三还可能让我们拿到大厂 ...
- WeMall微信商城源码活动报名插件代码详情
WeMall微信商城源码插件活动报名代码是用于商业推广的比较有效的方式,分享了部分比较重要的代码,供技术员学习参考,商家可自由设置报名项目,活动时间,报名内容 代码详情地址:http://addon. ...
- 【MyBatis源码分析】插件实现原理
MyBatis插件原理----从<plugins>解析开始 本文分析一下MyBatis的插件实现原理,在此之前,如果对MyBatis插件不是很熟悉的朋友,可参看此文MyBatis7:MyB ...
- 跟大佬一起读源码:CurrentHashMap的扩容机制
并发编程——ConcurrentHashMap#transfer() 扩容逐行分析 前言 ConcurrentHashMap 是并发中的重中之重,也是最常用的数据结构,之前的文章中,我们介绍了 put ...
随机推荐
- [Javascript]XMLHttpRequest对象实现下载进度条
摘要 可以通过设置一个XMLHttpRequest对象的responseType属性来改变一个从服务器上返回的响应的数据类型.可用的属性值为空字符串 (默认), "arraybuffer&q ...
- etcd集群搭建
etcd介绍,以及适用场景,参考:http://www.infoq.com/cn/articles/etcd-interpretation-application-scenario-implement ...
- [翻译] 5点建议,让iOS程序跑得更快
[文章原地址]http://mobile.tutsplus.com/tutorials/iphone/ios-quick-tip-5-tips-to-increase-app-performanc ...
- Coursera课程《Python数据结构》中课件
You can access the Google Drive containing all of the current and in-progress lecture slides for thi ...
- 1、cocos2d-x环境安装
1 所需软件 2 安装python-2.7.8.amd64.msi 注意将当中的有一步设置,Add python.exe to path 设置python的环境变量 3 解压cocos2d-x- ...
- 我所遭遇过的游戏中间件--Kynapse
我所遭遇过的游戏中间件--Kynapse Autodesk Kynapse游戏中间件是一款面向游戏开发.非玩家控制角色实时模拟的领先的人工智能解决方案.Kynapse具有先进的路径查找功能,比如三维路 ...
- OTL翻译(9) --常量的SQL语句
常量的SQL语句 一个没有绑定变量的SQL语句.SQL语句块或是存储过程就被称为常量的SQL语句.OTL通过一个静态的函数来执行这样的SQL语句. 例如: // static otl_cursor:: ...
- 第八章 JVM性能监控与故障处理工具(2)
注意:该篇博客主要记录自<深入理解java虚拟机(第二版)> 说明:关于命令行的JVM性能监控与故障处理工具见<第七章 JVM性能监控与故障处理工具(1)> 1.图像化的故障处 ...
- IOS开发之地图导航
一.问题描述 现在很多的APP 都开始引入了地图和定位功能,包括一些餐饮业,团购等.他们都过定位和地图来让用户更加方便的根据自己的位置找到合适的目标,也就是说,现在地图定位已经不再是导航工具类,地图工 ...
- Andrew Ng Machine Learning 专题【Linear Regression】
此文是斯坦福大学,机器学习界 superstar - Andrew Ng 所开设的 Coursera 课程:Machine Learning 的课程笔记. 力求简洁,仅代表本人观点,不足之处希望大家探 ...