利用jTessBoxEditor工具进行Tesseract3.02.02样本训练,提高验证码识别率
1、背景
前文已经简要介绍tesseract ocr引擎的安装及基本使用,其中提到使用-l eng参数来限定语言库,可以提高识别准确率及识别效率。
本文将针对某个网站的验证码进行样本训练,形成自己的语言库,来提高验证码识别率。
2、准备工具
tesseract样本训练有一个官方流程说明,https://github.com/tesseract-ocr/tesseract/wiki/TrainingTesseract#run-tesseract-for-training,不过都是英文的,个人认为这个地址适合于查找细节问题,全程看E文对大众还是有一定的困难。
具体的方法有两种:1-利用三方工具,2-完全命令行操作,三方工具主要在https://github.com/tesseract-ocr/tesseract/wiki/AddOns下载,本文将用到jTessBoxEditor这个工具,我们先给他下载到本地。
需要特别说明,这个工具是基于java虚拟机运行的,所以我们还要下载并安装一个java虚拟机,下载地址:http://download.oracle.com/otn-pub/java/jdk/8u91-b14/jdk-8u91-windows-x64.exe?AuthParam=1463733597_1161f2d895aa7606ed260b43b83d5f86。
总结一下:
1、工具2 java虚拟机 Ver 1.8.0_91 64位版本 (oracle官网)
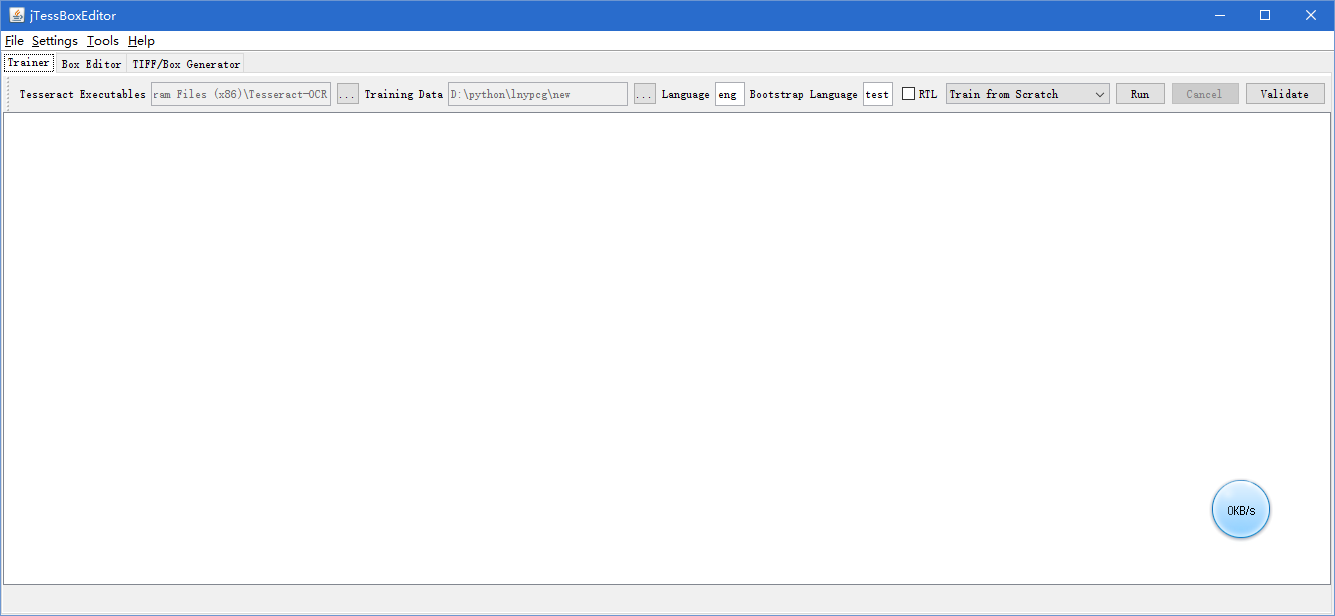
2、工具1 jtessboxeditor Ver 1.5版本 (jtessboxeditor官网),运行界面如下:
3、使用实例
1)、准备样本图片
手动刷新某网站验证码 ,手动或者写程序,保存了101个验证码样本文件,分别命名成:1.png,2.png,……,101.png。
该验证码有几个特点:a、定长4位,b、都是数字,c、有背景干扰,但比较简单,d、字体为红色。
为了提高识别率,首先做了一个工作就是灰度化处理 ,并全部转换成tif文件,分别命名成:1.tif,2.tif,……,101.tif,统一存放在d:\python\lnypcg下。
2)、合并样本图片
打开jtessboxeditor,点击Tools->Merge Tiff ,按住shift键选择前文提到的101个tif文件,并把生成的tif合并到新目录d:\python\lnypcg\new下,命名为langyp.fontyp.exp0.tif。
注意:langyp 是本人定义的语言名称,fontyp是本人定义的字体名称,后续都会用到,你可以修改成你喜欢的名字。
3)、生成box文件
执行命令生成langyp.fontyp.exp0.box文件
tesseract langyp.fontyp.exp0.tif langyp.fontyp.exp0 -l eng -psm 7 batch.nochop makebox
D:\python\lnypcg\new>tesseract langyp.fontyp.exp0.tif langyp.fontyp.exp0 -l eng -psm 7 batch.nochop makebox

Tesseract Open Source OCR Engine v3.02 with Leptonica

Page 1 of 101

Page 2 of 101

Page 3 of 101

……

Page 101 of 101

D:\python\lnypcg\new>dir

 驱动器 D 中的卷没有标签。

 卷的序列号是 36D9-CDC7

 D:\python\lnypcg\new 的目录

2016-06-03  14:37    <DIR>          .

2016-06-03  14:37    <DIR>          ..

2016-06-03  14:30             6,327 langyp.fontyp.exp0.box

2016-06-03  13:07           126,056 langyp.fontyp.exp0.tif

               2 个文件        132,383 字节

               2 个目录 24,869,994,496 可用字节
4)、修改box文件
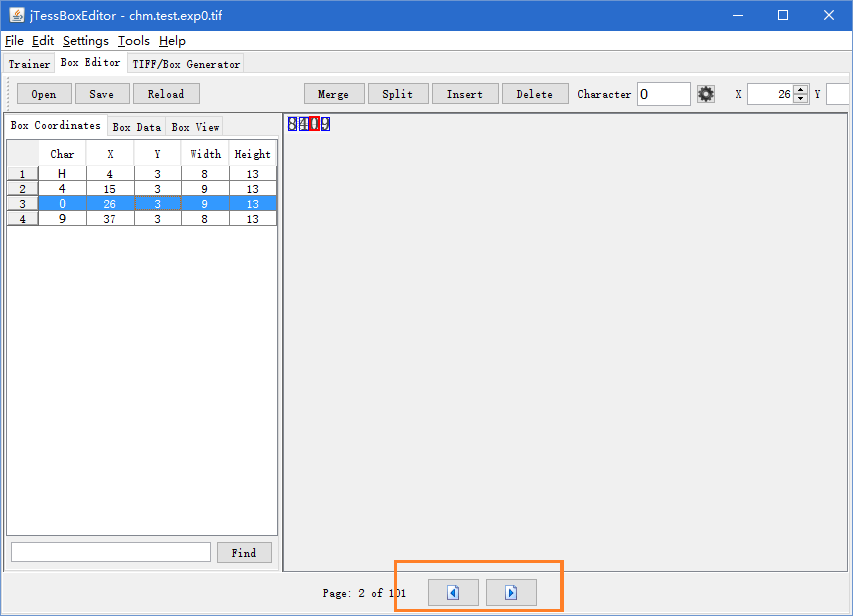
切换到jTessBoxEditor工具的Box Editor页,点击open,打开前面的tiff文件langyp.fontyp.exp0.tif,工具会自动加载对应的box文件。
检查box数据,如下图所示,数字8被误认成字母H,手工修改H成8,并保存。
点击下图红色框的按钮,逐个核对tif文件的box数据,全部检查结束并保存。
5)、生成font_properties
执行echo命令生成font_properties。
echo fontyp 0 0 0 0 0 >font_properties
也可以手工新建一个名为font_properties的文本文件(注意该文件没有扩展名),内容为字体名fontyp,后面带5个0,分别代表字体的粗体、斜体等属性,这里全部是0
D:\python\lnypcg\new>echo fontyp 0 0 0 0 0 >font_properties

D:\python\lnypcg\new>type font_properties

fontyp 0 0 0 0 0
6)、生成训练文件
执行命令,生成langyp.fontyp.exp0.tr训练文件
tesseract langyp.fontyp.exp0.tif langyp.fontyp.exp0 -l eng -psm 7 nobatch box.train
D:\python\lnypcg\new>tesseract langyp.fontyp.exp0.tif langyp.fontyp.exp0 -l eng -psm 7 nobatch box.train

Tesseract Open Source OCR Engine v3.02 with Leptonica

Page 1 of 101

row xheight=8.66667, but median xheight = 10

APPLY_BOXES:

   Boxes read from boxfile:       4

   Found 4 good blobs.

Generated training data for 1 words

……

……

……

Page 101 of 101

row xheight=8.66667, but median xheight = 10

APPLY_BOXES:

   Boxes read from boxfile:       4

   Found 4 good blobs.

Generated training data for 1 words

 D:\python\lnypcg\new 的目录

2016-06-03  16:34    <DIR>          .

2016-06-03  16:34    <DIR>          ..

2016-06-03  16:05                16 font_properties

2016-06-03  14:30             6,327 langyp.fontyp.exp0.box

2016-06-03  13:07           126,056 langyp.fontyp.exp0.tif

2016-06-03  16:20           618,844 langyp.fontyp.exp0.tr

2016-06-03  16:20               202 langyp.fontyp.exp0.txt

               5 个文件        751,445 字节

               2 个目录 24,869,101,568 可用字节
7)、生成字符集文件
执行命令,生成名为unicharset的字符集文件。
unicharset_extractor langyp.fontyp.exp0.box
D:\python\lnypcg\new>unicharset_extractor langyp.fontyp.exp0.box

Extracting unicharset from langyp.fontyp.exp0.box

Wrote unicharset file ./unicharset.

D:\python\lnypcg\new>dir

 驱动器 D 中的卷没有标签。

 卷的序列号是 36D9-CDC7

 D:\python\lnypcg\new 的目录

2016-06-03  16:41    <DIR>          .

2016-06-03  16:41    <DIR>          ..

2016-06-03  16:05                16 font_properties

2016-06-03  14:30             6,327 langyp.fontyp.exp0.box

2016-06-03  13:07           126,056 langyp.fontyp.exp0.tif

2016-06-03  16:20           618,844 langyp.fontyp.exp0.tr

2016-06-03  16:20               202 langyp.fontyp.exp0.txt

2016-06-03  16:41               712 unicharset

               6 个文件        752,157 字节

               2 个目录 24,869,171,200 可用字节
8)、生成shape文件
执行命令,生成shape文件
shapeclustering -F font_properties -U unicharset -O langyp.unicharset langyp.fontyp.exp0.tr
D:\python\lnypcg\new>shapeclustering -F font_properties -U unicharset -O langyp.unicharset langyp.fontyp.exp0.tr

Reading langyp.fontyp.exp0.tr ...

Building master shape table

Computing shape distances...

Stopped with 0 merged, min dist 999.000000

Computing shape distances... 0

Stopped with 0 merged, min dist 999.000000

Computing shape distances... 0

Stopped with 0 merged, min dist 999.000000

Computing shape distances... 0

Stopped with 0 merged, min dist 999.000000

Computing shape distances... 0

Stopped with 0 merged, min dist 999.000000

Computing shape distances... 0

Stopped with 0 merged, min dist 999.000000

Computing shape distances... 0

Stopped with 0 merged, min dist 999.000000

Computing shape distances... 0

Stopped with 0 merged, min dist 999.000000

Computing shape distances... 0

Stopped with 0 merged, min dist 999.000000

Computing shape distances... 0

Stopped with 0 merged, min dist 999.000000

Computing shape distances... 0

Stopped with 0 merged, min dist 999.000000

Computing shape distances... 0

Stopped with 0 merged, min dist 999.000000

Computing shape distances...

Stopped with 0 merged, min dist 999.000000

Computing shape distances...

Stopped with 0 merged, min dist 999.000000

Computing shape distances... 0 1 2 3 4 5 6 7 8 9 10

Stopped with 0 merged, min dist 0.057803

Master shape_table:Number of shapes = 11 max unichars = 1 number with multiple unichars = 0

D:\python\lnypcg\new>dir

 驱动器 D 中的卷没有标签。

 卷的序列号是 36D9-CDC7

 D:\python\lnypcg\new 的目录

2016-06-03  17:24    <DIR>          .

2016-06-03  17:24    <DIR>          ..

2016-06-03  17:20                19 font_properties

2016-06-03  14:30             6,327 langyp.fontyp.exp0.box

2016-06-03  13:07           126,056 langyp.fontyp.exp0.tif

2016-06-03  17:23           618,844 langyp.fontyp.exp0.tr

2016-06-03  17:23               202 langyp.fontyp.exp0.txt

2016-06-03  17:24               723 langyp.unicharset

2016-06-03  17:24               202 shapetable

2016-06-03  17:24               712 unicharset

               8 个文件        753,085 字节

               2 个目录 24,868,278,272 可用字节
9)、生成聚集字符特征文件
执行命令,生成3个特征字符文件,unicharset、inttemp、pffmtable
mftraining -F font_properties -U unicharset -O langyp.unicharset langyp.fontyp.exp0.tr
D:\python\lnypcg\new>mftraining -F font_properties -U unicharset -O langyp.unicharset langyp.fontyp.exp0.tr

Read shape table shapetable of 11 shapes

Reading langyp.fontyp.exp0.tr ...

Done!
10)、生成字符正常化特征文件
执行命令,生成正常化特征文件normproto。
cntraining langyp.fontyp.exp0.tr
D:\python\lnypcg\new>cntraining langyp.fontyp.exp0.tr

Reading langyp.fontyp.exp0.tr ...

Clustering ...
11)、更名
执行命令,把步骤9,步骤10生成的特征文件进行更名。
rename normproto fontyp.normproto
rename inttemp fontyp.inttemp
rename pffmtable fontyp.pffmtable
rename unicharset fontyp.unicharset
rename shapetable fontyp.shapetable
D:\python\lnypcg\new>rename normproto fontyp.normproto

D:\python\lnypcg\new>rename inttemp fontyp.inttemp

D:\python\lnypcg\new>rename pffmtable fontyp.pffmtable

D:\python\lnypcg\new>rename unicharset fontyp.unicharset

D:\python\lnypcg\new>rename shapetable fontyp.shapetable
12)、合并训练文件
执行命令,生成fontyp.traineddata文件。
combine_tessdata fontyp.
注意:
a、fontyp.traineddata文件最终要拷贝tesseract安装目录的tessdata目录下,才能被tesseract找到。
b、命令行最后必须带一个点。
c、执行结果中,1,3,4,5,13这几行必须有数值,才代表命令执行成功。
D:\python\lnypcg\new>combine_tessdata fontyp.

Combining tessdata files

TessdataManager combined tesseract data files.

Offset for type 0 is -1

Offset for type 1 is 140

Offset for type 2 is -1

Offset for type 3 is 852

Offset for type 4 is 137760

Offset for type 5 is 137850

Offset for type 6 is -1

Offset for type 7 is -1

Offset for type 8 is -1

Offset for type 9 is -1

Offset for type 10 is -1

Offset for type 11 is -1

Offset for type 12 is -1

Offset for type 13 is 139352

Offset for type 14 is -1

Offset for type 15 is -1

Offset for type 16 is -1
13)测试使用
譬如前文的28.tif 中8被误认为字母S,用新的字体看是否还出错。
D:\python\lnypcg>tesseract 28.tif output -l eng -psm 7

Tesseract Open Source OCR Engine v3.02 with Leptonica

D:\python\lnypcg>type output.txt

S094

#1调用默认的eng语言,8被识别成S

D:\python\lnypcg>tesseract 28.tif output -l fontyp -psm 7

Error opening data file C:\Program Files (x86)\Tesseract-OCR\tessdata/fontyp.traineddata

Please make sure the TESSDATA_PREFIX environment variable is set to the parent directory of your "tessdata" directory.

Failed loading language 'fontyp'

Tesseract couldn't load any languages!

Could not initialize tesseract.

#2条用新的fontyp语言,tesseract找不到fontyp语言。

D:\python\lnypcg>copy .\new\fontyp.traineddata "C:\Program Files (x86)\Tesseract-OCR\tessdata"

已复制         1 个文件。

#3复制fontyp.traineddata到tesseract的安装目录的tessdata子目录下
D:\python\lnypcg>tesseract 28.tif output -l fontyp -psm 7

Tesseract Open Source OCR Engine v3.02 with Leptonica

D:\python\lnypcg>type output.txt

8094
#使用fontyp语言成功识别8094
4、总结:
Anyway,jtessboxeditor 工具其实是一个基本成型的三方样本训练工具,它的功能就是自动执行上述脚本命令,但是在实际使用中,还存在不够完善的地方,譬如不能加psm参数,生成shape时经常程序异常崩溃,所以本文操作还是以命令行为主。
tesseract是一个非常强大的ocr引擎,尤其是做了针对性训练之后,验证码识别率几乎可以达到95%以上,再在程序中增加一些判断机制,基本上可以满足爬虫自动登陆需求了,回头写一个某东的自动识别验证码的爬虫程序。
把前文提的简化一下,综合成如下步骤列表:
1、合并图片

2、生成box文件

tesseract langyp.fontyp.exp0.tif langyp.fontyp.exp0 -l eng -psm 7 batch.nochop makebox

3、修改box文件

4、生成font_properties

echo fontyp 0 0 0 0 0 >font_properties

5、生成训练文件

tesseract langyp.fontyp.exp0.tif langyp.fontyp.exp0 -l eng -psm 7 nobatch box.train

6、生成字符集文件

unicharset_extractor langyp.fontyp.exp0.box

7、生成shape文件

shapeclustering -F font_properties -U unicharset -O langyp.unicharset langyp.fontyp.exp0.tr

8、生成聚集字符特征文件

mftraining -F font_properties -U unicharset -O langyp.unicharset langyp.fontyp.exp0.tr

9、生成字符正常化特征文件

cntraining langyp.fontyp.exp0.tr

10、更名

rename normproto fontyp.normproto

rename inttemp fontyp.inttemp

rename pffmtable fontyp.pffmtable

rename unicharset fontyp.unicharset

rename shapetable fontyp.shapetable

11、合并训练文件,生成fontyp.traineddata

combine_tessdata fontyp.
以上!
利用jTessBoxEditor工具进行Tesseract3.02.02样本训练,提高验证码识别率的更多相关文章
- jTessBoxEditor工具进行Tesseract3.02.02样本训练
1.背景 前文已经简要介绍tesseract ocr引擎的安装及基本使用,其中提到使用-l eng参数来限定语言库,可以提高识别准确率及识别效率. 本文将针对某个网站的验证码进行样本训练,形成自己的语 ...
- 利用jTessBoxEditor工具进行Tesseract-OCR样本训练
jTessBoxEditor依赖java虚拟机 , 所以要先安装 java. jTessBoxEditor下载地址: https://sourceforge.net/projects/vietocr/ ...
- 利用代码生成工具Database2Sharp设计数据编辑界面
在Winform程序开发中,界面部分的开发工作量一般是比较大的,特别是表的字段数据比较多的情况下,数据编辑界面所需要的繁琐设计和后台逻辑处理工作量更是直线上升,而且稍不注意,可能很多处理有重复或者错误 ...
- Python3.x:pytesseract识别率提高(样本训练)
Python3.x:pytesseract识别率提高(样本训练) 1,下载并安装3.05版本的tesseract 地址:https://sourceforge.net/projects/tessera ...
- [转]如何利用ndk-stack工具查看so库的调用堆栈【代码示例】?
如何利用ndk-stack工具查看so库的调用堆栈[代码示例]? http://hi.baidu.com/subo4110/item/d00395b3bf63e4432bebe36d Step1:An ...
- Web API应用架构在Winform混合框架中的应用(4)--利用代码生成工具快速开发整套应用
前面几篇介绍了Web API的基础信息,以及如何基于混合框架的方式在WInform界面里面整合了Web API的接入方式,虽然我们看似调用过程比较复杂,但是基于整个框架的支持和考虑,我们提供了代码生成 ...
- 利用mtd工具实现嵌入式设备在线升级
版权声明:本文为博主原创文章,未经博主允许不得转载. 目录(?)[+] 主要思路是:通过web post方式将升级文件交给CGI程序处理,然后通过mtd工具实现设备在线升级. 1.页面部分 & ...
- MYSQL启用日志,查看日志,利用mysqlbinlog工具恢复MySQL数据库【转载】
转自 MYSQL启用日志,查看日志,利用mysqlbinlog工具恢复MySQL数据库 - _安静 - 博客园http://www.cnblogs.com/xionghui/archive/2012/ ...
- 02.02.03第3章 餐饮项目案例(Power BI商业智能分析)
02.02.03第3章 餐饮项目案例 02.02.03.01餐饮数据理解与读入 00:06:12 02.02.03.02餐饮数据处理 00:29:57 处理生成的表为: 02.02.03.03餐饮数据 ...
随机推荐
- python总结--目录(转)
python模块 [Python]随机数与随机字符串 举例说明Python的CSV模块 python模块之smtplib: 用python发送SSL/TLS安全邮件 python模块之e ...
- MVC中分页的实现
我在 (www.helpqy.com) 中使用了下面的分页技术. 分页可以采用troygoode提供的开源包,其开源网站主页为:https://github.com/TroyGoode/PagedLi ...
- SSH(Struts 2.3.31 + Spring 4.1.6 + Hibernate 5.0.12 + Ajax)框架整合实现简单的增删改查(包含分页,Ajax 无刷新验证该用户是否存在)
软件152 余建强 该文将以员工.部门两表带领大家进入SSH的整合教程: 源码下载:http://download.csdn.net/detail/qq_35318576/9877235 SSH 整合 ...
- django2.1---上下文处理器
上下文处理器 上下文处理器是可以返回一些数据,在全局模板中都可以使用.比如登录后的用户信息,在很多页面中都需要使用,那么我们可以放在上下文处理器中,就没有必要在每个视图函数中都返回这个对象. 在set ...
- histoty显示时间戳
设置Linux可以查看历史命令的执行时间 大家都知道Linux平台上,可以通过history命令查看最近所执行过的命令,但history命令默认所显示的只有编号和命令的,只知道命令是最近所执行 ...
- zTree中 checkbox 点击向文本框中赋值
例子如下:第一个 文本框: <div class="content_wrap" style="height: 0;position: relative; " ...
- Jsp&Servlet入门级项目全程实录第4讲
惯例广告一发,对于初学真,真的很有用www.java1234.com,去试试吧! 1.添加搜索.添加.修改.删除按钮 <div id="tb"> <div> ...
- Java多态-如何理解父类引用指向子类对象
java多态,如何理解父类引用指向子类对象 要理解多态性,首先要知道什么是“向上转型”. 我定义了一个子类Cat,它继承了Animal类,那么后者就是前者是父类.我可以通过 Cat c = new ...
- git相关的简单命令
初次使用建议看这个ppt:http://www.bootcss.com/p/git-guide/ 从现有仓库克隆 这需要用到 git clone 命令.如果你熟悉其他的 VCS 比如 Subve ...
- 传输层协议TCP和UDP分析
分析所用软件下载:Wireshark-win32-1.10.2.exe 阅读导览 1. 分析应用TCP协议,以及TCP链接管理 2. 分析应用UDP协议 分析要求 (1)TCP部分: 学习3CDaem ...