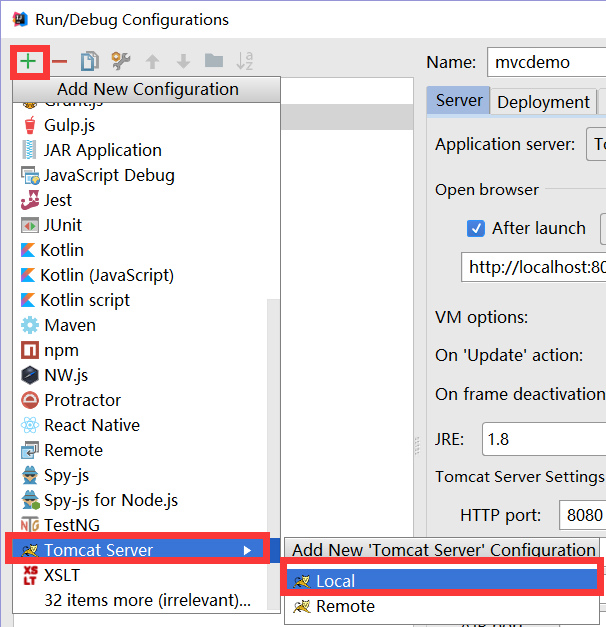
IDEA简单部署MVC项目
本文章主要参考![]() 七小栈主的文章,特此说明:
七小栈主的文章,特此说明:
前提
在配置好JDK,配置好Maven,配置链接如下:如何配置Java环境,包括JDK,Maven等
建项目
IEDA中File->New->Project->Maven->填写好GroupId,ArtifactId等,然后选择刚才配置的Maven的目录和目录下settings.xml和本地存放架包的路径(这个一般在C:\Users\{用户名}\.m2\repository中),起个项目的名字,点击Finish项目就建好了
配置pom.xml
登录http://mvnrepository.com/,可查看架包配置,直接拷贝到dependencies下即会自动Down下来
<project xmlns="http://maven.apache.org/POM/4.0.0" xmlns:xsi="http://www.w3.org/2001/XMLSchema-instance"

  xsi:schemaLocation="http://maven.apache.org/POM/4.0.0 http://maven.apache.org/maven-v4_0_0.xsd">

  <modelVersion>4.0.0</modelVersion>

  <groupId>Jef</groupId>

  <artifactId>me</artifactId>

  <packaging>war</packaging>

  <version>1.0-SNAPSHOT</version>

  <name>me Maven Webapp</name>

  <url>http://maven.apache.org</url>

  <dependencies>

    <dependency>

      <groupId>junit</groupId>

      <artifactId>junit</artifactId>

      <version>3.8.1</version>

      <scope>test</scope>

    </dependency>

    <dependency>

      <groupId>org.springframework</groupId>

      <artifactId>spring-test</artifactId>

      <version>4.3.1.RELEASE</version>

    </dependency>

    <!--spring-->

    <dependency>

      <groupId>org.springframework</groupId>

      <artifactId>spring-beans</artifactId>

      <version>4.3.1.RELEASE</version>

    </dependency>

    <dependency>

      <groupId>org.springframework</groupId>

      <artifactId>spring-core</artifactId>

      <version>4.3.1.RELEASE</version>

    </dependency>

    <dependency>

      <groupId>org.springframework</groupId>

      <artifactId>spring-context</artifactId>

      <version>4.3.1.RELEASE</version>

    </dependency>

    <!--Spring Web + Spring MVC-->

    <dependency>

      <groupId>org.springframework</groupId>

      <artifactId>spring-web</artifactId>

      <version>4.3.1.RELEASE</version>

    </dependency>

    <dependency>

      <groupId>org.springframework</groupId>

      <artifactId>spring-webmvc</artifactId>

      <version>4.3.1.RELEASE</version>

    </dependency>

    <!--json支持-->

    <!-- https://mvnrepository.com/artifact/org./json -->

    <dependency>

      <groupId>org.json</groupId>

      <artifactId>json</artifactId>

      <version>20160212</version>

    </dependency>

    <!-- https://mvnrepository.com/artifact/commons-lang/commons-lang -->

    <dependency>

      <groupId>commons-lang</groupId>

      <artifactId>commons-lang</artifactId>

      <version>2.6</version>

    </dependency>

    <!-- https://mvnrepository.com/artifact/commons-beanutils/commons-beanutils -->

    <dependency>

      <groupId>commons-beanutils</groupId>

      <artifactId>commons-beanutils</artifactId>

      <version>1.8.3</version>

    </dependency>

    <!-- https://mvnrepository.com/artifact/commons-collections/commons-collections -->

    <dependency>

      <groupId>commons-collections</groupId>

      <artifactId>commons-collections</artifactId>

      <version>3.2.1</version>

    </dependency>

    <!-- https://mvnrepository.com/artifact/commons-logging/commons-logging -->

    <dependency>

      <groupId>commons-logging</groupId>

      <artifactId>commons-logging</artifactId>

      <version>1.2</version>

    </dependency>

    <!-- https://mvnrepository.com/artifact/net.sf.ezmorph/ezmorph -->

    <dependency>

      <groupId>net.sf.ezmorph</groupId>

      <artifactId>ezmorph</artifactId>

      <version>1.0.6</version>

    </dependency>

    <!--json serialize and deserialization-->

    <!-- 引入fastjson依赖 -->

    <dependency>

      <groupId>com.alibaba</groupId>

      <artifactId>fastjson</artifactId>

      <version>1.2.12</version>

    </dependency>

    <!-- 引入gson依赖 -->

    <dependency>

      <groupId>com.google.code.gson</groupId>

      <artifactId>gson</artifactId>

      <version>2.6.2</version>

    </dependency>

    <!--NoClassDefFoundError: javax/servlet/jsp/jstl/core/Config-->

    <!-- https://mvnrepository.com/artifact/jstl/jstl -->

    <dependency>

      <groupId>jstl</groupId>

      <artifactId>jstl</artifactId>

      <version>1.2</version>

    </dependency>

  </dependencies>

  <build>

    <finalName>me</finalName>

  </build>

</project>
配置web.xml
项目初始运行的时候就会加载web.xml,所以web.xml的配置尤其重要,src->main->webapp->WEB-INF->web.xml
<?xml version="1.0" encoding="UTF-8"?>

<web-app xmlns:xsi="http://www.w3.org/2001/XMLSchema-instance"

         xmlns="http://java.sun.com/xml/ns/javaee"

         xsi:schemaLocation="http://java.sun.com/xml/ns/javaee http://java.sun.com/xml/ns/javaee/web-app_3_0.xsd"

         version="3.0">

    <welcome-file-list>

        <welcome-file>/index.jsp</welcome-file>

    </welcome-file-list>

    <!-- Spring MVC配置 -->

    <servlet>

        <servlet-name>spring</servlet-name>

        <servlet-class>org.springframework.web.servlet.DispatcherServlet</servlet-class>

        <!-- 可以自定义servlet.xml配置文件的位置和名称,默认为WEB-INF目录下,名称为[<servlet-name>]-servlet.xml,如spring-servlet.xml

        <init-param>

            <param-name>contextConfigLocation</param-name>

            <param-value>/WEB-INF/spring-servlet.xml</param-value>

        </init-param>-->

        <!-- load-on-startup元素标记容器是否在启动的时候就加载这个servlet(实例化并调用其init()方法) -->

        <load-on-startup>1</load-on-startup>

    </servlet>

    <servlet-mapping>

        <servlet-name>spring</servlet-name>

        <url-pattern>/</url-pattern>

        <!--<url-pattern>*.do</url-pattern>-->

    </servlet-mapping>

    <!-- Spring配置 -->

    <listener>

        <listener-class>org.springframework.web.context.ContextLoaderListener</listener-class>

    </listener>

    <!-- 指定Spring Bean的配置文件所在目录。默认配置在WEB-INF目录下 -->

    <context-param>

        <param-name>contextConfigLocation</param-name>

        <param-value>classpath:applicationContext.xml</param-value>

    </context-param>

</web-app>
新建 spring-servlet.xml
在WEB-INF文件夹下新建 spring-servlet.xml,采用注解的方式:
<?xml version="1.0" encoding="UTF-8"?>

<beans xmlns="http://www.springframework.org/schema/beans"

       xmlns:xsi="http://www.w3.org/2001/XMLSchema-instance"

       xmlns:context="http://www.springframework.org/schema/context"

       xmlns:mvc="http://www.springframework.org/schema/mvc"

       xsi:schemaLocation="http://www.springframework.org/schema/beans

http://www.springframework.org/schema/beans/spring-beans-3.1.xsd

http://www.springframework.org/schema/context

http://www.springframework.org/schema/context/spring-context-3.1.xsd

http://www.springframework.org/schema/mvc

http://www.springframework.org/schema/mvc/spring-mvc-3.1.xsd">

    <!-- 启动注解驱动的Spring MVC功能,注册请求url和注解POJO类方法的映射-->

    <mvc:annotation-driven >

    </mvc:annotation-driven>

    <!-- 启动包扫描功能,以便注册带有@Controller、@service、@repository、@Component等注解的类成为spring的bean -->

    <context:component-scan base-package="HelloSpringMvc.controller" />

    <!-- 对模型视图名称的解析,在请求时模型视图名称添加前后缀 -->

     <bean class="org.springframework.web.servlet.view.InternalResourceViewResolver">

         <property name="viewClass" value="org.springframework.web.servlet.view.JstlView"/>

         <property name="prefix" value="/"/>    <!-- 前缀 -->

         <property name="suffix" value=".jsp"/>    <!-- 后缀 -->

     </bean>

    <!-- 访问静态文件(jpg,js,css)的方法 -->

    <mvc:resources location="/files/" mapping="/files/**" />

    <mvc:resources location="/scripts/" mapping="/scripts/**" />

    <mvc:resources location="/styles/" mapping="/styles/**" />

    <mvc:resources location="/views/" mapping="/views/**" />

</beans>
这里我们配置了静态文件路径,因此在目录结构新建几个文件夹用以放静态文件例如脚本,图片文件,视图之类的。
新建applicationContext.xml
在Resources资源文件夹下新建applicationContext.xml
<?xml version="1.0" encoding="UTF-8"?>

<beans

        xmlns="http://www.springframework.org/schema/beans"

        xmlns:xsi="http://www.w3.org/2001/XMLSchema-instance"

        xsi:schemaLocation="http://www.springframework.org/schema/beans http://www.springframework.org/schema/beans/spring-beans-3.1.xsd">

    <!-- 我们可以在其中添加我们所需要配置的bean,也可以添加相应的数据库连接和事务处理等等,方便后续拓展

           -->

</beans>
测试SpringMVC配置
TestController.java
package HelloSpringMvc.controller; import org.springframework.stereotype.Controller;
import org.springframework.web.bind.annotation.PathVariable;
import org.springframework.web.bind.annotation.RequestMapping;
import org.springframework.web.bind.annotation.ResponseBody; /**
* Created by Jef on 2017/6/29.
* please remember Jef`s page -> http://www.cnblogs.com/tufujie
* thx~
*/ @Controller
@RequestMapping(value = "/Test") //访问的url地址前缀,可以不写,写了就必须在方法url前面先加上class url 进行区分控制器
public class TestController
{
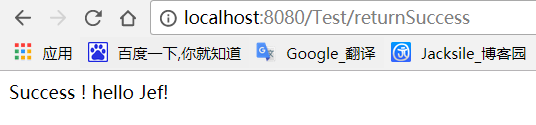
//访问地址:http://localhost:8080/Test/returnSuccess
@RequestMapping(value = "returnSuccess") //实际访问的url地址
public String returnSuccess() {
return "/views/success"; //返回Views文件夹下的success.jsp页面
} //访问地址:http://localhost:8080/Test/returnString
@RequestMapping(value = "returnString", produces = {"text/plain;charset=UTF-8"})
//produces用于解决返回中文乱码问题,application/json;为json解决中文乱码
@ResponseBody //用于返回字符串,不写即返回视图
public String returnString() {
return "hello return string 这是中文,并没有乱码";
} @RequestMapping(value = "clickPost")
public String clickPost(Long id) {
System.out.println(id);
return "index";
} @RequestMapping(value = "clickGet/{id}/{userName}")
public String clickGet(@PathVariable Long id, @PathVariable String userName) {
System.out.println(id);
System.out.println(userName);
return "index";
}
}
index.jsp
<%@ page contentType="text/html;charset=UTF-8" language="java" %>
<html>
<script src="https://code.jquery.com/jquery-1.10.2.js"></script>
<body>
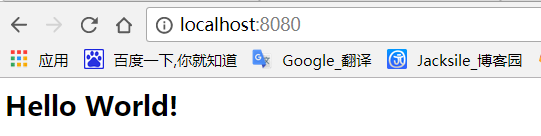
<h2>Hello World!</h2>
<button ><a href="/Test/returnSuccess" target="_blank">returnSuccess</a></button>
<button ><a href="/Test/returnString" target="_blank">returnString</a></button>
<button id="clickId">PostRequest</button>
<button ><a href="/Test/clickGet/2/Jef">GetRequest</a></button>
</body>
<script>
$( "#clickId" ).click(function () {
var a = 1;
$.post("/Test/clickPost", {id: a}, function (data) { }, "json");
});
</script>
</html>
新建一个success.jsp
<%@ page contentType="text/html;charset=UTF-8" language="java" %>

<html>

<head>

    <title>Title</title>

</head>

<body>

Success ! hello Jef!

</body>

</html>
开始试运行

然后下面的图标任意一个都可以开始运行

http://localhost:8080/Test/returnSuccess
http://localhost:8080/Test/returnString

IDEA简单部署MVC项目的更多相关文章
- IIS7或者IIS7.5部署MVC项目时出现404错误
IIS7或者IIS7.5部署MVC项目时出现404错误 服务器上需要安装Windows 补丁 kb980368 下载链接:http://support.microsoft.com/kb/980368
- vs2015制作一个超级简单的MVC项目
使用vs2015制作一个超级简单的MVC项目 本文链接:https://blog.csdn.net/qq_40919762/article/details/100705314 直奔主题一,创建一个 ...
- docker 部署mvc项目 <四>
一:部署方式 直接使用centos镜像,做一个镜像,此镜像制定端口号,在centos容器中安装jexus独立版,就可以了 docker run -d -p : -itd --name wds cent ...
- 简单Spring MVC项目搭建
1.新建Project 开发环境我使用的是IDEA,其实使用什么都是大同小异的,关键是自己用的顺手. 首先,左上角File→New→Project.在Project页面选择Maven,然后勾上图中所示 ...
- 创建简单的MVC项目
一,新建一个空的MVC项目 二,连接数据库,添加一个实体模型Model.edmx
- ASP.NET CORE 之 在IIS上部署MVC项目
与ASP.NET时代不同,ASP.NET Core不再是由IIS工作进程(w3wp.exe)托管,而是使用自托管Web服务器(Kestrel)运行,IIS则是作为反向代理的角色转发请求到Kestrel ...
- windows系统IIS环境下如何部署MVC项目
首先打开IIS:第一步:添加MVC程序映射 打开其中的:处理程序映射,如下图: 点击界面右边操作中的:添加脚本映射,弹出下图: 请求路径:* 可执行文件:c:/Windows/Mi ...
- windows系统IIS7环境下如何部署MVC项目
首先打开IIS:第一步:添加MVC程序映射 打开其中的:处理程序映射,如下图: 点击界面右边操作中的:添加脚本映射,弹出下图: 请求路径:* 可执行文件:c:/Windows/Mi ...
- 问题:IIS部署 MVC项目 (autofac) 错误解决
http://www.cnblogs.com/yelaiju/p/3375168.html Could not load file or assembly 'System.Core, Version= ...
随机推荐
- 遗传算法入门C1
遗传算法入门C1 觉得有用的话,欢迎一起讨论相互学习~Follow Me 参考文献 遗传算法历史 遗传算法(GA)是从生物进化的角度考虑提出来的方法,19世纪达尔文在大量观察基础上总结了大自然进化规律 ...
- Linux查看服务器公网ip的方法
在解决网络问题时,需要查看本机的出口公网IP信息,有如下两个方法: curl ifconfig.me 在linux系统中输入上述的命令,可以查看到本机连接的公网信息: 如果该命令无效,可以使用下面一个 ...
- gdb查看内存(转)
可以使用examine命令(简写是x)来查看内存地址中的值.x命令的语 法如下所示: x/<n/f/u> <addr> n.f.u是可选的参数. n是一个正整数,表示需要显示的 ...
- javamail模拟邮箱功能获取邮件内容-中级实战篇【内容|附件下载方法】(javamail API电子邮件实例)
引言: JavaMail jar包下载地址:http://java.sun.com/products/javamail/downloads/index.html 此篇是紧随上篇文章而封装出来的,阅读本 ...
- Java:数值-字符串转换(String转Double)
String ss = "3.141592653"; double value = Double.valueOf(ss.toString());
- Vue的生命周期的介绍
[推荐链接] https://segmentfault.com/a/1190000008010666
- Spring4笔记1--Spring概述、IoC
Spring概述: Spring框架: Spring 由 20 多个模块组成,它们可以分为数据访问/集成(Data Access/Integration).Web.面向切面编程(AOP, Aspec ...
- linux中断申请之request_threaded_irq 【转】
转自:http://blog.chinaunix.net/xmlrpc.php?r=blog/article&uid=21977330&id=3755609 在linux里,中断处理分 ...
- 空洞卷积(dilated Convolution) 与感受野(Receptive Field)
一.空洞卷积 空洞卷积是是为了解决基于FCN思想的语义分割中,输出图像的size要求和输入图像的size一致而需要upsample,但由于FCN中使用pooling操作来增大感受野同时降低分辨率,导致 ...
- linux文件管理 -> 系统文件属性
-rw-------. 1 root root 4434 May 30 13:58 ks.cfg -rw-------. ①:文件类型与权限 ②:硬链接次数 root ③:所属用户 root ④:所属 ...