在三台服务器,搭建redis三主三从集群
一、资源准备
1、准备三台服务器H1、H2、H3
172.26.237.83 H1

172.26.237.84 H2

172.26.237.85 H3
二、配置服务器
1、在H1服务器设置SSH免密登录;在H1生成RSA公钥和私钥(在H1操作)
(1)执行ssh-keygen -t rsa命令
(2)进入生成密钥所在的文件目录cd /root/.ssh/
(3)将公钥(名为id_rsa.pub文件)追加到认证文件(名为authorized_keys文件),先后执行以下指令:
ssh-copy-id 172.26.237.83

ssh-copy-id 172.26.237.84

ssh-copy-id 172.26.237.85
(注意:这里的IP是H1、H2、H3内网IP,执行后需要输入yes和服务器密码)
2、配置域名解析文件(负责将主机名称映射到相应的IP地址)
(1)在root目录创建env目录,并进入env目录下执行以下命令
cat > /root/env/hosts.txt <<EOF

172.26.237.83 H1

172.26.237.84 H2

172.26.237.85 H3

EOF

cat /root/env/hosts.txt

cat /root/env/hosts.txt >> /etc/hosts
(2)在每个节点进入env创建redis源配置文件,命名为redis-env.conf
echo -e "port 7001\ncluster-enabled yes\ndaemonize yes\ndir /root/soft/7001\ncluster-config-file nodes-7001.conf\npidfile "/root/soft//redis-.pid"\nlogfile "/root/soft//redis-.log"\nappendonly yes" > "redis-env.conf"
配置文件说明:
port

cluster-enabled yes

dir /root/soft/

cluster-config-file nodes-.conf

pidfile /root/soft//redis-.pid

logfile /root/soft//redis-.log

appendonly yes

daemonize yes

protected-mode no
3、在各个节点下载安装redis安装包
(1)创建/root/soft目录
mkdir -p /root/soft
(2)下载安装包、解压、并进行编译
cd /root/soft
# 下载
wget http://download.redis.io/releases/redis-5.0.5.tar.gz
# 解压
tar -zxvf redis-5.0.5.tar.gz

# cd redis-5.0.5 进行编译
make
4、指定配置文件
(1)创建/root/soft/7000目录与/root/soft/7001目录
cd /root/soft/

mkdir

cd /root/soft/

mkdir
(2)将之前创建的源配置文件拷贝到7000和7001目录下
cd /root/env

cp -R redis-env.conf /root/soft//redis.conf

cp -R redis-env.conf /root/soft//redis.conf
(3)分别进入7000和7001目录,修改redis.conf配置(修改成对应的端口),并检查文件路径是否正确

(4)启动redis-server服务
cd redis-5.0.5
./src/redis-server ..//redis.conf
./src/redis-server ../70001/redis.conf
启动redis-server需要注意,守护进程需要打开,不然启动的时候是不成功的
(5)检查是否启动成功
ps -ef |grep redis
5、创建集群(在H1操作)
三主三从架构说明
三台服务器,启动6个实例,形成三主三从,其中存储相同数据的主从节点不能落在同一台机器上,目的是防止部署redis的虚拟机宕机从而造成主从节点全部失效。实验机器的地址与端口如下:
172.26.237.83  7000 7001

172.26.237.84  7000 7001
172.26.237.85 7000 7001
为了使用主从节点不落在同一台机器上
使用如下命令:每台ip+port交叉(没有找到命令指定主从节点的关系的方法).
在目录下redis-5.0.5 执行
./src/redis-cli --cluster create --cluster-replicas  172.26.237.83: 172.26.237.84: 172.26.237.84: 172.26.237.85: 172.26.237.85: 172.26.237.83:7001

# 根据提示输入yes
集群创建成功,如下图:
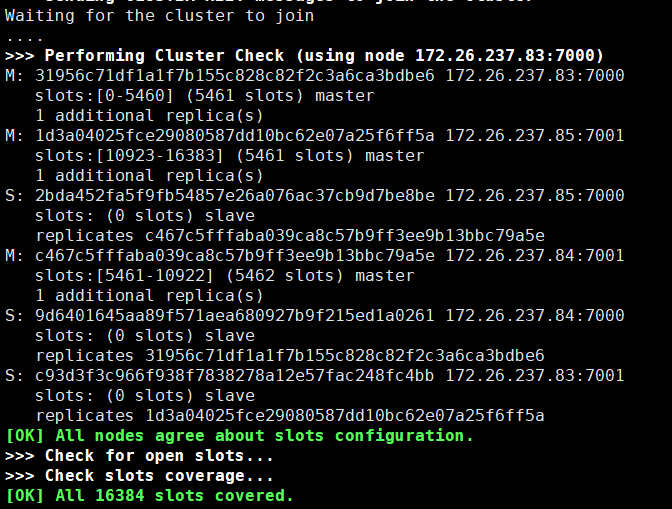
6、测试
()cd /root/soft/redis-5.0.5
(2)进入redis客户端
  ./src/redis-cli -c -h H1 -p 7000
(3)输入cluster info 查看集群健康状态
(4)输入cluster nodes 查看节点健康状态
三、搭建过程遇过的异常
1、配置文件的保护模式没有修改成no
(1)配置文件修改前
port

cluster-enabled yes

dir /root/soft/

cluster-config-file nodes-.conf

pidfile /root/soft//redis-.pid

logfile /root/soft//redis-.log

appendonly yes

daemonize yes
抛出异常如下-->
[ERR] Node 172.26.237.83: DENIED Redis is running in protected mode because protected mode is enabled, no bind address was specified, no authentication password is requested to clients. In this mode connections are only accepted from the loopback interface. If you want to connect from external computers to Redis you may adopt one of the following solutions: ) Just disable protected mode sending the command 'CONFIG SET protected-mode no' from the loopback interface by connecting to Redis from the same host the server is running, however MAKE SURE Redis is not publicly accessible from internet if you do so. Use CONFIG REWRITE to make this change permanent. ) Alternatively you can just disable the protected mode by editing the Redis configuration file, and setting the protected mode option to 'no', and then restarting the server. ) If you started the server manually just for testing, restart it with the '--protected-mode no' option. ) Setup a bind address or an authentication password. NOTE: You only need to do one of the above things in order for the server to start accepting connections from the outside.
修改后配置文件,将保护模式修改成no;(protected-mode no)
port 7000

cluster-enabled yes

dir /root/soft/7000

cluster-config-file nodes-7000.conf

pidfile /root/soft/7000/redis-7000.pid

logfile /root/soft/7000/redis-7000.log

appendonly yes

daemonize yes
protected-mode no
2、redis配置了密码,创建集群的时候没有输入密码,也会报错
(1)配置文件如下:
bind 172.26.237.83

port

cluster-enabled yes

dir /root/soft/

cluster-config-file nodes-.conf

pidfile /root/soft//redis-.pid

logfile /root/soft//redis-.log

appendonly yes

daemonize yes

protected-mode yes

requirepass
注意:绑定地址、保护模式设置为yes,密码最好一起设置!!
创建集群报错前的命令:
./src/redis-cli --cluster create --cluster-replicas 172.26.237.83: 172.26.237.84: 172.26.237.84: 172.26.237.85: 172.26.237.85: 172.26.237.83:
报错如下-->
[ERR] Node 172.26.237.83: NOAUTH Authentication required.
修改后的命令:
./src/redis-cli --cluster create --cluster-replicas 172.26.237.83: 172.26.237.84: 172.26.237.84: 172.26.237.85: 172.26.237.85: 172.26.237.83: -a
3。如果服务器开启了防火墙,需要开放对应的端口
在防火墙中对端口  7001开放:

firewall-cmd --zone=public --add-port=/tcp --permanent

firewall-cmd --zone=public --add-port=/tcp --permanent

firewall-cmd --reload
在三台服务器,搭建redis三主三从集群的更多相关文章
- Docker:docker搭建redis一主多从集群(配置哨兵模式)
角色 实例IP 实例端口 宿主机IP 宿主机端口 master 172.19.0.2 6382 192.168.1.200 6382 slave01 172.19.0.3 6383 192.168.1 ...
- Redis 3主-3从集群的搭建(CentOS 7)
注意ip地址为: 虚拟机ip设置 TYPE="Ethernet"BOOTPROTO="static"NAME="enp0s3"DEVICE= ...
- Linux系统:Centos7环境搭建Redis单台和哨兵集群环境
本文源码:GitHub·点这里 || GitEE·点这里 一.环境和版本 Linux:centos7 三台 三台Linux服务 192.168.72.129 192.168.72.130 192.16 ...
- Redis Cluster 集群三主三从高可用环境搭建
前言 Redis 是我们目前大规模使用的缓存中间件,由于它强大高效而又便捷的功能,得到了广泛的使用. Window环境下载地址:https://github.com/tporadowski/redis ...
- 实践 - 搭建Redis一主两从三哨兵
实践 - 搭建Redis一主两从三哨兵 原因: 最近在复习Redis的时候,学习到了为了提高Redis集群的高可用性,有一个模式为哨兵模式.哨兵模式的作用是为了在主节点出现阻塞或者错误,无法接收数据的 ...
- centos 7 两台机器搭建三主三从 redis 集群
参考自:https://linux.cn/article-6719-1.htmlhttp://blog.csdn.net/xu470438000/article/details/42971091 ## ...
- Redis集群搭建 三主三从
Redis集群介绍 Redis 是一个开源的 key-value 存储系统,由于出众的性能,大部分互联网企业都用来做服务器端缓存.Redis在3.0版本之前只支持单实例模式 虽然支持主从模式,哨兵模式 ...
- 搭建Redis三主三从集群
Redis三主三从集群规划 10.0.128.19 使用端口 7000 7001 10.0.128.22 使用端口 7002 7003 10.0.128.23 使用端口 7004 7 ...
- redis cluster + sentinel详细过程和错误处理三主三备三哨兵
redis cluster + sentinel详细过程和错误处理三主三备三哨兵1.基本架构192.168.70.215 7001 Master + sentinel 27001192.168.70. ...
随机推荐
- 安装双系统Windows+Centos安装完成之后提示双系统选项菜单!
原因:在windows下安装centos系统完成之后重启无法显示windows系统菜单选项 1.安装Windows系统 2.安装Centos系统 3.在Centos系统中安装ntfs-3g yum i ...
- Codeforces 1100E 拓扑排序
题意及思路:https://blog.csdn.net/mitsuha_/article/details/86482347 如果一条边(u, v),v的拓扑序小于u, 那么(u, v)会形成环,要反向 ...
- 使用 jQuery 实现当前页面高亮显示的通栏导航条
index.html <!DOCTYPE html> <html> <head> <meta charset="utf-8" /> ...
- hadoop HA集群的安装
1.hadoop集群规化 ip 主机名 安装软件 角色 运行进程 10.124.147.22 hadoop1 jdk.zookeeper.hadoop namenode/zookeeper/jobhi ...
- SQO2008配置管理工具服务显示远程过程调用失败0x800706be
需要进行删除或更改程序里面,去卸载Microsoft SQL Server 2012 Express LocalDB就可以用了 如果还不可以看,看看是不是还有其它的占用了这个实例名 如: Micros ...
- 每天一个linux命令:cat(10)
cat cat命令的用途是连接文件或标准输入并打印.这个命令常用来显示文件内容,或者将几个文件连接起来显示,或者从标准输入读取内容并显示,它常与重定向符号配合使用 注意:当文件较大时,文本在屏幕上迅速 ...
- Spring解决循环依赖
1.Spring解决循环依赖 什么是循环依赖:比如A引用B,B引用C,C引用A,它们最终形成一个依赖环. 循环依赖有两种 1.构造器循环依赖 构造器注入导致的循环依赖,Spring是无法解决的,只能抛 ...
- MOSFET学习
MOS/CMOS集成电路简介及N沟道MOS管和P沟道MOS管 在实际项目中,我们基本都用增强型mos管,分为N沟道和P沟道两种. 我们常用的是NMOS,因为其导通电阻小,且容易制造.在MOS管原理图上 ...
- 【LeetCode 35】搜索插入位置
题目链接 [题解] 还是那句话,想知道l或者r所在的数字的含义 就想想它最后一次执行的时候在干什么就行. [代码] class Solution { public: int searchInsert( ...
- mybatis plus generator工具集成(一)
参数配置文档 配置分两步 1.添加依赖 <dependency> <groupId>com.baomidou</groupId> <artifactId> ...