centos7安装kylo0.10.1
安装环境centos7,kylo版本0.10.1
常用的链接地址
kylo官网:https://kylo.io/
kylo文档:https://kylo.readthedocs.io/
下载地址
官网:https://kylo.readthedocs.io/en/v0.10.0/about/Downloads.html
https://s3-us-west-2.amazonaws.com/kylo-io/releases/tar/0.10.1/kylo-0.10.1.tar
百度网盘:https://pan.baidu.com/s/1xBtfSwETebN20iWoakdLeg 提取码:c5ae
自己编译:https://www.cnblogs.com/maobuji/p/10820691.html
系统需要提前安装工具:
yum install wget unzip
1.安装mysql或者mysql客户端
https://www.cnblogs.com/maobuji/p/8336702.html
本次使用已安装好的外部mysql,只安装客户端
wget https://repo.mysql.com//mysql57-community-release-el7-11.noarch.rpm

yum install mysql57-community-release-el7-.noarch.rpm

yum install mysql-community-client
2.设置用户
kylo安装脚本会为activemq或者nifi分配独立的用户
但kylo不会创建用户和组,但已存在的用户和组可以指定给kylo,所以我们需要先创建用户和组
useradd -r -m -s /bin/bash nifi && useradd -r -m -s /bin/bash kylo && useradd -r -m -s /bin/bash activemq

groupadd -f kylo && groupadd -f nifi && groupadd -f activemq
3.准备安装包
获取安装包到服务器上,进行解压
mkdir /opt/kylo
cd /opt/software

tar -zxvf kylo-0.10..tar -C /opt/kylo
解压后的目录结构

4.准备软件包
执行 /opt/kylo/setup/generate-offline-install.sh 下载依赖的软件包。会自动下载所有依赖。
如果下载很慢,可以下载网盘上的文件,放到/opt/software下,修改generate-offline-install.sh,将下载修改为拷贝
链接:https://pan.baidu.com/s/108OEtNPTPyT2RST4ltJ7Dg 提取码:v2xc
#!/bin/bash

NIFI_VERSION=1.6.

cd /opt/kylo/setup

# wget https://archive.apache.org/dist/activemq/5.15.6/apache-activemq-5.15.6-bin.tar.gz -P ./activemq

cp /opt/software/apache-activemq-5.15.-bin.tar.gz ./activemq/

# Modify to DEB file if necessary

# wget https://artifacts.elastic.co/downloads/elasticsearch/elasticsearch-5.5.0.deb -P ./elasticsearch/

# wget https://artifacts.elastic.co/downloads/elasticsearch/elasticsearch-5.5.0.rpm -P ./elasticsearch/

cp /opt/software/elasticsearch-5.5..rpm ./elasticsearch/

# wget --no-check-certificate --no-cookies --header "Cookie: oraclelicense=accept-securebackup-cookie" http://download.oracle.com/otn-pub/java/jdk/8u131-b11/d54c1d3a095b4ff2b6607d096fa80163/jdk-8u131-linux-x64.tar.gz -P ./java

cp /opt/software/jdk-8u131-linux-x64.tar.gz ./java/

# wget --no-check-certificate --no-cookies --header "Cookie: oraclelicense=accept-securebackup-cookie" http://download.oracle.com/otn-pub/java/jce/8/jce_policy-8.zip -P ./java

cp /opt/software/jce_policy-.zip ./java/

# wget https://archive.apache.org/dist/nifi/${NIFI_VERSION}/nifi-${NIFI_VERSION}-bin.tar.gz -P ./nifi

cp /opt/software/nifi-1.6.-bin.tar.gz ./nifi

cp /opt/kylo/kylo-services/lib/mariadb-java-client-*.jar ./nifi

VAULT_VERSION="${VAULT_VERSION:-0.9.0}"

UNAME=$(uname -s |  tr '[:upper:]' '[:lower:]')

VAULT_ZIP="vault_${VAULT_VERSION}_${UNAME}_amd64.zip"

# wget "https://releases.hashicorp.com/vault/${VAULT_VERSION}/${VAULT_ZIP}" -P ./vault

cp /opt/software/vault_0..0_linux_amd64.zip ./vault/

tar -cvf kylo-install.tar *
执行脚本拷贝或下载文件
cd /opt/kylo/setup/

sh generate-offline-install.sh
5.安装jdk
安装一个1.8的jdk,安装后配置环境变量
vi /etc/profile
export JAVA_HOME=/opt/myjdk/jdk1..0_131

export PATH=.:$JAVA_HOME/bin:$PATH

export CLASSPATH=.:$JAVA_HOME/lib/dt.jar:$JAVA_HOME/lib/tools.jar
source /etc/profile
6.安装spark
安装过程中,kylo安装脚本会调用sprak-submit命令,所以需要提前安装好spark
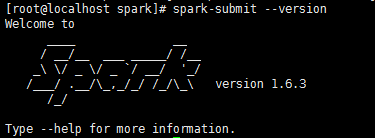
可以到以下网址下载spark文件,建议使用1.6.3版本
https://archive.apache.org/dist/spark/
https://archive.apache.org/dist/spark/spark-1.6.3/spark-1.6.3-bin-hadoop2.6.tgz
在网盘中,也已经提前下载好了对应的文件,我们以从网盘拷贝到/opt/software目录下的文件为例。
mkdir /opt/spark

cd /opt/spark

cp ../software/spark-1.6.-bin-hadoop2..tgz ./

tar zxvf spark-1.6.-bin-hadoop2..tgz
vi /etc/profile
export SPARK_HOME=/opt/spark/spark-1.6.-bin-hadoop2.

export PATH=$PATH:$SPARK_HOME/bin
source /etc/profile
7.执行预安装脚本
脚本的作用是将kylo启动命令加入到服务中
/opt/kylo/setup/install/post-install.sh /opt/kylo root root
8.通过向导进行安装
向导可以自动安装jdk、elasticsearch、activemq、nifi、kylo,你需要选择合适的选项。本次使用的是裸服务器,所以全部安装。
一定要加-o参数,否则会重新下载文件
cd /opt/kylo/setup

sh setup-wizard.sh -o
执行过程,没有没有输入的都使用默认值
[root@localhost setup]# sh setup-wizard.sh -o

Working in OFFLINE mode

The working directory is /opt/kylo/setup

Welcome to the Kylo setup wizard. Lets get started !!!

Please enter Y/y or N/n to the following questions:

Enter the kylo home folder location, hit Enter for '/opt/kylo':

Enter the kylo linux user, hit Enter for 'kylo':

Enter the kylo linux group, hit Enter for 'users':

Would you like to install the database scripts in a database instance? Please enter y/n: y

Would you like Kylo to manage installing and upgrading the database automatically? Please enter y/n: y

Which database (Enter the number)?

) MySQL

) PostgresSQL

) SQL Server

> 1

选择mysql数据库
Please enter the database hostname or IP, hit Enter for 'localhost'

> 192.168.0.1

Please enter the database ADMIN username

> root

Please enter the database ADMIN password

> Creating MySQL database 'kylo'

mysql: [Warning] Using a password on the command line interface can be insecure.


录入mysql ip、用户、密码后会自动建库

Please enter the password for the dladmin user

>

Please re-enter the password for the dladmin user

>

Please choose an option to configure Java for Kylo, ActiveMQ, and NiFi

) I already have Java  or higher installed as the system Java and want to use that

) Install Java  in the /opt/java folder for me and use that one

) I have Java  or higher installed in another location already. I will provide the location

) Java is already setup. No changes necessary

> 2


选择kylo提供的jdk

Would you like me to install a local elasticsearch instance? Please enter y/n: y

Would you like me to install a local activemq instance?  Please enter y/n: y

Enter the Activemq home folder location, hit Enter for '/opt/activemq':

Enter the user Activemq should run as, hit Enter for 'activemq':

Enter the linux group Activemq should run as, hit Enter for 'activemq':

Would you like me to install a local nifi instance? Please enter y/n: y

Enter Nifi version you wish to install, hit Enter for '1.6.0':

Enter the NiFi home folder location, hit Enter for '/opt/nifi':

Enter the user NiFi should run as, hit Enter for 'nifi':

Enter the linux group NiFi should run as, hit Enter for 'nifi':
安装完成提示
Externalizing NiFi data files and folders to support upgrades
Changing permissions to the nifi user
NiFi installation complete
Modifying the nifi.properties file
Updating the log file path
Adding custom Java path to the NiFi startup script
Working in offline mode
Installing the kylo libraries to the NiFi lib
Creating symbolic links to jar files
Creating symlinks for NiFi version 1.6.0.jar compatible nars
Copy the mysql lib from a lib folder to /opt/nifi/mysql
Copy the activeMQ required jars for the JMS processors to /opt/nifi/activemq
setting up temporary database in case JMS goes down
Creating flow file cache directory
Install the nifi service
Updating the home folder for the init.d script
Updating the provenance cache location
Installation Complete
users.properties and groups.properties was created in the /opt/kylo folder with the dladmin user. For more information on configuring users and groups please see the "Configure Access Control" page in the Kylo Docs
If this is the first time installing Kylo, or you made hive/database related changes, you will need to modify those settings in the /opt/kylo/kylo-services/conf/application.properties file
8.kylo数据库连接配置修改
vi /opt/kylo/kylo-services/conf/application.properties
spring.datasource.url=jdbc:mysql://localhost:3306/kylo

spring.datasource.username=root

spring.datasource.password=root

spring.datasource.maxActive=

spring.datasource.validationQuery=SELECT

spring.datasource.testOnBorrow=true

spring.datasource.driverClassName=com.mysql.jdbc.Driver

spring.jpa.database-platform=org.hibernate.dialect.MySQL5InnoDBDialect

spring.jpa.open-in-view=true
因为换了mysql驱动,所以需要添加mysql对应版本的驱动包
http://central.maven.org/maven2/mysql/mysql-connector-java/5.1.47/mysql-connector-java-5.1.47.jar
cp /opt/software/mysql-connector-java-5.1.47.jar /opt/kylo/kylo-services/lib/
初始化数据库
cd /opt/kylo/setup/sql/mysql

./setup-mysql.sh localhost root root
参数为ip、用户名、密码
初始化数据库后,需要执行修正语句,否则会启动不成功
ALTER TABLE kylo.FEED MODIFY COLUMN modified_time timestamp NOT NULL DEFAULT '1970-01-01 08:00:01';
9.检查依赖程序状态并启动
ps -ef | grep elasticsearch

ps -ef | grep activemq

ps -ef | grep nifi
若没有启动
service elasticsearch start

service activemq start

service nifi start
10.启动kylo
cd /opt/kylo

sh start-kylo-apps.sh
可能会提示
[root@localhost kylo]# sh start-kylo-apps.sh
Starting kylo-ui ...
Starting kylo-services ...
Unable to locate core-site.xml. Please define HADOOP_CONF_DIR for kylo service account
编辑启动文件,将core-site.xml文件的检查先注释掉,重新启动:
vi /opt/kylo/kylo-services/bin/run-kylo-services.sh
if ! [ -f $HADOOP_CONF_DIR/core-site.xml ]; then

  >& echo "Unable to locate core-site.xml.  Please define HADOOP_CONF_DIR for kylo service account"

  # exit 1

fi
11.访问系统
activemq: http://ip:8161/
nifi: http://ip:8079/nifi/
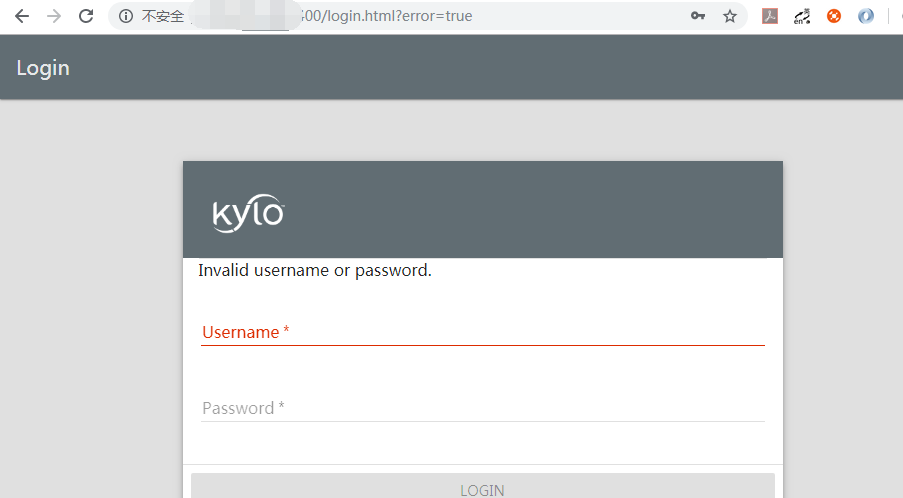
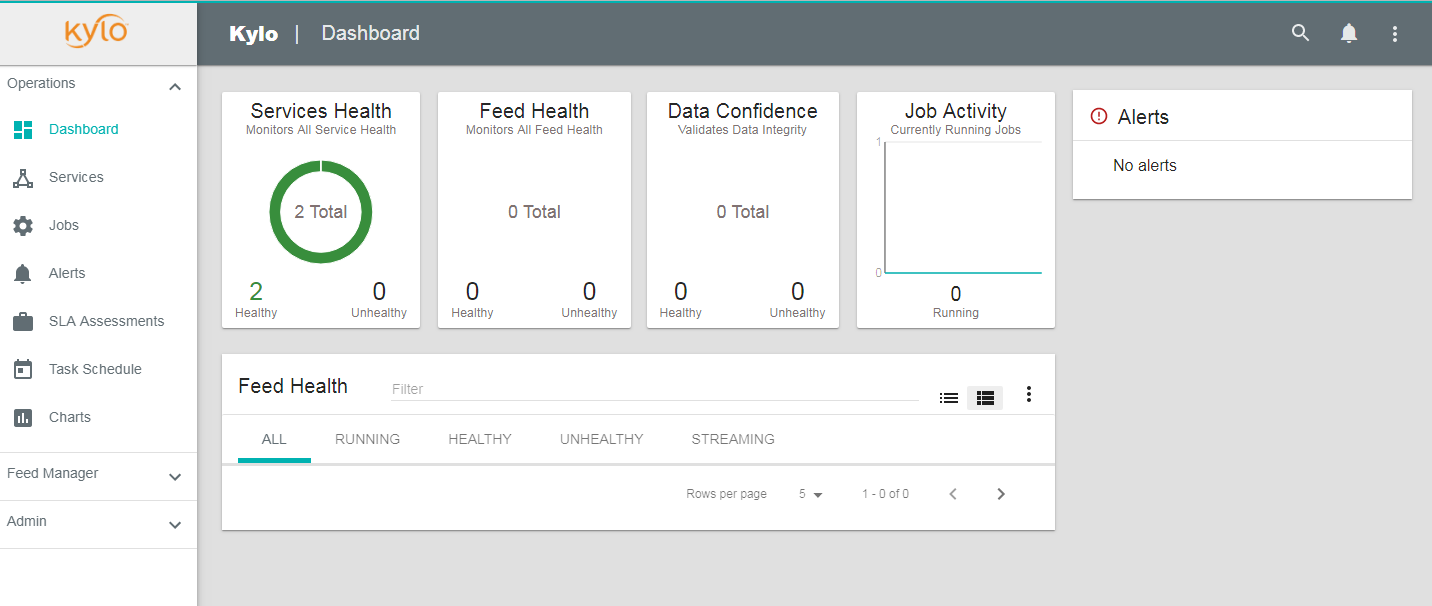
kylo: http://ip:8400
如果系统遇到问题可以到
/var/log目录下查看对应的日志
centos7安装kylo0.10.1的更多相关文章
- centos7构建kylo-0.10.1
构建服务器使用centos7,8G内存.建议使用8G内存,因为内存不够失败了好几次. 系统需要提前安装一下组件: yum install -y gcc bzip2 rpm-build rpmdev ...
- centos7安装nginx1.10.1
安装nginx. 1.首先在根目录下创建一个software文件夹用来存储下载的压缩包. 2.然后cd跳转的software文件夹下,进行压缩包的下载 wget -c https://nginx.or ...
- Linux上安装ZooKeeper并设置开机启动(CentOS7+ZooKeeper3.4.10)
1下载Zookeeper 2安装启动测试 2.1上载压缩文件并解压 2.2新建 zookeeper配置文件 2.3安装JDK 2.4启动zookeeper 2.5查看zookeeper的状态 3将Zo ...
- CentOS7 编译安装 nginx-1.10.0
对于NGINX 支持epoll模型 epoll模型的优点 定义: epoll是Linux内核为处理大批句柄而作改进的poll,是Linux下多路复用IO接口select/poll的增强版本,它能显著的 ...
- CentOS7安装Oracle 11gR2 安装
概述 Oracle 在Linux和window上的安装不太一样,公司又是Linux系统上的Oracle,实在没辙,研究下Linux下Oracle的使用,oracle默认不支持CentOS系统安装,所以 ...
- CentOS7安装mongoDB数据库
CentOS7安装mongoDB数据库 时间:2015-03-03 16:45来源:blog.csdn.net 作者:进击的木偶 举报 点击:8795次 mongoDB是目前发展比较好的NOSQL数据 ...
- [CentOs7]安装mysql(2)
摘要 之前安装过一次mysql,最后配置,发现在本地无法连接,重启服务的时候一直卡在那里不动,感觉是安装的过程出问题,最后没办法还是卸载了,然后重新安装一下. [CentOs7]安装mysql Mys ...
- centos7安装mysql
centos7安装mysql 1 查找系统是否安装了myql rpm -q mysql mysql-server1.1如果安装了.就删除 sudo yum -y remove mysql mysql- ...
- CentOS7安装Tomcat8.X
安装说明 安装环境:CentOS7安装方式:源码安装软件:apache-tomcat-8.0.30.tar.gz下载地址:http://tomcat.apache.org/download-80.cg ...
随机推荐
- 双11大考 POLARDB分钟级弹性让企业轻松扩展
无处不在的脉冲计算 阿里有双11,中国有春运,高考后有分数出来的那天,歌迷心中有周杰伦演唱会门票在线开售之时....有人的地方就有江湖,有人的地方也有脉冲计算,这些热点事件背后都需要大量的计算资源给予 ...
- bzoj 3626
http://www.lydsy.com/JudgeOnline/problem.php?id=3626 让我比较惊讶的一道链剖裸题(' ' ) 做法很精妙 首先我们考虑对于单个询问时可以拆分成 ...
- redis-持久化、主从复制、集群
持久化 RDB.AOF(redis.conf) 主从复制 redis.conf 集群 redis-trib.rb.ruby相见如下链接http://www.cnblogs.com/wuxl360/p/ ...
- boot、cloud
最近在学习Spring Boot也整理了一些文章,有需要的可以参考一下 https://www.zhihu.com/question/39483566 Spring Cloud是一系列框架的有序集合. ...
- Python之-在字典、列表、集合中刷选数据
一.元组.字典.列表的遍历 1.元组遍历 元组的遍历借助 range() 函数,基本思想是通过元组的长度使用for循环进行遍历 #troup s = ["aaa","bb ...
- LiveTelecast直播平台技术图谱skill-map
#直播平台技术图谱 ----##直播 ----###采集- **iOS** * HTTP Live Streaming * DirectShow- **Android** * setPreviewCa ...
- How do I force my .NET application to run as administrator?
How do I force my .NET application to run as administrator? You'll want to modify the manifest that ...
- 未来-YLB-二手市场:二手市场
ylbtech-未来-YLB-二手市场:二手市场 1.返回顶部 1. 二手市场是人们将闲置不用的物品集中起来进行交换.交易的场所.在二手市场中买卖二手物品,价格低廉.二手交易市场又称跳蚤市场. 中 ...
- C. Ancient Berland Circus(三点确定最小多边形)
题目链接:https://codeforces.com/problemset/problem/1/C 题意:对于一个正多边形,只给出了其中三点的坐标,求这个多边形可能的最小面积,给出的三个点一定能够组 ...
- 力扣算法——137SingleNumberII【M】
Given a non-empty array of integers, every element appears three times except for one, which appears ...