【深入浅出 Yarn 架构与实现】5-3 Yarn 调度器资源抢占模型
本篇将对 Yarn 调度器中的资源抢占方式进行探究。分析当集群资源不足时,占用量资源少的队列,是如何从其他队列中抢夺资源的。我们将深入源码,一步步分析抢夺资源的具体逻辑。
一、简介
在资源调度器中,以 CapacityScheduler 为例(Fair 类似),每个队列可设置一个最小资源量和最大资源量。其中,最小资源量是资源紧缺情况下每个队列需保证的资源量,而最大资源量则是极端情况下队列也不能超过的资源使用量。
资源抢占发生的原因,是为了提高资源利用率,资源调度器(包括 Capacity Scheduler 和 Fair Scheduler)会将负载较轻的队列的资源暂时分配给负载重的队列。
仅当负载较轻队列突然收到新提交的应用程序时,调度器才进一步将本属于该队列的资源归还给它。
但由于此时资源可能正被其他队列使用,因此调度器必须等待其他队列释放资源后,才能将这些资源“物归原主”,为了防止应用程序等待时间过长,RM 在等待一段时间后强制回收。
开启容器抢占需要配置的参数 yarn-site.xml:
yarn.resourcemanager.scheduler.monitor.enable

yarn.resourcemanager.scheduler.monitor.policies
二、抢占具体逻辑
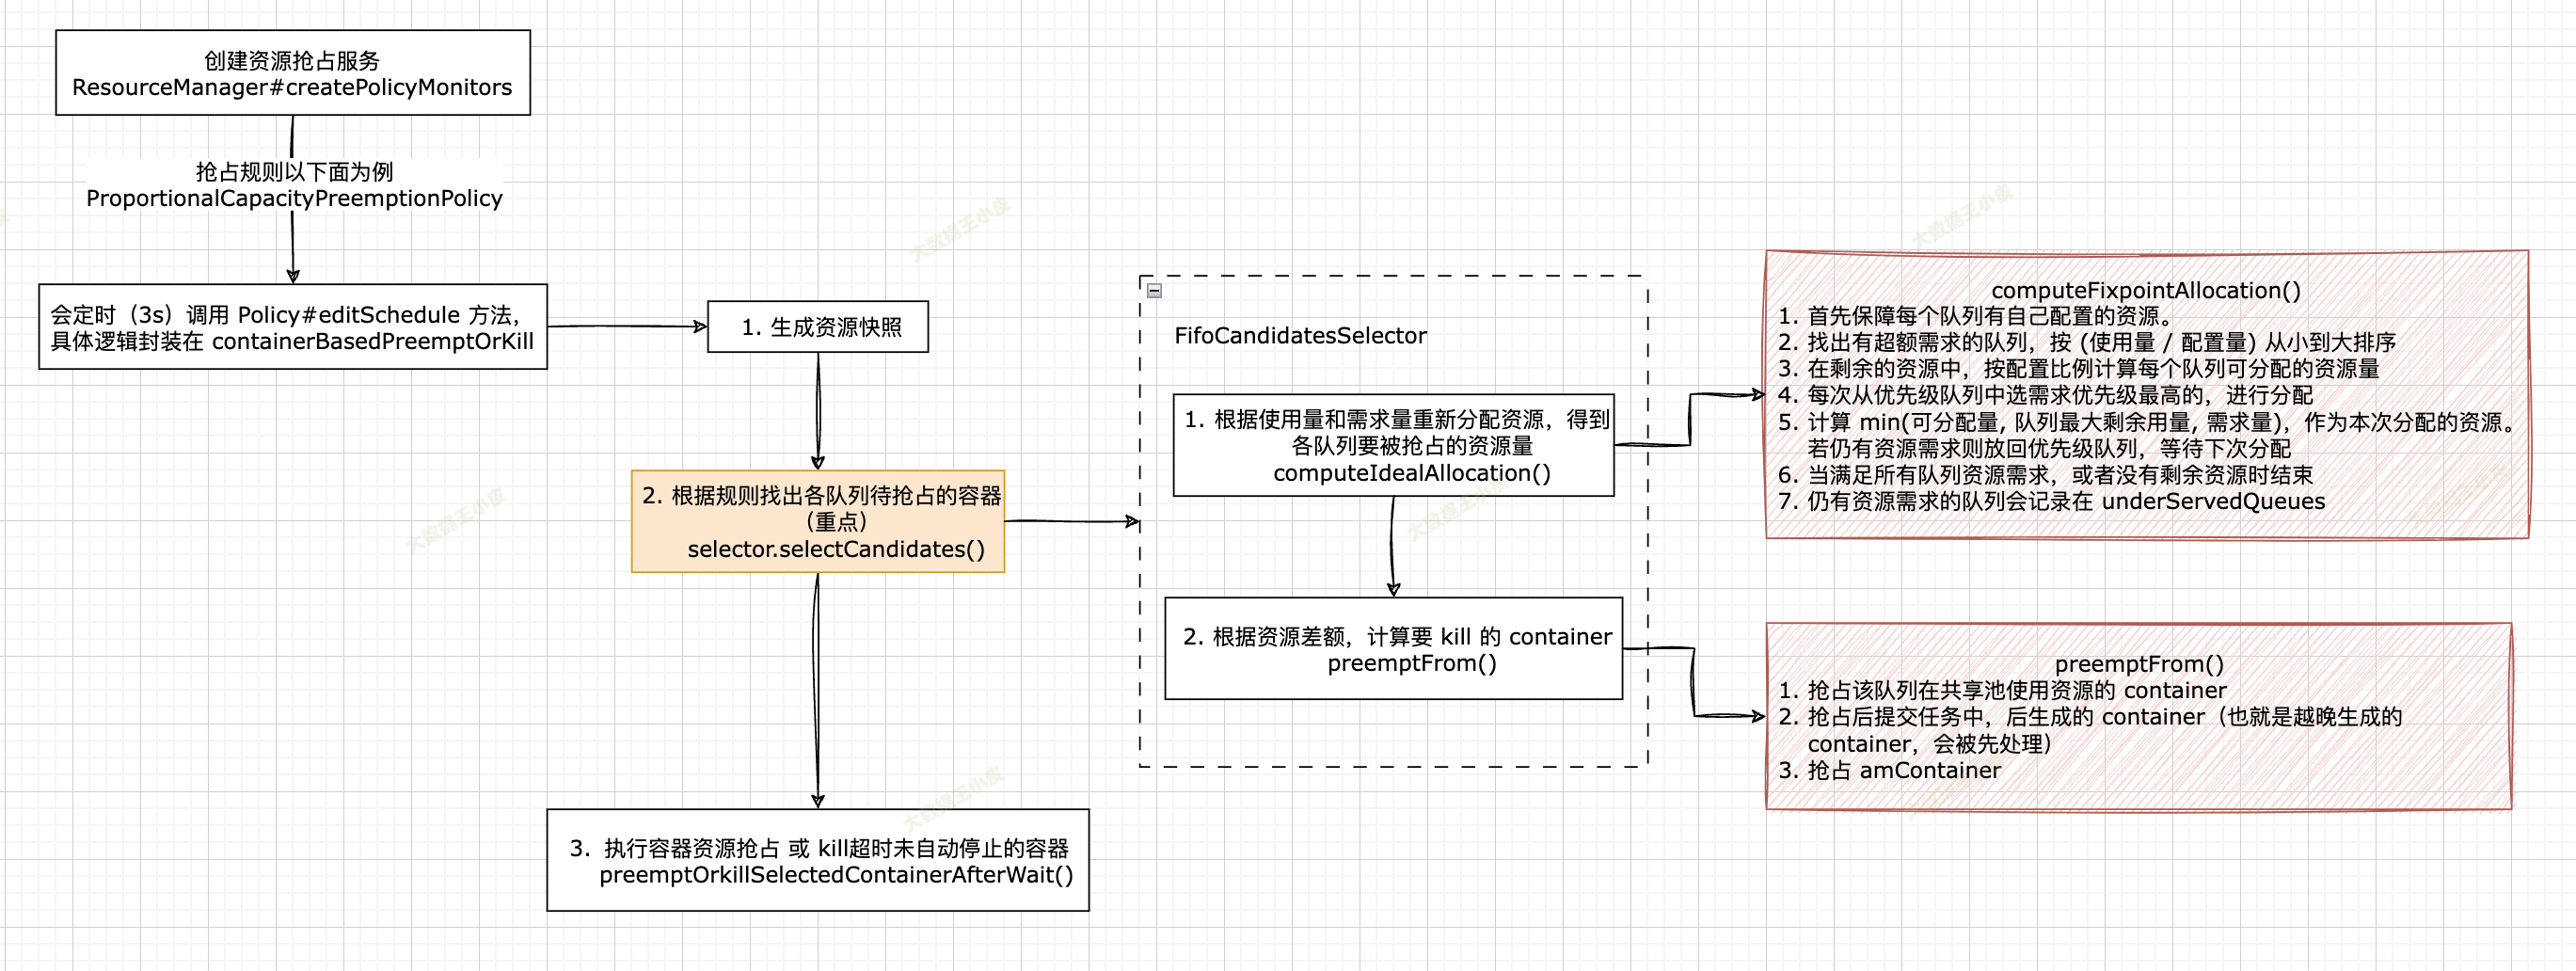
这里我们主要分析如何选出待抢占容器这一过程。
整理流程如下图所示:
接下来我们深入源码,看看具体的逻辑:
首先 ResourceManager 通过 ResourceManager#createPolicyMonitors 方法创建资源抢占服务:
    protected void createPolicyMonitors() {

      // 只有 capacity scheduler 实现了 PreemptableResourceScheduler 接口,fair 是如何实现资源抢占的?

      if (scheduler instanceof PreemptableResourceScheduler

          && conf.getBoolean(YarnConfiguration.RM_SCHEDULER_ENABLE_MONITORS,

          YarnConfiguration.DEFAULT_RM_SCHEDULER_ENABLE_MONITORS)) {

        LOG.info("Loading policy monitors");

        // 是否配置了 scheduler.monitor.policies

        // 默认值是 ProportionalCapacityPreemptionPolicy? 代码中没看到默认值,但是 yarn-site.xml doc 中有默认值

        List<SchedulingEditPolicy> policies = conf.getInstances(

            YarnConfiguration.RM_SCHEDULER_MONITOR_POLICIES,

            SchedulingEditPolicy.class);

        if (policies.size() > 0) {

          for (SchedulingEditPolicy policy : policies) {

            LOG.info("LOADING SchedulingEditPolicy:" + policy.getPolicyName());

            // periodically check whether we need to take action to guarantee

            // constraints

            // 此处创建了资源抢占服务类。

            // 当此服务启动时,会启动一个线程每隔 PREEMPTION_MONITORING_INTERVAL(默认 3s)调用一次

            // ProportionalCapacityPreemptionPolicy 类中的 editSchedule方法,

            // 【重点】在此方法中实现了具体的资源抢占逻辑。

            SchedulingMonitor mon = new SchedulingMonitor(rmContext, policy);

            addService(mon);

          }
资源抢占服务会启动一个线程每隔 3 秒钟调用配置的抢占规则,这里以 ProportionalCapacityPreemptionPolicy(比例容量抢占规则)为例介绍其中的抢占具体逻辑(editSchedule 方法):
// ProportionalCapacityPreemptionPolicy#editSchedule

  public void editSchedule() {

    updateConfigIfNeeded();

    long startTs = clock.getTime();

    CSQueue root = scheduler.getRootQueue();

    // 获取集群当前资源快照

    Resource clusterResources = Resources.clone(scheduler.getClusterResource());

    // 具体的资源抢占逻辑

    containerBasedPreemptOrKill(root, clusterResources);

    if (LOG.isDebugEnabled()) {

      LOG.debug("Total time used=" + (clock.getTime() - startTs) + " ms.");

    }

  }
editSchedule 方法很简单,逻辑都被封装到 containerBasedPreemptOrKill() 方法中,我们继续深入。
其中主要分三步:
- 生成资源快照
- 根据规则找出各队列待抢占的容器(重点)
- 执行容器资源抢占 或 kill超时未自动停止的容器
// 仅保留重要逻辑

  private void containerBasedPreemptOrKill(CSQueue root,

      Resource clusterResources) {

    // ------------ 第一步 ------------ (生成资源快照)

    // extract a summary of the queues from scheduler

    // 将所有队列信息拷贝到 queueToPartitions - Map<队列名, Map<资源池, 队列详情>>。生成快照,防止队列变化造成计算问题。

      for (String partitionToLookAt : allPartitions) {

        cloneQueues(root, Resources

                .clone(nlm.getResourceByLabel(partitionToLookAt, clusterResources)), partitionToLookAt);

      }

    // ------------ 第二步 ------------ (找出待抢占的容器)

    // compute total preemption allowed

    // based on ideal allocation select containers to be preemptionCandidates from each queue and each application

    // candidatesSelectionPolicies 默认会放入 FifoCandidatesSelector,

    // 如果配置了 INTRAQUEUE_PREEMPTION_ENABLED,会增加 IntraQueueCandidatesSelector

    for (PreemptionCandidatesSelector selector :

        candidatesSelectionPolicies) {

      // 【核心方法】 计算待抢占 Container 放到 preemptMap

      toPreempt = selector.selectCandidates(toPreempt,

          clusterResources, totalPreemptionAllowed);

    }

    // 这里有个类似 dryrun 的参数 yarn.resourcemanager.monitor.capacity.preemption.observe_only

    if (observeOnly) {

      return;

    }

    // ------------ 第三步 ------------ (执行容器资源抢占 或 kill超时未自动停止的容器)

    // preempt (or kill) the selected containers

    preemptOrkillSelectedContainerAfterWait(toPreempt);

    // cleanup staled preemption candidates

    cleanupStaledPreemptionCandidates();

  }
一)找出待抢占的容器
第一步资源快照没什么好说的,直接进入到重点:第二步找出待抢占的容器。
即 selector.selectCandidates(),以默认的 FifoCandidatesSelector 实现为例讲解,其他的同理。
主要分两步:
- 根据使用量和需求量重新分配资源,得到各队列要被抢占的资源量
- 根据资源差额,计算要 kill 的 container
// yarn/server/resourcemanager/monitor/capacity/FifoCandidatesSelector.java

  public Map<ApplicationAttemptId, Set<RMContainer>> selectCandidates(

      Map<ApplicationAttemptId, Set<RMContainer>> selectedCandidates,

      Resource clusterResource, Resource totalPreemptionAllowed) {

    // ------------ 第一步 ------------ (根据使用量和需求量重新分配资源)

    // Calculate how much resources we need to preempt

    // 计算出每个资源池每个队列当前资源分配量,和实际要 preempt 的量

    preemptableAmountCalculator.computeIdealAllocation(clusterResource,

        totalPreemptionAllowed);

    // ------------ 第二步 ------------ (根据资源差额,计算要 kill 的 container)

    // 选 container 是有优先级的: 使用共享池的资源 -> 队列中后提交的任务 -> amContainer

    for (String queueName : preemptionContext.getLeafQueueNames()) {

      synchronized (leafQueue) {

          // 省略了大部分逻辑,在后面介绍

          // 从 application 中选出要被抢占的容器

          preemptFrom(fc, clusterResource, resToObtainByPartition,

              skippedAMContainerlist, skippedAMSize, selectedCandidates,

              totalPreemptionAllowed);

        }

    }
重新计算各队列分配的资源量
我们先来看「根据使用量和需求量重新分配资源」,即 PreemptableResourceCalculator#computeIdealAllocation()
  // 计算每个队列实际要被 preempt 的量

  public void computeIdealAllocation(Resource clusterResource,

      Resource totalPreemptionAllowed) {

    for (String partition : context.getAllPartitions()) {

      TempQueuePerPartition tRoot = context.getQueueByPartition(

          CapacitySchedulerConfiguration.ROOT, partition);

      // 这里计算好每个队列超出资源配置的部分,存在 TempQueuePerPartition

      // preemptableExtra 表示可以被抢占的

      // untouchableExtra 表示不可被抢占的(队列配置了不可抢占)

      // yarn.scheduler.capacity.<queue>.disable_preemption

      updatePreemptableExtras(tRoot);

      tRoot.idealAssigned = tRoot.getGuaranteed();

      // 【重点】遍历队列树,重新计算资源分配,并计算出每个队列计划要 Preempt 的量

      recursivelyComputeIdealAssignment(tRoot, totalPreemptionAllowed);

    }

    // 计算实际每个队列要被 Preempt 的量 actuallyToBePreempted(有个阻尼因子,不会一下把所有超量的都干掉)

    calculateResToObtainByPartitionForLeafQueues(context.getLeafQueueNames(),

        clusterResource);

  }

}
我们直接深入到 recursivelyComputeIdealAssignment() 方法中的核心逻辑:重新计算各队列资源分配值 AbstractPreemptableResourceCalculator#computeFixpointAllocation()
主要逻辑如下:
- 首先保障每个队列有自己配置的资源。若使用量小于配置量,多余的资源会被分配到其他队列
- 若队列有超出配置资源需求,则放到一个优先级队列中,按 (使用量 / 配置量) 从小到大排序
- 对于有资源需求的队列,在剩余的资源中,按配置比例计算每个队列可分配的资源量
- 每次从优先级队列中选需求优先级最高的,进行分配
- 计算 min(可分配量, 队列最大剩余用量, 需求量)。作为本次分配的资源。若仍有资源需求则放回优先级队列,等待下次分配
- 当满足所有队列资源需求,或者没有剩余资源时结束
- 仍有资源需求的队列会记录在 underServedQueues
  // 按一定规则将资源分给各个队列

  protected void computeFixpointAllocation(Resource totGuarant,

      Collection<TempQueuePerPartition> qAlloc, Resource unassigned,

      boolean ignoreGuarantee) {

    // 传进来 unassigned = totGuarant

    // 有序队列,(使用量 / 配置量) 从小到大排序

    PriorityQueue<TempQueuePerPartition> orderedByNeed = new PriorityQueue<>(10,

        tqComparator);

      // idealAssigned = min(使用量,配置量)。  对于不可抢占队列,则再加上超出的部分,防止资源被再分配。

      if (Resources.greaterThan(rc, totGuarant, used, q.getGuaranteed())) {

        q.idealAssigned = Resources.add(q.getGuaranteed(), q.untouchableExtra);

      } else {

        q.idealAssigned = Resources.clone(used);

      }

      // 如果该队列有超出配置资源需求,就把这个队列放到 orderedByNeed 有序队列中(即这个队列有资源缺口)

      if (Resources.lessThan(rc, totGuarant, q.idealAssigned, curPlusPend)) {

        orderedByNeed.add(q);

      }

    }

    // 此时 unassigned 是 整体可用资源 排除掉 所有已使用的资源(used)

    // 把未分配的资源(unassigned)分配出去

    // 方式就是从 orderedByNeed 中每次取出 most under-guaranteed 队列,按规则分配一块资源给他,如果仍不满足就按顺序再放回 orderedByNeed

    // 直到满足所有队列资源,或者没有资源可分配

    while (!orderedByNeed.isEmpty() && Resources.greaterThan(rc, totGuarant,

        unassigned, Resources.none())) {

      Resource wQassigned = Resource.newInstance(0, 0);

      // 对于有资源缺口的队列,重新计算他们的资源保证比例:normalizedGuarantee。

      // 即 (该队列保证量 / 所有资源缺口队列保证量)

      resetCapacity(unassigned, orderedByNeed, ignoreGuarantee);

      // 这里返回是个列表,是因为可能有需求度(优先级)相等的情况

      Collection<TempQueuePerPartition> underserved = getMostUnderservedQueues(

          orderedByNeed, tqComparator);

      for (Iterator<TempQueuePerPartition> i = underserved.iterator(); i

          .hasNext();) {

        TempQueuePerPartition sub = i.next();

        // 按照 normalizedGuarantee 比例能从剩余资源中分走多少。

        Resource wQavail = Resources.multiplyAndNormalizeUp(rc, unassigned,

            sub.normalizedGuarantee, Resource.newInstance(1, 1));

        // 【重点】按一定规则将资源分配给队列,并返回剩下的资源。

        Resource wQidle = sub.offer(wQavail, rc, totGuarant,

            isReservedPreemptionCandidatesSelector);

        // 分配给队列的资源

        Resource wQdone = Resources.subtract(wQavail, wQidle);

        // 这里 wQdone > 0 证明本次迭代分配出去了资源,那么还会放回到待分配资源的集合中(哪怕本次已满足资源请求),直到未再分配资源了才退出。

        if (Resources.greaterThan(rc, totGuarant, wQdone, Resources.none())) {

          orderedByNeed.add(sub);

        }

        Resources.addTo(wQassigned, wQdone);

      }

      Resources.subtractFrom(unassigned, wQassigned);

    }

    // 这里有可能整个资源都分配完了,还有队列资源不满足

    while (!orderedByNeed.isEmpty()) {

      TempQueuePerPartition q1 = orderedByNeed.remove();

      context.addPartitionToUnderServedQueues(q1.queueName, q1.partition);

    }

  }
上面第 5 步是重点,也就是 sub.offer(),是计算给该队列在保证值之外,还能提供多少资源:
  /**

   * 计算队列 idealAssigned,在原有基础上增加新分配的资源。同时返回 avail 中未使用的资源。

   * 参数说明:

   * avail 按比例该队列能从剩余资源中分配到的

   * clusterResource 整体资源量

   * considersReservedResource ?

   * idealAssigned = min(使用量,配置量)

   */

  Resource offer(Resource avail, ResourceCalculator rc,

      Resource clusterResource, boolean considersReservedResource) {

    // 计算的是还有多少可分配资源的空间( maxCapacity - assigned )

    Resource absMaxCapIdealAssignedDelta = Resources.componentwiseMax(

        Resources.subtract(getMax(), idealAssigned),

        Resource.newInstance(0, 0));

    // remain = avail - min(avail, (max - assigned), (current + pending - assigned))

    // 队列接受资源的计算方法:可提供的资源,队列最大资源-已分配资源,当前已使用资源+未满足的资源-min(使用量,配置量) 三者中的最小值。

    Resource accepted = Resources.min(rc, clusterResource,

        absMaxCapIdealAssignedDelta,

        Resources.min(rc, clusterResource, avail, Resources

            .subtract(

                Resources.add((considersReservedResource

                    ? getUsed()

                    : getUsedDeductReservd()), pending),

                idealAssigned)));

    Resource remain = Resources.subtract(avail, accepted);

    Resources.addTo(idealAssigned, accepted);

    return remain;

  }
核心的资源重新分配算法逻辑已经计算完毕,剩下的就是:
根据重新计算的资源分配,得到各队列超用的资源,这部分就是要被抢占的资源。
这里不会一下把队列超用的资源都干掉,有个阻尼因子,用于平滑抢占处理。
根据资源差额,计算要抢占的容器
回到 selector.selectCandidates(),上面已经介绍了各队列抢占量的计算逻辑,接下来介绍「如何选出各队列中的 container」
- 抢占该队列在共享池使用资源的 container
- 抢占后提交任务中,后生成的 container(也就是越晚生成的 container,会被先处理)
- 抢占 amContainer
  public Map<ApplicationAttemptId, Set<RMContainer>> selectCandidates(

      Map<ApplicationAttemptId, Set<RMContainer>> selectedCandidates,

      Resource clusterResource, Resource totalPreemptionAllowed) {

	// ......

    // ------------ 第二步 ------------ (根据资源差额,计算要 kill 的 container)

    // 根据计算得到的要抢占的量,计算各资源池各队列要 kill 的 container

    List<RMContainer> skippedAMContainerlist = new ArrayList<>();

    // Loop all leaf queues

    // 这里是有优先级的: 使用共享池的资源 -> 队列中后提交的任务 -> amContainer

    for (String queueName : preemptionContext.getLeafQueueNames()) {

      // 获取该队列在每个资源池要被抢占的量

      Map<String, Resource> resToObtainByPartition =

          CapacitySchedulerPreemptionUtils

              .getResToObtainByPartitionForLeafQueue(preemptionContext,

                  queueName, clusterResource);

      synchronized (leafQueue) {

        // 使用共享池资源的,先处理

        Map<String, TreeSet<RMContainer>> ignorePartitionExclusivityContainers =

            leafQueue.getIgnoreExclusivityRMContainers();

        for (String partition : resToObtainByPartition.keySet()) {

          if (ignorePartitionExclusivityContainers.containsKey(partition)) {

            TreeSet<RMContainer> rmContainers =

                ignorePartitionExclusivityContainers.get(partition);

            // 最后提交的任务,会被最先抢占

            for (RMContainer c : rmContainers.descendingSet()) {

              if (CapacitySchedulerPreemptionUtils.isContainerAlreadySelected(c,

                  selectedCandidates)) {

                // Skip already selected containers

                continue;

              }

              // 将 Container 放到待抢占集合 preemptMap 中

              boolean preempted = CapacitySchedulerPreemptionUtils

                  .tryPreemptContainerAndDeductResToObtain(rc,

                      preemptionContext, resToObtainByPartition, c,

                      clusterResource, selectedCandidates,

                      totalPreemptionAllowed);

            }

          }

        }

        // preempt other containers

        Resource skippedAMSize = Resource.newInstance(0, 0);

        // 默认是 FifoOrderingPolicy,desc 也就是最后提交的在最前面

        Iterator<FiCaSchedulerApp> desc =

            leafQueue.getOrderingPolicy().getPreemptionIterator();

        while (desc.hasNext()) {

          FiCaSchedulerApp fc = desc.next();

          if (resToObtainByPartition.isEmpty()) {

            break;

          }

          // 从 application 中选出要被抢占的容器(后面介绍)

          preemptFrom(fc, clusterResource, resToObtainByPartition,

              skippedAMContainerlist, skippedAMSize, selectedCandidates,

              totalPreemptionAllowed);

        }

        // Can try preempting AMContainers

        Resource maxAMCapacityForThisQueue = Resources.multiply(

            Resources.multiply(clusterResource,

                leafQueue.getAbsoluteCapacity()),

            leafQueue.getMaxAMResourcePerQueuePercent());

        preemptAMContainers(clusterResource, selectedCandidates, skippedAMContainerlist,

            resToObtainByPartition, skippedAMSize, maxAMCapacityForThisQueue,

            totalPreemptionAllowed);

      }

    }

    return selectedCandidates;

  }
二)执行容器资源抢占
把要被抢占的 container 都选出来之后,就剩最后一步, kill 这些 container。
回到 containerBasedPreemptOrKill():
  private void containerBasedPreemptOrKill(CSQueue root,

      Resource clusterResources) {

	// ......

    // ------------ 第三步 ------------ (执行容器资源抢占 或 kill超时未自动停止的容器)

    // preempt (or kill) the selected containers

    preemptOrkillSelectedContainerAfterWait(toPreempt);

    // cleanup staled preemption candidates

    cleanupStaledPreemptionCandidates();

  }
三、总结
至此,分析完毕整个资源抢占的过程。
总结一下主要逻辑:
- 重新计算各资源池中各队列应分配的资源;
- 与现在已使用的资源进行对比,如果超过新计算的分配量,(超用的部分*阻尼系数)就是要被抢占的资源量;
- 各队列根据要被抢占的资源量,选出要被 kill 的 container。优先度低的 container 就会被先处理(使用了共享资源的、后生成的 container);
- 通过心跳通知 AM 要被 kill 的 container,或者处理掉通知过已超时的 container。
参考文章:
Yarn FairScheduler的抢占机制详解_小昌昌的博客的博客-CSDN博客
Yarn抢占最核心剖析_Geoffrey Turing的博客-CSDN博客 - 针对 fair
Yarn调度之CapacityScheduler源码分析资源抢占
Better SLAs via Resource-preemption in YARN's CapacityScheduler - Cloudera Blog
【深入浅出 Yarn 架构与实现】5-3 Yarn 调度器资源抢占模型的更多相关文章
- 【深入浅出 Yarn 架构与实现】3-1 Yarn Application 流程与编写方法
本篇学习 Yarn Application 编写方法,将带你更清楚的了解一个任务是如何提交到 Yarn ,在运行中的交互和任务停止的过程.通过了解整个任务的运行流程,帮你更好的理解 Yarn 运作方式 ...
- 【深入浅出 Yarn 架构与实现】2-1 Yarn 基础库概述
了解 Yarn 基础库是后面阅读 Yarn 源码的基础,本节对 Yarn 基础库做总体的介绍.并对其中使用的第三方库 Protocol Buffers 和 Avro 是什么.怎么用做简要的介绍. 一. ...
- 【深入浅出 Yarn 架构与实现】2-3 Yarn 基础库 - 服务库与事件库
一个庞大的分布式系统,各个组件间是如何协调工作的?组件是如何解耦的?线程运行如何更高效,减少阻塞带来的低效问题?本节将对 Yarn 的服务库和事件库进行介绍,看看 Yarn 是如何解决这些问题的. 一 ...
- YARN中FIFO、Capacity以及Fari调度器的详细介绍
(1)FIFO Scheduler 将所有的Applications放到队列中,先按照作业的优先级高低.再按照到达时间的先后,为每个app分配资源.如果第一个app需要的资源被满足了,如果还剩下了资源 ...
- 第1节 yarn:14、yarn集群当中的三种调度器
yarn当中的调度器介绍: 第一种调度器:FIFO Scheduler (队列调度器) 把应用按提交的顺序排成一个队列,这是一个先进先出队列,在进行资源分配的时候,先给队列中最头上的应用进行分配资源 ...
- 【深入浅出 Yarn 架构与实现】2-2 Yarn 基础库 - 底层通信库 RPC
RPC(Remote Procedure Call) 是 Hadoop 服务通信的关键库,支撑上层分布式环境下复杂的进程间(Inter-Process Communication, IPC)通信逻辑, ...
- 【深入浅出 Yarn 架构与实现】2-4 Yarn 基础库 - 状态机库
当一个服务拥有太多处理逻辑时,会导致代码结构异常的混乱,很难分辨一段逻辑是在哪个阶段发挥作用的. 这时就可以引入状态机模型,帮助代码结构变得清晰. 一.状态机库概述 一)简介 状态机由一组状态组成: ...
- 【深入浅出 Yarn 架构与实现】3-2 Yarn Client 编写
上篇文章介绍了编写 Yarn Application 的整体框架流程,本篇文章将详细介绍其中 Client 部分的编写方式. 一.Yarn Client 编写方法 本篇代码已上传 Github: Gi ...
- 【深入浅出 Yarn 架构与实现】3-3 Yarn Application Master 编写
本篇文章继续介绍 Yarn Application 中 ApplicationMaster 部分的编写方法. 一.Application Master 编写方法 上一节讲了 Client 提交任务给 ...
- Yarn架构详解
Yarn架构介绍Yarn/MRv2最基本的想法是将原JobTracker主要的资源管理和job调度/监视功能分开作为两个单独的守护进程.有一个全局的ResourceManager(RM)和每个Appl ...
随机推荐
- SQL 之 SQL server 中 遇到字段的值为null 遇到的坑
SQL server 中,如果查询或筛选的条件中,某字段的值为NULL,如何处理?又有哪些坑需要避免呢? 直接上坑 : NULL 与其他任何类型进行逻辑判断: [解释]: NULL表示值未知,和空字符 ...
- Mybatis框架中 collection 标签 和 association标签中关于 columnPrefix 属性的底层逻辑
columnPrefix的作用是给column自动拼接上前缀, 已知多重嵌套的collection 和 association的columnPrefix属性的值是会叠加的 <associatio ...
- kafka工具的使用-发送数据
1.了解推送数据的是哪个topic,选择对应topic下面的partition分区 2.右侧界面选择Data,并点击『+』号: 3.可选择添加单个消息『add Single Message』或者添加多 ...
- 会话保持 Session和cookie
Session是什么? Session在网络中称为会话控制,是服务器为了保护用户状态而创建的一个特殊的对象,简而言之,session就是一个对象,用于存储信息. Session有什么用? sessio ...
- 对象和类复习题(c++ prime plus )
第一题: 为复习题5描述的类提供方法定义,并编写一个小程序来演示所有的特性: bank.h #ifndef BACK_H_ #define BACK_H_ #include <string> ...
- uniapp项目 hbuilder工程转cli工程 hbuilder工程不可以用命令行打包
hbuilder工程不可以用命令行打包,只能用自带的发行手动打包 cli工程可以用命令行打包,可以配置多环境 1.安装空的cli项目 vue create -p dcloudio/uni-preset ...
- Ext中数据表格序号超过3位数时显示省略号
问题 在老项目上优化时,遇到了Ext中ColumnModel序号超过3位数时,自动显示了省略号,不友好 修改方法 给RowNumberer添加样式 new Ext.grid.RowNumberer({ ...
- QTreewidget树状列表右击事件
树状列表右击事件(添加 删除 修改等操作) 思路:首先我们需要一个void contextMenuEvent(QContextMenuEvent * event); 管理Menu事件的一个接口 此接口 ...
- 12.6linux学习第十三天
今天老刘开始讲第9第章使用ssh服务管理远程主机.第10章开了个小头. 9.1 配置网卡服务 9.1.1 配置网卡参数 截至目前,大家已经完全可以利用当前所学的知识来管理Linux系统了.当然,大家的 ...
- 下载并安装Swagger-ui和Swagger-edit
1. github上下载好Swagger-ui和Swagger-edit文件 https://github.com/swagger-api/swagger-ui https://github.com/ ...